跳转到主内容
已存档的指南
本指南只作为历史记录保留。请使用指南的最新版本来进行维修。

视频概述

这个拆解是不是维修指南。 要维修你的的Nexus 6P,请使用我们的维修手册

  1. Nexus 6P Teardown, Nexus 6P Teardown: 步骤 1 中的图像 1,2 Nexus 6P Teardown, Nexus 6P Teardown: 步骤 1 中的图像 2,2
    • Remove SIM card tray.

  2. Nexus 6P Teardown: 步骤 2 中的图像 1,3 Nexus 6P Teardown: 步骤 2 中的图像 2,3 Nexus 6P Teardown: 步骤 2 中的图像 3,3
    • Heat up back glass panel.

    • Use hobby knife to open a gap and cut the fierce sticker underneath rear glass panel.

    • The back glass panel is easily shattered and the adhesive underneath is fierce. So be careful to pry this part.

    • Remove back glass panel carefully.

  3. Nexus 6P Teardown: 步骤 3 中的图像 1,3 Nexus 6P Teardown: 步骤 3 中的图像 2,3 Nexus 6P Teardown: 步骤 3 中的图像 3,3
    • Heat up bottom plastic panel.

    • Use hobby knife to open a gap and insert guitar picks to cut adhesive underneath.

  4. Nexus 6P Teardown: 步骤 4 中的图像 1,3 Nexus 6P Teardown: 步骤 4 中的图像 2,3 Nexus 6P Teardown: 步骤 4 中的图像 3,3
    • Twist off 6 Phillips screws together.

    • Insert guitar picks and plastic opening tool to separate front assembly from back cover.

    • Attention: These two parts fit tightly.It is very difficult to separate them. You can also try using heavy-duty suction cup to disassemble them.

  5. Nexus 6P Teardown: 步骤 5 中的图像 1,3 Nexus 6P Teardown: 步骤 5 中的图像 2,3 Nexus 6P Teardown: 步骤 5 中的图像 3,3
    • Unscrew one Phillips screw.

    • Remove metal bracket securing flex contactors.

    • Release 3 flex contactors and remove it .

    • This flex is used to connect motherboard and daughterboard.

  6. Nexus 6P Teardown: 步骤 6 中的图像 1,3 Nexus 6P Teardown: 步骤 6 中的图像 2,3 Nexus 6P Teardown: 步骤 6 中的图像 3,3
    • Release battery contactor.

    • The battery is fiercely glued in.

    • Use plastic card to cut strong adhesive underneath, then pry up and remove battery.

  7. Nexus 6P Teardown: 步骤 7 中的图像 1,2 Nexus 6P Teardown: 步骤 7 中的图像 2,2
    • Here we can see the strong sticker underneath 3450 mAh battery.

  8. Nexus 6P Teardown: 步骤 8 中的图像 1,3 Nexus 6P Teardown: 步骤 8 中的图像 2,3 Nexus 6P Teardown: 步骤 8 中的图像 3,3
    • Disconnect signal cable contactor and twist off one Phillips screw.

    • Remove daughterboard.

  9. Nexus 6P Teardown: 步骤 9 中的图像 1,3 Nexus 6P Teardown: 步骤 9 中的图像 2,3 Nexus 6P Teardown: 步骤 9 中的图像 3,3
    • Cut adhesive underneath vibration motor, then remove vibrator.

  10. Nexus 6P Teardown: 步骤 10 中的图像 1,3 Nexus 6P Teardown: 步骤 10 中的图像 2,3 Nexus 6P Teardown: 步骤 10 中的图像 3,3
    • Twist off one Phillips screw and remove loudspeaker.

  11. Nexus 6P Teardown: 步骤 11 中的图像 1,2 Nexus 6P Teardown: 步骤 11 中的图像 2,2
    • Twist off 2 Phillips screws.

    • Remove metal bracket securing front camera contactor and audio jack contactor,

  12. Nexus 6P Teardown: 步骤 12 中的图像 1,3 Nexus 6P Teardown: 步骤 12 中的图像 2,3 Nexus 6P Teardown: 步骤 12 中的图像 3,3
    • Remove front camera.

  13. Nexus 6P Teardown: 步骤 13 中的图像 1,2 Nexus 6P Teardown: 步骤 13 中的图像 2,2
    • Remove audio jack.

  14. Nexus 6P Teardown: 步骤 14 中的图像 1,3 Nexus 6P Teardown: 步骤 14 中的图像 2,3 Nexus 6P Teardown: 步骤 14 中的图像 3,3
    • Twist off 3 Phillips screws.

    • Take away metal bracket securing LCD flex contactor.

    • Release LCD flex connector.

  15. Nexus 6P Teardown: 步骤 15 中的图像 1,2 Nexus 6P Teardown: 步骤 15 中的图像 2,2
    • Remove signal cable.

  16. Nexus 6P Teardown: 步骤 16 中的图像 1,2 Nexus 6P Teardown: 步骤 16 中的图像 2,2
    • Pry up and remove motherboard.

  17. Nexus 6P Teardown: 步骤 17 中的图像 1,3 Nexus 6P Teardown: 步骤 17 中的图像 2,3 Nexus 6P Teardown: 步骤 17 中的图像 3,3
    • Remove fingerprint scanner.

  18. Nexus 6P Teardown: 步骤 18 中的图像 1,3 Nexus 6P Teardown: 步骤 18 中的图像 2,3 Nexus 6P Teardown: 步骤 18 中的图像 3,3
    • Remove rear camera.

  19. Nexus 6P Teardown: 步骤 19 中的图像 1,2 Nexus 6P Teardown: 步骤 19 中的图像 2,2
    • Here is the motherboard.

  20. Nexus 6P Teardown: 步骤 20 中的图像 1,2 Nexus 6P Teardown: 步骤 20 中的图像 2,2
    • Remove earpiece.

  21. Nexus 6P Teardown: 步骤 21 中的图像 1,3 Nexus 6P Teardown: 步骤 21 中的图像 2,3 Nexus 6P Teardown: 步骤 21 中的图像 3,3
    • The sticker underneath LCD with digitizer is a little bit strong, so use heat gun to soften it for a few minutes.

    • With the help of suction cup, plastic opening tool and guitar picks, remove LCD assembly carefully.

  22. Nexus 6P Teardown: 步骤 22 中的图像 1,1
    • Done.

Witrigs

于11/24/15注册

69,454 声望

创作了378篇指南

9条评论

good jod !buddy

Kaye - 回复

Does the Nexus 6P have two antennas? I've noticed there's a two sim card slots?

sam34866 - 回复

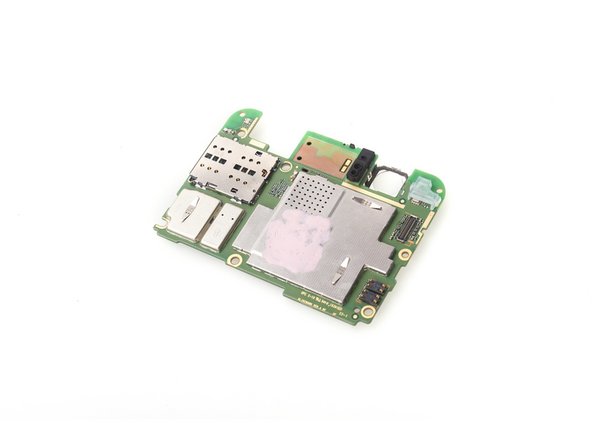
Its single sim slot sorry

Noorulla Shariff -

Ya its haveing to sim slot but there is only 1 antina

Noorulla Shariff - 回复

There is a thin lining of plastic around the screen. Does removing it deteriorate the structural integrity of the screen or is it simply cosmetic?

Sorry if this is the wrong place to ask.

Eric Jensen - 回复

添加评论

浏览统计数据:

过去 24 小时: 1

过去 7 天: 3

过去 30 天: 7

总计 19,515