-
-
Surface Pro 4顶配版竟然卖到了2600多美元的价格,它最好是能比其他产品有一些优势——实际上它的配置目前看起来也还不错:
-
12.3英寸 PixelSence 2736 x 1824 (267ppi)IPS LCD 显示屏
-
英特尔 Skylake 酷睿 m3 (4M 三级缓存 2.20 GHz),最高可选 酷睿 i7 (8M 三级缓存 3.8 GHz)处理器
-
可选 4 GB / 8 GB / 16GB DDR3L 1866 MHz 内存
-
可选基于PCIe的 128 GB/ 256 GB/ 512 GB和1 TB 固态硬盘
-
支持1080p拍摄的8百万像素后摄像头,以及5百万像素前摄像头
-
USB 3.0 接口,micro-SD插槽,miniDP接口以及SurfaceConnect 充电接口
-
802.11a/b/g/n/ac 双频Wi-Fi和蓝牙4.0连接
-
-
-
这是个我们不经常见到的玩意儿——润滑脂!Pro 4外露的铰链都涂上了润滑脂,以满足各位不同的场景需求。
-
只是各位要注意,别把线头,宠物毛发或者沙子啥的弄进里面去……
-
要使得支架能够展开如此大的角度,还要拥有足够的阻力以支撑起平板,微软的工程师也许在这套铰链上面花费了大量的时间精力。所以,我们还是用X光照照它们。
So say hypothetically that someone has a surface pro 4. And hypothetically this someone’s cat decided to use the sp4 as a landing pad while the sp4 was propped open. And hypothetically both hinges broke and the actual casing of the sp4 was bowed out.
Is that something that can be fixed? Or should I just suck it up and deal with it?
where can we get the screws shown in the hinges?
-
-
-
即便是在Surface Pro 3痛苦的拆解之后,恐怖的粘合依旧困扰着我们的拆解工程师。因此今年我们做好了最坏的打算。
-
战场的开端,是由iOpener带领的,我们利用它来软化屏幕的胶水。
-
我们的iSclack也加入了战斗,为的是提供足够的拉力,让我们能进一步深入敌后。
-
小样,即便你叫Pro,也是不能把我们挡在门外的。在我们把opening pick塞进屏幕底部边缘后,拉锯战正式结束。
Is the iOpener now the preferred tool for opening up Surface devices? Because over at the Surface Pro 3 guides, iFixit mentions that a heat gun would be better. Also, how many iOpener passes does it take for the adhesive to melt and the screen to lift easily like that?
The new iOpener is able to get hotter, sty hotter, and make more contact with the surface (no pun intended) so we'd use it for guides instead of a heat gun. The amount of time it will take to soften the adhesive will vary depending on ambient temperature, the temperature of the table you're working on, etc. The best method is going slow and steady, stop any time you feel resistance. It certainly took us a long time to get into our teardown device. If you need more advice, check out our Answers forum to consult people who may have tried heat guns or other methods!
Watch out for the WiFi Antennas when prying off the screen at the top! They're just thin strips of copper sandwiched between two sheets of plastic. Pictures from Step 10 below shows them as greenish-yellow traces on both sides of the camera assembly near the text that says "Supplier name: FIT"
They are very easily nicked if you're using a metal prying tool, and you might accidentally tear them when pulling up the adhesive tape.
Wish this was actually in the description and not a comment. I wouldn’t have to replace it now if it was. Thanks though.
This teardown is not a repair guide. To repair your Microsoft Surface Pro 4, use our ++service manual++.
-
-
-
哟,这下发现新东西了。在上一次 我们拆解Surface Pro时,我们碰到了一个由弹性金属支架覆盖的显示屏排线。
-
这回,它就变成了两根排线链接显示屏本身,使得屏幕不能再像一本书一样任意打开了。唯一的解决办法就是:把排线拔下来。
-
当然了,微软已经改过这些排线端子的设计。显示屏排线端子相对来说更像常规的按压式设计——与iPhone的显示屏类似——但不同的是它们被金属罩所覆盖。
-
-
-
虽然它并不是什么贺卡,但显示屏背面还是印有一些让人看起来很认真负责的条码。
-
这或许也是值得高兴的事!比如说,这代表着品控的提高。
-
接下来,该尝一尝我们最喜欢的硅晶点心——芯片了!其中包含了几个N-trig IC,应该是用来为Surface Pen提供硬件支持的。
-
N-trig DS-D5000 A1
-
N-trig DS-A5048 B2
-
Macronix MX25U1635F 1.8V 16 Mb MXSMIO 串行闪存
It's actually 20-40 human hairs
A better comparison would be 4 paper sheets
Anyone know where to find this digitizer logic board for the Surface pro 4.
How wide adhesive tape is used? Around 5mm?
Does anyone know what type of adhesive would be the most suitable for the logic board/n-trig board? From what I can see from underneath it has some conductive elements that need to touch the back side of the screen?
-
-
-
-
接着,我们把注意力转向Pro 4剩下的部分,我们在主板旁边看到了一个可疑的空白区域(还有热管经过!)。
-
主板已经近在咫尺,然而也远在天涯。等不下去了,我们直接跳到餐后甜点,打开一些屏蔽罩来近距离观察。
-
主板剩余的部分贴合实在太紧,没法进一步观察,但似乎固态硬盘还值得一拆……
Suppose someone with access to a laser cutter wanted to cut an opening in back cover to upgrade the SSD. Would that component be as freely accessible as it appears in photo Pro4_28.jpg? Or is there some other material or insulation between the back cover material and that layer of components? Ideally, an access opening would be covered by the kickstand plate, but it appears as though the socket for the SSD might be just under the upper half of the back cover, requiring cutting into the upper half of the back cover as well. Or would there be just enough clearance to angle the SSD chip into its socket?
Just opened mine up... you could do that if you wanted to. The only other interference for the ssd is one of those silly crimp on metal cages.
SUSPECIOUS BLANK SPACE
Was not expecting that to be blank…
Well, clearly you guys didn’t buy one for yourself and take that apart (because I happened to have a fan occupying such place)
So, strongly NOT advertised to play games on your Surface Pro (especially the low wattage ones)…unless you put some ice pack on top of the alumium case. Ice packs work just fine.
I am curious about how large this fan may be? I have a screen flicker in the spot this fan may be located and trying to figure out what may be causing it.
-
-
-
哦,我亲爱的Surface,你真的长大了!
-
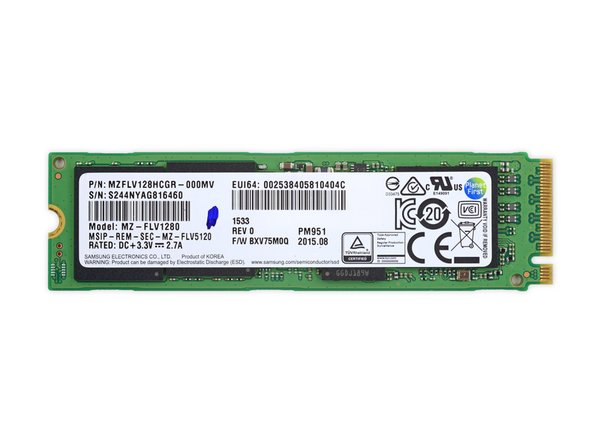
Surface 4代的三星固态硬盘比我们在上一代产品里看到的小气傲慢,要大气了许多。
-
唔,做得大气了芯片也多了。这块128GB三星PM951固态硬盘由以下部分组成:
-
三星S4LN058A01 PCIe 3.0 x4 NVMe闪存主控
-
三星 K9CHGY8S5C 64 GB NAND 闪存
-
三星K4E4E324EE 4 Gb (512 MB) 缓存
-
德州仪器TPS22966 5.5V,6A,16mΩ,2通道负荷开关
-
-
-
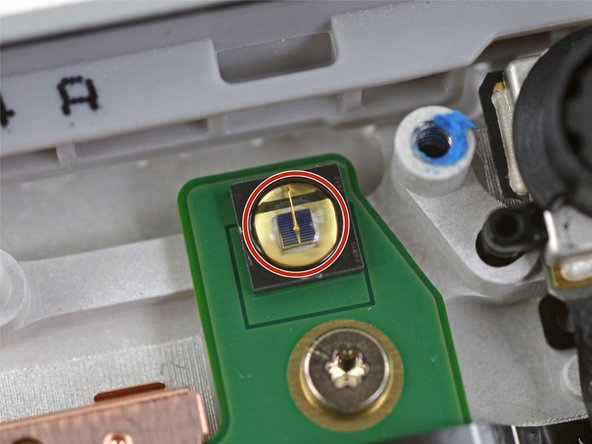
相应的,Surface还有一排专业的摄像头及传感器阵列:
-
红外线发射器
-
红外线摄像头
-
前置摄像头
-
起“隐私灯”作用的指示灯(安装在后置摄像头模组上)
-
麦克风
-
光线传感器
I'm not sure what it's called, but the yellow stripes are antennae, and they're really easy to destroy if you are spudging off a screen that's shattered along the top edge. The replacement part is impossible to get if you do this. I wrote about my "creative" solution to this problem on my blog: https://blog.kamens.us/2017/05/10/lesson...
They are available, p/n X939879 X939878 on that one auction site for around $18 shipped.
I have 5 things on the front of mine and I'm trying to work out where the ambient sensor is! Is it a hole (the last one) or is that the Mic? Is the ambient sensor visable from the outside?
-
-
-
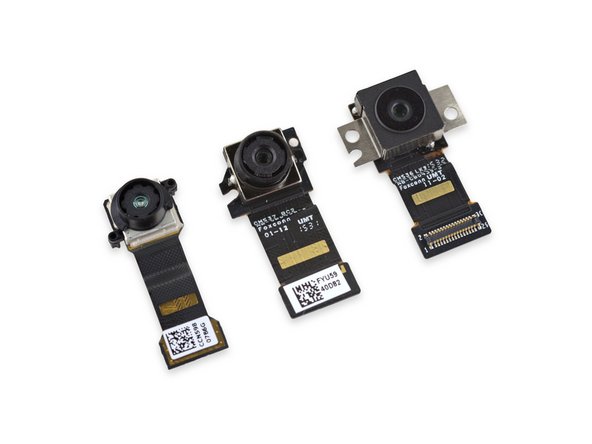
被高科技的海洋所环绕,平板上的这三颗摄像头终将浮出水面(译注:双关语,水面即Surface)。
-
从左到右:
-
红外线人脸识别摄像头,支持Windows Hello
-
前置5百万像素摄像头
-
后置8百万像素摄像头
-
-
-
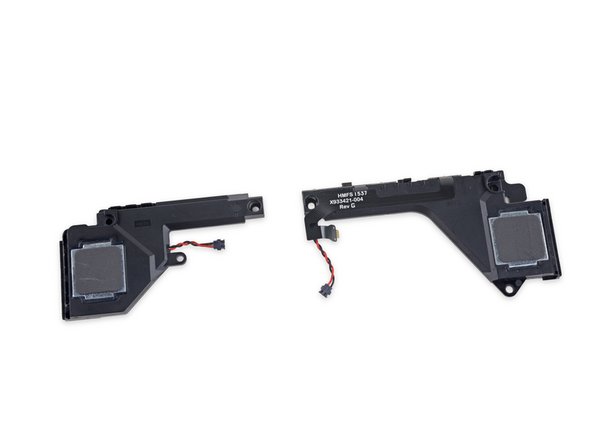
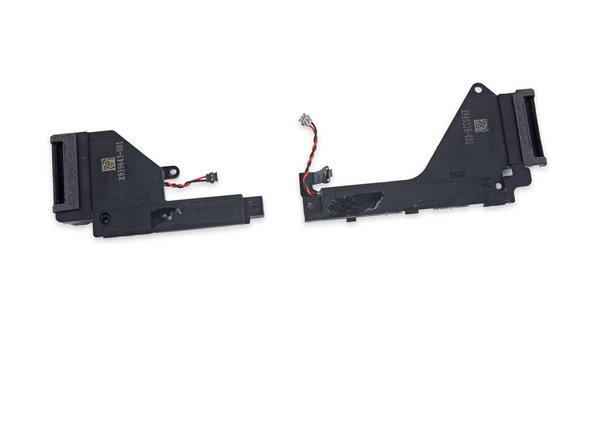
我们用镊子从外壳两角取出了立体声扬声器,然后发现了一些有趣的东西……
-
优点:更换的时候,比起那种独立开来的按键,整合的按钮可以一次性换一整套,更安全舒心。
-
缺点:即便是换一个按钮,整个扬声器也要跟着换,提高了维修成本。
The buttons seem to be only attached to the speaker with adhesive. I'm sure it won't be hard to just replace the buttons, just like in the iPhone 3GS etc.
absolutely right, I agree with you, it will not complicate speaker on iphone : http://hargasmartphone.id/harga-iphone-7...
Hi,
Wonderful detail on the teardown. Any ideas on how the Marvel Avastar is tied to external antennas and the purpose of the precarious wire which seems to reappear in the various incarnations of the Surface. Is that wire tied to anything under the black tape in Step 14?
I am also interested in knowing where the WiFi antennas are located. I seem to have spotty Wi-Fi using my new Surface in tablet mode and would like to know if there's an optimal way of holding it.
I need help with one of the specific connectors on the motherboard that connects to the speaker shown above, could you explain more about the connector, what it’s called, where I could maybe find a replacement.
dcamarda17 - 回复
-
-
-
在外围元件被熟练地分离后,我们就可以来到重头戏——主板上了!
-
英特尔SR2EN 酷睿m3-6Y30 (4M三级缓存,最高睿频 2.20 GHz)
-
三星 K4E8E304EE-EGCF 8 Gb LPDDR3 (4 片 × 1 GB,共4 GB)
-
Marvell Avastar 88W8897 802.11ac,NFC及蓝牙主控
-
飞思卡尔KL17 MKL17Z256VFM4 48 MHz ARM Cortex-M0+微控制器
-
ITE IT8528VG I/O控制器
-
瑞昱ALC3269音频解码芯片
-
瑞昱RTS5304 micro-SD卡读卡控制器
-
-
-
继续来看芯片型号……
-
华邦25Q128FV序列式快闪闪存
-
德州仪器TPS51367集成FET转换器
-
英飞凌科技SLB96659TT20可信平台模块
-
芯源系统MP3388S 50V,8线,升压式白光LED驱动器
-
然后在背面……
-
英特矽尔ISL95857 1+2+1稳压模块,用于英特尔IMVP8 CPU
-
这个巨大的弹簧触点阵列将主板与电池和键盘盖接口相连。
Where is the keyboad controller? Where are the array of spring contacts leading to?
So the Winbond is the BIOS chip? And the ITE chip near it is the Startup chip (SuperIO)?
-
-
-
iOpener再登台来一场安可演出,为的是软化电池背面的胶水。
-
在流汗,流泪,猛撬之后,电池终于松动了。
-
:'(
Sam Lionheart, thank you so much for replying to my concerns abou the iOpener and the screen. However I only asked about how many passes it took because I have to do the inverse. I need the adhesive soft enough so it adheres back to the screen again, so I won't find resistance to know when it's worm enough/already cool. All I'm going to do is put some weight over it. Would say that 1 pass would be enough to heat the adhesive enough on only one edge of the screen?
Ah I see! That makes it a little different then ;) I would say a couple passes on each edge (of two minutes or so maybe) would be good. You want the device to be fairly hot to the touch before you weight it down. After the device has fully cooled, you should poke at it a bit to see if the seal is complete. If it's a little loose, you may need to open it, remove the adhesive, and apply new adhesive. Good luck!
-
-
-
这块38.2 Wh,7.5 V 电池相当于5087毫安时——相比起Surface Pro 3的5547毫安时减少了9%。
-
尽管电池更小了,但4代的电池续航通常还是优于3代。
-
拿“苹果”(译注:双关语,此处也指苹果公司的产品)和橙子对比的话,iPad Air 2则拥有27.62 Wh的电池。但是,即将推出的iPad Pro或许更适合拿来直接对比,因为它更面向专业用户。各位敬请拭目以待!
-


由衷感谢以下译者:
75%


这些译者帮助我们修补全世界! 您也想加入吗?
开始翻译 ›
82条评论
Looks great, much better than last year's. Pity about the glue for the screen. Would love to see screws. Know it's hard, because these are miracles of engineering, but there are lots of very smart men and women working on this, I'm sure they could find a way, especially since these are billed as enterprise devices, and having worked in an IT department, devices get broken a lot. No pen teardown? I'd imagine it's super similar to last year.
I want one of these even more now. Can't wait to see the Surface Book, if they managed to get one.
Thanks everyone at iFixit, keep up the good work. You're an inspiration to us all.
Is the set of huge connectors on the back of the motherboard in step 14 where the battery connects? They look too large for anything else.
Glad you liked it! They're tough to get ahold of, but we're definitely gunning for a Surface Book as soon as we can! Those are spring contacts on the reverse of the motherboard, that press against the battery cable and also the keyboard dock connector cable. I updated step 14 to mark them up and explain that, thanks for the reminder!
Hi,
I am curious about the copper plate over the battery. Is there some insulation against heat radiation to the battery? Does the plate radiate against the lcd (the battery also tells that the temperatures should not be higher then 140°F. Thinking about how they manage this)?
Thank you for the nice teardown (and fast!).
Hi ddink! The flat plate does diffuse heat into the battery and LCD plate. It actually works as one of two condensers that make up the hybrid cooling system. This article shows a bit more about how that works: http://www.techspot.com/news/62361-surfa...
Thank you for your response. The diffusion to the battery is what I am scared of. Doesn't it reduce the lifetime of the battery (that's why I asked for the thermal insulation)? I'm just curious how they manage, that the battery never reaches the 140*F they have written on it. Maybe we'll see when someone makes a heatmap of the device ;).
ddink -
It looks to me like the heat is mostly going to the battery... I wonder why they couldn't have added at least a heatsink to the second heatpipe so it at least does something?
As for the heat-plate, what about the back of the LCD display? The back of the LCD is a large sheet of aluminum. I bet that most of the heat form the heat-plate is transferred to the display, thus spread throughout the entire machine.
The heat appears to dump into the battery pack. I recently had the left battery cell expand enough to force the screen off of the surface along the left side. A good 1/4 inch separation
This is also my concern (I have i7-8GB).
Instead of using the back magnesium they are bringing the heat to the temp sensitive regions of this device!!!
So it appears that the Micro-SD port is UHS-I only, not UHS-II, correct? UHS-II chips have 16 pins, but the x-ray appears to only show 8 pins, which is standard for UHS-I. I couldn't find anything about the Micro-SD RealTek controller.
Could you tell more about the display? Which company's branding can be seen there? Is it Microsoft themselves? Or is it LG like most IPS displays? Or Samsung, Sharp pr something else entirely?
True,. Indeed most companies print the Ip primarily microsft san samsung ...
That Samsung controller supports both AHCI and NVMe. For example, see http://www.anandtech.com/show/9396/samsu...
Thanks for the tip! We've updated the teardown to reflect that.
Not 0,so there still something Macrohard need to works on.
Thinking of replacing the SSD with a larger capacity model (since Microsoft charges an arm and a leg for extra space). But if I open the device by softening the glue with an iOpener and using an iSclack, how do I re-assemble/re-glue the device after putting in a new SSD?
This is the question no one seems to answer. My Pro 4 froze and on reboot the SSD has disappeared. I was able to boot into a live Linux install and it doesn't see the OS drive, nor does the Windows reinstallation tool.
I've seen reference to this tape: https://www.amazon.com/3M-Scotch-4905-VH...
as well as this: https://www.amazon.com/NIUTOP-Double-Adh...
but not entirely sure how wide to get it?
It would seem like this design would cause the battery to heat up considerably, which I can't imagine being too good for it. Considering how how these things get, it would appear that this would only cause the battery to have a shorter lifetime and make a difficult replacement come sooner.
Larry Chen - 回复
Will the iOpener damage the lcd/ pixels or even the camera/sensor if placed on the edge above those?
I need to soften up the adhesive only, not replacing the screen at all.
The iOpener is specifically formulated to melt adhesive without damaging parts. Follow the directions to avoid overheating, but the internal components will not be damaged.
in replacing the ssd do you have to reinstall windows 10?
If this is not a troll question, don't attempt this yourself. You have much to learn before attempting to replace SSDs on a screw-less device. I suggest building your own tower PC first. There is only one permanent storage drive on this device, so Windows will necessarily be installed on there.
To more clearly answer your question, you could either attempt an image level copy of the drive or yes, reinstall windows.
My Surface Pro seems to be ejecting something between the edge of the bezel and the glass screen... very thin and only just sticking out ever so slightly. I looked through this tear down to try and figure out what it is and it looks like maybe the strip in the top right corner of Step 13 (motherboard coming out).. its the copper colored strip, maybe with some white writing on it (can't quite tell in the image). Any idea what it is and how alarmed I should be? That whole top edge bezel is just ever so slightly 'loose' feeling....
Thanks!
Sounds an awful lot lie the Wi-Fi antennas.
Does anyone know if the daughter board on the LCD assembly is removable or hard fixed? We got one in for repair with a small crack on the screen and we ordered the replacement screen in but it does not come with the daughter board. We are hesitant to take off the old screen if the daughter board is not removable. Anyone have experience with this?
Return and buy OEM, always oem even if you have to charge more. It install better confidence in your tech's on quotes and makes repairs a breeze and less likely for defects. Every OEM screen I have ordered came with the connectors and pcb's attached. Just because it's cheaper and margins are better doesn't mean a "good" repair. But you can lift it off carefully, make sure you photograph everything as not perfectly lined up and exact could and most likely will cause clearance issue and possible ribbon folding/tearing from that clearance. All because the adhesive you most likely have was not spec'ed or QA'd with the device, that's extra milimeters that wasn't intended for. All and all being creative and doing these steps wastes more time and could end badly rather than ordering the screen with it. If anything you have a spare cracked screen to practice perfection on removing it.
Hi! the ntrig board is glued with double sided tape on the LCD and it is fairly simple to remove. The same tape is sticky enough to hold the pcb on the new screen. Just be careful with the ribbon cables, they are very frail. (the ones on the broken screen that I replaced broke in the middle of the bend as soon as I disconnected them).
Step 6
Does anyone know if the daughter board on the bottom right (where the 2 ribbon cables attach) is removable and easily swappable to the new screen assembly? The new screens do not come with the daughter board. https://d3nevzfk7ii3be.cloudfront.net/ig... Bottom Right
Hi Guys,
does anyone know how thick the glue holding the screen assembly is? After the Screen assembly is removed, how easy / hard is it to remove the remaining glue from the glass or aluminium? Thanks a lot. Keep up the good work!
With a little heat as you scrape carefully will get it off very nicely. Use a soft cloth with MGchemicals 99% isopropyl to clean off what a plastic spudger and slight heat couldnt, and the isopropyl will give a better clean surface to adhere new adhesive. If you have to use metallic objects to scrape clean try not to dig into the aluminum, while it won't show after repair, it will cause "pits" & "craters" (under the scope you can see em!) and will not let your adhesive have "bite" on the aluminum side and potentially leaves you open for a return or redo because of lifting.
Can I replace the RAM? If, what is the compatible memory? Where can I buy it? What is the max Surface Pro 4 can support?
While the ssd is "easily" replaceable(once you get to it), the RAM is NOT. It is soldered onto the motherboard. Unless you want to try your luck with soldering gun and small 2 to 4gb RAM chips...
Yes I agree with your scoring on these, I've repaired many surfaces and all are pain in the rear side, kind of. I wish I could find that foam-type adhesive used, that stuff is really strong. I always get the LCD panels off clean and touch still working, you would be suprised to know they have very LITTLE value, and suprisingly cheap for an oem replacement. You'll have your work cut out for you as not only is it rough to open your potentially gambling with $2k worth of MSRP hardware! Not even the 128gb iPad pro 12" intimidated me as much on the screen repair, and I did one of those like a week after release. Still on of the first on the YouTube to show that there is solder involved!
Is the ram soldered ??? Can we upgrade the ram ??? Plzz reply asap guys .....plzz
Hello, can some expert of Surface Pro tell me if one can replace the Surface Pro 4's RAM and HDD with Surface Pro 3? I have two Surface Pro: the 4 has 4GB with 128GB; where as the 3 has 8GB and 256GB. I would like to swap them so my surface pro is as beefy as I can get!
Is it possible?
bad news is 4gb ram will be 4gb ram (surface owner can't upgrade it)
in many countries 8 GB ram surface pro 4 is very expensive (if users can upgrade the ram it will very awesome - and very cheap )
Do you guys know how n\to snap the screen in after fixing it?
Does anyone know where I can buy a spare Surface Pro 4 Wifi antenna?
Most parts can be purchased here -> http://www.powerbookmedic.com/xcart1/hom...
Has anyone experienced issues with not being able to run off of battery after screen replacement? Everything worked fine including running off battery my screen was just shattered so I ordered a replacement and put it in using a heat gun lightly and pry tools. That said I did turn to a razor knife to scrap off some adhesive and may have sliced into the gold embedded wire for the Ambient light sensor board. Everything seems to work fine when I am plugged in. The battery shows it is charging are even charged completely but if I unplug it immediately turns off completely.
Torn completely down again tested battery and it has full charge, ran a led light for couple days and run battery to 40%. Put everything back together including using concudtive glue to fix the WiFi antenna that I previously sliced. Still no luck running off of battery with new screen. I am thinking it must have to do with some kind of grounding that is not making contact with the new screen when running on battery. Any insight would be greatly appreciated.
Hello thank you for the brilliant article
I have a question if anyone could answer, that would be great!
Can I put the motherboard of a cosmetically damaged Surface Pro i7 into my Microsoft i3 and it behave it's self?
Any in put would be gladly received. ,
All the best Steven
totalloser - 回复
chassis for i3 and i7 models have different thickness. i7 has a fan that the i3 does not. it's highly unlikely you would get it to fit the way you described.
joeku -
Helllo everyone, I am ina bit of a mess with this device. I tried a screen replacement on my i7 pro. Whilst doing this I mistakenly tore the flex that connects the n-trig board to the motherboard. But I still tried to connect all together to at least check that the display I bought is working.
Unfortunately I didnt get any thiong on the screen, I have now ordered a new flex ribbon whic h should hopefully be here on Friday. Does anyone know if this could be responsible for my no display. I am sure the pro is on as I can feel the board is warm etc. I've also ordered an HDMi which I can hopefully use to see it on an external screen. Has anyone here attempted a screen replacement before?
Does anyone know where I can buy a bottom case for surface pro 4?
Nice piece guys, please my Microsoft surface pro4 screen start to flicker after a while, like when the processor get hot. Thought it was a windows problem, which I actually reset the system but the problem persisted. Any solution please? Thanks
Can you changed a CMOS battery in SP4 to get out of UEFI stuck mode since I do not have the password?
Any idea how to remove the CMOS battery and replace, or does this not exist on the SP4? thanks
Ian -
Can you remove and replace the CMOS battery on a SP4? Or does this not exist? How did you get around the stuck UEFI mode? thanks
Ian -
We have chenges the screen. Once done the Surface works but only with the adaptor and does not work with his own battery. Any Ideas???
Wei Chien. Did you get any answer/solution?
Hi. What’s the red surface just behind the CPU, non-conductive insulation? Also, what type of adhesive material is used at the back of the batteries? It there any chance that the batteries also serve the role of heat pipes, transferring heat they absorb from the copper plate to the back panel, via the adhesive? That would explain how the back of the Surface Pro feels warmer than the touch screen (that’s my impression).
Hi
i have surface pro 4 and it has 2 problems
flick(vibration)screen + BSOD (hardware failure)
is there a way to find why this problems occur ? (I am IT engineer and i can’t solve that -drivers , … )
thanks
ps: my country is ban from US and i can’t exchange it
I didn’t see the antenna for the wifi thingy…actually, did we even see the wifi chip in this teardown???
Well, the antenna is clearly visible in the last pictures of this teardown, when they hang around loosely around the empty frame.
*frame.*
Overall it was a decent *laptop* that was repair-wise ACCEPTABLE, with screws, still, holding most things down.
That array of connectors for keyboard and stuff should add point to the score of 2.
Overall, it shouldn’t get a 2. Yes, you can’t get the battery out of there without destroying it (or practically burning it so it will be hot and soften the glue), but when you do need to get the battery out there it is pretty much dead, so you can just wrestle it out, and put LIGHT ADHESIVE (opposite of Samsung’s patches) for convenience.
Personally, I’d rate it 6. Because only the display was lagging off.
. n .
I hate those new, adhesive-bound new “thin“ models. I think a 0.5 inch thick “brick” would be better.
Although, one had hever made a great touchscreen held with screws…
Hi
I have s4p 128 gb. I have issue with surface stop responding when not being charged.i tried recovery but dosnt help. I thought thats battery but its screen is light
My Surface Pro 4 was bent in my backpack. Enough to pop the screen away from the base about 1/4”. Still works great.
There is something that keeps me from popping the bottom of the screen to the case. Do I have to pop the screen in hopes to find something that is out of place, thus keeping me from snapping it back in place?
Thanks.
My surface pro 4 just stopped Woking. I opened the panel in the process damaged one part. I need to find the part number for the same could somebody please help.
Part is located in the center of the board where the screen connects to the motherboard
On the left of the display connector.
The part is in blue color
1) https://ibb.co/YdKPQFk zoomed out
2) https://ibb.co/SXFdpbn please help
jigar -
hi, you forgot to show removing the charging port assembly
Hi!
(For) What are these three flat cable stickers in step 10 (where the micro is mounted on).
Thanks
Marcus
I need to find a replacement battery for my surface pro 4, but since I’m based in Thailand I can’t order from your website unfortunately. Do you have any suggestions on how I can identify if the battery replacements are genuine original?
What happens if you remove the battery without first disconnecting the connector cable? Will the device no longer work?
Excelente trabajo. Fotos y descripción inmejorables. Tengo un Surface 4 Pro, que al calentarse bajo la barra de tareas aparece una línea parpadeante que corresponde con el centro de la pantalla. Sólo cuando se calienta...
¡Un 10! Muchas gracias.
it should be 1866 MHz
haoyang liu - 回复