跳转到主内容

本拆机指南正在进行中 – 定期刷新以看到更新!

你所需要的

  1. Linksys WRT54GL Teardown, Linksys WRT54GL Teardown: 步骤 1 中的图像 1,1
    • The Linksys WRT-54GL.

    • Note that the antenna cover is missing but otherwise fully intact.

    • Note that this is v. 1.1. Other versions may differ slightly.

  2. Linksys WRT54GL Teardown: 步骤 2 中的图像 1,1
    • Begin by unplugging the router.

    • Turn the router off by disconnecting the router.

    • Unplug all Ethernet cables.

  3. Linksys WRT54GL Teardown: 步骤 3 中的图像 1,2 Linksys WRT54GL Teardown: 步骤 3 中的图像 2,2
    • Begin by twisting the two antennas off.

    • They will come off as a whole assembly, see picture 2.

  4. Linksys WRT54GL Teardown: 步骤 4 中的图像 1,3 Linksys WRT54GL Teardown: 步骤 4 中的图像 2,3 Linksys WRT54GL Teardown: 步骤 4 中的图像 3,3
    • Remove two rubber feet from the front/blue section

    • If screws are present, remove them. (This WRT54GL v 1.1 shown did not have screws, but some of the many similar models do)

  5. Linksys WRT54GL Teardown: 步骤 5 中的图像 1,2 Linksys WRT54GL Teardown: 步骤 5 中的图像 2,2
    • Flip the router over.

    • Depress where the black plastic meets the blue and slide the blue piece off carefully.

    • This may require considerable force.

  6. Linksys WRT54GL Teardown: 步骤 6 中的图像 1,3 Linksys WRT54GL Teardown: 步骤 6 中的图像 2,3 Linksys WRT54GL Teardown: 步骤 6 中的图像 3,3
    • Place your thumbs into the two grooves near the back.

    • Place your index fingers in front of the back two legs.

    • Push the black top away.

    • Lift off the top cover.

  7. Linksys WRT54GL Teardown: 步骤 7 中的图像 1,1
    • Using a Phillips head screwdrivers, remove the two screws in the middle of the motherboard.

  8. Linksys WRT54GL Teardown: 步骤 8 中的图像 1,1
    • Place the middle section of your index fingers behind the two legs.

    • Place your thumbs on the ends of the antenna connection.

    • Apply very light force to remove the motherboard.

    • Lift the motherboard out of the shell.

Josh Bacon

于03/02/15注册

151 声望

创作了3篇指南

6条评论

thats horrible, why let they post you stuff?

Learn how to make photos and proper documentation OR GET THE &&^& OUT

Burk Maggison - 回复

It worked for me (even with the blurry pictures). Thanks!

zonnked - 回复

“This may require considerable force.”

Or, pry out the two front feet, and remove the two hidden screws.

Less effort, less damage.

Steven Schweda - 回复

Steven, which model and revision of router do you have? None of my WRT54GL v1.1 units have screws under the rubber feet, though there are holes to accomodate them. The front comes off without damage. The squeeze and pull did take some force, as I was disengaging two large clips (one on each side of the router.) I think step should be “remove the front rubber feet and remove screws (if present.)” This would help prevent damage and frustration with the great many very similar routers that may have screws.

Reid Solberg -

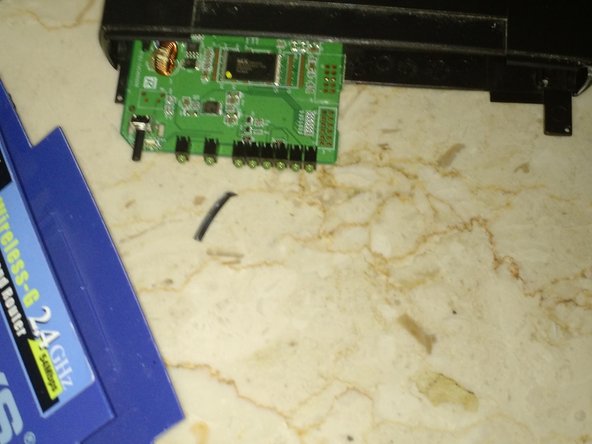
You broke the right tab on the black part. (It even can be seen in the picture, the semicurcular part that lies on the table.) It will never hold the blue front as it should. Yes, that is the “needs consiserable force”.

I guess all the routers having screws have been broken by their previous owners.

secretariat_alcatel - 回复

添加评论

浏览统计数据:

过去 24 小时: 0

过去 7 天: 5

过去 30 天: 20

总计 5,981