跳转到主内容

你所需要的

这个拆解是不是维修指南。 要维修你的的Acer Chromebook C732,请使用我们的维修手册

  1. Acer Chromebook 11 C732 Teardown, Acer C732 Chromebook Teardown: 步骤 1 中的图像 1,3 Acer Chromebook 11 C732 Teardown, Acer C732 Chromebook Teardown: 步骤 1 中的图像 2,3 Acer Chromebook 11 C732 Teardown, Acer C732 Chromebook Teardown: 步骤 1 中的图像 3,3
    • This teardown applies to the Acer C732 models of Chromebook. For this guide, I used a model with the following specs:

    • Intel Celeron CPU N3350 clocked at 1.10GHz (Quad Core processor)

    • 4 GB of integrated LPDDR4 memory

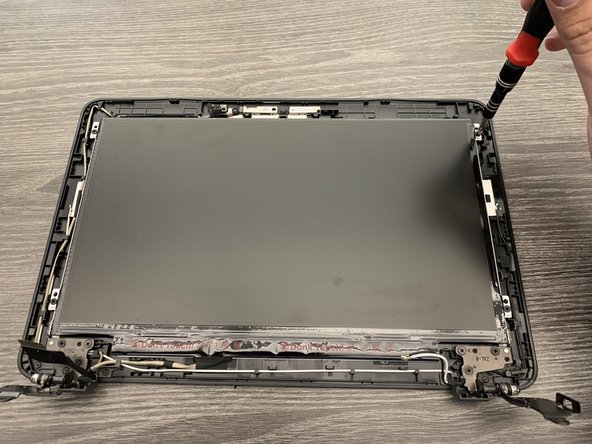
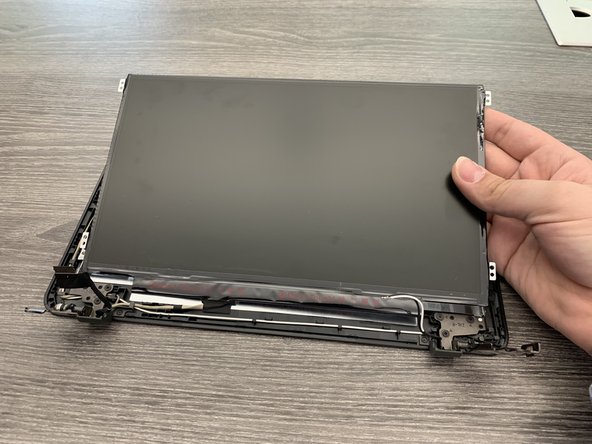
    • 11.6" (diagonal) LCD backlight HD display.

    • 32 GB of SSD storage

    • Specs aside, the overall device is just a few inches larger than a 7th gen iPad and is almost three times as thick. But, as you'll soon see, it isn't as difficult to get into this device compared to an iPad.

  2. Acer Chromebook 11 C732 Teardown: 步骤 2 中的图像 1,1
    • This unit comes with two regular USB-C ports and two 3.0 USB-A ports. So there is at least one port on the left and right-hand sides of the device. However, the lefthand side of the unit has a standard 3.5 mm headphone jack and a micro SD card slot for storage expansion.

  3. Acer Chromebook 11 C732 Teardown: 步骤 3 中的图像 1,1
    • This machine is model N17Q8. This is the same model Acer has used for all their Chromebook 11 models.

    • Much like other devices, Acer includes the warning to not throw your device in the trash.

  4. Acer Chromebook 11 C732 Teardown: 步骤 4 中的图像 1,3 Acer Chromebook 11 C732 Teardown: 步骤 4 中的图像 2,3 Acer Chromebook 11 C732 Teardown: 步骤 4 中的图像 3,3
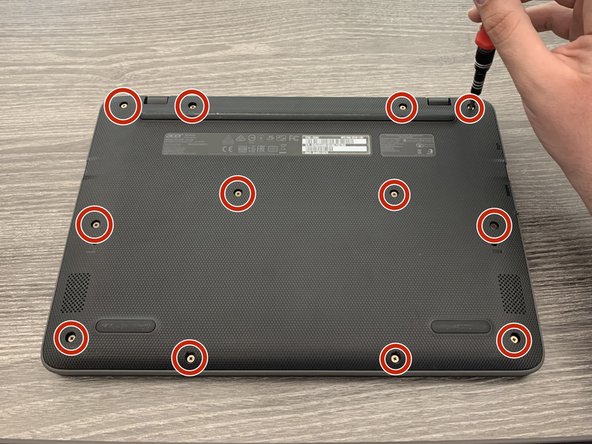
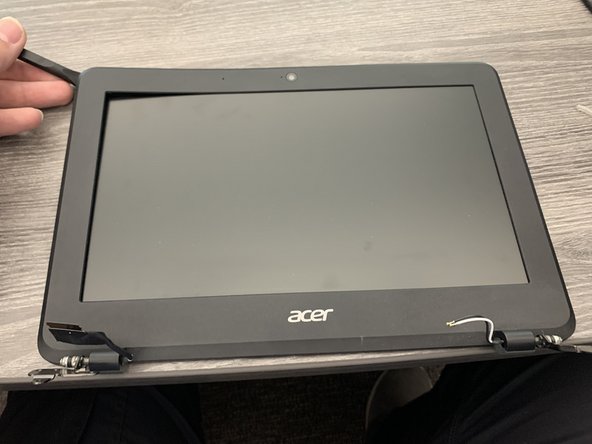
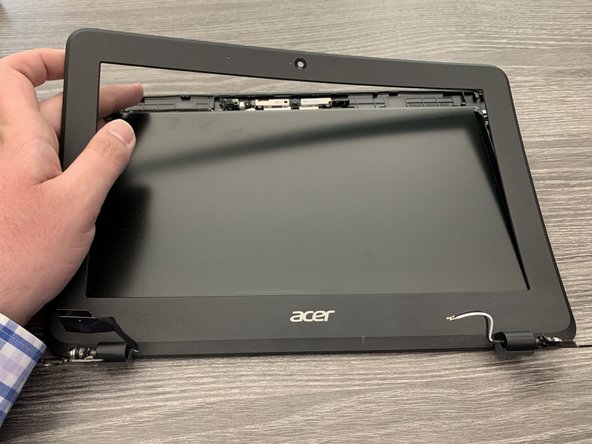
    • Getting inside the device is fairly simple. The case is held together by 12 Phillips #1 screws on the bottom of the device. All the case screws are 6.58 mm, so you don't have to worry about keeping track of these screws.

    • Once the bottom case is removed, all the internal components can be accessed fairly easily (same for the trackpad).

    • Acer does recommend using a scribe to open the case up, but the device can be opened up by placing your pointer fingers between the bottom case and the hinges.

  5. Acer Chromebook 11 C732 Teardown: 步骤 5 中的图像 1,2 Acer Chromebook 11 C732 Teardown: 步骤 5 中的图像 2,2
    • This machine's labeling boasts a 45-watt-hour battery. Acer has said that the battery should last you around 12 hours, but reports say that it will give you around 7 - 8 hours of use. Given the fact that this device is primarily targeted to students, this is a reasonable run time.

    • On this model, there are no screws that lock the battery in place. Other than the cable itself, the only thing that's holding the battery in place is some anti-static tape. This does make swapping out the battery a bit quicker, simply because we don't have to worry about replacing any screws or removing any adhesive from the battery.

  6. Acer Chromebook 11 C732 Teardown: 步骤 6 中的图像 1,3 Acer Chromebook 11 C732 Teardown: 步骤 6 中的图像 2,3 Acer Chromebook 11 C732 Teardown: 步骤 6 中的图像 3,3
    • To remove the battery, you will need to remove the anti-static tape covering the port.

    • A spudger makes disconnecting the battery safe and easy.

    • On this model, you can disconnect the battery without having to remove it from the device. While this is a nice design choice, there is no consequence for removing the battery as there is no adhesive keeping the battery in place, or screws, that hold the device in place.

  7. Acer Chromebook 11 C732 Teardown: 步骤 7 中的图像 1,3 Acer Chromebook 11 C732 Teardown: 步骤 7 中的图像 2,3 Acer Chromebook 11 C732 Teardown: 步骤 7 中的图像 3,3
    • The wireless card includes support for IEEE 802.11a/b/g/n/ac and two antennas that attach to the card with coaxial connectors.

    • This device also has integrated Bluetooth 4.2 but does not have a dedicated antenna for this.

  8. Acer Chromebook 11 C732 Teardown: 步骤 8 中的图像 1,2 Acer Chromebook 11 C732 Teardown: 步骤 8 中的图像 2,2
    • After removing the card, we can see that IEEE 802.11a/b/g/n/ac wireless connectivity is provided by Intel's "Dual Band Wireless-AC 7265"

  9. Acer Chromebook 11 C732 Teardown: 步骤 9 中的图像 1,3 Acer Chromebook 11 C732 Teardown: 步骤 9 中的图像 2,3 Acer Chromebook 11 C732 Teardown: 步骤 9 中的图像 3,3
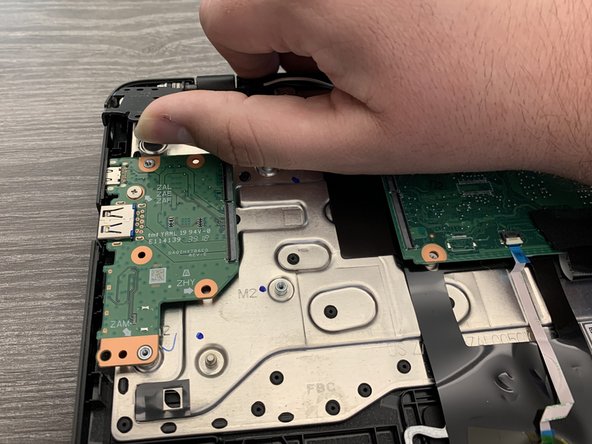
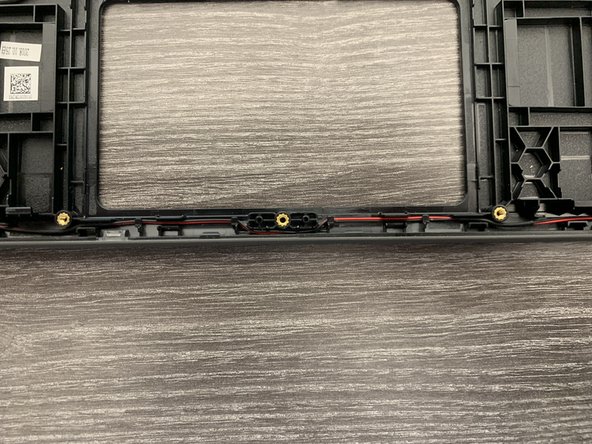
    • Much like other laptops, this device does have a separate daughter board with additional I/O ports. For this device, this board is connected to the rest of the computer with ribbon cables.

    • Using a spudger, we can pop the tabs on the zero insertion force (ZIF) connectors and pull on the blue thumb tabs to remove them.

  10. Acer Chromebook 11 C732 Teardown: 步骤 10 中的图像 1,3 Acer Chromebook 11 C732 Teardown: 步骤 10 中的图像 2,3 Acer Chromebook 11 C732 Teardown: 步骤 10 中的图像 3,3
    • There are three 4.65 mm screws holding the daughterboard in place. Two of those screws hold a screen hinge in place. Once the screws are removed, you are going to need to lift the hinge to remove the board.

  11. Acer Chromebook 11 C732 Teardown: 步骤 11 中的图像 1,2 Acer Chromebook 11 C732 Teardown: 步骤 11 中的图像 2,2
    • The USB-C port can be seen in the top left corner of the first picture, with the USB-A port right below it.

    • In the second picture, we flipped the board over to show some of the additional information on the board.

    • Through some additional digging, I was able to find the manufacturer part numbers are the following: 55.GVJN7.001.

  12. Acer Chromebook 11 C732 Teardown: 步骤 12 中的图像 1,3 Acer Chromebook 11 C732 Teardown: 步骤 12 中的图像 2,3 Acer Chromebook 11 C732 Teardown: 步骤 12 中的图像 3,3
    • Now that we have the daughterboard removed, we can start working on getting the motherboard out. We can start by removing the screws holding the other hinge in place.

    • Once these screws are out, we can separate the screen from the rest of the computer.

  13. Acer Chromebook 11 C732 Teardown: 步骤 13 中的图像 1,3 Acer Chromebook 11 C732 Teardown: 步骤 13 中的图像 2,3 Acer Chromebook 11 C732 Teardown: 步骤 13 中的图像 3,3
    • Once we have the hinges free, all we have to do is remove the three screws and lift the motherboard out.

  14. Acer Chromebook 11 C732 Teardown: 步骤 14 中的图像 1,3 Acer Chromebook 11 C732 Teardown: 步骤 14 中的图像 2,3 Acer Chromebook 11 C732 Teardown: 步骤 14 中的图像 3,3
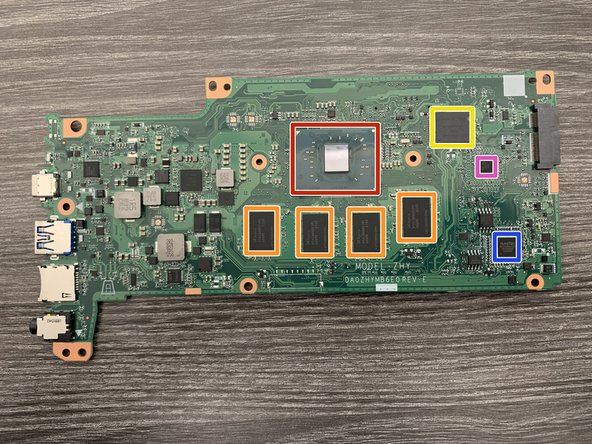
    • Front side of the motherboard:

    • Quad-Core Intel Celeron CPU N3350 (labeled as (H46417 01 E88)

    • SanDisk 32 GB eMMC Memory (labeled as SanDisk SDINADF4 - 32 GB)

    • SKhynix 4 GB RAM (labeled as SKhynix H9HCNN8KUML)

    • NUVOTON EC Micro-controller (labeled as NPCX588GGA0BX)

    • TPM (H1 Secure Microcontroller)

    • While it is nice to not have to deal with a mess of thermal paste, the thermal pad will need to be replaced since we removed the motherboard from the heat spreader.

  15. Acer Chromebook 11 C732 Teardown: 步骤 15 中的图像 1,2 Acer Chromebook 11 C732 Teardown: 步骤 15 中的图像 2,2
    • Once the motherboard is removed, you'll see a heat spreader. This can be peeled off and what you're left with is a naked keyboard.

    • It is worth pointing out that this model of Chromebook has the key switches riveted to the lower body, making it impossible to replace the switches without replacing the lower body of the device.

  16. Acer Chromebook 11 C732 Teardown: 步骤 16 中的图像 1,3 Acer Chromebook 11 C732 Teardown: 步骤 16 中的图像 2,3 Acer Chromebook 11 C732 Teardown: 步骤 16 中的图像 3,3
    • The trackpad can be removed with ease. At this point, the only thing holding it in place is 4 screws. Once those are out, we can take it out of the keyboard.

    • While the steps thus far have shown that the heat spreader and motherboard have been removed, you don't need to take them out if you need to replace the trackpad. The placement of the motherboard does allow us to peal the heat spreader up just enough so that we can get at the screws and remove the trackpad.

  17. Acer Chromebook 11 C732 Teardown: 步骤 17 中的图像 1,2 Acer Chromebook 11 C732 Teardown: 步骤 17 中的图像 2,2
    • Next up are the two stereo speakers located in the bottom corners of the device. These can be removed by simply lifting one speaker straight up, navigating the wire out from the tabs, and lifting the other speaker out of its housing.

    • The speakers cannot be removed unless you first remove the trackpad.

  18. Acer Chromebook 11 C732 Teardown: 步骤 18 中的图像 1,1
    • The speakers have the following manufacturer part number: 23.GUKN7.001

  19. Acer Chromebook 11 C732 Teardown: 步骤 19 中的图像 1,3 Acer Chromebook 11 C732 Teardown: 步骤 19 中的图像 2,3 Acer Chromebook 11 C732 Teardown: 步骤 19 中的图像 3,3
    • Now that the bottom half of the device is done, we can finally look at the screen assembly.

    • Getting into the assembly only requires a spudger. Once you have released the first tab, you can easily use your hands to remove the bezel.

  20. Acer Chromebook 11 C732 Teardown: 步骤 20 中的图像 1,3 Acer Chromebook 11 C732 Teardown: 步骤 20 中的图像 2,3 Acer Chromebook 11 C732 Teardown: 步骤 20 中的图像 3,3
    • With the bezel removed, we can start working on getting our screen out.

    • On this model, there are only 4 Phillips head screws holding the screen in place. Once these screws are taken out, we will need to flip the screen on its front.

    • The screen is still being held in place by the display cable behind the screen.

  21. Acer Chromebook 11 C732 Teardown: 步骤 21 中的图像 1,3 Acer Chromebook 11 C732 Teardown: 步骤 21 中的图像 2,3 Acer Chromebook 11 C732 Teardown: 步骤 21 中的图像 3,3
    • Once the screws are out, we can flip the screen out and get access to the 30-pin connector.

    • Once we release the display cable connector, we can separate the screen from the assembly.

  22. Acer Chromebook 11 C732 Teardown: 步骤 22 中的图像 1,2 Acer Chromebook 11 C732 Teardown: 步骤 22 中的图像 2,2
    • It's also worth pointing out that the screen hinges can be removed. The only thing holding them in place are 3 Phillips head screws.

  23. Acer Chromebook 11 C732 Teardown: 步骤 23 中的图像 1,3 Acer Chromebook 11 C732 Teardown: 步骤 23 中的图像 2,3 Acer Chromebook 11 C732 Teardown: 步骤 23 中的图像 3,3
    • At the very top of the panel, we can see the 1280 x 720 webcam (labeled as part number KS0HD06003), along with the microphone just to the left of it (manufacturer part number 23.GUMN7.001).

    • Both the microphone and the webcam are adhered to the panel, but it is a considerably weak adhesive and can be broken without any heating tools.

  24. Acer Chromebook 11 C732 Teardown: 步骤 24 中的图像 1,1
    • Finally, we have the display cable (manufacturer part number 50.GUKN7.005). Just like our speakers, we can remove the display cable by moving the cables past the plastic tabs on the panel.

  25. Acer Chromebook 11 C732 Teardown: 步骤 25 中的图像 1,1
    • Acer Chromebook 11 C732 Reparability Score: 8 out of 10 (10 is easiest to repair).

    • The easily removable case and the battery does allow for easy access to most components. Matter of fact, most of the components are pretty easy to get to and replace.

    • Lack of adhesion allows you to easily remove and replace the battery.

    • You only need 1 Phillips head screwdriver for all your repairs.

    • The thermal pad might give you some problems if moved.

    • A majority of the I/O ports are soldered directly to the logic board. If a port breaks, then you are going to need micro-soldering skills if you want to replace it.

    • Upgrading the RAM or internal storage is nonexistent.

    • Keyboard switches are impossible to replace due to the riveting.

Jacob Mehnert

于10/18/21注册

26,523 声望

创作了43篇指南

团队

iFanatics iFanatics 的会员

Community

54 名成员

创作了154篇指南

4条评论

Thanks for posting a nice little teardown of a device many of us have used, or have in our homes for school work. Speaking for all teardown enthusiasts, Thank You for creating this in a thoughtful and logical sequence and taking clear photographs that have adequate lighting. In an era where smartphones do so much of the heavy lifting to correct our mediocre photos it is refreshing to see that someone still understands the value in making an effort to do this well.

mic25ro - 回复

Well thank you. This is actually my first teardown guide, so that actually means quite a bit to me.

Jacob Mehnert -

What's powering the processor? Can you flip is and do some chip ID?

Caesar Ali - 回复

Hello, the processor's architecture is Intel's Apollo Lake SoC, and according to chapter 1, page 19 of the official service guide for this device, it has a Wattage of 4 - 6. I'm not sure if this will answer your question, but I will begin working on updating this teardown for better chip identification.

Jacob Mehnert -

添加评论

浏览统计数据:

过去 24 小时: 2

过去 7 天: 19

过去 30 天: 93

总计 3,466