简介
This guide will scratch the itch of knowing what's inside and maybe help people on identifying problems they have.
你所需要的
-
-
I wanted to take this thing apart in order to identify a problem I had, which was that it was rattling when playing music. And in my curiosity I decided to take it apart completely, and post it on here for others to see.
-
To start things of, I began with removing the SD-card. (Red arrow, second picture)
-
To gain access I had to use a metal spudger, insert it between the housing and the top cover.
-
The lid is about 3-4mm thick and glued all around with some kind of RTV, I think, and needs alot of force to pry loose, hence the metal spudger.
-
Beneath the lid lies the battery. It has normal tacky glue on the backside to secure it in the cradle it's in, I needed to pry it loose for steps to come, carefully not to yank it out, it's soldered to the PCB and I just needed it to be loose.
-
-
-
-
Removing the screws, PH0, in the holes.
-
The battery cradle is glued with the same RTV as the top in some places, and one of the screw-hole-prongs is fitted over a sort of dovel, shown on the second picture with the red circles.
-
With two spudgers lift the cradle from where it's the strongest, as shown with red arrows on the first picture. Had to be careful as to not destroy the sides of the cradle where force was applied..
-
-
-
After the cradle is removed you can see the board that is secured with two screws, one of which I've already removed when disassembling the cradle.
-
I removed the screw in the red circle and pried with the spudger where the red arrow is, in the direction of the blue arrow. Had to push the LED inwards with my thumb as needed until the board came lose.
-
The gold and red cables that go to the speaker was troublesome as I almost yanked them apart when removing the PCB..
-
The second picture, with the screw (PH2) and yellow circle, holds the resonance speaker in place (this one was loose in my case and I just had to tighten the screw a bit). Had to be careful with the speaker cables again since the speaker dropped out quite easily when the screw was removed.
-
Note that I did not remove the plastic separator between the speaker and the PCB as it is there to keep the PCB at the correct height, and is well secured with even more RTV
-
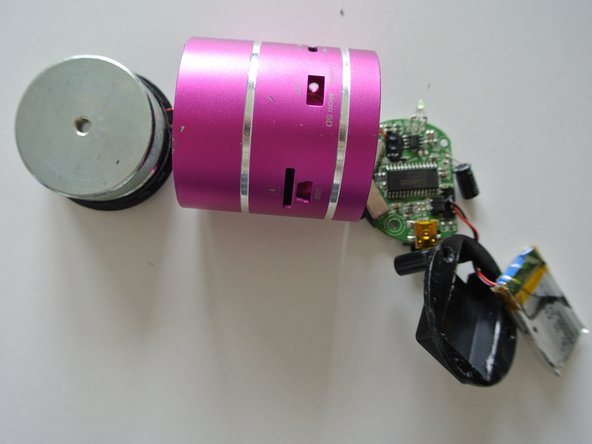
Final picture depicts a gutted Mighty Dwarf.
-


一条评论
I am like you. Interested in the assembly and design. Thanks for the content of your article. Interested in changing the battery if required.
Regards: Steve