跳转到主内容

why! W670SZQ1 Remplacement Carte WLAN / Bluetooth

你所需要的

  1. why! W670SZQ1 Remplacement Carte WLAN / Bluetooth, The Batteries: 步骤 1 中的图像 1,3 why! W670SZQ1 Remplacement Carte WLAN / Bluetooth, The Batteries: 步骤 1 中的图像 2,3 why! W670SZQ1 Remplacement Carte WLAN / Bluetooth, The Batteries: 步骤 1 中的图像 3,3
    • Unlock the lock latch on the left.

    • Unlock the lock latch on the right.

    • Remove the battery while holding the lock latch unlocked.

  2. why! W670SZQ1 Remplacement Carte WLAN / Bluetooth, Access to Major Components: 步骤 2 中的图像 1,3 why! W670SZQ1 Remplacement Carte WLAN / Bluetooth, Access to Major Components: 步骤 2 中的图像 2,3 why! W670SZQ1 Remplacement Carte WLAN / Bluetooth, Access to Major Components: 步骤 2 中的图像 3,3
    • Using the Philips # 0 screwdriver, unscrew the 2 screws from the bottom cover.

    • Lift the bottom right cover with the iFixit Opening Tool.

    • Lift the lower left cover with the iFixit Opening Tool.

    • Finally clear the bottom cover completely to access the main components.

  3. why! W670SZQ1 Remplacement Carte WLAN / Bluetooth, Carte WLAN / Bluetooth: 步骤 3 中的图像 1,3 why! W670SZQ1 Remplacement Carte WLAN / Bluetooth, Carte WLAN / Bluetooth: 步骤 3 中的图像 2,3 why! W670SZQ1 Remplacement Carte WLAN / Bluetooth, Carte WLAN / Bluetooth: 步骤 3 中的图像 3,3
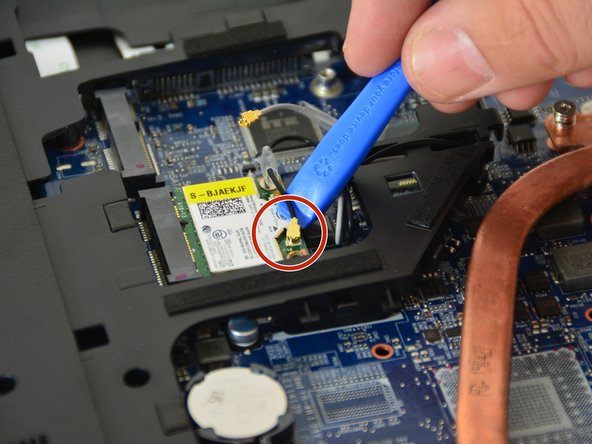
    • First disconnect one of the antenna connectors.

    • Then the other connector.

    • Unscrew the fixing screw with the Philips # 0 screwdriver. Then slightly lift the chipset and remove it from the mSATA connector.

结论

TO REASSEMBLE YOUR DEVICE FOLLOW THE FOLLOWING INSTRUCTIONS IN REVERSE ORDER.

由衷感谢以下译者:

fr en

100%

irlanda正在帮助我们修复这个世界! 您也想加入吗?
开始翻译 ›

Felice Suglia

于06/15/13注册

30,527 声望

创作了259篇指南

0条评论

添加评论

浏览统计数据:

过去 24 小时: 0

过去 7 天: 0

过去 30 天: 3

总计 103