跳转到主内容

why! N650DU Pile BIOS

你所需要的

  1. why! N650DU  Pile BIOS, The Batteries: 步骤 1 中的图像 1,3 why! N650DU  Pile BIOS, The Batteries: 步骤 1 中的图像 2,3 why! N650DU  Pile BIOS, The Batteries: 步骤 1 中的图像 3,3
    • Unlock the button without spring

    • Slide the battery up while unlocking the button with spring

  2. why! N650DU  Pile BIOS, Access to major components: 步骤 2 中的图像 1,3 why! N650DU  Pile BIOS, Access to major components: 步骤 2 中的图像 2,3 why! N650DU  Pile BIOS, Access to major components: 步骤 2 中的图像 3,3
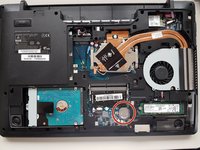
    • Unscrew the two large screws circled in red

    • Unscrew the two small screws circled in green

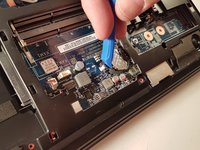
    • Slide the plate down and lift the

  3. why! N650DU  Pile BIOS, Pile BIOS: 步骤 3 中的图像 1,2 why! N650DU  Pile BIOS, Pile BIOS: 步骤 3 中的图像 2,2
    • Remove the battery using a flat screwdriver

结论

To reassemble your device, Follow these instructions in reverse order.

另外一个人完成了本指南。

由衷感谢以下译者:

fr en

100%

irlanda正在帮助我们修复这个世界! 您也想加入吗?
开始翻译 ›

Felice Suglia

于06/15/13注册

31,100 声望

创作了264篇指南

0条评论

添加评论

浏览统计数据:

过去 24 小时: 0

过去 7 天: 7

过去 30 天: 18

总计 293