跳转到主内容

why! N240BU Hard Drive Replacement

你所需要的

  1. why! N240BU Hard Drive Replacement, Battery: 步骤 1 中的图像 1,2 why! N240BU Hard Drive Replacement, Battery: 步骤 1 中的图像 2,2
    • Start by unlocking the right locking latch.

    • Then, by simultaneously unlocking the left latch, lift the battery out of its socket.

  2. why! N240BU Hard Drive Replacement, Access to main components: 步骤 2 中的图像 1,2 why! N240BU Hard Drive Replacement, Access to main components: 步骤 2 中的图像 2,2
    • Begin by spotting the dummy memory card.

    • Then, remove it and put it on your workplan.

  3. why! N240BU Hard Drive Replacement: 步骤 3 中的图像 1,3 why! N240BU Hard Drive Replacement: 步骤 3 中的图像 2,3 why! N240BU Hard Drive Replacement: 步骤 3 中的图像 3,3
    • Locate the 15 screws that hold the bottom cover of the device in place.

    • Unscrew them and place them on your work surface.

    • Then, un-clip the bottom cover, starting with the side shown in the third picture.

  4. why! N240BU Hard Drive Replacement, Hard Drive (mass storage): 步骤 4 中的图像 1,3 why! N240BU Hard Drive Replacement, Hard Drive (mass storage): 步骤 4 中的图像 2,3 why! N240BU Hard Drive Replacement, Hard Drive (mass storage): 步骤 4 中的图像 3,3
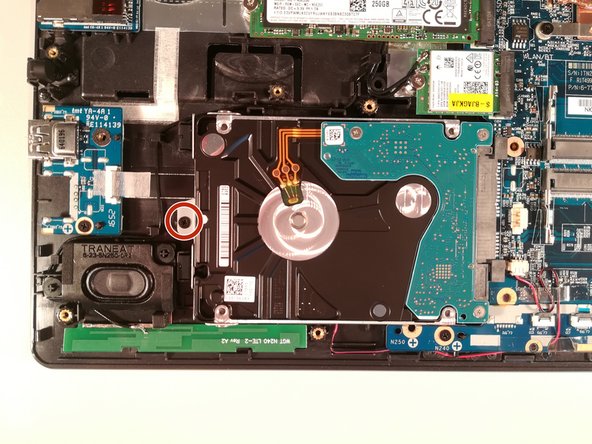
    • Remove the screw circled in red

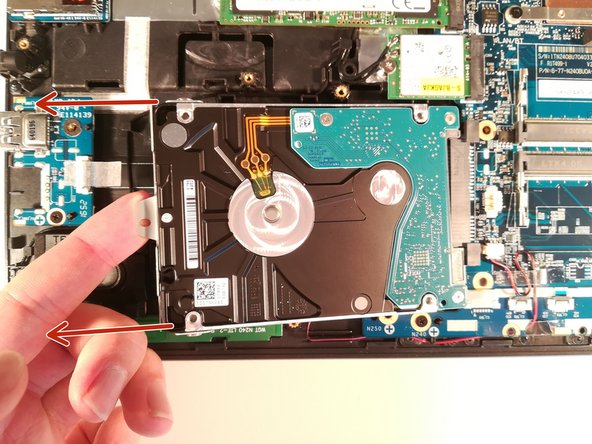
    • Lift up the hard drive

    • Remove the hard drive in the direction of the red arrows

结论

To reassemble your device, follow these instructions in reverse order.

另外一个人完成了本指南。

由衷感谢以下译者:

fr en

100%

这些译者帮助我们修补全世界! 您也想加入吗?
开始翻译 ›

Felice Suglia

于06/15/13注册

30,731 声望

创作了262篇指南

0条评论

添加评论

浏览统计数据:

过去 24 小时: 1

过去 7 天: 1

过去 30 天: 1

总计 155