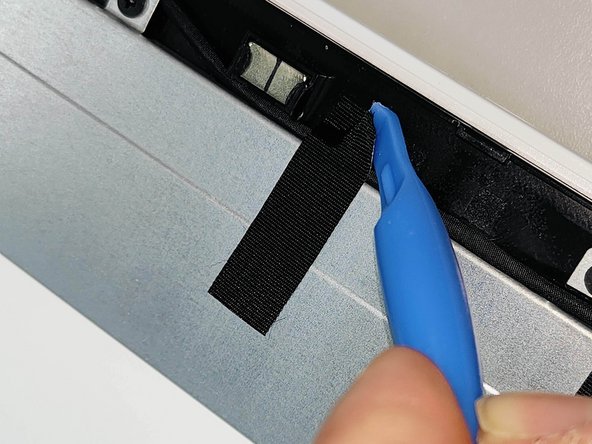
跳转到主内容

jp.ik Leap T304 LCD Replacement Replacement

你所需要的

  1. jp.ik Leap T304 LCD Replacement Replacement, jp.ik Leap T304 LCD Replacement: 步骤 1 中的图像 1,2 jp.ik Leap T304 LCD Replacement Replacement, jp.ik Leap T304 LCD Replacement: 步骤 1 中的图像 2,2
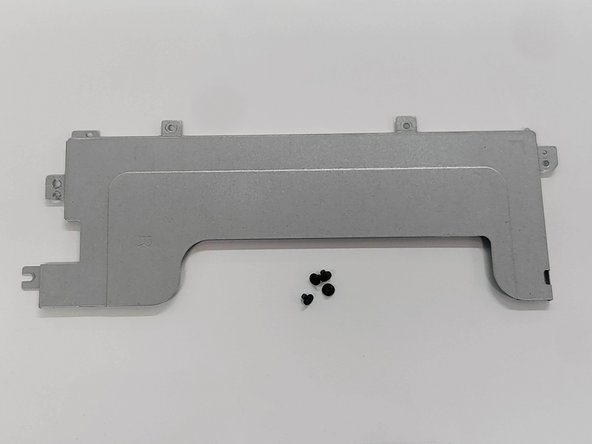
    • First make sure the notebook is turned off and check if you have the necessary tools.

  2. jp.ik Leap T304 LCD Replacement Replacement: 步骤 2 中的图像 1,2 jp.ik Leap T304 LCD Replacement Replacement: 步骤 2 中的图像 2,2
    • All screws are identified by circles. Pay special attention to the red circles as the rubber covers hide the screws.

    • With an utlility knife remove all the screw covers.

    • For this action, the procedure must be carried out with caution, as the covers are glued with a resistant glue.

  3. jp.ik Leap T304 LCD Replacement Replacement: 步骤 3 中的图像 1,1
    • Remove all screws with a Philips PH1 screwdriver

    • All screws are the same, don't worry about identifying them.

  4. jp.ik Leap T304 LCD Replacement Replacement: 步骤 4 中的图像 1,3 jp.ik Leap T304 LCD Replacement Replacement: 步骤 4 中的图像 2,3 jp.ik Leap T304 LCD Replacement Replacement: 步骤 4 中的图像 3,3
    • Using the plastic tool, insert it between the plastic and open it carefully.

    • You will feel and hear several clicks, which are perfectly normal. Remove the rear LCD Cover completely.

  5. jp.ik Leap T304 LCD Replacement Replacement: 步骤 5 中的图像 1,3 jp.ik Leap T304 LCD Replacement Replacement: 步骤 5 中的图像 2,3 jp.ik Leap T304 LCD Replacement Replacement: 步骤 5 中的图像 3,3
    • Unscrew both hinges.

    • All screws are the same, don't worry about identifying them.

  6. jp.ik Leap T304 LCD Replacement Replacement: 步骤 6 中的图像 1,2 jp.ik Leap T304 LCD Replacement Replacement: 步骤 6 中的图像 2,2
    • Carefully disconnect the cable identified in the figure, removing it from its connector.

  7. jp.ik Leap T304 LCD Replacement Replacement: 步骤 7 中的图像 1,3 jp.ik Leap T304 LCD Replacement Replacement: 步骤 7 中的图像 2,3 jp.ik Leap T304 LCD Replacement Replacement: 步骤 7 中的图像 3,3
    • Remove the mylers shown in the image.

  8. jp.ik Leap T304 LCD Replacement Replacement: 步骤 8 中的图像 1,2 jp.ik Leap T304 LCD Replacement Replacement: 步骤 8 中的图像 2,2
    • Peel off and remove the Wireless antennas

    • Before removing the wireless antennas, the cable route must always be analyzed to ensure that the antennas will be correctly replaced in their original position.

  9. jp.ik Leap T304 LCD Replacement Replacement: 步骤 9 中的图像 1,3 jp.ik Leap T304 LCD Replacement Replacement: 步骤 9 中的图像 2,3 jp.ik Leap T304 LCD Replacement Replacement: 步骤 9 中的图像 3,3
    • Remove the left and right LCD Bracket.

  10. jp.ik Leap T304 LCD Replacement Replacement: 步骤 10 中的图像 1,3 jp.ik Leap T304 LCD Replacement Replacement: 步骤 10 中的图像 2,3 jp.ik Leap T304 LCD Replacement Replacement: 步骤 10 中的图像 3,3
    • Remove the LCD from the Bezel.

    • To reassemble the LCD module, you must perform the previous steps in reverse.

    • After replacing the LCD, always check if flat cable is correctly connected and the protection tape is stuck in the original position.

结论

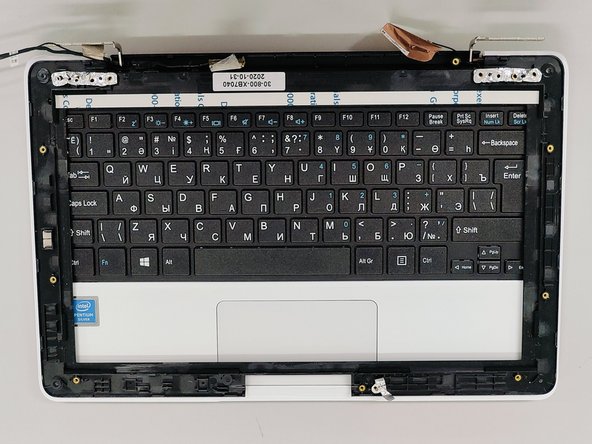
To reassemble your device, follow these instructions in reverse order.

另外一个人完成了本指南。

由衷感谢以下译者:

pt en

100%

Miguel Santos正在帮助我们修复这个世界! 您也想加入吗?
开始翻译 ›

Miguel Santos

于01/29/24注册

509 声望

撰写一个指南

团队

jp.ik jp.ik 的会员

Business

2 名成员

创作了14篇指南

0条评论

添加评论

浏览统计数据:

过去 24 小时: 0

过去 7 天: 1

过去 30 天: 6

总计 160