跳转到主内容

iRobot Roomba i6 Cleaning Head Module Replacement

你所需要的

  1. iRobot Roomba i6 Cleaning Head Module Replacement, Remove the Edge Sweeping Brush: 步骤 1 中的图像 1,1
    • Using your PH2 size screwdriver, remove the edge sweeping brush by unscrewing the single screw

  2. iRobot Roomba i6 Cleaning Head Module Replacement, Remove the Bottom Cover: 步骤 2 中的图像 1,2 iRobot Roomba i6 Cleaning Head Module Replacement, Remove the Bottom Cover: 步骤 2 中的图像 2,2
    • Using your PH2 screwdriver, remove all 5 of the screws.

    • The two screws up top will keep unscrewing all the way if you don't stop. Stop unscrewing as soon as you feel a noticeable change in resistance.

    • After all screws are unscrewed, gently lift the bottom cover straight up from the two points the arrows are pointing to.

  3. iRobot Roomba i6 Cleaning Head Module Replacement, Remove the Battery: 步骤 3 中的图像 1,1
    • It is very important to remove the battery before removing any electrically connected components, as a screwdriver could possibly cause a short in the electronics and the battery could explode.

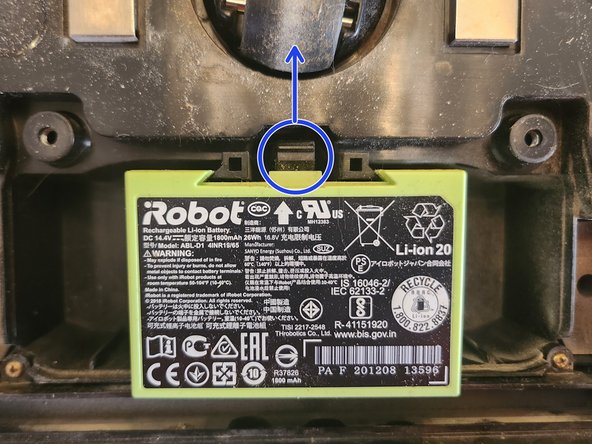
    • Remove the battery by pushing the plastic clip up and lifting the battery out of the Roomba.

  4. iRobot Roomba i6 Cleaning Head Module Replacement, Remove the Dust Bin: 步骤 4 中的图像 1,2 iRobot Roomba i6 Cleaning Head Module Replacement, Remove the Dust Bin: 步骤 4 中的图像 2,2
    • Press the button to remove the dustbin and set it aside.

  5. iRobot Roomba i6 Cleaning Head Module Replacement, Remove the Cleaning Head Module: 步骤 5 中的图像 1,2 iRobot Roomba i6 Cleaning Head Module Replacement, Remove the Cleaning Head Module: 步骤 5 中的图像 2,2
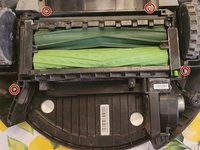
    • Unscrew all 4 screws highlighted in red using your PH1 size screwdriver.

    • IMPORTANT Do not try to remove the screws. Just unscrew them until they are no longer biting any threads. When you remove the module, the screws will stay with the module.

    • After all screws are removed, gently lift the cleaning module by inserting your fingers into the slit highlighted in blue and lifting straight up.

结论

To install the replacement module, follow these instructions in reverse order.

Kaden Gonzalez

于08/16/24注册

314 声望

创作了3篇指南

0指南评论

添加评论

浏览统计数据:

过去 24 小时: 3

过去 7 天: 5

过去 30 天: 16

总计 329