简介
This guide will show how to remove the Roomba front bumper and also the sensor attached by the red ribbon wire. You will need a Phillips Head #0 Screw driver for this repair. Make sure you work on a clean flat surface for this repair. Be sure to not misplace the small screws holding the sensor to the bumper.
你所需要的
-
-
Place Roomba flat on table with iRobot text upside down and closest to you.
-
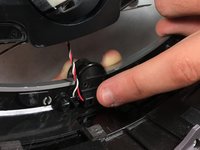
Detach the clips on the bumper.
-
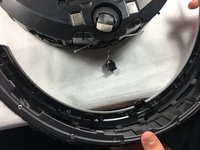
Flip Roomba so that the bottom side is facing up and you can access bottom screws on bumper.
-
-


To reassemble your device, follow these instructions in reverse order.
另外一个人完成了本指南。

团队

UMass Dartmouth, Team S5-G5, Gulbrandsen Fall 2018 UMass Dartmouth, Team S5-G5, Gulbrandsen Fall 2018 的会员
UMASSD-GULBRANDSEN-F18S5G5
3 名成员
创作了3篇指南
1指南评论
Very good directions for disassembly. Can you add specific instructions for re-assembly?
If you have any suggestions for getting the main part of the bumper back on, that would be helpful. It was very challenging to get that part reattached to the chassis. There is a tab at each end of the main part of the bumper, and it was challenging to get them into their respective slots. It required a lot of pushing and pulling and compressing of the main bumper part, and although the tabs finally went where they were supposed to go, I’m not sure what I did to get them there.