跳转到主内容

iPod Nano 7th Generation Battery Replacement

你所需要的

  1. iPod Nano 7th Generation Battery Replacement, Front Panel Assembly: 步骤 1 中的图像 1,2 iPod Nano 7th Generation Battery Replacement, Front Panel Assembly: 步骤 1 中的图像 2,2
    • Lay the iOpener over the plastic tab to loosen the adhesive. Let the bag sit on the device for approximately 90 seconds before attempting to open the panel.

  2. iPod Nano 7th Generation Battery Replacement: 步骤 2 中的图像 1,3 iPod Nano 7th Generation Battery Replacement: 步骤 2 中的图像 2,3 iPod Nano 7th Generation Battery Replacement: 步骤 2 中的图像 3,3
    • Use a plastic opening tool to pull the rear plastic cover away from the device until there is enough room to insert a spudger.

    • Insert a spudger under the cover, then pry it up and away from the device.

    • Remove the rear plastic cover from the iPod.

    • Be very careful in removing the plastic cover as the bluetooth antenna is adhered to it.

  3. iPod Nano 7th Generation Battery Replacement: 步骤 3 中的图像 1,1
    • Gently bend the Bluetooth antenna to the right, out of the way of the screws in the bottom of the device.

    • Remove the single 1.4 mm Phillips #000 screw from the black plastic spacer.

  4. iPod Nano 7th Generation Battery Replacement: 步骤 4 中的图像 1,2 iPod Nano 7th Generation Battery Replacement: 步骤 4 中的图像 2,2
    • Use a plastic opening tool to remove the black plastic spacer from the Nano.

  5. iPod Nano 7th Generation Battery Replacement: 步骤 5 中的图像 1,1
    • Remove the two 2 mm Phillips #000 screws from the bottom of the case.

  6. iPod Nano 7th Generation Battery Replacement: 步骤 6 中的图像 1,2 iPod Nano 7th Generation Battery Replacement: 步骤 6 中的图像 2,2
    • Insert a plastic opening tool into the seam between the white plastic front panel and the rear case.

    • Slide the opening tool along the edge of the front panel to free it from clips and adhesive.

  7. iPod Nano 7th Generation Battery Replacement: 步骤 7 中的图像 1,1
    • Use a spudger to press the midframe screw tab up and out of the rear case.

  8. iPod Nano 7th Generation Battery Replacement: 步骤 8 中的图像 1,1
    • Use a metal spudger to carefully pry near the Lightning connector and under all parts of the front panel assembly: the front glass/digitizer, the LCD display and the metal midframe.

    • The adhesive under the metal midframe/display assembly is quite strong and the components are fragile, so go slowly and gently. Make sure you do not bend the LCD screen.

  9. iPod Nano 7th Generation Battery Replacement: 步骤 9 中的图像 1,2 iPod Nano 7th Generation Battery Replacement: 步骤 9 中的图像 2,2
    • Continue prying along the edges under the front panel assembly, releasing the clips and adhesive along the sides of the device.

  10. iPod Nano 7th Generation Battery Replacement: 步骤 10 中的图像 1,2 iPod Nano 7th Generation Battery Replacement: 步骤 10 中的图像 2,2
    • Pull the front panel assembly slightly down and partially out of the device.

    • You only need to open the device enough to gain access to the display cable connectors near the sleep/power button.

    • Do not separate the two halves entirely, they are still connected by several cables.

  11. iPod Nano 7th Generation Battery Replacement: 步骤 11 中的图像 1,2 iPod Nano 7th Generation Battery Replacement: 步骤 11 中的图像 2,2
    • Use a spudger to release the digitizer cable and display data cable connectors.

  12. iPod Nano 7th Generation Battery Replacement: 步骤 12 中的图像 1,1
    • Gently unfold the two halves of the device to access the internal components.

    • Do not try to completely separate the two sections, yet, as they are still attached via a soldered cable.

  13. iPod Nano 7th Generation Battery Replacement: 步骤 13 中的图像 1,2 iPod Nano 7th Generation Battery Replacement: 步骤 13 中的图像 2,2
    • Pull up on the battery pull tab to free the battery from its adhesive.

    • Flip the battery over into the rear case for safekeeping.

  14. iPod Nano 7th Generation Battery Replacement: 步骤 14 中的图像 1,1
    • Completely separate the front panel assembly from the rest of the device.

  15. iPod Nano 7th Generation Battery Replacement, Battery: 步骤 15 中的图像 1,1
    • Use a cotton swab or Q-tip to remove any dust or lint on both sides of the iPod.

    • Ensure the area is clean and free from debris to provide a clean environment for the new battery.

  16. iPod Nano 7th Generation Battery Replacement: 步骤 16 中的图像 1,1
    • Scrape the rubber adhesive off of the solder joints using a spudger.

  17. iPod Nano 7th Generation Battery Replacement: 步骤 17 中的图像 1,2 iPod Nano 7th Generation Battery Replacement: 步骤 17 中的图像 2,2
    • Heat your soldering iron. Place the soldering iron on the solder joints of the battery connections to melt the solder.

    • Carefully pull the old battery away from the motherboard as the solder melts.

    • Use tweezers to lift the battery.

  18. iPod Nano 7th Generation Battery Replacement: 步骤 18 中的图像 1,3 iPod Nano 7th Generation Battery Replacement: 步骤 18 中的图像 2,3 iPod Nano 7th Generation Battery Replacement: 步骤 18 中的图像 3,3
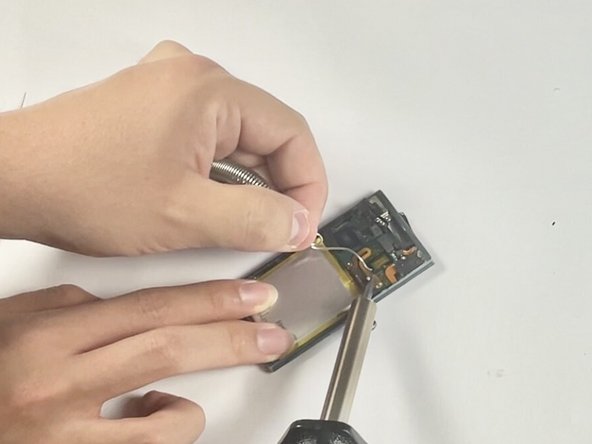
    • Using the iFixit opening pick, carefully pry open the device. Start from the edges and work your way around to separate the screen from the back cover.

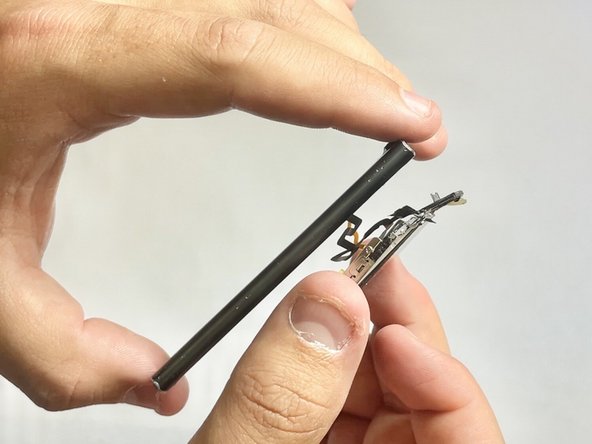
    • Gently lift the screen to reveal the internal components.

    • Do not pull too hard as the screen is still connected to the motherboard via a cable.

    • Use the iFixit opening pick to disconnect the screen cable from the motherboard gently.

  19. iPod Nano 7th Generation Battery Replacement: 步骤 19 中的图像 1,2 iPod Nano 7th Generation Battery Replacement: 步骤 19 中的图像 2,2
    • Place the new battery on the back of the screen and apply fresh solder.

  20. iPod Nano 7th Generation Battery Replacement: 步骤 20 中的图像 1,3 iPod Nano 7th Generation Battery Replacement: 步骤 20 中的图像 2,3 iPod Nano 7th Generation Battery Replacement: 步骤 20 中的图像 3,3
    • Reconnect the screen cable to the motherboard.

    • Ensure it is securely attached.

    • Carefully place the screen back into the casing.

    • Make sure everything fits snugly.

    • Press the screen and back cover together until they click into place.

    • Ensure there are no gaps between the screen and the back cover.

结论

To reassemble your device, follow these instructions in reverse order.

Jindu Li

于04/26/24注册

133 声望

撰写一个指南

团队

UC Davis, Team 2-2, Whithaus Spring 2024 UC Davis, Team 2-2, Whithaus Spring 2024 的会员

UCD-WHITHAUS-S24S2G2

3 名成员

创作了1篇指南

0条评论

添加评论

浏览统计数据:

过去 24 小时: 6

过去 7 天: 88

过去 30 天: 101

总计 162