跳转到主内容

当前版本的文档还未经巡查,您可以查看最新的已查核版本

iPod Nano 第三代电池更换

你所需要的

  1. 这个步骤还没有翻译 帮忙翻译一下

    iPod Nano 第三代电池更换: 步骤 1 中的图像 1,1
    • Please be aware that removing the rear panel from the back of the iPod will cause considerable damage to the rear panel. We highly recommend purchasing an additional rear panel to properly reassemble the iPod.

    • Before opening your iPod, ensure that the hold switch is in the locked position.

  2. 这个步骤还没有翻译 帮忙翻译一下

    iPod Nano 第三代电池更换: 步骤 2 中的图像 1,1
    • The rear panel is secured to the front case by eight clips permanently attached to the rear panel. These clips lock onto small tabs machined into the front case.

    • To free the tabs, they must be pushed toward the center of the Nano. Note the location of all tabs on the rear panel. When using an iPod opening tool to free the rear panel, be sure to work the tool at the location of these clips.

    • To aid in visualization, the two clips boxed in red are located closest to the headphone jack.

  3. 这个步骤还没有翻译 帮忙翻译一下

    iPod Nano 第三代电池更换: 步骤 3 中的图像 1,2 iPod Nano 第三代电池更换: 步骤 3 中的图像 2,2
    • Opening the iPod can be challenging. Don't get discouraged if it takes you a few tries before the iPod is opened.

    • Insert the large iPod opening tool into the seam between the front case and rear panel of the iPod, above the dock connector. The tool's edge should point toward the rear panel to prevent any accidental scratching of the anodized aluminum front case.

  4. 这个步骤还没有翻译 帮忙翻译一下

    iPod Nano 第三代电池更换: 步骤 4 中的图像 1,1
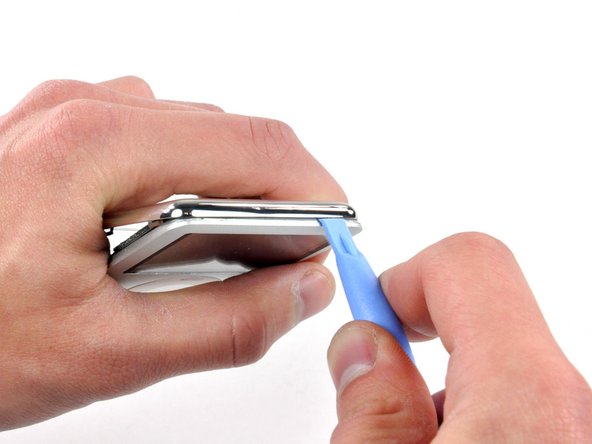
    • Insert a small iPod opening tool into the seam on the headphone jack side of the Nano, with the edge of the tool pointing toward the rear panel.

    • Gently enlarge the existing gap by pressing/wiggling the small iPod opening tool into the gap near each of the the two tabs attached to the rear case, pushing the clips toward the center of the Nano until both have been freed.

  5. 这个步骤还没有翻译 帮忙翻译一下

    iPod Nano 第三代电池更换: 步骤 5 中的图像 1,2 iPod Nano 第三代电池更换: 步骤 5 中的图像 2,2
    • The large iPod opening tool is no longer needed to gain access to the left side of the iPod.

    • Repeat the same procedure listed in the previous step to free the three clips along the hold switch side of the Nano.

  6. 这个步骤还没有翻译 帮忙翻译一下

    iPod Nano 第三代电池更换: 步骤 6 中的图像 1,1
    • Insert an iPod opening tool into the gap near the top left corner of the Nano and work to free the three clips along the top edge of the rear panel.

    • After ensuring all tabs are free, separate the two halves of the iPod.

    • The rear panel is now free from the iPod.

  7. 这个步骤还没有翻译 帮忙翻译一下

    iPod Nano 第三代电池更换: 步骤 7 中的图像 1,1
    • With the rear case removed, the back side of your Nano should now look like this.

  8. 这个步骤还没有翻译 帮忙翻译一下

    iPod Nano 第三代电池更换: 步骤 8 中的图像 1,1
    • Remove the following six screws:

    • One 1.8 mm Phillips.

    • Three 1.9 mm Phillips.

    • One 2.4 mm Phillips.

    • One 2.6 mm Phillips.

  9. 这个步骤还没有翻译 帮忙翻译一下

    iPod Nano 第三代电池更换: 步骤 9 中的图像 1,2 iPod Nano 第三代电池更换: 步骤 9 中的图像 2,2
    • Using a spudger, flip up the brown click wheel ribbon cable retaining clip.

    • The clip is hinged at the end nearest the edge of the case.

  10. 这个步骤还没有翻译 帮忙翻译一下

    iPod Nano 第三代电池更换: 步骤 10 中的图像 1,1
    • Use the tip of a spudger to slide the click wheel ribbon cable out of its socket.

    • The logic board is still connected to the iPod by the display ribbon cable.

  11. 这个步骤还没有翻译 帮忙翻译一下

    iPod Nano 第三代电池更换: 步骤 11 中的图像 1,2 iPod Nano 第三代电池更换: 步骤 11 中的图像 2,2
    • The logic board is still connected to the front case by the display ribbon cable, located on the headphone jack side of the logic board.

    • Lift the logic board assembly out of the front case from the click wheel connector side (the cable you just disconnected). Rotate the logic board assembly about the display ribbon cable and lay it next to the front case.

  12. 这个步骤还没有翻译 帮忙翻译一下

    iPod Nano 第三代电池更换: 步骤 12 中的图像 1,1
    • Use a spudger to flip up the display ribbon cable retaining clip.

    • The retaining clip is hinged about the end nearest the battery.

  13. 这个步骤还没有翻译 帮忙翻译一下

    iPod Nano 第三代电池更换: 步骤 13 中的图像 1,1
    • Slide the display ribbon cable out of its socket.

    • The logic board is now completely disconnected from the front case.

  14. 这个步骤还没有翻译 帮忙翻译一下

    iPod Nano 第三代电池更换: 步骤 14 中的图像 1,2 iPod Nano 第三代电池更换: 步骤 14 中的图像 2,2
    • Before proceeding, remove the metal EMI finger shown by pulling it away from the adhesive on the logic board.

    • Do not forget to reinstall this during reassembly.

  15. 这个步骤还没有翻译 帮忙翻译一下

    iPod Nano 第三代电池更换: 步骤 15 中的图像 1,1
    • Battery replacement on the iPod Nano 3rd Generation requires soldering. Before proceeding, be sure you have all the required tools and a general feel for soldering small electronic components.

    • Before de-soldering the battery cables, you must remove a small amount of black rubbery adhesive securing them to the logic board.

  16. 这个步骤还没有翻译 帮忙翻译一下

    iPod Nano 第三代电池更换: 步骤 16 中的图像 1,1
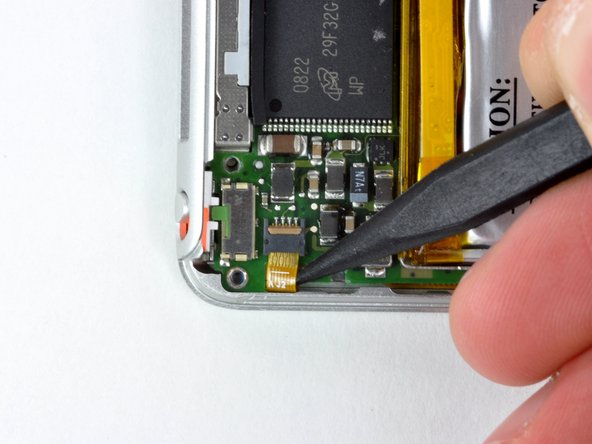
    • Push the tip of a spudger beneath the rubber adhesive and toward the battery to free it from the surface of the logic board.

    • Start freeing the adhesive from around one of the outer leads, then free it from the two gaps between leads, and finally push the spudger along the back side of the leads to completely remove it from the logic board/battery leads.

    • The battery leads are delicate, so be careful to not tear them while removing the black adhesive.

  17. 这个步骤还没有翻译 帮忙翻译一下

    iPod Nano 第三代电池更换: 步骤 17 中的图像 1,1
    • The battery leads, now free of adhesive, should look like this.

  18. 这个步骤还没有翻译 帮忙翻译一下

    iPod Nano 第三代电池更换: 步骤 18 中的图像 1,1
    • The next few steps require a soldering iron.

    • The ends of the battery leads are fed through small holes in the logic board and held in place by a small amount of solder.

    • Begin by heating the exposed end of the white battery lead with the tip of a soldering iron while simultaneously pulling the lead away from the connection, using tweezers to grasp the lead by the insulation.

    • Due to the delicate nature of electronic components, it is imperative to limit the amount of heat transferred from the soldering iron to the logic board. An easy way to accomplish this is to pull on the battery lead with light continuous tension while the soldering iron heats up the connection. As soon as the solder melts and the lead slides out, immediately lift the solder tip off the connection to avoid damage.

  19. 这个步骤还没有翻译 帮忙翻译一下

    iPod Nano 第三代电池更换: 步骤 19 中的图像 1,2 iPod Nano 第三代电池更换: 步骤 19 中的图像 2,2
    • De-solder the remaining leads, following the procedure illustrated in the previous step.

  20. 这个步骤还没有翻译 帮忙翻译一下

    iPod Nano 第三代电池更换: 步骤 20 中的图像 1,1
    • All leads should now be de-soldered and disconnected from the logic board.

  21. 这个步骤还没有翻译 帮忙翻译一下

    iPod Nano 第三代电池更换: 步骤 21 中的图像 1,2 iPod Nano 第三代电池更换: 步骤 21 中的图像 2,2
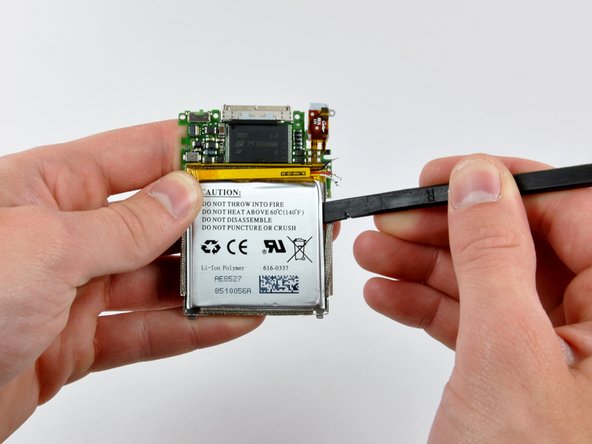
    • Using a spudger, pry the battery up from the adhesive holding it to the battery shield.

    • Start prying at the upper right corner of the battery and work your way around the perimeter until the battery has lifted enough to grab it with your fingers.

    • Remove the battery from the battery shield.

  22. iPod Nano 第三代电池更换, 电池: 步骤 22 中的图像 1,2 iPod Nano 第三代电池更换, 电池: 步骤 22 中的图像 2,2
    • 为了帮助焊接新电池,确保主板上的焊盘上的孔洞没有焊锡。这样,您可以插入新电池的引线并将它们焊接在位,而不是在同时插入电池引线并施加焊锡的情况下加热焊盘。

    • 要打开焊盘上的孔洞,将一根订书钉弯直,然后将其压在堵塞孔洞的焊锡上,同时从主板的另一侧加热相同的焊锡焊盘。

    • 不要过度加热主板。如果订书钉第一次没有成功穿过,先让主板冷却,然后重新加热焊盘。重复这个过程,直到订书钉完全穿过孔洞。

  23. iPod Nano 第三代电池更换: 步骤 23 中的图像 1,1
    • 将新电池放在金属电池托盘中,将其粘在背胶上。

  24. iPod Nano 第三代电池更换: 步骤 24 中的图像 1,3 iPod Nano 第三代电池更换: 步骤 24 中的图像 2,3 iPod Nano 第三代电池更换: 步骤 24 中的图像 3,3
    • 使用镊子,将电池引线的末端插入它们各自的孔中。

    • 将黑色导线插入最右边的孔中。

    • 将红色导线插入中心孔。

    • 将白色导线插入最左边的孔中。

    • 为了使导线固定到位,首先弯曲电池引线的绝缘部分成最终的形状,然后再将剥离末端插入孔中可能会容易一点。

  25. iPod Nano 第三代电池更换: 步骤 25 中的图像 1,1
    • 在这一步中,您将把电池引线焊接到主板上的焊盘上。

    • 在焊接时,如果传递到主板上的热量过多,可能会导致永久性的电子元件损坏。通常的经验法则是,只需将焊铁的尖端接触焊点足够长的时间以融化焊锡,然后迅速将其移开。

    • 通过将焊铁的尖端暂时放在连接处,将焊锡压入连接处(使其融化),然后迅速将焊锡和焊铁的尖端从连接处移开来焊接连接。焊锡应该流到新的电池引线周围,牢固地连接到主板上的焊盘。

    • 以相同的方式焊接另外两根电池引线,特别注意不要使用焊锡连接任何两个引线。

结论

根据指示的相反顺序来组装你的设备。

117等其他人完成本指南。

由衷感谢以下译者:

en zh

100%

这些译者帮助我们修补全世界! 您也想加入吗?
开始翻译 ›

18条评论

I have one suggestion about replacing the back cover after you are all done (If you did not purchase a new replacement cover). I noticed that in the process of removing the back cover, the metal clips get bent up. This causes the cover to be very loose when you replace it (this is the "considerable damage" I presume the article talks about. In order to get a tight fit, you must press down the clips very gently. One of the tack welds came off of mine, and I had to remove one of the metal tabs because it was useless, so be careful. Anyway, keep this in mind and you won't have to buy a new back cover. Thanks for the article, it really helped!

Mag748 - 回复

definitely get the back cover

gdohmeier - 回复

This is NO EASY TASK. Much HARDER than the steps shown here. There is no way in !@#$ the plastic tool will separate the case...but I am sure someone will say there is.

Not I though.

I will be purchasing the back case now since it is obvious to me after receiving the replacement battery in the mail that I am going to butcher this thing up and the clips.

Peace.

scederas - 回复

I totally agree, the plastic tool broke the tangs right away. I had to use a small flat blade jewelers screwdriver to pry around. And yes, I bought a new cover

Bud -

I successfully opened the ipod with a walmart brand set that contained a large and small plastic tool. You gotta work it.

Logan Carbin -

添加评论

浏览统计数据:

过去 24 小时: 58

过去 7 天: 323

过去 30 天: 1,566

总计 265,784