简介
Dieses Kabel verbindet die Festplatte mit dem Logic Board.
你所需要的
-
-
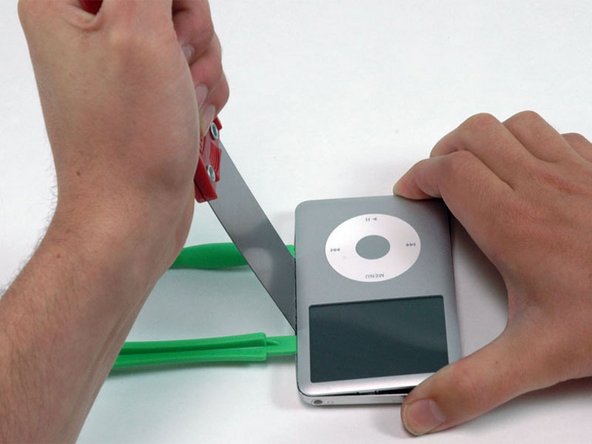
Stecke ein Plastiköffnungswerkzeug in die Naht zwischen Vorder- und Rückseite des iPods.
right here, you should insert a picture of the little clips on the rails inside the back of the ipod, so that we can visualise what we're trying to undo, & get a better idea of which way to bend, which way NOT to bend the tools.
Good point! There is such a picture showing the location of at least four (4) clips on each side of the case here:
https://d3nevzfk7ii3be.cloudfront.net/ig...
in the Step 4 of the “iPod Classic Teardown”: iPod Classic 拆解
As mentioned below by Kevin M there are 3 more (1 on top and 2 on the bottom sides).
LDS -
Actually it’s a wayyyyyyy easier using the iFlash opening tool and following the pdf of this guy (youtube link)
Actually it’s wayyyyyy easier using this tool as mentioned by this awesome guy on his video.
That video is excellent. He has a PDF you print which is the same size as the iPod so you know exactly where the 11 clips are (1 on top, 2 on bottom, and 4 more along each side).
Appreciated the earlier comment about using guitar picks. It is very easy to open the iPod with guitar picks. It still requires patience sometimes, but no noticeable damage to the iPod. Went to the local music store, they stocked Fender picks. Fender "Thin" work best for me for starters, but sometimes Fender "Medium" are needed. (Go to your local music store-- very cheap!) I have opened (and repaired successfully!) four different iPods just using guitar picks.
-
-
-
In einem Winkel vorsichtig ein Spachtel etwa 3,1 mm in die Naht zwischen den beiden Öffnungswerkzeugen einsetzen.
-
Sobald der Spachtel die Lippe der Rückwand hinüber ist, schwenkst du den Spachtel senkrecht und drückst ihn vorsichtig (aber fest) in die Lücke zwischen den Öffnungswerkzeugen, indem du ihn etwas hin und her bewegst.
I tried this on the first iPod I was trying to fix. This method really messes up the sides of the iPod. Go back and read earlier comments about using guitar picks or other tools!
I tried this on the first iPod I was trying to fix. This method really messes up the sides of the iPod. Go back and read earlier comments about using guitar picks or other tools!
-
-
-
Drücke mit den Fingern auf die Rückwand hinter dem Spachtel, um die Biegung zu minimieren. Biege den Spachtel wie in der Abbildung gezeigt langsam, um sicherzustellen, dass die meisten metallenen Laschen auf dieser Seite des iPods gelöst sind.
I tried this on the first iPod I was trying to fix. This method really messes up the sides of the iPod. Go back and read earlier comments about using guitar picks or other tools!
-
-
-
-
Setze unter einem Winkel sorgfältig einen Spachtel ungefähr 3,1 mm tief in den Spalt zwischen den beiden Plastiköffnern.
-
Der Spachtel hat auch hier wieder die Verzahnung mit dem Rückteil gelöst. Hebe ihn bis er senkrecht steht und zwinge ihn dann sorgfältig (aber kräftig) in den Spalt zwischen den beiden Plastiköffnern.
-
Drücke mit den Fingern auf die Rückseite des iPod hinter dem Spachtel, um sie möglichst wenig zu verbiegen. Bewege den Spachtel leicht und versicherte dich, dass die meisten der Metallklammern an dieser Seite geöffnet sind.
-
-
-
Fasse die Front Panel Einheit mit einer Hand und das Rückteil mit der anderen.
-
Löse vorsichtig (VORSICHTIG) die restlichen Klammern am Rückteil, indem du die Oberkante beider Gehäusehälften voneinander weg ziehst. Verstehe dabei die Unterkante als Achse eines Scharniers. Achte sehr darauf dass Flachbandkabel die beiden Hälften verbinden.
-
-
-
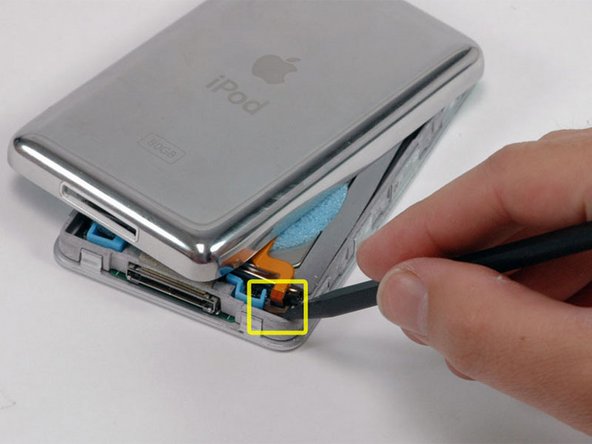
Schiebe den Verbinder, der das orangene Akkukabel befestigt, mit einem Spudger weg. Du musst nur etwa 2 mm hochheben, um das Kabel zu befreien.
-
Schiebe das orangene Akkukabel aus seinem Verbinder.
If the small battery black/white connector pumps out of the ipod when you are trying to unplug the cable...REMEMBER the "U" black shape is meant to be just in the same direction as the blue plastic "U" beside it. If you plug it back in the wrong way it will display "Charging please wait..." forever!.
:)
How did you get the black battery piece to stay in after it popped out?
I knocked this little bit out too! Any tips to get it back in? Soldering?
This step is what ultimately destroyed my iPod. A caution to be very careful would be good.
I got the whole black white thing disconnected from the pins. After a lot of struggle I was able to get it back in, but I couldn’t get the black locking part to go up on its own. after many tries and some tries to get it in when the black thing is closed, i tore out the pins that were connected to the panel. can’t get it back on so it isn’t connected to the battery…
Now i have a perfect iPod with a new harddrive but I can’t use it.
Please add a red caution sentence because I’m pretty sure that if i had known what I had to do I would’ve been more careful and I would now have a functioning iPod.
Nonetheless, great guide! without this I wouldn’t even have tried and the harddisk came from another broken down iPod classic so it’s not that I lost money.
I got the whole battery clamp connector (black and white) all out too… So angry about it! I thought that the white part should be disconnected too, like former iPod models. Be careful, you only have to release the BLACK locking bar! One more photo with a zoom on the battery connector could have been useful… Great guide anyway :-)!
battery connector fix
Hello! Trying to identify the problem on my Ipod. I think I'm not qualified to open it and do the fixing. Do you know a shop or someone in Paris that would try it? Apple says they are not qualified anymore.
Thanks in advance!
OK, you have to be really careful with this step! If you pry too hard, the little plastic clamp that holds the cable will come up too far and break, and then you are ****ed. It only needs to be raised millimeter or two, but at first, it doesn't move at aIl, so it is easy to pry upwards too hard. I have found that using angled tweezers while VERY GENTLY prying upwards on both sides works best. But still, BE VERY CAREFUL AND GENTLE! It's also easy not to even know that it is up all the way! So every now and then try gently lifting the ribbon cable to see if it is already released.
-
-
-
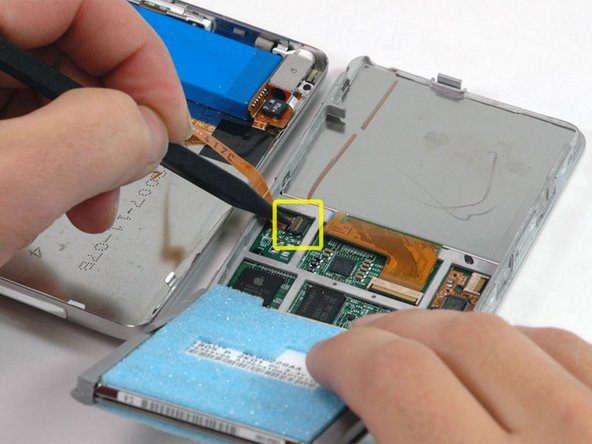
Hebe die Festplatte mit einer Hand hoch, so dass du an das Flachbandkabel zur Kopfhörerbuchse herankommst.
-
Klappe den Plastikhalter der das Kopfhörerkabel festhält mit einem Spudger auf. Er wird etwa 90° kippen und dabei das Kabel freigeben.
-
Ziehe das orangene Kopfhörerkabel aus seinem Sockel.
-
Nun ist das Rückteil vom iPod frei.
-
-
-
Du musst jetzt eventuelle Schäden reparieren, die durch das Entfernen der internen Komponenten des iPod Classic entstanden sind! Sicher ist mindestens eine der Metallklammern am Rückteil nach oben verbogen. Sie müssen alle wieder nach unten zeigen, bevor du das Rückteil wieder einbauen kannst.
-
-
-
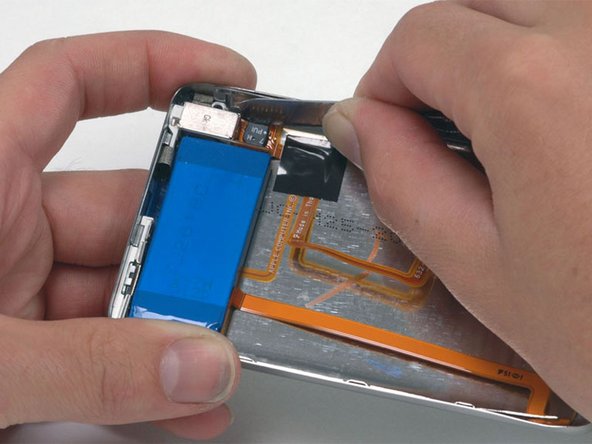
Drehe die Festplatte aus dem Rahmen und lege sie so, dass der Verbinder nach oben zeigt.
-
Kippe den Plastikhalter, der das Flachbandkabel zur Festplatte befestigt, mit einem Spudger hoch. Er wird sich um 90° drehen und dann das Kabel freigeben.
To be clear, the plastic tab to be flipped up is the SMALL BLACK piece shown vertically in the photo above. The spudger is pointing directly to it. The tab flips TOWARDS the ribbon. While the picture is correct, this wasn’t obvious to me.
Thanks for the feedback! I will adjust the wording to clarify this.
-
-
-
Kippe den Plastikhalter, der das Flachbandkabel zur Festplatte befestigt, mit einem Spudger hoch. Er wird sich 90° drehen und dann das Kabel freigeben.
-


Um dein Gerät wieder zusammenzusetzen, folge den Schritten in umgekehrter Reihenfolge.
Um dein Gerät wieder zusammenzusetzen, folge den Schritten in umgekehrter Reihenfolge.
36等其他人完成本指南。


一条评论
I'm switching the hdd on my thin case ipod but bought a hdd with a connector for a thick case -_- Can I just buy a thin hdd cable and switch it or are there compatibility issues?
Luis Vidal - 回复
If you're meticulous, the job can perfectly be done, without any of the recommended tools. I hadn't the time to order them, so I opened my iPod with the large blade of my Victorinox swiss army knife. By just following the instruction I succeeded in releasing all of the metal tabs all around the iPod, and didn't damage any of them. You can clearly hear them "declipsing". I think the blade of the Victorinox is thiner than the putty knife, the only thing you have to take care of, is not to cut the black or silver painting of the front of the case, but if you are used to cut with a knife, you should succeed. Just be aware that it is however a difficult job !
jcfsystems - 回复
Thank you for these instructions - my dead iPod classic (that died whilst attached to an ipod dock during a heavy thunderstorm which took out the dock too) is now working again. Opening the case took me 40 minutes and 7 plastic case openers not to mention very sore hands but the rest of the process worked fine. thanks again
Stuart Hutchesson - 回复
Opened it up with MANY super thin nylon guitar picks in less than a minute starting from the two tabs on the bottom - I used the putty knife in my shop for wood filler and patching walls :)
cmguitar - 回复
Appreciated the earlier comment about using guitar picks. It is waaaaaay easier to open the iPod with guitar picks. It still requires patience sometimes, but no noticeable damage to the iPod. Went to the local music store, they stocked Fender picks. Fender "Thin" work best for me for starters, but sometimes Fender "Medium" are needed. (Go to your local music store-- very cheap!) I have opened (and repaired successfully!) four different iPods just using guitar picks.
Novice iPod Repair Guy - 回复