跳转到主内容

当前版本的文档还未经巡查,您可以查看最新的已查核版本

你所需要的

  1. , 外壳: 步骤 1 中的图像 1,1
    • 打开iPod之前,请确保保持开关处于锁定位置。 如果您的iPod面向您,解锁滑块应该一直向右。

  2. : 步骤 2 中的图像 1,1
    • 打开iPod可能是一个挑战。在打开iPod之前需要尝试几次,请不要气馁。

    • 使用iPod开口工具打开iPod底部的第一个固定夹。 工具的边缘应该指向金属背壳,以防止刮伤塑料前端。

  3. : 步骤 3 中的图像 1,1
    • 使用此iPod的照片作为参考,以便找到固定夹所在的区域 - 每侧4个,顶部1个,底部2个。 它应该为您节省很多挫折,并帮助避免刮伤塑料盖。

  4. : 步骤 4 中的图像 1,3 : 步骤 4 中的图像 2,3 : 步骤 4 中的图像 3,3
    • iPod的两侧有四个固定夹。 使用iPod开口工具将iPod的塑料前端与iPod背面分开。

    • 将iPod开口工具插入iPod的左侧,使工具的边缘朝向金属背面。

    • 一个小小的拨片可以非常有助于打开iPod。 只需将其插入并在外壳周围滑动开关即可打开卡子以简化流程。

    • 通过摆动iPod开口工具并将其移动到左侧,轻轻地放大现有的缝隙。

    • 继续这样做,直到iPod的整个面板都松动。

    • 然后,您可以在按钮的右侧插入一个iPod开口工具。 插入工具时要非常小心,因为显示屏非常脆弱。

  5. : 步骤 5 中的图像 1,2 : 步骤 5 中的图像 2,2
    • 轻轻地滑动显示器顶部的iPod开启工具,确保它打开固定夹。

    • iPod的另一边现在应该很容易松动。 如果不是这样,请使用iPod右侧的iPod开口工具,方法与iPod左侧步骤相同。

    • 将iPod的正面从背面分开大约一英寸(或几厘米)。

    • iPod的外壳现在是分开的,但还没有完全分开两个半。 两条带状电缆仍将后面板连接到iPod的其余部分。

  6. : 步骤 6 中的图像 1,2 : 步骤 6 中的图像 2,2
    • 使用斜角镊子或iPod开口工具向上滑动棕色连接器闩锁,将橙色电池带电缆固定到位。 确保你从锁的两侧拉。 只需将棕色连接器闩锁抬起约1-2mm即可挑起电缆。 请勿抬起或取下闩锁,否则可能会拉出白色连接器

    • 不要抬起太远,否则可能会将电池连接器从主板中拔出。

    • 确保直接向上滑动棕色连接器。 连接器很脆弱,如果意外地移到侧面,会断开连接。 连接器的底部有挂钩,用于固定电缆。 一旦你折断了其中一只,你将会遇到麻烦,请重新安装电池电缆。 如果断开,将电缆插入插槽,然后将棕色支撑架推到位以防止电缆滑出。

    • 从连接器上拔下电缆。

  7. : 步骤 7 中的图像 1,1
    • 现在你应该还有一根橙色的排线将前壳连接到后面。

    • 此时,您可以卸下并更换蓝色橡胶垫,或者继续将外壳分开。

    • 完成电池更换不需要分开外壳,但这样做更便于更换电池。这确实需要移除额外的线缆,以免在拆卸过程中造成损坏

  8. : 步骤 8 中的图像 1,1
    • 提起硬盘以露出耳机孔的带状连接器(用黄色框表示)。

    • 如果硬盘松动,请务必按照图中所示将其放回槽口。

  9. : 步骤 9 中的图像 1,2 : 步骤 9 中的图像 2,2
    • 使用iPod开口工具,轻轻提起耳机带状电缆连接器的棕色卡扣。 将该卡扣旋转90度,松开排线。

    • 用手指拉出耳机插孔带状电缆。

  10. : 步骤 10 中的图像 1,1
    • iPod的正面和背面现在应该完全分开。

  11. , 电池: 步骤 11 中的图像 1,3 , 电池: 步骤 11 中的图像 2,3 , 电池: 步骤 11 中的图像 3,3
    • 执行此步骤时,请小心不要损坏任何耳机或连接电池带状的电缆。

    • 将iPod开口工具插入金属外壳和电池之间的图片所示的位置。

    • 轻轻摇动工具,同时将其推入电池和后盖之间。 粘着电池的粘合剂应该给,允许电池从后面板被去除。

  12. 这个步骤还没有翻译 帮忙翻译一下

    : 步骤 12 中的图像 1,1
    • Be very careful when performing this step, since the orange ribbon cables can easily be broken.

    • Peel off the tape holding the ribbon cables in place.

  13. 这个步骤还没有翻译 帮忙翻译一下

    : 步骤 13 中的图像 1,1
    • Remove the two black Phillips screws that are securing the headphone jack to the lower casing.

  14. 这个步骤还没有翻译 帮忙翻译一下

    : 步骤 14 中的图像 1,1
    • Remove the following two screws:

    • One black Phillips screw securing the hold switch near the corner of the iPod.

    • One silver Phillips screw securing the other side of the hold switch.

    • Side Note: When reassembling the iPod, a touch of white Elmer's glue on the end of your screwdriver helps hold these little screws on your screwdriver to make it easier to screw them in.

  15. 这个步骤还没有翻译 帮忙翻译一下

    : 步骤 15 中的图像 1,1
    • Lift the Hold switch free of its housing on the rear panel.

    • Slide the headphone jack out of its housing on the rear panel.

    • Lift the headphone jack and hold switch assembly out of the iPod.

    • If you are removing the Hold switch and headphone jack to replace the back panel, you may stop here.

  16. 这个步骤还没有翻译 帮忙翻译一下

    : 步骤 16 中的图像 1,2 : 步骤 16 中的图像 2,2
    • If your replacement headphone jack includes the white plastic hold switch, simply reinstall the headphone jack. If your replacement part does not include the plastic hold switch, follow the next steps to transfer the plastic hold switch to your new headphone jack.

    • If you're just trying to remove the rear panel, you can skip Steps 15 and 16.

    • Remove the single Phillips screw nearest to the hold switch. Note: You may find adhesive holding the back of the screw in place.

    • Lift the plastic portion of the Hold switch away from the orange ribbon cable.

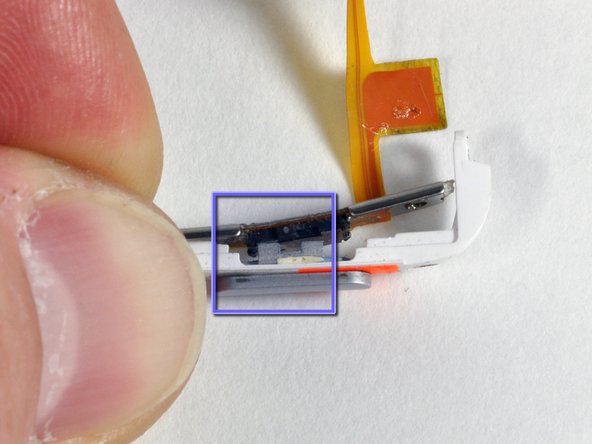
    • Ensure that the black notch lines up with the gray slider during reassembly of the switch (see picture 2).

  17. 这个步骤还没有翻译 帮忙翻译一下

    : 步骤 17 中的图像 1,1
    • Use the small iPod opening tool to carefully peel the orange ribbon cable and attached black Hold switch up from the metal backing.

    • When re-attaching the replacement Hold switch, make sure the two small posts on the back of the switch are aligned with the two holes in the metal backing.

终点

319等其他人完成本指南。

12条评论

thanks for guiding me through the process & making the tutorial available .

anton tolliver - 回复

Very effective guide just be carefull and it should be smooth sailing thank you.

Dobsonfwtstar - 回复

Fantastic instructions. Was able to fix the head phne jack with tools and parts purchased here at iFixit. I have been using this site for years and will continue forever!! I recommend buying the toolkit was invaluable on this job could have not been successful without it. Thanks iFixit you are amazing as well as your contributors.

bethmigalla - 回复

Putting the iPod back together is much harder than taking it apart! Could definitely have used a magnifying glass, but dad's reading glasses helped.

Reattaching the screws and the ribbons was particularly difficult. I ended up replacing one screw with a piece of insulation tape, because it refused to tighten again. But after finally getting everything back where it should be, it was magical to turn it on and watch it light up. It's also fantastic having sound come out both ears, and a working Hold button :) Thanks!

shughes - 回复

great fix, just two comments: the screwdriver is not easy to use at first and the ipod opener tool (blue plastic) is quite fragile. Otherwise, my ipod is just like new now!!!

nicolaswroth - 回复

添加评论

浏览统计数据:

过去 24 小时: 7

过去 7 天: 72

过去 30 天: 335

总计 237,860