跳转到主内容

iPod 3rd Generation Hard Drive Replacement

你所需要的

  1. iPod 3rd Generation Hard Drive Replacement, Case: 步骤 1 中的图像 1,1
    • Before opening your iPod, ensure that the hold switch is in the locked position. The orange bar should be visible, indicating hold is active.

  2. iPod 3rd Generation Hard Drive Replacement: 步骤 2 中的图像 1,3 iPod 3rd Generation Hard Drive Replacement: 步骤 2 中的图像 2,3 iPod 3rd Generation Hard Drive Replacement: 步骤 2 中的图像 3,3
    • Insert an opening pick as far as possible into the seam between the plastic front and the metal rear panel, on the right edge of the iPod.

    • You may need to rock the pick back and forth to slide it in farther.

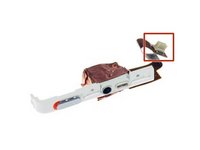
    • Use the opening pick to pry up against the plastic front panel and release five retaining tabs (seen in the third photo).

    • Slide the pick along the edge of the iPod and continue prying to release the rest of the retaining tabs.

    • After all five tabs along the right side are free, the case should open easily.

  3. iPod 3rd Generation Hard Drive Replacement: 步骤 3 中的图像 1,1
    • The iPod case is now open, but don't separate the two halves just yet. There is still an orange ribbon cable connecting the headphone jack to the logic board.

    • Open the case like a book with the dock connector at the top, and lay the rear panel next to the front half of the iPod.

  4. iPod 3rd Generation Hard Drive Replacement: 步骤 4 中的图像 1,2 iPod 3rd Generation Hard Drive Replacement: 步骤 4 中的图像 2,2
    • Use a plastic tool or your fingernails to carefully disconnect the orange headphone jack cable. Be sure to pull straight up on the connector, not the cable itself.

    • The headphone jack connector is unusually tall. When prying, be careful to not separate the lower, plastic part of the connector from the ribbon cable. Pry between the connector and the socket, not between the two halves of the connector.

  5. iPod 3rd Generation Hard Drive Replacement, Hard Drive: 步骤 5 中的图像 1,1
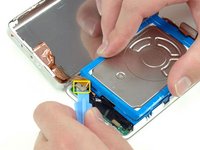
    • Lift up the hard drive with one hand and carefully disconnect the hard drive ribbon from the logic board.

    • Lift the hard drive out of the iPod.

  6. iPod 3rd Generation Hard Drive Replacement: 步骤 6 中的图像 1,1
    • Peel back the metallic tape connecting the hard drive ribbon to the blue mounting bracket.

  7. iPod 3rd Generation Hard Drive Replacement: 步骤 7 中的图像 1,1
    • Use a spudger to carefully disconnect the orange ribbon cable from the hard drive.

    • If the cable doesn't come free easily, it may be helpful to gently wiggle the cable from side to side.

  8. iPod 3rd Generation Hard Drive Replacement: 步骤 8 中的图像 1,1
    • Lift the hard drive mounting bracket and cable off the hard drive.

  9. iPod 3rd Generation Hard Drive Replacement: 步骤 9 中的图像 1,1
    • Lift the blue and white mounting bracket off the other side of the hard drive.

  10. iPod 3rd Generation Hard Drive Replacement: 步骤 10 中的图像 1,1
    • Hard drive remains.

结论

To reassemble your device, follow these instructions in reverse order.

34等其他人完成本指南。

iRobot

于09/24/09注册

1 声望

创作了636篇指南

一条评论

Works with iPod 3rd Generation 10GB also.

Xavier Delapree - 回复

添加评论

浏览统计数据:

过去 24 小时: 3

过去 7 天: 49

过去 30 天: 255

总计 44,817