跳转到主内容

此翻译可能不反映源指南的最新更新。 帮助更新翻译查看源指南

iPhone XS 后置摄像头更换

你所需要的

  1. iPhone XS 后置摄像头更换, 五角螺丝: 步骤 1 中的图像 1,1
    • 在开始之前,请将 iPhone 电池电量放至 25% 以下。有电的锂离子电池如果被意外刺穿,可能会起火和/或爆炸。

    • 在开始拆卸之前,请关闭 iPhone 的电源。

    • 卸下 iPhone 底部边缘的两颗6.9 mm 长的五角螺丝。

    • 打开 iPhone 的显示屏会损坏其防水密封条。在进行此步骤之前,请准备好更换的密封条,如果在未更换密封条的情况下重新组装 iPhone,则应注意避免接触液体。

    Der Original Akku ist codiert. Egal, ob man einen zweiten Apple Original Akku oder einen neuen Fremdakku einbaut erscheint bereits in den Einstellungen eine "Wichtige Batterienachricht" mit einem roten Punkt. "Unbekanntes Bauteil" und die "Informationen zum Batteriezustand" sind nicht verfügbar. Diese Nachricht verbleibt immer und nervt auf Dauer immens.

    Der Akku muss angelernt werden und dieses können von jetzt an nur authorisierte Apple Servicebetriebe und diesen ist es durch Apple verboten die notwendige Info weiterzugeben.

    Dies ist nicht zu verwechseln mit der bereits bekannten Rekalibrierung seit iOS 14.5.

    Seit dieser neuen Codierung kostet der Akkutausch bei Apple auch nicht mehr 75 € sondern aktuell 99 € (Stand Novmber 2023 in Deutschland).

    Damit sind künftig alle nicht authorisierten Servicebetriebe raus - denn wer will schon dauernd diese Mitteilung auf dem Bildschirm haben?

    Überlegt vorher, ob unter diesen Bedingungen ein eigener Akkutausch noch sinnvoll ist .....

    Manfred Wachtel - 回复

    Lieben Dank @manfredwachtel ! Mehr Infos dazu haben wir auch in unserem Blog zusammengefasst: https://de.ifixit.com/News/78890/teileko...

    Sandra Hiller -

  2. iPhone XS 后置摄像头更换, 胶带覆盖裂缝: 步骤 2 中的图像 1,3 iPhone XS 后置摄像头更换, 胶带覆盖裂缝: 步骤 2 中的图像 2,3 iPhone XS 后置摄像头更换, 胶带覆盖裂缝: 步骤 2 中的图像 3,3
    • 如果您的 iPhone 屏幕破裂,请在维修过程中用胶带粘住玻璃,以遏制进一步的破损并防止人身伤害。

    • 在 iPhone 屏幕上重叠铺上透明包装胶带,直至覆盖整个面板。

    • 戴上安全眼镜,保护眼睛免受维修过程中玻璃碎片的伤害。

    • 如果在接下来的几步中无法让吸盘粘住,请将一块强力胶带(例如管道胶带)折叠成手柄状,然后用它抬起屏幕。

    • 如果还是不行,可以将吸盘粘到屏幕上。

  3. iPhone XS 后置摄像头更换, 反向钳使用指南: 步骤 3 中的图像 1,3 iPhone XS 后置摄像头更换, 反向钳使用指南: 步骤 3 中的图像 2,3 iPhone XS 后置摄像头更换, 反向钳使用指南: 步骤 3 中的图像 3,3
    • 接下来的三个步骤演示了反向钳,这是我们设计的一种工具,用于使开启过程更加容易。如果你没有使用反向钳,可以跳过三个步骤,采用其他方法。

    • 关于如何使用反向钳的完整说明,请查看本指南

    • 将蓝色手柄向后拉,以解锁反向钳的夹臂。

    • 将反向钳从 iPhone 的左侧或右侧边缘滑进。

    • 将吸盘放置在 iPhone 底部边缘附近,一个在正面,一个在背面。

    • 将吸盘挤压在一起,以在所需区域产生吸力。

    • 如果你发现你的 iPhone 表面过于光滑,反向夹具无法固定,你可以使用胶带来增加摩擦力。

    The anti clamp is a much needed tool

    It makes opening the phone a breeze.

    Lon

    [deleted] - 回复

  4. iPhone XS 后置摄像头更换: 步骤 4 中的图像 1,3 iPhone XS 后置摄像头更换: 步骤 4 中的图像 2,3 iPhone XS 后置摄像头更换: 步骤 4 中的图像 3,3
    • 将蓝色手柄向前拉动,锁定吸盘臂。

    • 顺时针旋转手柄360度或直到吸盘开始伸展。

    • 确保吸盘保持对齐。如果它们开始脱离对齐,稍微松开吸盘并重新调整吸盘臂。

  5. iPhone XS 后置摄像头更换: 步骤 5 中的图像 1,3 iPhone XS 后置摄像头更换: 步骤 5 中的图像 2,3 iPhone XS 后置摄像头更换: 步骤 5 中的图像 3,3
    • 加热 iOpener并将其穿过反向钳的臂部。

    • 你也可以使用吹风机热风枪或热板,但极高的温度可能会损坏显示屏和/或内部电池,所以请小心操作。

    • 将iOpener折叠,使其位于iPhone的底部边缘

    • 等待一分钟,让粘合剂有机会打开,形成一个打开的缝隙。

    • 在屏幕和塑料边框之间的缝隙中插入翘片,而不是直接插入屏幕本身。

    • 如果反向钳没有形成足够大的缝隙,就在该区域加热更多,并将手柄旋转四分之一圈。

    • 不要一次旋转超过四分之一圈,在旋转之间等待一分钟。让反向钳和时间来帮你完成工作。

    • 跳过接下来的三个步骤。

  6. iPhone XS 后置摄像头更换: 步骤 6 中的图像 1,1
    • 将iPhone底部加热—这能使粘合剂变软,从而让开盖变得更容易

    • 用一个吹风机或热风枪或准备一个iOpener,将iPhone底部加热一分钟左右,从而软化屏幕下面的粘合剂

  7. iPhone XS 后置摄像头更换: 步骤 7 中的图像 1,2 iPhone XS 后置摄像头更换: 步骤 7 中的图像 2,2
    • 如果你正在使用单个吸盘手柄,请将它贴在手机的底部边缘,同时避免触碰玻璃的曲面部分。

  8. iPhone XS 后置摄像头更换: 步骤 8 中的图像 1,3 iPhone XS 后置摄像头更换: 步骤 8 中的图像 2,3 iPhone XS 后置摄像头更换: 步骤 8 中的图像 3,3
    • 用坚定而持续的压力拉起吸盘,使前面板和后壳之间产生一个轻微的间隙。

    • 屏幕和塑料边框之间的间隙插入翘片,而不是直接插入屏幕。

    • 屏幕上的防水胶粘剂非常强力,需要施加相当大的力量来创造这个初始缝隙。如果你发现很难打开缝隙,可以加大加热温度,然后轻轻地上下晃动屏幕,削弱胶粘剂,直到你成功地开出足够大的缝隙来插入工具。

    It seems like I need a third hand to do this. To hold the phone; hold the suction cup; and push the pick in the space.

    haroldappel - 回复

  9. iPhone XS 后置摄像头更换: 步骤 9 中的图像 1,3 iPhone XS 后置摄像头更换: 步骤 9 中的图像 2,3 iPhone XS 后置摄像头更换: 步骤 9 中的图像 3,3
    • 将翘片从iPhone左下角沿着左侧向上滑动从而松开粘合剂。

    • 请不要将翘片插入超过 3mm,否则你会损坏 iPhone 内部元件。

  10. iPhone XS 后置摄像头更换, 注意事项: 步骤 10 中的图像 1,1
    • 你的iPhone右边缘有易损的排线。不要在这里插入撬片,你很可能会损坏这些排线。

  11. iPhone XS 后置摄像头更换: 步骤 11 中的图像 1,3 iPhone XS 后置摄像头更换: 步骤 11 中的图像 2,3 iPhone XS 后置摄像头更换: 步骤 11 中的图像 3,3
    • 在iPhone下边缘再次插入翘片,并沿右侧向上滑动,继续分离胶粘剂。

    • 请不要将翘片插入超过 3 毫米,否则可能会损坏显示排线。

  12. iPhone XS 后置摄像头更换: 步骤 12 中的图像 1,3 iPhone XS 后置摄像头更换: 步骤 12 中的图像 2,3 iPhone XS 后置摄像头更换: 步骤 12 中的图像 3,3
    • 显示屏的顶部边缘同时使用胶水和卡扣固定。

    • 将开口拨片滑动到显示屏的顶角,同时 沿着Lightning端口的方向 轻轻拉动或摆动显示屏。

    • 如果用力过大,卡扣可能会断裂。请小心操作,耐心进行。

    • 不要将翘片插入超过3毫米,否则可能会损坏前面板传感器阵列。

    • 将翘片滑到对角,并切断固定显示屏的任何剩余胶水。

  13. iPhone XS 后置摄像头更换: 步骤 13 中的图像 1,1
    • 拉动吸盘上凸起的小块,将其从前面板上取下。

  14. iPhone XS 后置摄像头更换: 步骤 14 中的图像 1,3 iPhone XS 后置摄像头更换: 步骤 14 中的图像 2,3 iPhone XS 后置摄像头更换: 步骤 14 中的图像 3,3
    • 从左侧向上摆动显示器打开iPhone,就像打开一本书一样。

    • 请不要现在就试图完全分离显示器,因为几条脆弱的带状电缆仍然将它连接到iPhone的逻辑板。

    • 当你在处理手机中其他部件的时候,请为屏幕找一个支撑物。

    • 在重新组装的过程中,将显示器放置到位,沿顶部边缘对齐夹子,并小心地将顶部边缘按到位,然后将显示器的其余部分向下压。 如果它没有很容易地卡到位,请检查显示器周边的夹子状况,并确保它们没有弯曲。

    Open from the LEFT. Photo confused me and I came very close to damaging my phone by opening from the wrong side.

    charlotte - 回复

  15. iPhone XS 后置摄像头更换, 显示屏总成: 步骤 15 中的图像 1,2 iPhone XS 后置摄像头更换, 显示屏总成: 步骤 15 中的图像 2,2
    在这个步骤中使用的工具:
    Magnetic Project Mat
    $19.95
    购买
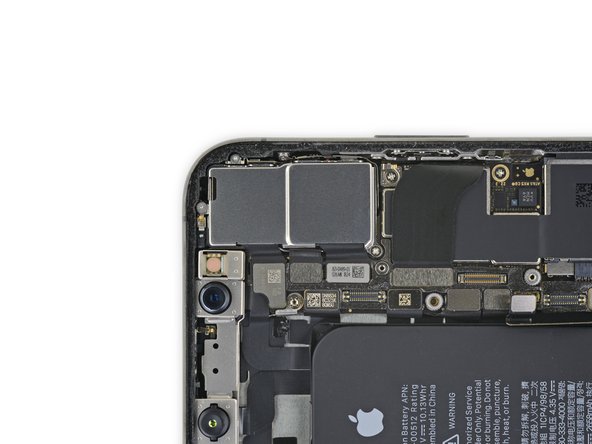
    • 卸下固定主板连接器支架的五颗螺钉,如下所示:

    • 三个1.0毫米Y000螺钉

    • 一个1.3毫米Y000螺丝

    • 一个3.7毫米十字螺丝

    • 在整个维修过程中,记录每个螺丝的准确位置,并确保它准确地回到原来的位置,以免损坏您的iPhone。

    The ribbon makes the 1.3 mm screw a little tricky. Use one hand to hold the display at a 90 degree or smaller angle to create the slack necessary to get the screw driver in place.

    charlotte - 回复

    I tracked my screws by using my kids fridge magnets to hold each screw size and placing a piece of masking tape below with the screw size.

    charlotte - 回复

    I stripped a screw ugh

    Tresia - 回复

    Where can i buy a One 1.3 mm Y000 screw

    Ismail - 回复

    FYI: I used a tiny piece of scotch tape to hold those 1mm screws in place while aligning the magnetic screwdriver. Otherwise they are so tiny the magnetic bit pulls them right out the hole.

    Jeff Miller - 回复

  16. iPhone XS 后置摄像头更换: 步骤 16 中的图像 1,1
    • 移除支架。

    • 支架可能粘附在其他组件上面。轻柔并稳妥地提起以将其分开。

    • 在重新组装过程中,在将显示器重新装回去之前,将iPhone开机进行测试是一个不错的选择。在接下来继续你的修理工作之前,请务必将iPhone的电源关闭。

    During reassembly, pause here to check function. Gently reattach the top of the display to the base to test face ID.

    charlotte - 回复

  17. iPhone XS 后置摄像头更换: 步骤 17 中的图像 1,2 iPhone XS 后置摄像头更换: 步骤 17 中的图像 2,2
    • 用撬棒或干净的手指甲从主板上的插座上分离电池连接器。

    • 尽力不要损坏围绕它的黑色聚硅氧烷封条以及其他的板上连接处。这些封条提供额外的防水防尘保护。

    • 让连接器轻轻弯离主板以防它意外地碰到插座并破坏维修时的断电状态。

  18. iPhone XS 后置摄像头更换: 步骤 18 中的图像 1,2 iPhone XS 后置摄像头更换: 步骤 18 中的图像 2,2
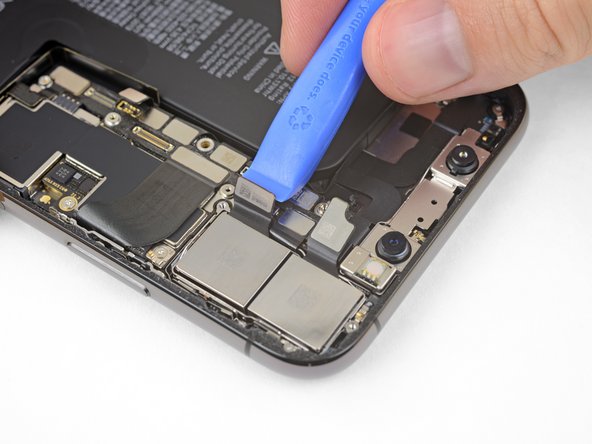
    • 用撬棒或指甲分离前面板的传感器总成连接器。

    In my phone the connector made poor contact with the socket resulting in no sound audible through the phone receiver/headset. There was an overhang of insulation close to the socket which I believe may have prevented a good connection. So if you have these kinds of audio problems you might see if this is the problem.

    goblazers - 回复

  19. iPhone XS 后置摄像头更换: 步骤 19 中的图像 1,2 iPhone XS 后置摄像头更换: 步骤 19 中的图像 2,2
    • 使用撬棒或者指甲来断开OLED面板排线接头。

    • 要重新连接此类按压式连接器,请小心地对齐并向下按压一侧,直至其卡入到位,然后在另一侧重复。 不要从中间按下。 如果连接器未对准,则引脚可能会弯曲,从而造成永久性损坏。

    Shine a bright light here to help you align the connector. Eventually, the right side snapped in first.

    charlotte - 回复

    On reassembly, use the pad of your fingertip to reconnect.

    charlotte - 回复

  20. iPhone XS 后置摄像头更换: 步骤 20 中的图像 1,2 iPhone XS 后置摄像头更换: 步骤 20 中的图像 2,2
    • 使用撬棒或者指甲来将数字转换器排线链接头从插座上翘起。

    • 此连接器的位置使重新安装连接变得棘手。 请花点时间仔细对齐,然后用指尖先轻轻按压一侧到位,然后另一侧。 您应该能够感觉到链接到位。

    • 如果在维修后屏幕的任何部分触屏失灵,请断开电池,然后重新安装此连接器,确保其完全卡入到位并且插座中没有灰尘或其他异物。

    Reassembly: reconnecting the press connectors upon reassembly was so hard, even for the ones not seated in a recessed location !! It took me two days to get them reconnected. What helped me was to shine bright lights on all sides of the iPhone and then hold the iPhone vertically like a book and press it in that way. They are now all in, but the touchscreen functionality has disappeared :( so I will need to reconnect that one.
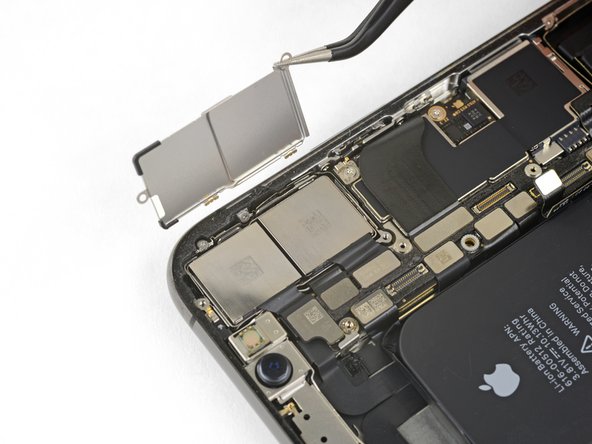
    natialollie - 回复

  21. iPhone XS 后置摄像头更换: 步骤 21 中的图像 1,3 iPhone XS 后置摄像头更换: 步骤 21 中的图像 2,3 iPhone XS 后置摄像头更换: 步骤 21 中的图像 3,3
    • 前面板传感器组件的柔性排线轻轻地粘附在这里。

    • 小心的抬起排线,直到粘合剂断开。

    Will replacing camera and sensors fix damaged face I'd

    Siddhartha Chowdhury - 回复

    No, FaceID will be disabled because the original sensors are paired with the logic board.

    Arthur Shi -

  22. iPhone XS 后置摄像头更换: 步骤 22 中的图像 1,1

    I wish the reassembly directions were separate. I forgot to pause here to do the waterproof seal.

    charlotte - 回复

    Geez, I blazed right past that small line to replace the waterproof seal. Needs to be called out much larger.

    Jeff Miller - 回复

  23. iPhone XS 后置摄像头更换, 后置摄像头: 步骤 23 中的图像 1,2 iPhone XS 后置摄像头更换, 后置摄像头: 步骤 23 中的图像 2,2
    • 移除固定后置摄像头盖的两颗螺钉:

    • 一颗 1.4 mm Y000螺丝

    • 一颗 2.0 mm 菲利普斯十字螺丝

  24. iPhone XS 后置摄像头更换: 步骤 24 中的图像 1,3 iPhone XS 后置摄像头更换: 步骤 24 中的图像 2,3 iPhone XS 后置摄像头更换: 步骤 24 中的图像 3,3
    • 从最靠近电池的边缘提起相机盖,然后将其取下。

    • 要重新安装相机盖,请按照图片完全反向操作:首先,降低外边缘,直到盖上的两个突出卡扣,牢固地插入相机模块外边缘的支架中。然后,铰接盖子关闭。

    • 如果两个卡扣未正确就位,则盖板将不会平放。

  25. iPhone XS 后置摄像头更换: 步骤 25 中的图像 1,3 iPhone XS 后置摄像头更换: 步骤 25 中的图像 2,3 iPhone XS 后置摄像头更换: 步骤 25 中的图像 3,3
    • 使用 iFixit 撬棒工具或指甲将两个相机电缆连接器从插座中直接撬开,从而断开它们。

  26. iPhone XS 后置摄像头更换: 步骤 26 中的图像 1,2 iPhone XS 后置摄像头更换: 步骤 26 中的图像 2,2
    • 将镊子的尖端或尖头撬棒工具插入相机的右下角,插在相机组件和 iPhone 的框架之间。

    • 轻轻撬起将相机拉出iPhone。

    • 相机组件没有胶合,但是它被牢固地压入到位。 撬棒或塑料撬具可能不够强大,无法将其拉出。

  27. iPhone XS 后置摄像头更换: 步骤 27 中的图像 1,1
    • 移除后置摄像头组件。

结论

将新的更换部件与原始部件进行比较 -—— 在​​安装之前,你可能需要转移剩余部件或从新部件上移除背面粘合剂。

要重新组装你的设备,请按相反顺序执行上述步骤。

将你的电子垃圾带到R2或e-Stewards认证的回收商

修理没有按计划进行?查看我们的论坛以获取故障排除帮助。

24等其他人完成本指南。

由衷感谢以下译者:

en zh

88%

Yuting Zhao正在帮助我们修复这个世界! 您也想加入吗?
开始翻译 ›

Jeff Suovanen

于08/06/13注册

427,997 声望

创作了259篇指南

团队

iFixit iFixit 的会员

Staff

135 名成员

创作了16,766篇指南

一条评论

I have some dark spots on my main camera and i notice some dust behind the lens cover, do you think it as to do with it?

Thank you

Emmanuel Neff - 回复

添加评论

浏览统计数据:

过去 24 小时: 20

过去 7 天: 134

过去 30 天: 510

总计 46,849