简介
本指南将帮助您更换iPhone 8 plus的电池。
本指南将指导您拆开屏幕组件;此行为有可能会导致屏幕排线受损。如果您有足够的自信可以在不移除屏幕排线的情况下完成电池更换,您可以略过拆除屏幕的步骤。此外,虽然打开手机时可以取下固定电池的胶条,但本指南建议先拆下Taptic Engine。这样做可以减少意外破坏下部电池胶条的风险,无论是通过将它们挂在Taptic Engine上,还是将条带拉得太细。
为达到电池的最佳效果,请您在完成更换以后校准您的新电池:将您的电池电量消耗至10%以下,然后不中断充电至100%。
开启iPhone 8 将会影响手机的防溅水功能。如果您不更换粘合剂,手机虽然可以正常工作但是将不再可以防水。
你所需要的
-
-
将重叠的透明包装胶带条黏在 iPhone 的后玻璃上,直到覆盖整个手机后部。
-
如果在接下来的几个步骤中无法让吸盘粘在手机上,请将强力胶带(折叠到把手中,然后用它提起后玻璃。
-
-
-
将蓝色手柄拉向铰链以解锁反向钳的手臂。
-
将反向钳手臂滑过 iPhone 的左边缘或右边缘。
-
将吸盘放在靠近 iPhone 底部边缘的位置——一个在正面,一个在背面。
-
向下推吸盘以将吸力施加到所需区域。
-
-
-
加热 iOpener并将其穿过反向钳。
-
折叠 iOpener,使其位于 iPhone 的底部边缘。
-
等待一分钟,让粘合剂有机会释放并出现开口间隙。
-
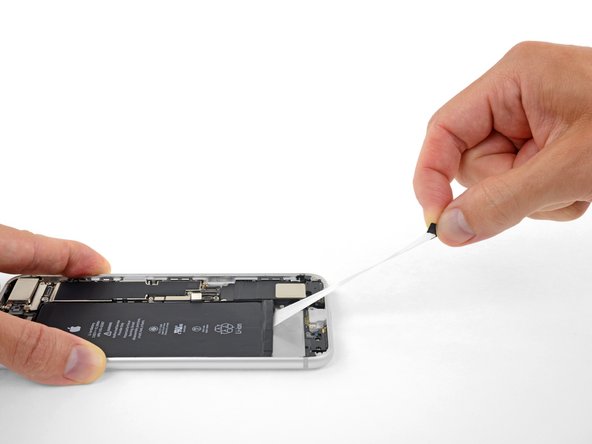
将撬片插入间隙中。
-
跳过接下来的三个步骤。
-
-
-
-
移除四颗将显示排线支架与逻辑板相固定的十字(JIS) 螺丝,它们的长度如下:
-
2颗 1.3mm 螺丝
-
1颗 1.4mm 螺丝
-
1颗 2.7mm 螺丝
-
-
-
拧下固定Taptic Engine的三个螺丝:
-
两个 1.5 mm 十字螺丝
-
一个 2.4 mm 支架螺丝
-


将新的更换部件与原始部件进行比较 - 在安装之前,您可能需要转移剩余部件或从新部件上移除粘合剂背衬。您可以按照指南,并以相反顺序来将您的设备安装回去。
将您的电子垃圾带到R2或e-Stewards认证的回收商。
修理没有按计划进行?查看我们的
Answers社区以获取故障排除帮助。
将新的更换部件与原始部件进行比较 - 在安装之前,您可能需要转移剩余部件或从新部件上移除粘合剂背衬。您可以按照指南,并以相反顺序来将您的设备安装回去。
将您的电子垃圾带到R2或e-Stewards认证的回收商。
修理没有按计划进行?查看我们的
Answers社区以获取故障排除帮助。
188等其他人完成本指南。


39条评论
You can leave the display connected and skip steps 15-20, as long as you’re careful to support the display so as not to damage the display cables while you work.
Don’t do it,you can EASILY RIP LCD RIBBON CABLE
Are there any statistics or even educated guesses about how many people are able to successfully complete this repair? Although it is rated as “moderate” in terms of difficulty, I would rate it as more than just moderate. I tried to replace the battery on a much older iPhone and wound up with a brick. Is an 8 plus easier than an iPhone 3 or 4? Where might one find such statistics?
It takes a little time to learn how to do certain things. As always a video tutorial is better than the picture only version. But if you follow one of their teardowns maybe you can get an idea of how to do some of the more intricate things like the battery adhesive removal. I do this as a hobby and it took a while to perfect, but my first 2 repairs went well and I didn't brick my phone or my iPad so guess I was doing some of the basics right.
Don't be discouraged. Watch some YT vids. Then work up the courage to try again. Good Luck!