-
-
从尖端测量 3 毫米,并用永久性记号笔标记三角撬片。
Got to step 2 and realized the fix kit doesn't include an opening pick! Looks like a guitar pick, and I have those lying around. Is that expected? Looks like the pick is used in many steps below. There's a little blue crowbar that isn't mentioned in the instructions. Perhaps that replaces the opening pick?
Hi! I can't see which guide you were using when writing this comment. Can you reply here with which guide and fix kit you used?
I see you posted this in Meta. I hope it's resolved soon! In the meantime, a guitar pick may work well enough for your repair.
what fix kit?
My fix kit didn't include an opening pick either
My AliExpress refurbished screen came with a pick that has a coin-like circle that pops out, so no modification was necessary
-
-
-
接下来的三个步骤演示了如何使用反向钳,一个旨在简化打开过程的工具。 如果你不使用 反向钳,请跳过这两个步骤以使用替代方法。
-
将蓝色手柄拉向铰链以解锁反向钳。
-
将手机塞进反向钳的两臂之间。
-
将吸盘放在屏幕上主页按钮的正上方——一个在前面,一个在后面。
-
向下推吸盘以将吸力施加到所需区域。
-
-
-
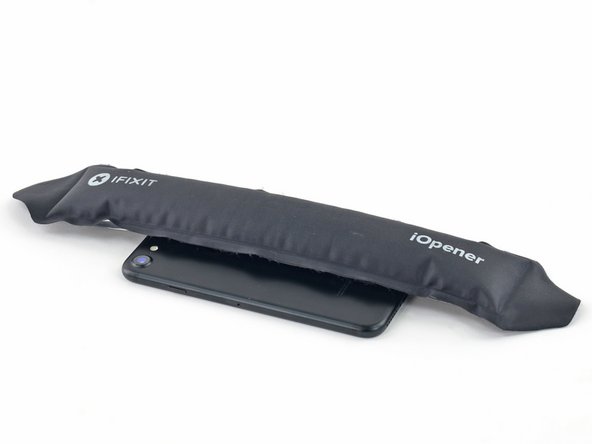
加热 iOpener并将其穿过反向钳。
-
折叠 iOpener,使其位于 iPhone 的底部边缘。
-
等待一分钟,让粘合剂有机会释放并出现开口间隙。
-
将撬片插入间隙中。
-
跳过接下来的三个步骤。
-
-
-
加热iPhone的下缘将有助于软化固定显示屏的粘合剂,使其更容易打开。
-
使用吹风机或准备一个iOpener,并将其放到手机的下缘约90秒,以软化显示屏下面的粘合剂。
Hello,
What temperature is suitable for removing the front display ? I bought i-Fixit ProTech which is not include the heating "roller" . Thanks for help
Jiří Sítko - 回复
Ich habe eine heiße Wärmflasche verwendet. Das hat gut funktioniert :-)
I used a heated tea kettle and a tea towel, it worked!
I put on the furnace vent for 10 minutes to get it warm to the touch but not hot.
terrelldoc - 回复
I attached it to the after burner of my rocket ship and that worked.
Matt Brown - 回复
I used a water-filled ziploc bag, heated it in microwave. fast, cheap, worked.
The most effective way to heat up the glue is to leave the phone in full sun - if it's available. In fact I would always wait for a sunny day to repair any glued together Apple device. The heat will be very even and the phone was probably designed to survive anything the sun can throw at it - although it can get very warm. (I'm in the UK) If you leave the phone turned on it will give a warning if it goes near the temperature limit.
I'm sorry but I tried both the hair dryer (for 3 minutes!) and the eye opener (also 3 minutes) and no luck. Not even a hint of loosening the adhesive holding down the display!! Do I send this kit back for a refund or what??!!
John Noble - 回复
No luck, guys. 3 minutes of hair drying and 3 minutes heating up the iopener. What next?
John Noble - 回复
Okay, a half hour later i finally got the screen loose, but not after super heating it for at leat 10 minutes with a hair drying and burning my hand trying to pry it open. Also, watch out for the power button because it inadvertently keeps switching the phone back on while you wrestle with it. More later . . .
John Noble - 回复
. . . and now I need to buy a new phone!!! the cable broke as I was trying to unscrew one of the top screws, so thanks! I FIXed IT but Good!!!!
John Noble - 回复
-
-
-
将吸盘放在前面板的下半部分,刚好放在home按键的上方。
Even with using high heat from a blow dryer, I had to put the suction cup over the home button or the bottom edge wouldn’t lift at all. That waterproof adhesive is incredibly strong.
As others have said, this part really stinks, but it’ll work if you keep trying. Agree with multiple rounds of hair dryer on high (did about 60-90s each time), and with having to out the suction cup over the home button. You don’t need a big gap to pry it open - it’ll be slight …
Patience is the key here. Expletives and patience. Like previous comments say, putting the suction cup over the home button (I used packing tape to maintain the seal) will allow you to apply force to the proper location to separate the screen. Good luck!
Get a suction cup pliers. It’ll make this part fun
iSclack EVO opened the iPhone easily even without heating with no fear of accidentally over-opening it like with a simple suction cup.
If you don't have the anti-clamp device, to prevent the screen from tearing open when suctioning it, I suggest some layers of tape around it and the back of the phone (the tape has to be stretchy enough to just minimise the momentum when separating the screen), or some big rubberbands
Raziocinjo - 回复
-
-
-
用力、恒定的压力向上拉吸盘,在屏幕和框架之间形成微小的间隙。
-
将撬片插入间隙中。
Just completed a smashed screen replacement, this is probably the most time consuming part. Used packing tape to cover the screen to help create a suction surface (had to replace it a couple times because it pulls away after a purple good pulls ) Used consistent heat for about 5 minutes, then stuck a pick in the tiniest opening… and pry pry pry!
Brian Gill - 回复
I failed at this step. No amount of heating, pulling, and rocking opened up enough of a gap to slip in even a knife let alone the blue plastic tool. That's with a phone that has an undamaged screen - just trying to replace the battery. Apple won this round :(
Be really careful here. I placed a sucker to the front and rear to help lever off the screen. However, the whole thing came away much easier than I anticipated and I ripped the front part completely away from the rear, tearing all three connector cables. New iPhone required.
Chris Wood - 回复
Note that the opening pick they show here does not appear to come with the kit, which is a bummer! The plunger, the mini blue crowbar thing, these are too thick. I ended up using a really thin guitar pick.
Following careful methods can mostly preserve the seal and reusable. Won’t be as water tight but probably still pretty good.
Bottom edge is pull up with suction + separating tool. Use small precision scissor to cut any tape that gets overly stretched upon initial opening.
- For the 2 long edges, use an exacto knife to separate the seal from the screen. This keeps the tape on the chassis. Go slow along the long sides. Becareful to avoid scratching the paint on underside of the screen’s edge.
- Top corners have a thick sealed tape. Best to just use separating tool to twist it open.
In summary, top and bottom edge use separating tool. Side long edges can use exacto knife to gradually gently separate the seal from underside of the screen’s edge.
Intact screen, check. Tool kit, check. Hair dryer hot enough to make the phone too hot to touch, check. Following all instructions, check. Screen still in place and refusing to come off, check.
I heated, reheated, pulled and pulled. I simply could not get it off. Worked at it for an hour and a half, and I’m not a small guy. Yes it is hard to hold, but could get a grip. Just could not get it to budge. Off to the iPhone repair shop tomorrow. Anybody want to buy a repair kit and replacement battery?
Jim Meyers - 回复
After struggling for 30m, I looked up some alternate methods and found this helpful:
https://www.youtube.com/watch?v=25zAK5mG...
- I used a utility knife and pried up right under the home button
- the angle matters! I was trying to go too far down before going in. The top surface of the phone is rather thin, so you go in after barely getting under the chassis lip
- tilt utility knife left to right once you’ve got it under to work it in
- leave the utility knife in, and now add that pick
Jared Wilk - 回复
Pro-tip: don't be an idiot like me. Instead, remove the screen protector you have on the phone before applying the suction cups. Derp.
I struggled with a hair dryer at first and a singular suction cup. However, I tried putting packing tape on the spot where I put the suction job (even though my screen isn't cracked) and I was able to do it first try with ease. Definitely recommend packing tape.
Suction cup pliers. Dead easy
After successful screen replacement, returning to give my thanks here. Excellent tips from you all - if you’re using force, you’re doing it wrong. Heat, very very gentle exact-o knife barely down then fully under the screen below the home button … perfect. Slow and patient around the upper corners, and don’t forget to heat there as well! Thank you all!
The problems with this step are (1) not having three hands and (2) managing to hold the phone in a way that doesn't put reverse pressure somewhere else on the screen. Exacto knife was the best tip. It's a little dangerous. On a misstep you may scratch the screen or jab yourself, but it's what got me in.
thewrytstf - 回复
I used a razor blade and plenty of heat, and it somehow worked like a charm at the cost of me cutting myself. Definitely be careful when doing this, I used the razor blade on the left side of the iphone then wedged in a small screwdriver and then used the pick to cut the rest of the material away.
-
-
-
用拨片划动开口,从手机的下边缘开始一直到手机的左边缘,然后向音量控制按钮和静音开关划动,划开固定显示屏的粘合剂。
-
停在显示屏左上角附近。
-
-
I was trying to replace my battery, and accidentally cut one of the cords on my screen. I marked my pick, so i don't know how it happened.
-
-
-
从显示屏左上角下的开口部分开始,将工具沿手机的顶部边缘划动,划开最后一处粘合剂。
I did end up using just a smidge of IFIXIT adhesive remover along the edge before opening and that seemed to really help
I have been using the pointed tweezers to pull the adhesive strands apart and out as the display comes off.
This bit was awkward as to get a good grip I kept inadvertently switching the %#*@ phone on!
-
-
-
像翻书一样将显示屏轻轻的从手机的左侧翻开。
-
用其他物品支撑显示屏以保持其倾斜,以便您进行下一步的维修。
Nach RECHTS klappen - nicht nach links!
Als ich das Flachbandkabel auf der rechten Seite sah, hab ich mich auch gefragt, ob die das mit nach Links klappen ernst meinen, und das „Buch“ lieber auf japanische Art nach rechts aufgeklappt. Das sollte dringend in der Anleitung korrigiert werden!
“Up from the left” means lift up the left side.
Which is the same as folding to the right.
“Like the back cover of a book” explains it even more clearly.
Maybe it gets lost in translation?
Fold to THE RIGHT - not to the left!
Jim Glenys - 回复
When I saw the ribbon cable on the right side, I also wondered if they were serious about folding it to the left, and the "book" would rather be opened to the right in the Japanese way.This should be corrected urgently in the manual!
Jim Glenys - 回复
Hi Jim, the display opens from the left side, toward the right side. It should look like the back cover of a book. Hope this helps. Good luck with the repair!
DO NOT LAY THE TWO HALVES FLAT!!! There is a reason why the third photo shows the screen half leaning against a box! This really needs to be a warning in addition to the one about not separating the display.
If you're skipping the screen and taptic engine removal like I did, I suggest you tape the back of the phone to the table, and also tape the screen to the vertical object it lays on, so it stays still. That way you will avoid having to constantly readjust it because of the sliding of the housing of the phone when you're working on it. Be careful where you're putting the tape on the screen though, if you're doing it on the internal components.
Raziocinjo - 回复
-
-
-
从下侧连接器支架上拆下以下长度的四颗三点式 Y000 螺丝 :
-
三个1.2mm螺丝
-
一个2.4 mm螺丝
-
维修过程中,使用磁性垫来记住每颗螺丝所对应的位置,避免重新安装的过程中螺丝安装错位损伤您的手机。
These screws just spin for me. They don't back out, but the heads aren't stripped either. I've tried applying backpressure to help lift the screws, but no luck
Jeff Hurst - 回复
What driver do I need to remove these screws i’m stuck
i cant use, the Y000 it isnt working.
What if I stripped a screw what do I do??
Yep, only the 2.4mm came out, other 3 won’t budge, and worried I’ve stripped the heads. Anyone got any ideas?
It’s the screwdriver bit that is the problem. I had the same issue with 2 Y000 bits not grabbing the screw properly. I fixed it by using a small 3 sided file to slightly grind the groves in the Y000 bit just a bit deeper. Then the bit worked like a charm on these screws.
Use Y000 on all 4. U have to be very sensitive on the 1.2mm screws. Put the bit in the screw, put the left pointing finger on top of the screwdriver and turn the driver carefully to the right until you feel a “bump”, thats the trick :-), then you are able to screw the screw out.
For me the key here was a LOT of downward pressure to ensure the Y000 bit caught in the screw. Not sure i can describe how much exactly, but is was significant. Otherwise the bit would not catch.
What do I do if I Stripped one of them?
Can’t get them removed what to do ?
Managed to get the central one out. The upper one won't move, the lower one I've popped out with some force. This allows you to rotate the cover enough to unplug the various bits. Not ideal, but works. I've tried applying a lot of pressure, using the tighten/ loosen method, but the heads have just got mashed… no wonder Samsung are now No1, sigh…
You need to be careful when just rotating the cover as you can accidentally slice through the two black antennas! You only need to nip them…As you can tell I have done this in the past :/
Filing down the bit worked for me. The tip about putting an index finger on the end of the screwdriver handles and then turning gently until it clicks into place was very helpful! Using these 2 tips I didn't need much downward pressure. Screws are out in a few turns.
Mine came out easily. I placed the screws in the area where the bit goes in my kit so I can keep track.
I use a 28 day pill box and keep every screw separate and reburn to exact slot because they all vary in length, width and can really damage u phone if too long and nt secure if to small. use a magnetised screwdriver, or make the cheap freebees magnetic for a short period by rubbing it up an a magnet. lol
Absolutely ridiculous had to go get a different one just stupid
Was able to get the outer bracket screws out using fine needle nose pliers 90 degrees straight down for the outer ones by pressing down a little and using medium gripping force. Had to take these out first before i could use tweezers on the middle one, for which I had to use tweezers to hold the screw, then rotating the bracket (not the screw) counter clockwise a few mm many times over to slowly unscrew it 1/32th of a turn at a time, repeat. (this loosened middle screw). Think ‘rotating bracket 3minutes/degrees counterclockwise at a time while holding screw in place.) You are gonna need really small/fine pliers and tweezers for this because the heads are countersunk into the bracket.
To help tell if the screw is turning, put a small dot from a marker on the head of the screws. This helped me to know I wasn't just stripping the head.
try heating the iPhone with a hairdryer or a bag of rice or about 60 degrees in an oven for 3 minutes . It has worked for me. If the screws don’t come out while hot the will come out as the iPhone cools.
-
-
-
卸下下侧连接器支架。
my battery cable connector was stuck to the bottom of this metal bracket plate so be careful when you lift it off
This may have been intentionally done by Apple to make sure the battery gets disconnected before any other connector is disconnected. So always make sure to disconnect the battery before disconnecting and reconnecting the connectors for the display.
So…I forgot to put this bracket back on when reassembling. Now I’ve adhered the display to the case and don’t have another adhesive strip…so I’m wondering: what purpose does this bracket serve? The phone is powering on and seems to work okay.
Am I going to run into trouble with this bracket missing?
Well, that didn’t last long. The phone shuts down without warning. So I guess that plate is important…
I also forgot to put the battery shield in, and adhered the display. I’m tempted to leave it like that. However, your negative experience is a good data point telling me to not be cheap.
Ordered a new adhesive , under $2 shipped from eBay.
Thanks, Josh Martin! Mine was stuck too, so I lifted carefully.
-
-
-
使用撬棒尖端将电池连接器从逻辑主板上的插座中翘起。
Was kann passieren wenn man diesses Kabel vergessen hat zu entfernen `?
Reconnecting the battery poorly can cause the iPhone to appear to be properly powered and functional, but then suffer a reboot loop.
I had difficulty after a screen replacement, and the Console app on my Mac showed that the ‘thermalmonitord’ process was throwing lots of errors from not getting any sensor readings from the battery. It would never charge past 1% and just kept rebooting.
The contacts on this conector looked fine so even though I had reseated this connector several times already, I reconnected it very firmly using my thumb and a spudger to really press all the corners and middle and really gave it a good massage and then finally it showed the normal dead battery screen and started properly charging and eventually booted back up to normal functionality.
It seems the battery has to be able to transmit data to the phone to say it’s not overheating or iOS will not allow any current into the battery to recharge it, and the kernel will panic from the null readings and just reboot over and over again.
In my case, the battery connector was attached to the bracket. We just left it connected bracket when we pryed it up.
Reconnecting the battery connector was a bit difficult in my case. The cable that comes out of the battery was a tiny bit too long, or that I placed the battery a bit too high (i.e., too close to the top of the phone). It took me several frustrating minutes of fiddling with the connector for it to sit right into the socket. I was not sure if that was connected correctly but, alas, the phone came back to life when it was turned back on.
VERY IMPORTANT NOTE: Please READ the reply here by jason.
It is very easy to knock off or nudge the little pins near the battery socket, see https://guide-images.cdn.ifixit.com/igi/... and https://guide-images.cdn.ifixit.com/igi/....
Those pins are the data lines to extract battery info: temperature, charge, etc. If you accidentally nudge/knock off them the phone could appear to work normally, even for a few days. But then you will start getting wrong battery reads and then after that it may suffer a reboot loop. If you enter settings > privacy > analytics & improvements and you scroll down you will find panic errors from thermalmonitord that there are missing sensors (TG0B or TGXXX) and you will have to micro solder them. DO NOT NUDGE THEM and double check the socket connector when reconnecting the battery.
after installing new ifixit battery kit, note the foam on the new battery is thicker than old apple one, managed to remove the old foam and swap to new battery connector, sheild plate now level
Neil Mills - 回复
-
-
-
使用撬棒或者指甲来将两条显示排线从逻辑板上的插座中撬出。
To be honest you don’t really need to disconnect the display cables in step 15 or 16 to get the battery out. Just keep the suction cup on the screen to keep it propped up and to give the cables some slack. The only reason to take these cables off is that it’s a pain to apply the replacement display adhesive with those cables in the way. If you’re not re-waterproofing your phone just leave these attached.
minimalist - 回复
MAKE SURE you hold the top screen when dislodging the cable connections. I let the screen lie flat down and ended up tearing one of the cable connections, now my touch ID does not work at all! I’m going to have to order a whole new screen.
Don’t miss that SECOND CONNECTOR like I did. It will break very easily if not disconnected :(
I replaced the screen and have ended up with a blank screen. Touch control seem to work (touch button works and I can shut down the phone by pressing power button for some seconds and then swipe left to right in the upper part of the screen). But the screen is blank. I’ve tried to disconnect and connect the two connectors in step 16 but with the same result (blank screen). What do I need to do?
Thanks for advice!
this point is the most important in the whole manual.
Please pay attention not to strain the flex cables or they will end up breaking
I should have been more careful - the second cable tore off.
My own fault after having done this replacement about four times previously without any issues, I clearly got cocky and didn’t pay enough attention.
Be VERY CAREFUL and remember to unplug those cables. Don’t skip steps.
I’ve now had to order a replacement screen.
If you replace the screen and there is no display apply io propyl alcohol 99.9 & purse to both connectors on the screen and on the iPhone with a clean toothbrush and let them dry for 45 minutes and then fit the screen and reassemble the iPhone..
It works for me . when I get a new screen I do t5his before fitting it.
I tried to save time by not removing the screen during battery replacement as some comment here, HOWEVER, I ended up having to use a little force to remove the battery and in the process broke the second, lower smaller cable, resulting in loss of home button function and needing to get a new screen. Next time I will follow these steps and completely remove the screen during a battery replacement
chrislacey - 回复
I removed the screen and cable still got ripped during reassembling :(
Viktoria -
There is a critical fact missing from the steps here, for reassembly: That bottom (underlying) cable is longer than it should be. Loads of people are reporting that the Home button is dead after this repair, but the cables aren't torn. I'm pretty sure this is why. Here is a picture of the problem.
When reassembling the phone, you must poke this cable back into the body of the phone while you bring the halves together, or you will crush, crimp, and destroy the cable.
I’m only reading your very useful comment now, after the exact thing happened to me and my cable got ripped during reassembling phone. Would you be able helping me naming this part, so I can look for a new one? Thank you very much!
Viktoria -
thanks gavin. ifixit should have included this piece of info.
-
-
-
拧下将支架固定在前面板传感器组合件连接器上的两颗1.3毫米Phillips#000螺丝。
-
有些电话可能是Y000。苹果在产品生命周期的某个阶段开始将Y000用于这些产品。
Has anyone had trouble getting these two screws off? I’ve been working on these for about 10 minutes and the LEFT screw wont spin. It seems like the little PH000 screwdriver bit won’t even grip it. (The one of the right comes off, no problem)
It looks like I’ll have to pick this project up again with a screwdriver that will actually take off this piece.
If you’re having trouble removing these screws;
the screw on the right goes into a standoff screw that is screwed into the frame.The left one goes into the logicboard.
If your phone is used most likely it has been repaired in the past and the person that repaired it put the screws in way too tight.
If your phone is brand new And you know 100% it is then the problem is your screwdriver.Stop before you strip it completely and buy a better screwdriver (EBAY).
If you already stripped the screw head take the phone to a shop before you break it.
there are ways to get them out but truthfully it’s extremely dangerous and sometimes your better off quitting while you are ahead.
I used a #1 flat head tip to loosen.
I couldn’t get the two screws out either—used the correct screw tip and everything. Stripped the screw. Will now attempt to just keep the cable attached…..
Use the PH000 and apply a little more force before spinning, should come right out!
^To anyone having trouble, this is the correct answer. Put the phone on a firm surface, align your driver carefully, press down hard, and twist. As long as your driver is approximately the right size, it’ll come out.
the two screw i have are stripped and i have n way of getting either screws off whats my next bet
The PH000 bit is to large. I can’t get the screws out either which really sucks…now I have to put everything back together, find another bit that will work and try this again another day. Not impressed with IFIXIT’s attention to detail so far :-(
Using iFixit’s driver kit, I prefer a PH00 for this, which is larger than the PH000. If you think the PH000 is too big, something is wrong.
I think part of the issue with the iFixit PH000 is that it is slightly too pointy. The PH00 fits better because the splines engage the slots of the screw before the point bottoms out. The PH000 tip bottoms out in the screw’s center point and the splines don’t engage as well. I have other PH000 tips that are more blunt nose and they work better than the iFixit bit.
PH000 screwdriver didn’t work for any of these screws, or the barometric vent, or the taptic engine. It was too big. I had to use a different screwdriver from another kit I had.
minimalist - 回复
the cable tore. is that it i need a new phone?
You don’t need a new phone, but your selfie camera and phone speaker will not work. You can get replacements for that about $10.
jack jones - 回复
Reconnecting this cable and coverplate took a good 20 minutes. O_O
I also had issues to loosen up the screws, in two parts the right side up and the left side down, i think the PH000 is to pointy or something or its too hard for the srews of the iphone, i cannot take it off and know im regreting i bought i order all the way from Paraguay in south america and know so angry it doesnt work
I skipped this step. Just be really careful not to pull on the screen.
The guide says they changed these to the Y000 “at some point in the t middle of the product’s lifecycle”…
That can’t be true, I have a *day one*, preordered iPhone 7, and mine had, unmistakably, Y000 screws!
and also, I’m just faithfully following the guide here, but can anyone clarify *why* is is necessary to entirely remove the display AND the Taptic Engine at all? The battery seems accessible just fine… oh well
PS- I’m doing this on an older backup iPhone 7. My iPhone 12 Pro just went berserk and stopped working completely a little over a year after I got it day one of its release… since the iPhone X I’ve only had easily breakable, overly sensitive phones. I’ve had every numbered iPhone except for the 8 (I got the X released at the same date) and the 11, and man, are these newer iPhones post X fragile!
-
-
-
从主板的插座上断开前面板传感器组件排线插头。
Das ist sehr mutig, das Kabel dort so zu strapazieren.
Mich würde das Display daneben stellen und mit irgendetwas stützen, dass es nicht umkippen kann um Beschädigungen an dem Kabel zu vermeiden. Das reißt sehr schnell ein.
Is this the connector for the earpiece, as well? I did the screen replacement and everything worked, except now I can’t use my earpiece… I’m afraid I didn’t fully connect this particular portion.
Victor Bui - 回复
@victorbui714 Correct, this is also the connector for the earpiece speaker. Check the flex cable carefully and make sure it wasn’t pinched or torn. Make sure the connector socket is clean (give it a blast with some compressed air if needed) and try reseating it. If that doesn’t help, you may want to remove the earpiece speaker and inspect the four springs on the back, and check that they’re intact and making good contact with the four circular pads on the flex cable. Give the pads a wipe with some IPA and try not to leave any skin oils on them. If none of that works, try replacing the entire flex cable/sensor assembly. Good luck!
This is the only connector that is quite easily possible to put back in the wrong way. If you do so, the phone will just get into a continuous loop where it shows the boot screen, goes blank and then shows the boot screen again and again. If this happens, do not despair-just put it back in the right way.
Roy Mathew - 回复
After putting together, I had a continuous loop boot up (as noted above). I saw articles where this (front panel sensor connection) was the reason. I disconnected this connection and the boot up loop stopped. I tried reconnecting several times but had the same problem (boot up loop). However, it turns out that I needed to apply extra pressure when installing until a heard a (faint) second click when pressing down. Note - before I was using the spudger to press the connection together, which didn’t do the job. I ended up using my finger to press harder to get it to click in. Solved that issue.
The ribbon cable on this step is torn. Is this something that can be replaced? Is this only to the earpiece?
John Daily - 回复
The ribbon cable on this step is torn. Is this something that can be replaced? Is this only to the earpiece?
-
-
-
移除显示屏部件。
When removing the screen, be aware of the two tiny square black rubber grommets on the Penelope screw brackets that secure the screen. They can fall off very easily and be lost without even knowing it (it happened to me, but was lucky enough to find them).
Guy Cooley - 回复
Sorry, I’m so unclear about when to replace the Adhesive tape. Should I put the iPhone 7 Display Assembly Adhesive at this step, or after I’ve replaced the battery?
Victor Bui - 回复
@victorbui714 Battery first, then adhesive during reassembly, as it says in the instructions. ;)
This is the 3rd screen iv put in my phone and everyone them bust at the top by the camera every time iv bought one of these screen idk if it’s the manufactures fault or what?
trent bost - 回复
@trentb28922 Ouch! That’s not normal. Is your phone’s frame bent? Are you having to use a lot of force when you install the display?
If the instructions are followed step by step, then adding the adhesive comes before changing the battery.
If I had to do it all over again, I'd skip adding the adhesive, because you have to disconnect the battery, plus the two lower display connecters and the front panel sensor assembly connector. It was a nightmare trying to marry the components back together without disturbing the wire prongs, and I don't even want to talk about reinserting the tiny screws that kept twirling around on the tip of the screwdriver as well. It wasn't worth the time or aggravation!!
If you decide to skip this step, just avoid using your iPhone near water.
-
-
-
卸下两颗将气压计固定到后壳的1.9mm P000 十字螺丝。
I didn't see the necessity, so I didn't remove the Barometric Vent since I decided I wasn't going to uplug the Taptic Engine, although I did remove screws for the Taptic Engine, but I didn't unplug it. I believe the point of removing the Taptic Engine is to gain access and space to pull the adhesive strips off the battery. If you attempt and are able to remove the adhesive off the battery, then I believe it's NOT necessary to remove the Barometric Vent nor the Taptic Engine.
-
-
-
使用撬棒(Spudger)的平端从主板的插座上断开Taptic Engine的连接器。
-
-
-
卸下三颗将Taptic Engine固定到后壳的 1.6mm P000十字螺丝。
My screws are stripped here. Please help, I don’t know what to do!
Hey Salva and Kyle, sorry to hear about all these stripped screws! For help with removing them, check out our guide.
I had my 7 battery replaced by an Apple Authorized dealer. Around 2 weeks after the taptic engine started to make a !&&* of a noise when it was activated (sounded as if it was loose)… then 1 month after that… it stopped working completely. fast forward 8-9 months later, the battery they had replaced just wasn’t holding its charge anymore (phone was spending more time plugged in charging and depleting very quickly = full charge lasted about 1-2 hours). Having bought the ifixit battery and have gotten as far as this step, I could see that all three of the 1.6mm screws were just floating around in the compartment and the taptic engine was just being held on via it’s ribbon lead. WTF?! Screws aren’t stripped and I managed to fix it in again. Why would these screws be floating around like this??
another person checking in here to assure you that, if you find a stripped screw (or more) at this step, you’re not crazy. I have one as well! I’m in dis-effing-belief. This phone has NEVER been serviced by anyone, and was allegedly brand new when purchased.
To the person suggesting a dremel tool to remedy this…. *blink**Blink*. Are you kidding me right now? *slap*. Vibrating the !&&* out of all those sensitive parts - not to mention what one slip could end in your phone being effectively sawed in half.
-
-
-
使用钝头镊子将电池下边的一根胶带剥离。
I found using the blunt end of a spudger to roll the adhesive strip off worked better than trying to get hold of it with tweezers.
Peter Gray - 回复
-
-
-
使用钝头镊子将电池下边的一条胶带剥离。
I can recommend preheating - first phone attempted without preheating both strips broke almost instantly, but this time heating the back of phone until battery felt about 40 degrees made for a smooth removal, saving me ages prying it out with cards…
Definitely preheat. Don’t even bother trying to pull out the tabs without preheating the back.
-
-
-
慢慢地将一块电池胶片朝iPhone的底部方向从电池中拉出,。
-
拉的时候要平稳用力,保持胶条上的恒定张力,直到其从电池和后壳体之间滑出。 为了获得最佳效果,请以60º或更小的角度拉胶条。
Same here, I had to work it out with the guitar pic they give you.
greggammon - 回复
How do you keep it from wrinkling without tearing
After a past experience with the adhesive strips immediately tearing on an iPhone 4, I knew to heat the battery with a hair dryer before pulling on the strip. After heating the battery, I was able to pull the adhesive strip without any problems.
First one worked perfectly as it was seen in the video. The second one teared immediately. I lifted the battery a little by a spudger and used the tweezers to pull out the white part and grabbed with my fingers and gently pulled it slowly, which worked.
A very good way I found when I, as probably many others, made the straps snap; a way I definitely will apply next time if I do this: use a spudger and “spinn” the white tejp out. Working with the hands trying to pull it out was not ideal… So:
Stick the tejp on/around the spudger and roll it up/out on the tip on the spudger. Once it grips hold on the spudger and you roll it, it almost eats it way out.
Otherwise it would have taken me ages to get it out but yes, if it snaps (or from start) you can get hold of it under the battery then you definitely have a substitute solution here.
The spinning spudger worked really well! That and heating it first made it a breeze.
JoeP -
Gentle heating of the back to soften the adhesive and then I used tweezers to wind the adhesive strip out spudger would probably work well too. When starting, do not pull the strip out more than an inch or two before winding the strip back around the tweezers or spudger and keep the angle low as you pull straight, which is why removing the Taptic Engine is recommended. As you go along, the strips get wider and less likely to snap and you can pull a little further each time before winding it up. This all takes a while since the adhesive stretches a lot, (like a LOT), but slow and easy works best. Prying the battery out is not fun.
+1 for hairdryer & rolling on the spudger!
I use iso propyl alcohol applied with an eye dropper to the battery at a 10n degree lift and let the alcohol seep through for about 30 to 60 seconds and hen remove the adhesive It works a treat
Heating the back of the phone, before hand helps 100% to loosen the adhesive. Work on pulling slowly and close the edge of the phone. I wore a glove while holding the phone and heating it.
I tried to do this on a very smashed phone and the battery caught fire lol
-
-
-
大约一分钟后,轻轻地抬起电池。
Bij mij brak ook een van de kleefstrips , ik heb toen de batterij een heel klein beetje opgelicht en er wat isopropyl (alcohol) laten tussenlopen en dan een halve minuut gewacht . Vervolgens heb ik heel voorzichtig in combinatie van een Plastic card en een iSesamo opening tool (deze zijn beiden hier te koop bij iFixit), de batterij kunnen los wrikken zonder dat deze beschadigd of geplooid was.
Nitwit was smart, lifting the battery enough to grab a broken strip worked for me
-
-
-
将电池从后壳上取下。
-
重新组装好你的iPhone后,请强制重启,这样可以预防一些问题的发生并会简化故障排除难度。
After I replace the battery, should I put on the iPhone 7 Display Assembly Adhesive and then follow the steps in that guide to reassemble?
Victor Bui - 回复
Follow this guide for the display adhesive. There should be a link here for it. iPhone显示屏粘合胶的更换
minimalist - 回复
==> Step 18 !
VauWeh -
There should be directions as to how to locate the new battery in the case! There is enough freedom of movement that the battery could be glued back into the case and not be able to make the battery connection. Some temporary spacers would be a great idea.
I put the Taptic Engine back in the case first. The battery seems to rest right against it, so it becomes a physical reference point. I cut out a piece of the plastic cover that came on the battery & put it over the battery connector mating point on the circuit board to keep the battery disconnected until necessary.
I contacted the battery first, using the connector and cable as a reference point. I wanted to make sure the cable from the battery did not put any stress on the battery connector after I glued the battery to the case.
steinmb -
There should be a STEP 30 Instructions to refer you to the link for instructions for installing the REPLACEMENT SEALS. Or at least a big note saying to install the seal now before re-assembling
Bought kit, followed all the instructions, and now the Touch ID and home button don’t work on my phone, rendering it useless. Connections are fine, no obvious cable tears, I’ve checked and rechecked all connections … not to mention, what component did I even touch to render home button useless since it’s on the display screen? This is going to cost me. What a horrible experience that’s taken up 4 hours and cost me time and money. Can’t recommend just shipping phone back to Apple enough. One of the most disappointing experiences with a product in ages. And all just to replace a freakin’ battery …
John Cagle - 回复
I have the same issue :(
radeise -
I have the same odd behavior. Is there a solution to this?
CAREFULLY connect all cables and test it before putting back together. I reseated the long and short cable connectors a couple of times when it appeared the button wasn't working. I was successful, but I knew going in that Apple didn't design these to be repaired by the owner. So I knew I may be out the money and in need of a phone if I screwed something up. That's just the way it works.
I am fairly certain that the home button no longer works because when you plug in the battery with the other cables disconnected, it breaks the paring off the home button and logic board as a safety precaution with Touch ID. To repair it, you need to go to an Apple Store, or you could replace the button but not have Touch ID
I also did this to my phone and now I'm stuck with the touch assist button until I can get it fixed D:
Hello guyz. Please help me. I tried to replace my iphone 7 battery. When i was removing the 4 tri wing screws on the cover that is covering the battery cable Etc, I used many screwdriver because at first I didn’t know that those are tri wing screws. I ordered .6 tri wing screwdriver. I successfully removed the 2 screws but the other 2 cannot remove. I think they are stripped or they are damaged because of what i did pn my first try. I dont know what to do. My iphone battery health is 73 percent. I want them to be removed but i dont know how. Pleaseee help mee guyss. (Sorry if my english is bad, im from Philippines) please help me
The battery placement during install needs to be spot on or else the connector won’t line up. There is no wiggle room in the cable
In step 29 there is the way to cerrectly align the battery by connecting it first, then adhering it, and finally disconnect it.
The heating via hair dryer didn’t work as expected for me. Instead, this video worked perfectly - https://www.youtube.com/watch?v=e743HCkx...
Wait. What? You gave me 30 steps on how to remove the old/faulty battery. Where are the steps showing how to install the new battery and put everything back together?
Do you really need to remove the taptic engine and barometric vent? Can’t you do it without removing those components?
Did this back in 2021 and it took a lot of patience to do screws were one of the hardest things to deal with being so tiny. Guide was good.
Not for someone who doesn’t have patience and determination to fix things themselves. I did crack my screen trying to lift it with suction device and felt smudged wasn’t good enough to get underneath phones screen while pulling on suction cup.
Good overall fix it guide just plan on few hours to do.
-


将您的替换零件与原始零件进行比较——您可能需要在安装前转移剩余的组件或从新零件上移除背胶。
- 若要重组你的设备,重新涂抹显示屏粘胶剂 并按照相反的顺序执行以下指南。 ***
请将您的电子垃圾送到[e-waste |R2或e- steward认证的回收商|new_window=true]。
维修手机遇到问题怎么办?来iPhone7问题回答找找解决方案吧。
将您的替换零件与原始零件进行比较——您可能需要在安装前转移剩余的组件或从新零件上移除背胶。
- 若要重组你的设备,重新涂抹显示屏粘胶剂 并按照相反的顺序执行以下指南。 ***
请将您的电子垃圾送到[e-waste |R2或e- steward认证的回收商|new_window=true]。
维修手机遇到问题怎么办?来iPhone7问题回答找找解决方案吧。
906等其他人完成本指南。


120条评论
yes , unless it is sealed back with new waterproof tape, which almost no one has yet
Atronx -
No you can buy the replacement. See the above guide for a link on how to do that and iFixIt sells them. Recommend buying more than one because installation is tricky - must get it aligned perfectly though the spluger and pointy tweezers can help reposition minor slipups.
The back adhesive is available on ifixit. So you can make it water proof-ish again.
Recall, an original iPhone is far from waterproof after only a month usage.
Guenter -
Is there any way to put back the waterproof sealing after changing the battery for iPhone 7? Thanks
I too would like to know this! It's a shame they don't elaborate as such. There is this part here - Display Adhesive iPhone 7 Display Assembly Adhesive which I assume needs to be put on after the screen is taken off but this guide says it's not needed? But for a screen repair it is? Does it get placed on the phone housing or screen? Thanks
blitzn -
Yep, we have a guide for replacing the seal (display adhesive) now. I don't know how waterproof the seal will be afterward, but I think it's worth doing regardless.
Most of the adhesives that are being sold are not rated to be waterproof, and are not the geniune OEM brand materials.
Atronx -
Probably too late, but there are many vendors that sell the waterproof seal for iPhone7. Use alchohol and tweezers to remove the old seal and glue, align the new seal and stick it. Compared to the battery change, it’s a breeze.
Yes it is. Have a look at the iPhone Display Adhesive Replacement guide
steinmb -
Hi!
Now I got a huge problem concerning the HomeButton/ForceTouch-function.
It does not work anymore. I think it's a safety measure by Apple to prevent people from changing their batteries.
ANY HELP, please? :(
87schiller - 回复
Those functions aren't related to the battery. Double-check your work, reseat the cable connectors, and inspect the cables and home button hardware carefully for damage.
I know this is a month late, but hopefully this helps someone. On the 7, 3D Touch and the home button are routed through the same flex cable that comes out from underneath the metal backing of the display and plugs into the board.
This flex cable is very easy to pull and damage when taking the screen off for the first time. In most situations you won't see this damage because it will be underneath the metal backing of the display.
If this same thing happens to you, you'll unfortunately need a screen replacement to fix it.
My problem is with the 4 tri screws holding the 1st bracket down. They just spin, all 4 of them. The screw heads aren't stripped, as they all spin, they just don't back out. I've applied backpressure in hopes that would help lift the screws, but no luck.
Jeff Hurst - 回复
You dont have to remove the Taptic Engine but it gives you more room to work with the glue.
nicolay.94 - 回复
Hello there, I got a dead iPhone 7, so I tested the battery, and the only “weird” thing.. is that the battery is rated 3.8v… and on this one.. im having a reading of 4.1V…. maybe this overpowered issue is preventing the iPhone to turn on???
So, I changed the battery of my iPhone 7 with the kit provided by IFIXIT a couple of days ago, and cononutBattery is reporting that the battery is already at 95% (1862 out of 1960 mAh), with only 1 charge cycle. Is this normal?
Hi Federico
Did you try the following tip?
For optimal performance after completing the guide, calibrate your newly installed battery: Drain it below 10%, then charge it uninterrupted to 100%.
Takehiro -
The step by step guide can be converted to a pdf by selecting Options>Download PDF.
mnvery east to follow quide but i almoust did burn down my phone when i was removing battery it cathed on fire and i have no idea did i puncture it or what.
In any such venture, when dealing with precision components. DON’T RUSH, if you have any issue with hands that tremor for whateverr reason when handinlng small items, DON’T TRY THIS, LEAVE IT TO SOMEONE WITH STEADY HANDS !!
My iPhone 7 wasn't not charging. So, After searching on Google, I found this guide "iPhone 7 not charging". And, with this guide I get to know about that, my iPhone battery got damaged. And, My iPhone warranty also got expired. So, I have decided to replace the battery by myself. And, this guide really helped me to replace my iPhone battery. Just want to say thanks to you. :)
Can you pull the battery adhesive tabs without removing the Taptic Engine? Anyone tried that?
@balleklorin You certainly can, but you’re much more likely to break the adhesive strips that way. You want to pull them at as low an angle as possible, and with the Taptic Engine installed you’ll have to pull them at nearly 90 degrees. My advice is not to take shortcuts, but it’s your phone and your rules! Good luck.
Hi ! I want to do this repair but I read online that if I use a non-original battery Apple’s software will detect it and will slow down the phone (like it does for the damaged original battery).
Is it still true or is it fixed in the current IOS ?
Not true at all. As long as you have a high-quality battery, the iPhone’s performance is just as good as with a brand-new battery from Apple. If you have any doubts, you can verify the performance by benchmarking it with the GeekBench app.
Hi everyone, I’ve replaced my iPhone 7 Battery and for some reason i am still seeing the old battery readings (same percentage and same battery health percentage 80%) on battery settings. Will this fix after the battery gets calibrated?
Thanks.
my home button stopped working. Any ideas how to fix this ?
I‘ve done it step by step, everything went well. everything works, except touchID wont work.
could anyone tell me what the reason could be?
thank you lads.
Follow this guide for the display adhesive. There should be a link for it here in this guide. I had to go looking for it. iPhone显示屏粘合胶的更换
minimalist - 回复
super détail pour les vis et leurs tailles
ca va m’ aider , car au démontage rien etait fixé, et il en manque 2 ( au moins 12 vis en promenades)
donc avec le kit commandé je pourrai m aider des différents tuto pour retrouver leurs emplacements
cordialement marchal
Gros Lutin - 回复
Excellent guide, but may I make a couple of suggestions:
1) in step 18 this guide should strongly recommend that anyone doing the waterproof sealant replacement MUST watch the linked “iPhone Display Adhesive Replacement” guide FIRST considering that it does require an additional tool (no, I did not have enough pennies on me to do the recommended heat treatment followed by weight-pressing the reassembled iPhone assisted by said pennies).
2) also in step 18, you could point out that the forward camera assembly at the top of the front plate of the iPhone 7 has a hooked ridge that must be fitted into the bottom plate for the re-assembly to work at all. Personally I had NOT noticed that, so when I tried to reassemble mine I hadn’t tried to make sure that the ridge was properly placed. Could you add a picture here of that ridge and perhaps recommend that everyone working on disassembly that they should see how it works so they can recall it upon re-assembly.
I agree. Reassembly is NOT the reverse of the many steps! That ridge or plastic edge MUST be slid into first. Opening the iPhone doesn’t reveal that. Careful, because the waterproof glue can catch the battery cable too. Aligning the battery by connecting the battery cable/ribbon helps BUT be careful and remember to disconnect the battery BEFORE reconnecting the two data cables (Again, this would be obvious if the steps or reassembly pics were included. Number of steps = 60 more realistically because reassembly is just as important and risky!
BTW: when I first completed my re-assembly, when I first looked at my screen there was a set of greyish bands that covered about 1/3rd of the screen. Not so dark that clearly blocked the use of those parts of the screen but rather noticable. I shrugged my shoulders, thinking that perhaps there was some internal damage that I couldn’t help having done.
But less than 24 hours after that, that banding has been considerably reduced (covering less than 10%) AND it is much less grey. It is such that I must bring up an app like Notes in order to have a mostly blank white screen in order to see what remains, so perhaps this was merely an artifact left by the ending heating I did to “cure” the waterproof adhesive, and over time it will disappear entirely.
after doing this fix ive gotten a message - unable to activate touch id on this iphone —-its an iphone 7
super! merci
Home button not working after battery replacement.
karllittau - 回复
Thanks for the guide. Very helpful on two iPhones
For some reason i forgot to use the suction cup but was still able to open the phone without much difficulty (so don’t worry about needing iopeners etc. )
Of course one of my battery strips snapped, but with a bit of effort and pointed tweezers under the battery i managed to grab it after a few attempts and fully remove it.
Although you could do this without removing the screen, you will need to remove it to place a new sealant strip around the edge.
Just completed changing the battery on my Father-in-law's iPhone 7. He had purchased the phone used and I suspect the battery had been replaced previously as there was no adhesive seal holding the display to the case. In addition one of the screws holding the bracket was missing. Nonetheless the procedure went very well. The instructions were clear and easy to follow. The most difficult part of this project was removing the battery from the case as the adhesive broke almost immediately. Fortunately the tips that are in that step made removing the battery easy. Bottom line, read the instructions ahead of time, watch the video and TAKE YOUR TIME! Good luck!
I used this guide with the ifixit replacement kit and it went very well. I do wish though that the guide gave advice on how to install the new adhesive gasket when reassembling.
Hey Thomas! Glad to hear that everything went well. Sorry to leave you hanging on the adhesive install, we do have a guide but it’s a little hidden. iPhone显示屏粘合胶的更换
I followed every step. Replaced the battery. Played backwards every step. Now I am stuck with the Apple Logo slowly flashing on & off. I think I just killed my iPhone7. My Mac does not ‘see’ my phone when I connect it to iTunes.
i am not being able to do it… I have heated up the phone, to smooth the glue… but the cover doesn’t me off
Same problem brother. Were you able to remove the screen?
Good instructions. Two things that would be nice to add to reassembly would be how to apply the adhesive and seal.
Tom Fields - 回复
My iphone fell in the toilet and was there maybe 5 seconds. I dried it and let it rest but then (I know) tried to to do things. The next day (I took it to a TekDry machine and they put it through for two half hour plus periods. After the first half hour, the start screen came back for a maybe a minute. (I almost paid.) Then nothing. I brought it home and plugged it in to charge it. After 5 hours (?) it began to flash- It was like a living creature trying to breathe- It would light up- then go dark- many times. I tried a hard reset and think I managed to turn it off. Now it is in a vertical position, off the charger. This is a newly refurbished phone. (I had it for a day)- I am wondering where I could take it to in Seattle for someone to open it up. It will turn on even now. Or should I give it a decent burial? I am in my 70s and techno-challenged. Any advice, expressions of gentle derogation or approval, are welcome.
Lyn Coffin - 回复
Getting the adhesive to loosen was the hardest and most frustrating part of this with me trying it multiple times for a few days. Simply “warming up” the phone did not work, I had to make it really, really hot in order to lift the phone a fraction of a millimeter with the whole thing flying around the room and me hitting myself in the face with the suction cup multiple times. Using a thinner metal plunger did the trick, but scratched my case. Nevertheless, it was the only way to open up that beast. A third hand would have been be nice for that job x)
Me too. I stopped and bought the tool that has two suction cups and looks like pliers. It allowed me to gently squeeze, release, squeeze and eventually it began to separate. Also, that tool kept me from pulling to hard or opening too wide thus saving the ribbon connections. The iFixIt heat tool worked better than a hairdryer.
hat geklappt, danke für die Anleitung!
LG Andreas von studi kompass
Completed. This is now the second 7 that I have successfully replaced the battery on.
I have to agree with some of the other comments - the re-assembly instructions might have helped!!! Instead of having to switch between guides to figure out how and when to apply the screen adhesive. I successfully dismantled the iPhone, replaced the battery, got through the majority of the re-assembly, realised the instructions hadn’t included the screen adhesive, searched for the instructions, then re-disconnect the screen AGAIN, apply the screen adhesive, re-assemble the iPhone completely this time, only to find I’d broken the display at some point!!!
Perfect install. Now phone is dead.
I missed the “forced restart” after reassembly. That created some angst for me wondering where the trusty white Apple logo was hiding. I reread the notes and found the forced restart. All is good. Super nice tutorial. Many thanks,
I just replaced a swollen battery on an iPhone7. I purchased the iFixIt kit that included the battery and all necessary tools for $35. Everything went well in the replacement. I’m glad I watched the vid on replacing the case adhesive FIRST! A little advise; 1) Read through the entire replacement steps at least twice. 2) Watch the videos for battery replacement AND adhesive application BEFORE starting. 3) TAKE YOUR TIME! Work slowly and uninterrupted. 4) Be organized with the screw/part placements. I do wish there were guide marks inside the case for exact battery placement. My placement was ‘off’ about 1/32 of an inch, it made connecting the battery a little tricky. But I persevered and now the phone works great! Thank you iFixIt for saving me LOTS of money on a shop repair ($100+) or a even more on a replacement iphone ($1000+)!!
I just replaced a swollen battery on an iPhone7. I purchased the iFixIt kit that included the proper battery and all necessary tools for $35 + shipping. Great news! Everything went well in the replacement. A little advise to you DIY types; 1) Read through the entire replacement steps at least twice. 2) Watch the videos for battery replacement AND adhesive application BEFORE starting. 3) TAKE YOUR TIME! Work slowly and uninterrupted. 4) Be organized with the screw/part placements. I do wish there were guide marks inside the case for EXACT battery placement. My placement was ‘off’ about 1/32 of an inch, it made connecting the battery a little tricky. But I persevered and now the phone works great! Thank you iFixIt for saving me LOTS of money on a shop repair ($100+) or a even more on a replacement iphone ($1000+)!!
I’ve made it, after all. How dare you not saying that one need new adhesive strips and sealing AT THE BEGINNING of this instruction or OFFER IT IN THE INTRODUCTION as all the other stuff, I’ve asked!!!
Great kit and tutorial, I had it done in one shot without buying any extra strips! Just go slow and you’ll get there eventually. Oh and, keep the hairdryer nearby, it will be your bff for this! Good luck and many thanks to the people in the comments as your warnings have been really helpful!!
Worked OK. Hard bits is screen removal - I used very narrow screwdriver. Advise using piece of A4 with step numbers to place various screws and parts on as you remove. Some very tiny screws in there.
I followed all the steps perfectly and the battery shorted out (the back heated up really hot and the phone wouldn’t turn on). Then I tried to do it all again but the pentalobe driver is not biting into the screws anymore so I couldn’t open the case.
I replaced the battery and the Home Button no longer works. The are a few other comments posted on this here and a long chain in the iPhone 7 section. I have done a lot of troubleshooting to include reseating all the connectors , loosening the middle screw over the Home Button, hard resets, etc. No luck. I have done quite a few phone repairs successfully and have had good luck. I was very careful with this battery replacement and don’t know how I could have damaged a cable. Some repairmen suspect the heat application to loosen the seal. It’s the only reasonable explanation I can think of. I now have an iPhone 4 that looks like an iPhone 7!
Thank you so very much for publishing this very helpful instructions. They helped me sucessfully install a battery and save $33 doing it myself.
J’ai changé la batterie sans difficulté avec ce tutoriel. En revanche, la batterie se décharge rapidement même si le téléphone n’est pas utilisé, et même la lorsque le téléphone est éteint. C’est curieux et je ne sais pas d’où vient la panne: de la batterie ou du téléphone?
I replaced the battery, and put everything back together. When I turned on the phone I received “Touch_ID_Issue_Notification. Touch ID and home button do not work even though the screen and home button are the original. I rechecked all connection and ribbons and all red seated correctly and unharmed. I hard reset the phone (volume down/power button) and nothing works.
Anyone have any ideas oh to correct this issue?
me too i’m sorry to hear it. not sure what to do now haha f*ck
Thanks for tanking my home button.
Simple battery replacement causes home and haptics to stop working on an iPhone 7
Put a warning up.
you too?? any way to fix this?
my home button won’t work
Home button does not work after fitting new battery. I was very careful to not strain the leads while doing the job and have checked the leads with a magnifying glass and there is not a mark on them. Tried re-fitting old battery and all the other suggestions to be found on Google search but still nothing. Is there any diagnostic software to test it?
what is the “vent” for? on the opposite side of the main loudspeaker
It is for the microphone.
“according to Apple it's a "barometric vent." Apparently adding all the waterproofing to the iPhone 7 and 7 Plus meant that it was more of a sealed box, and so to be able to have an accurate and working barometer, Apple used that space. The barometer is the thing that allows a phone to measure altitude, and Apple points out that on the iPhone 7 it can measure even minor changes like climbing a flight of stairs.”
gowski -
Very straightforward guide. It took me 1h20m, although a lot of time was spent on cleaning the old adhesive. Now the iPhone is up and running as new. Many thanks to the author and all the contributors from the comments!
Happy fixing everyone!
After putting the battery, how long do you recommend charging it?
When it reeaches 100%, leave it charging for another 2 hours. See our wiki.
My home button stop working aloso after changing the battery. There is a workaround with the Accessibility setting
Go to Settings > General > Accessibility > Assistive Touch (on)
Update : the home button started working after a complete depletion of the battery and a complete charge. However, the touch ID with the fingerprint dosn’t seem to work.
Luis -
Slightly OT: Good Video, but could you please remove the underlying drum loop? It adds needless rush and distracts from the topic.
Hmmph.. It seems after I attempted this repair, the phone refused to connect to the internet (though it would connect to wifi and bluetooth just fine, as well as cellular) The cellular (as in sms and calls) works fine, but any sense of data via wifi or cellular just seems to no longer work. Ive reseated the connectors for the antennae but to no avail.. I do have to note the logic board area is getting hot (especially near the rear camera) and the phone makes a faint sizzling sound, which makes me think that there is a short.. Any tips?
Battery connector seems slightly longer on the ifix it battery compared to the apple baterys’s still works but make it far more difficult to reconstruct without squashing the battery
When I opened the phone i snapped the ribbon cable connecting the display to the phone. I’m heart broken but i hope this comment would warn someone out there.
This is a very thorough guide…until the end. “To reassemble your device, follow the above steps in reverse order” forgets to mention using a replacement display assembly adhesive to add waterproofing to the device. Nowhere in this guide does it mention the need for this part, which is sold by iFixit. I suggest amending this.
After the battery replacement Touch ID stopped working. I checked all of the flex cables and they appear to be intact. What could be the solution for this problem? Maybe it has to do at least one power cycle?
Ugh - similar issue to many here. I replaced the battery, being very careful with the ribbons and re-seating the connections. Everything worked fine - except the haptics. The phone is my son’s. If I use my thumbprint for Touch ID, it doesn’t recognize my thumb and gives the haptic feedback. My son can get in to his phone just fine, but the home button does not give haptic feedback to him. So the haptic engine is working only in the instance of an incorrect touchID or when hitting the volume button. But not otherwise. Everything else works fine…such a weird problem to troubleshoot. We re-seated all the connections and power cycled several times, including the shutting down through the settings menu.
Significant amount of force indeed!
I yoyo’d the phone off of one of the battery adhesive strips. The incredibly slippery aluminum case slipped out of my right hand as I was pulling one of the battery strips out with my left hand. It shot across the table and I was sure it was going to rip the adhesive strip. But it held!
Keep a grip on the phone when pulling the battery strips out.
I just followed the instruction and the apple logo just flashes on and off and does not turn on. Do I just need to keep it plugged in to charge for a while?
Hi, is it necessary to fully charge the battery after the replacement.
What could cause the loudspeaker to stop working after replacing the battery? I don’t see any connectors for the loudspeaker that I might have accidentally dislodged. I followed all of the troubleshooting steps I could find to rule out software issues. I even did a DFU restore. Everything is working on the phone except for the loudspeaker. Thanks.
I received my new battery and installed it. The calibration on the battery box is different than the instructions given on ifix.com. The website says to charge to 100% and keep charging for 2 more hours. Then use it until it dies. Finally charge it uninterrupted to 100%. The ifixit battery box says use it until it dies and then charge it uninterrupted to 100%. Which is best?
Unplugging the display might not be necessary, but it does help to release the stress on the flex cables. So…while not mandatory if all you want to do is replace the battery, it is recommended. This guide was really useful to me for replacing the battery on my iPhone 7, and everything went perfectly fine on the first try. Thank you! :)
Replaced battery, great video, Screws very small. Dropped a screw in side so turned upside down to get screw out.
Tore cable at top which i think is front facing camera but now digitiser doesn’t work either.
Bum!
Excellent tuto. Tout s’est passé comme sur des roulettes.
Je repars avec mon ephone 7 restauré !
Merci à toute l’équipe. Merci pour la trad en français !!!
Avec plaisir ! Et bravo à vous pour la réparation !!
iPhone 7... Bought the battery replacement kit, didn't come with an iOpener. I used a CVS Heating Pad as an alternative after several heat ups I managed to remove the LCD without any physical damage. I put everything back together, and to my surprise there was a rainbow on the left side of the screen and everything is shaking. I am not blaming iFiixIt, I dind't have the right tools. Get the right tools!!
Lets gooooo!!! I finished without managing to screw anything up!!!
The iPhone 7 guides lack a critical piece of information: The cable that goes to the home button (which lies under the display cable) is too long. It will get crushed and crimped between the two halves of the phone during reassembly, breaking the Home button and requiring an entire screen replacement to fix it. Pictures here.
You have to shove this thing back in with a toothpick or spudger while bringing the right side of the phone together.
Replaced iPhone 7 battery with no major problems, EXCEPT…new battery install is tricky (you have to align the loose battery connector to the terminal on the board before you press down on the battery to fasten battery adhesive). LAST THING…battery kit included new adhesive to apply to the display for waterproofing…there are no steps on the battery replacement instruction page. I didn’t know about this until I buttoned up the iPhone (so it didn’t get installed).
Have previously changed a 6S battery & now successfully changed the battery on a 7. The guide works well & one month later the battery health is still on 100%. Thanks to iFixit I've now extended the life on my iPhone.
спасибо, за инструкцию, всё установил, всё работает
Danke für die Anleitung.
Das hätte ich mir schon viel früher antun sollen:
Ladekapazität: 2h ---> 2 Tage
Es hat eine Weile gedauert, weil ich sehr vorsichtig war, aber der Lohn war ungemein. Jetzt muss ich mir keine Gedanken machen wenn ich mit nur 20%-Ladung mal kurz unterwegs bin.
Hi, just performed battery and screen change . . . accidentally punctured the black connection piece of metal of battery just before it clips into circuitry but iPhone is charging and seems to be working. Is the metal connection arm just a conductor of energy, therefore small hole in it, probably won't cause any problems??
Hallo,
Der Austausch des Akkus hat bei mir problemlos funktioniert. Für diejenigen bei denen der Homebutton nach dem Neustart nicht funktionieren sollte (sofern der Homebutton und das Display intakt waren):
im iCloud Menü überprüfen, ob die Codeänderung deaktiviert ist! Dies das war in meinem Falle ein Problem, da unter den Einstellungen die Touch ID und Code nicht aufrufbar waren. Als ich diese im iCloud Menü wieder aktiviert habe, konnte dieser Menüpunkt wieder aufgerufen werden und die TouchID funktioniert wieder einwandfrei.
Also ist eine Sperrung der TouchID Funktion beim IPhone 7 durch Apple nicht gegeben.
Replaced the iPhone 7 battery with the IFIXIT IF332-005-10 and the phone keeps displaying the Apple logo on black screen…
It has been connected to the charger and Apple cable for over an hour. Initially it was displaying the Apple logo for a few seconds and then off (black screen), then logo again and then black screen… and so on. This resetting is still happening btw. but with longer (15-20 mins) Apple logo intervals.
Bum battery or do I need to wait much longer? I’d hate to have to revert back to the original Apple battery but at least it worked…
If the the adhesive strip is broken (it happened to me 😇, you can use a credit card to lift the battery without risk
Can anyone confirm 7/7P's pentalobe screws have a ring of seal near the screw head?
Cooper Chase - 回复
Confirmed, the screws have a black ring seal around the head.
rcheing - 回复
Can’t get the display front
Bernadette Pfeifer - 回复
From personal experience, I highly recommend before doing this procedure or any other, that you do a backup of your phone (preferably local) in case your procedure goes south.
ballina5ny - 回复
I purchased the repair tools with the replacement battery from iFixit. The tools include a screw driver and three heads none were labeled 3.4 mm. I think the one that fit the pentalobe screws was labeled Y000. The guide should identify the screw driver head supplied by the kit not 3.4mm.
Mark Lieberman - 回复
in the iphone 7 replacement battery kit from iFixit, the screwdriver that fits the 3.4 mm pentalobe screws is labeled P2 (and not Y000)
Jan-Tijn Oppermann -
3.4 mm is the height of the screw and is not related to the screw driver code.
Ahmad Vaziri -
the screwdriver PH000 does not work i wasted two screws and now they dont have the 4 cross mark they are now a circle, i buyed it all from Paraguay and it doesnt work, had to assembly back the parts because i got stuck like i mention with some screws, well im just going to send to a professional to install, thanks
Martin Frutos, Nuñez - 回复
The bottom screws are Pentalobe, not Phillips.
Bram Driesen -
Before starting, I would recommend backing up your Iphone’s data just in case.
Jon Moylan - 回复
If you managed to make it to this section, just send the phone into apple for 50 + 6 dollars shipping. The ribbon cables on the screen are designed to break. I can literally twist on the rest of the cable and it won’t fall apart but there is a diagonal section where it snaps. This is the fault of apple and the fault of ifixit for misrepresenting the fragility of the cables.
Ryan Huebert - 回复
Had to reheat it a few times for a minute each with a hairdryer to get the seal to break after pulling and rocking the suction
Cynthia Lamb - 回复
I’m technically challenged. Is there a premier national service who can professionally install a replacement battery got my 7 +?
Richard - 回复
Do the screws come out in total?
YVES THEUGELS - 回复
They may come out or may not. If you loosen as much as you can and they don't come out you should still be able to pry open the bottom. Once you get the screen off you can then push the screws out from the inside.
Anthony Falabella -
Is it the P2 you should use for the bottom??
YVES THEUGELS - 回复
I heated the bottom of the phone with a hairdryer and then used a syringe to put a couple of drops of acetone directly into the bottom two screw holes. I GENTLY pulled on the screen with the suction cup and used the pry tool to GENTLY separate the screen. The sealant is applied around the entire display so be very careful pulling it off so you don’t break the fragile display cables.
Anthony Scaminaci - 回复
At first it was very difficult to open, per instructions. I used a heat/ice pack and nuked it for 1 minute. The pry tool wasn’t working so I carefully used my pocket knife to wedge the cover open. The rest of the procedure went well until I cracked the glass while trying to get the top right corner to pop off. Other than that mistake, all went well. Tip: before setting the new battery, attach the battery connector first and leave enough room for the taptic engine, or better yet, place the taptic engine before adhering the replacement battery. This way you’ll have a small gap between the two, whereas mine barely fit. Good job on hosting the video, Gwendyl.
Klaus Preiss - 回复
I love the fact that the screw bit and shaft are magnetic! I almost lost a screw and found it attached to the magnet.
I used a heat/ice pack and nuked it for 1 minute. At first the display cover was very difficult to open with the pry tool, per instructions. The pry tool wasn’t working so I carefully used the blade of my pocket knife to wedge the cover open. The rest of the procedure went well until I cracked the glass while trying to get the top right corner to pop off. Other than that mistake, all went well. Tip: before setting the new battery, attach the battery connector first and leave enough room for the taptic engine, or better yet, see the taptic engine in place before adhering the replacement battery. This way you’ll have a small gap between the two, whereas mine barely fit because I placed it almost too low.
Good job on hosting the video, Gwendyl.
Klaus Preiss - 回复
I replaced the lightning connector assembly and reassembled. The old one did not 'click' into the cable and had corrosion inside, it needed the cable to be placed in a specific way to charge. The new part - does not recognize that a charger is plugged in at all.
I backtracked the assembly - took it apart, put it back again - and find that every thing on the part works - the mic, speakers, taptic engine.
The original problem with the cable still persists. Any ideas?
H K - 回复