当前版本的文档还未经巡查,您可以查看最新的已查核版本。
简介
若要简化维修过程, 请使用我们的工具 fix kit 并遵循指示 this shorter guide 来更换你 iPhone 的全部显示组件 (屏幕总成).
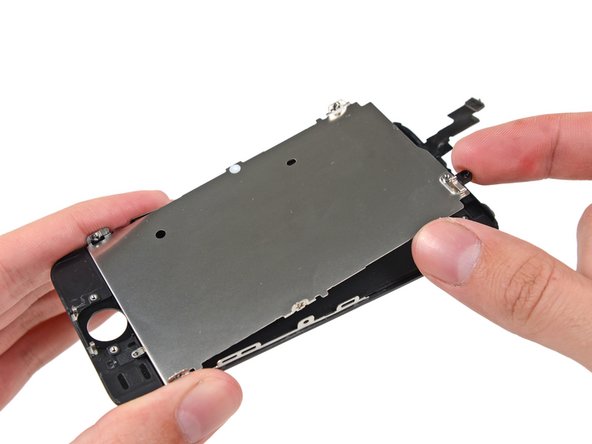
对于更熟练的维修者, 本教程将帮助您*仅*更换 iPhone 5s 的 LCD 显示器和触摸组件 (即俗称的“外屏”) 而无需更换全部的显示组件 (屏幕总成). 这需要你在安装前从你旧有的屏幕总成上转移一些组件到新的触摸组件 (外屏) 上 — 包含前置摄像头组件, 听筒组件, LCD 保护背板和 Home 键组件.
对于上述维修, 转移原有的 Home 键组件到新触摸组件 (外屏) 上是必要且重要的, 因为它们对于维持 Touch ID 正常工作而言是必要的.
你还可以使用此教程来更换如下组件:
你所需要的
视频概述
-
-
一只手固定好iPhone机身,另一只手轻轻地把机身从前面板底端的home键上分离。
-
当你左手使用吸盘拉动的时候,右手用塑料撬棒在后机壳边缘处,轻轻地撬动,使屏幕和机身分离。
-
-
-
稍微打开屏幕,可以看到盖住home键电线的挡板铁片就可以了。
-
只有手机原装的Home键组件才能使用Touch ID功能。如果你扯断这根电线,装上新的home键只能恢复home键功能,而将失去Touch ID功能。
-
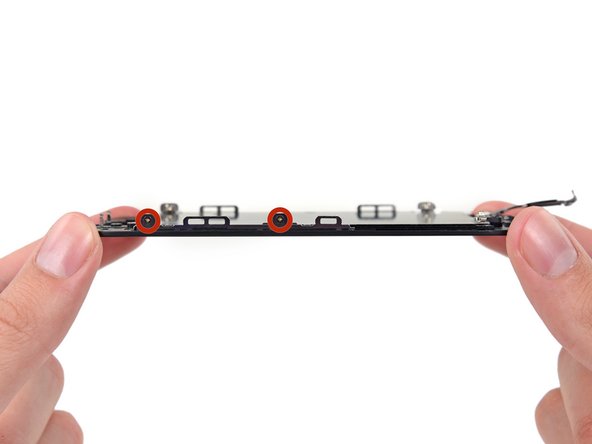
使用手机撬棒推动松下铁片,再用镊子取下来。
-
-
-
一旦连接器被撬开了后,把home键底端从机身上拉起,把手机顶端当做一个转动支点。
-
把显示屏立起来,保持跟机身成90度角。在你维修手机的过程中一直保持这个状态。
-
用橡皮筋把显示屏如图三所示固定住。这会避免在维修过程中显示屏电缆的损坏。
-
-
-
这个步骤还没有翻译 帮忙翻译一下
-
Place the earpiece speaker bracket over the speaker so that it fits snugly in its housing.
-
Slide the left hook of the bracket into the notch above the top left corner of the front facing camera.
-
Rotate the bracket so it lays flat on the rear case, aligning the two screw holes. Press the bracket into place, ensuring the hook on the right side of the metal bracket latches onto the display.
-


若要重新组装你的设备,请以逆序参考本说明的以下步骤。
若要重新组装你的设备,请以逆序参考本说明的以下步骤。
1141等其他人完成本指南。


93条评论
FYI Vibrate motor
Just did one of these last night, worked perfectly except that the vibrate motor stopped working, took it back apart and realized that the little prong on the ear speaker cover sometimes gets bent a little with removal. I just pushed it back in and the vibrate motor then had enough room to work again. Make sure that you push it back in all the way first time unless you want to do more work than you have to! These phones have no space to spare!
For some reason after doing this the home button seems to have sunk and requires a much much harder press for it to work. I think it's the adhesive? Any ideas?
If the rubber gasket is not seated correctly, it may have wrinkle in it, thus hindering is action.
During reassembly be very, VERY careful when pressing the display assembly into the rear frame. Many displays are damaged because the phone was dropped and the rear frame hit a hard surface. The rear frame may be slightly bent or out of shape. When pressing the new display in place it might not fit easily and applying even light pressure can BREAK the new display assembly (I know from experience). Supper lame to get literally to the very last step and crack the new display. %&*#!!!
kevindfrye - 回复
just happened to me i also got reboot logo stuck