跳转到主内容

当前版本的文档还未经巡查,您可以查看最新的已查核版本

你所需要的

  1. , 粘贴显示屏玻璃: 步骤 1 中的图像 1,3 , 粘贴显示屏玻璃: 步骤 1 中的图像 2,3 , 粘贴显示屏玻璃: 步骤 1 中的图像 3,3
    • 如果屏幕的盖板碎裂并且有玻璃的碎屑,为了保护自己请用胶带把玻璃碎屑贴住。

    • 用胶布贴住整块屏幕以固定住玻璃碎屑。

    • 这样当你撬起和取下屏幕时保护玻璃面板和屏幕支架。

    • 当你进行维修时请戴好防护眼镜保护眼睛,以避免玻璃碎屑飞溅。

  2. , 移除底部螺丝: 步骤 2 中的图像 1,1
    • 在开始之前,将手机电池电量放电至25%及以下。如果不小心捅破的话,过多电量的锂电池会起火或者爆炸。

    • 在拆解之前将手机关机。

    • 拧掉 2 颗在 Lightning 接口两侧的 3.8mm P2防撬螺丝

  3. , 使用iSclack 起屏器打开屏幕: 步骤 3 中的图像 1,3 , 使用iSclack 起屏器打开屏幕: 步骤 3 中的图像 2,3 , 使用iSclack 起屏器打开屏幕: 步骤 3 中的图像 3,3
    • 接下来两步是展示如何使用iSclack起屏器打开iPhone 5c的屏幕,也可以用于其他任何手机。如果你没使用iSclack起屏器,请跳到步骤5。

    • 合拢iSclack的手柄,打开吸盘口。

    • 把手机底部放入吸盘口,并抵在塑料深度计上。

    • 上方的吸盘口不要覆盖在Home键上。

    • 打开iSclack的手柄合拢吸盘口。按压手柄使得吸盘口贴合在手机表面和底部中线上。

  4. , 完成iSclack开屏步骤: 步骤 4 中的图像 1,2 , 完成iSclack开屏步骤: 步骤 4 中的图像 2,2
    • 握好机器合拢iSclack手柄分离吸盘口,把屏幕从后盖上拉开。

    • iSclack致力于安全的打开iPhone,仅仅是完全分离部件而不会损坏排线。

    • 取下iPhone上的两个吸盘。

    • 可以跳过接下来的3步从第8步开始。

  5. , 手工开屏方法: 步骤 5 中的图像 1,1
    • 把吸盘贴合在屏幕上,Home键的正前方。

    • 确保吸盘口紧密的贴合在屏幕上。

  6. , 抬起显示屏: 步骤 6 中的图像 1,2 , 抬起显示屏: 步骤 6 中的图像 2,2
    • 确定吸盘牢固的贴合在前置面板上。

    • 一只手用撬棒下压机器,另一只手轻轻的拉起吸盘使前置面板从后盖上分离出来。

    • 慢慢的使匀力稳当的拉起吸盘。比起大多数部件来说屏幕是装配得最紧的。

    • 当你拉起吸盘时,使用塑料撬棒轻轻的下压后盖使屏幕与机身分离。

    • 有好几个卡扣在前置面板和后盖之间,所以需要组合使用吸盘和塑料撬棒使屏幕与机身分离。

  7. : 步骤 7 中的图像 1,1
    • 拉起小点释放吸盘的真空密闭空间。

    • 从屏幕上取下吸盘。

  8. , 抬起显示屏: 步骤 8 中的图像 1,2 , 抬起显示屏: 步骤 8 中的图像 2,2
    • 打开屏幕竖起大约90°角,把屏幕竖起依靠在某些物品上。

    • 需要的话,可以使用未打开的罐装饮料支持住屏幕。

    • 用橡皮筋固定住屏幕,这样可以避免过度紧绷屏幕排线。

  9. : 步骤 9 中的图像 1,1
    • 拧掉主板上用于固定电池排线的金属屏蔽罩上的2颗1.6mm PH000号螺丝。

  10. : 步骤 10 中的图像 1,1
    • 取下电池排线的金属屏蔽罩。

  11. , 断开电池排线: 步骤 11 中的图像 1,1
    • 用撬棒或干净的手指甲挑开主板上的电池排线。

    • 请小心!仅将排线插头挑起即可,不要挑起插座。如果您挑起了主板上的插座,可能会导致插座和周围元件的损坏

  12. : 步骤 12 中的图像 1,1
    • 拧掉主板上固定前置面板排线金属屏蔽罩上十字PH000螺丝:

    • 2颗1.3mm的螺丝

    • 1颗1.7mm的螺丝

    • 1颗3.25mm的螺丝

    • 记住这些螺丝的位置是很重要的。在恢复的时候 错误的把3.25mm螺丝或者1.7mm螺丝拧在右下角会对主板造成不可修复的损伤或使得iPhone无法开机。

    • 螺丝不要拧太紧。如果拧紧螺丝时很困难可能是使用了错误规格的螺丝刀,请不要使用蛮力。

  13. : 步骤 13 中的图像 1,1
    • 从主板上取下固定前置面板排线的金属屏蔽罩。

  14. , 断开显示屏排线: 步骤 14 中的图像 1,2 , 断开显示屏排线: 步骤 14 中的图像 2,2
    • 用撬棒或干净的手指甲挑开前置摄像头排线和感应器排线。

    • 请小心!仅将排线插头挑起即可,不要挑起插座。如果您挑起了主板上的插座,可能会导致插座和周围元件的损坏

  15. : 步骤 15 中的图像 1,3 : 步骤 15 中的图像 2,3 : 步骤 15 中的图像 3,3
    • 在您进行本步骤操作需要连接或者断开线缆时请确保电池保持在断开的状态。

    • 用撬棒或干净的手指甲来断开LCD线缆链接头。

    • 显示排线和触摸排线是联在一起的,所以必须同时挑开2根排线。在取下屏幕前请再次检查2根排线是否都已经挑开。

    • 当重装机器时,显示排线可能会跑偏扣在座子上。白屏或者有条纹就是因为排线没扣好。如果出现这样的情况,重新扣排线和重启iPhone即可。最好的办法是,重置电池:挑开电池排线然后再扣上即可。

  16. , 将显示屏和后盖分离: 步骤 16 中的图像 1,1
    • 从后盖上取下显示屏。

  17. 这个步骤还没有翻译 帮忙翻译一下

    : 步骤 17 中的图像 1,1
    • Remove the two 1.5 mm Phillips #000 screws securing the rear-facing camera to the rear case.

  18. 这个步骤还没有翻译 帮忙翻译一下

    : 步骤 18 中的图像 1,1
    • Remove the rear-facing camera bracket from the iPhone.

  19. 这个步骤还没有翻译 帮忙翻译一下

    : 步骤 19 中的图像 1,1
    • Use the flat edge of a spudger to pry the rear-camera connector up off the logic board.

  20. 这个步骤还没有翻译 帮忙翻译一下

    : 步骤 20 中的图像 1,1
    • Remove the rear-facing camera from the iPhone.

  21. 这个步骤还没有翻译 帮忙翻译一下

    : 步骤 21 中的图像 1,1
    在这个步骤中使用的工具:
    Standoff Screwdriver for iPhones
    $5.49
    购买
    • Remove the following screws securing the upper assembly contact bracket to the rear case:

    • 3.0 mm standoff screw

    • Standoff screws are best removed with a standoff screwdriver or standoff driver bit. A small flathead screwdriver can also do the job—but use extra caution to ensure it doesn't slip and damage surrounding components.

    • 1.5 mm Phillips #000 screw

  22. 这个步骤还没有翻译 帮忙翻译一下

    : 步骤 22 中的图像 1,3 : 步骤 22 中的图像 2,3 : 步骤 22 中的图像 3,3
    • Remove the upper assembly contact bracket from the rear case.

    • A small rubber bumper may fall off the top of the bracket—take care not to lose it.

  23. 这个步骤还没有翻译 帮忙翻译一下

    : 步骤 23 中的图像 1,1
    • Remove the small foam tape from inside the rear camera's cavity.

  24. 这个步骤还没有翻译 帮忙翻译一下

    : 步骤 24 中的图像 1,1
    • Remove the two 1.4 mm Phillips #000 screws securing the power/sleep button bracket.

  25. 这个步骤还没有翻译 帮忙翻译一下

    : 步骤 25 中的图像 1,3 : 步骤 25 中的图像 2,3 : 步骤 25 中的图像 3,3
    • Use the pointed end of a spudger to gently fold the power/sleep button bracket down from the top of the rear case.

    • Use tweezers to grab and remove the button.

    • For reassembly, note the orientation—the metal bar should be flush with the bottom of the button. Check if your home button has the metal hinge, if not you will need to transfer it from your current home button.

    • If you can't get a hold on the power button from inside the case, use a spudger to slightly push it in from the outside.

终点

44等其他人完成本指南。

团队

iFixit iFixit 的会员

Staff

135 名成员

创作了17,198篇指南

8条评论

So whats next,if you removed it and reintalled it and still dont work. What next??

ZULEYMA - 回复

This should not be rated "difficult" because it's extremely easy.

THIS is difficult.: iPhone 5c Audio Control and Power Button Cable Replacement

applerepairshop - 回复

Yes, this one is relatively easy.

Anything involving a heat gun is "Difficult ".

Anything involving mandatory spare parts and a heat gun is "Very Difficult ".

:-)

Boyd Waters -

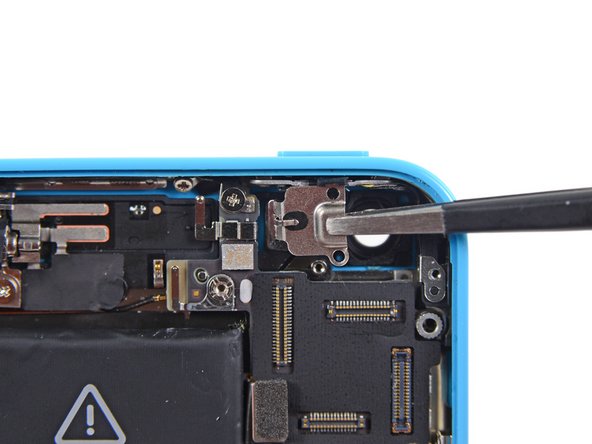
There is a cable connected to be power button on my iPhone c and all the videos don't show how to remove it HELP PLEASE

Perry Harrison - 回复

You can find the guide for removing/replacing the cable for the power button right here. That cable also contains the flash, microphone, and volume controls.

Jeff Suovanen -

添加评论

浏览统计数据:

过去 24 小时: 1

过去 7 天: 13

过去 30 天: 35

总计 43,318