简介
按照这份指南来更换已损坏的前置摄像头。
你所需要的
-
-
从下往上推开后盖。
how can i take out the screw if it is stripped
with a small driller, but I guess it is very difficult. Never attempted that myself on an iPhone.
lantzero -
There is no screw in Step 2?
Is the screw stripped or the head stripped?
I have used superglue on the screwdriver to remove a stripped screw, it would turn but not come out, with superglue I could turn and pull the screw out. May also work on a stripped head.
Trevor -
Why isn't it moving? I removed my screws.
Don't use too much force to slide the back -- the back on my phone was hard to slide, and I bent and broke a silver metal contact tab at the top of the back (on the inside).
Super easy fix. Thanks for the tutorial!
Those little screwdrivers are easy to mix up, for those of us without ultra-perfect vision! Once I used the correct screwdriver, and my 13yo son's little fingers and perfect eyes, it went smoothly! Also my son noticed that the rubber piece around the camera len was covering the camera; it likely slid out of place when sliding off the back cover. A little playing around (with plastic tools only!) and it looks perfect now!
ashleedawg - 回复
sorry but the rear panel is not pushed up. I pulled out the screws in the step 1 but still the rear panel does not move with even when I push it strongly.
I too tried to push and slide the rear cover without success. I then tried just pushing the bottom edge up with my thumbnails. It moved very easily forward. Just a few mm movement is needed and then the cover can be removed.
The finger friction approach did not work for me, even when using a sticky pad.
Here is what worked for me: Grab the iPhone in your right hand with the screen facing your hand and the top facing your body. Find a sharp edge of a desk or counter and place the bottom of the phone's back cover on is so that when you push it, the back cover remans against the desk with the body of the phone sliding free. BE GENTLE as this approach takes far less force than the finger friction approach.
-
-
-
向下轻拉后盖,小心不要将塑料卡扣损坏。
-
取下后盖
On reassembly, be sure to clean the metal plate at the place of contact with the tiny pressure contact mentioned in step 4.
I pried one end of the back off only to find 2 funny little screws holding the other end on so I took my Dremel, like Jack said, and ground those suckers out. Once I had the back off I loosened all the screws then turned it upside down and shook the crap out of it. The screws went flying everywhere and fell on the floor. Its my moms house so of course she's got gross brown carpet. How am I supposed to find my screws in that? I get the vacuum out and go over every inch of the floor to suck up all them screws. Then I dump the bag on the table and all I find is a bunch of hair and gods knows what else, but no screws. When I look for my phone I see its covered in all that stuff that came out of the vacuum. I mean, what's up with that? How can I work on my phone if its covered in dirt? Nobody said anything about that, did they? The average guy's gonna screw up his phone big time if he follows these instructions and nobody warns him about all the dirt that's gonna end up in his phone. Are you kidding me!! Now what?
The replacement panel I got had two sheets of protective plastic on the inside and one on the outside. I used a toothpick to carefully lift and peel the two inside sheets off. One small one was over the lens on the inside. The other was over some large brown sheet of unknown function (though I think it goes over the battery). When I peel that away, some of the brown material tried to lift of with it, so be very careful.
From this point go to step ?? Just peel off the tape from the chip. Take some aluminium foil and cut a hole the size of the chip (Use a second layer of foil if you don't thrust it). Heat the chip as described at temperature 300 deg C for 5 minutes. Let it cool down. Reassemble and ..... hura WIFI is on again.
-
-
-
卸下电池排线固定架上的螺丝:
-
1颗1.7mm螺丝
-
1颗1.5mm螺丝
This step needs a few more caveats.
The bottom screw on my phone was locked with some thread adhesive, and required more force to loosen it than I expected.
Even after removing the screws, the battery connector was rather firmly seated, and required a fair bit of persistent gentle prying with the opening tool before it came loose.
The ground clip came loose and nearly flew off while loosening the connector, so it would really help people if there were a warning on this step to watch out for the ground clip and make sure it doesn't bounce away.
I had the same problem with the ground clip! I’m glad that I didn't for it.
iScott -
The battery connector is attached to the battery. You're not going to completely lift it out and remove it. It pulls out from the socket you can see in step 5 picture 3. The pressure contact (little black and gold thing) will probably just slide out from under the connector. Not a problem.
I completed this successfully, but this step gave me the most trouble. The pressure contact is really difficult to reseat. So much so that it should probably be called out more clearly in it's own step.
Greg Fulco - 回复
If your pressure contact pops out you might find the video at http://www.hightechdad.com/2013/05/07/ho... helpful
I found this link to be incredibly helpful in identifying how/ where to put the pressure contact back in place
In french: attention avant de retirer le contacteur de la batterie. La vis du haut tient "en sandwich" une petite pièce métallique noire et dorée. Cette pièce a pour but de faire contact de masse avec le dos de l'iphone quand il est refermé. Donc il ne faut pas la tordre. Quand les deux vis du contacteur sont retirée, attention au moment de débrancher le contacteur: cela va faire bouger cette pièce qui ne doit pas être abîmée ni tordue. Au remontage, il faut bien la remettre en place sous le contacteur de batterie: il est tout à fait possible de mettre d'abord le contacteur, puis de glisser la petite pièce au dessous pour qu'elle soit bien à sa place, le trou en face du trou de vis et du trou du contacteur. En remettant la vis, la pièce tient bien en place. Elle doit bien continuer à dépasser de manière a faire contact avec le dos de l'iphone.
Top screw didn’t move with iFixit Philips #000 driver. The metal is too soft and in the result the screw was damaged while still in place. Having nothing to lose I also tried #00 and #0. Any way to remove the stuck screw? I would gladly saw it off if I could.
viktorcode - 回复
Ok, I had to drill the screw to break it. It was very delicate and time consuming operation. But in the end the screw cap finally broke off and I was able to remove the battery!
The Liberation Kit Philips head screwdriver strips the battery connector screws! It stripped the ne 1.7 mm Phillips screw circled in red in the photo above. I was able to remove the other screw, then I lifted the battery connector off while the red screw was still in position and wound the connector around in circles while lifting upwards and managed to unscrew the stripped screw. Advice, find a decent philips heard screwdriver for the internal screws like the two found on the battery connector.
Bottom screw was totally stuck, nothing could budge it. I removed top screw, heated up battery with hair dryer to release the glue, pulled it out using the spudger. Lifted up the metal plate thing (after taking out the ground piece and putting it aside). Cut off the flexible bit between the plate and the battery and twisted the plate around the screw as you did.
Well, the screw eventually came out—but only the top half! Yes, it split in two. Then the bottom half came out, still attached to the thing it was screwed in to (a sort of barrel).
I put the new battery in, put the bottom half (with the barrel) of lower screw back in its original position, replaced the ground piece and positioned the new plate over it, and screwed the top screw back in. Then put the top half of the lower screw in and tightened it.
Et voila!
Extra: It was helpful to discover that the 1.5 and 1.7 mm measurements refer to length of screw, not size of Phillips head.
When reassembling, use EST tweezers to get align the pressure contact over the top screw hole. using the pointy end of a spudger to assist: put the point through top screw-hole on the battery connector, then through the pressure contact and into the screw-hole. this will help to keep the small piece in place while re-seating the battery connector. Leave the top hole spiked as such until the screw in the bottom hole is gently fastened. Remove the spudger and replace the top screw.
Pressure contact needs to be remain EXACTLY in the same position if you remove/replace battery. I had to re-open my iPhone 4S after a battery replacement (the mobile connectivity was lost) and tweak the position of the Pressure to restore functionality.
I used my 16x magnifier loupe to be certain I had the pressure sensor aligned with the screw hole - no problem, no stripping. I consider it indispensable for tricky steps like this, and IFixit sells a similar tool for just $14.
Jen Morris - 回复
The pressure connector is the battery connector under the silver plate. BE CAREFUL. It seems like it'd be really easy to tear that pressure connector out without meaning to. The bronze and black thing is the ground, *not* the pressure connector. If you remove it just keep track of it and re-install it.
The phillips head screwdriver provided in the ifixit repair kit does not work well this these two screws after my first attempt at unscrewing the screws became stripped. The 1.7 mm phillips screw gave me the most trouble. It took an hour to unscrew after the screwdriver from the kit stripped the screw. I used a piece of masking tape over the screw for grip to loosen it, then used finger nail clippers as pliers to unscrew. I would recommend investing in a better screwdriver for this one step. Assembly is otherwise simple and easy.
Here's a tip if you're having trouble removing the 1.7 mm screw. I had real problems removing it – the 1.5 mm screw came out easily using a Phillips #000 screwdriver but I almost stripped the 1.7 mm screw using the same screwdriver. What I did instead was use a flathead screwdriver from the iFixit pro tech toolkit I got, the one with a "–" sign and 1.0 size. That worked perfectly!
I would agree that a decent magnifier would help as the screws and components are small.
Also take necessary precautions to ensure the screws are not lost or mixed up.
Other than being a bit fiddly (particularly the earth connector), the only challenge I had not covered was that the battery was fixed with glue close to where the connector is and despite releasing the battery along the side, I couldn't get the battery to lift out using the tab. In the end I had to use the plastic tools to gently lever the battery away, working from the outside edge and ensuring I wasn't levering against the volume control buttons.
The new battery is in and following the advise given, I hard reset the phone and all my usual functions are now running... and if this £18:00 fix gives the phone another year or two of use, it will be well worth the effort.
Vous dites "Le connecteur de batterie s'enlève verticalement de la carte mère. Ne forcez pas latéralement"
Ou placez vous la verticalité ? pour moi c'est connecteur d'alimentation en bas, bouton d'alimentation en haut ?
Parce ce que sur la photo suivante, vous enlevez le connecteur de la gauche vers la droite ... c'est à dire latéralement ...
Soit nous n'avons pas le même sens vertical / horizontal, soit il y a un GROS problème dans l'explication, ou dans la traduction.
En tout cas, à la lecture de votre explication, j'ai essayé d'enlever le connecteur vers le haut !!
Donc il m'est maintenant impossible de remettre la batterie neuve, le connecteur est cassé !!!
Bravo pour l'expertise ifixit :(
I've gone through this process twice now. I found this video also very helpful: https://www.youtube.com/watch?v=nYYdbk3U...
The little contact thing that sits under top screw is always the biggest hassle to fit back into place (I do it after attaching the battery cable) with tweezers from ifixit.
My personal tips:
- plan that the incredibly tiny screws or the top-screw contact thing, might get away from you. so work in a space where you can find them easily. Not over carpet, etc.
- I use strips of tape on a piece of paper to secure the screws while they are out, and position them so I know which one goes on top of battery connector, and the one on bottom.
- If you have access to a spouse's/mate's iphone, in Accessibility settings there's a Magnifier option (triple-click home button) which does an amazing job at magnifying stuff at a circa 4-6" distance. Lacking any good magnifying glasses, this feature helped a lot. https://www.imore.com/how-use-magnifier-...
I wonder if the two screws shown on the picture are not inverted. It would seem logical to me that the longest (1.7mm) screw be placed on the upper hole, (where there is the yellow circle) ie on the hole where there is extra thickness (of the gold plated grounding contact sheet metal) in the sandwich. I have not checked, however, I just put the screws in the same location as found.
It does not work
When removing the 1.7 mm Philips screw, on rare occasion, the socket it is threaded into, might come out with it. (It depends on how little of that blue glue was used underneath on the assembly line.) Grab the socket under the removed plate between your fingers and use your Phillips screwdriver to back out the 1.7 mm screw from the old shield. Then once separated, thread back in the socket, into the case where it came from. You will want to do that before installing the new battery. You will need a small flat blade to span the socket hole in order to thread it back in snug. When the 1.7 mm screw is threaded back in with the new shield (with the Phillips screwdriver), it should tighten the rest of the way. Don’t over tighten. Great little kit!
Jim Henkel - 回复
-
-
-
使用塑料开启工具断开电池连接座。
-
将工具的尖端放置在扬声器外壳和连接器的金属盖之间,然后先撬起连接座边缘。
No idea what exactly this step means. I just pulled the battery connector without trying to move the pressure contact. Installed new battery, plugged in connector and aligned the pressure contact slightly for the screw to fit.
Got a big scare as the phone would not connect to the cell network at first boot, only WiFi. Shut it off and when it rebooted it seemed to work. WIll probably know in a day or so if everything works fine or if there are interference issues, etc.
This is normal ... removing the battery resets internal clock to start value and your provider doesn't accept that, hence no network.
Going online through wifi or manually setting date right corrects this after a reboot.
Dreetn -
After reassembling the iPhone I the GSM connection wasn't working. After cleaning all parts with isopropyl alcohol it still didn't work. What solved my problem was to turn on WiFi and then synchronizing the date and time which was set to 1970-01-01. After a reboot everything worked just fine. :)
I had the same problem. Thanks for the solution!!
thanks for this!
The black ground contact needs still more "flagging." This is a simple metal strip that is attached ONLY by the 1.5mm (upper) screw. It will help if you look at it before you remove the upper screw. Notice the gold contact arm and point. That contact point must be in a plane above every other surface inside the device when you replace the battery connector, because it makes a ground contact with the metallic inner surface of the device back plate.
When I replaced it, I used the Pentalobe driver to line up battery connector and ground contact with the screw socket post. I then attached the 1.7mm (lower) screw loosely, removed the Pentalobe driver gently, and inserted the 1.5mm (upper) screw into the assembly. There is a tab on the ground contact that helps it align properly once pressure begins to applied. I completed driving the upper screw, pressing lightly with the spudger on the battery connector plate to make sure it was seated on the pressure contacts. Finally, I completed driving the lower screw.
I didn't find any need to remove the pressure contact. I just pried the battery connector up (gently) with a spudger and left the pressure contact in place. Connected the new battery and aligned the pressure contact screw hole. Replaced the screws, finished reassembly and all was good.
After reassembly, the CELL CONNECTION WASN'T WORKING. You might need to slightly bend the contact in step 5 up just a little, so it will make contact with the metal back plate. Did that and it worked perfectly.
Great kit, great instructions, thanks!
all those teeny screws...and the world is so...well...BIG!
go slow and put those parts INTO something...
putting them "on" something will just cause heartache and and an infected bladder...
°¿°
after a lot of froofroo and very errant iphone behaviour problems, i concluded that that tiny grounding piece must be being lazy as hello. i spread it out a bit to ensure a better contact with the back plate and everything appears to be working smoothly.
did this repair, as well as the battery replacement...GTG!!!
spoke too soon, i 'spect...random reboots persist.
Just went through the replacement and the battery "plug" (step 5) on my replacement battery was slightly misaligned relative to the metal plate used to screw it onto the board. The plastic and "gold" "plug" was slightly askew on the metal plate, which meant that when the plug was inserted, the screw holes (step 4) were poorly aligned.
I managed to pull everything back into line using the screws, but the QC on these replacement batteries is a bit suspect.
Guess what happens when you rotate that ground connector 180 degrees...it grounds what I deduced to be the heat sink of the power amplifier for the speaker! So it is silent. It took me a couple of attempts to discover this as I was distracted by the new speaker not sitting down properly and a little dot of stuff under the main connector stuck to the pins. The latter was cleaned-off with a pin under 5x magnification followed by some isopropyl alcohol.
I suggest that Step 5 is more explicit about the orientation of this ground connector. It's only obvious after a really close look and if one has a lot to do like I did, it's a long time before one comes back to this step so the correct orientation is not obvious.
I accidentally removed the pressure contact and I was not able to put it back in place and so far haven't ran into any problems. Is this safe??
Vasu Reddy - 回复
The hole in the pressure contact aligns with the top screw. The IFIXIT tool kit I bought contained a black sharp “thing” that I used to align the pressure contact with the top screw hole. I used this tool to align the bottom screw hole also. I put the bottom screw in first but did not tighten it all the way. A good magnifying glass with a light helped a lot. Tim
Aligning with the black pointy “thing” definitely helps. Also, the small copper end of the contact piece is supposed to stick up once attached, to make contact with the back plate of the phone after re-assembly. The piece slides under the silver metal plate, and the the pointer can be used to align the silver plate hole and the black/copper plate hole in place for the screw.
88888888888888
888888888888
-
-
Without that contact. Will the iPhone still use wifi? I need an answer ASAP!
Nope, Just tried it and without it it won’t connect to cellular or WiFi
What if i lose that little metal ? Huhu
Reattached it before removing the battery in next step? Or you mean upon reinstalling after all following steps ? Little confused why I would disconnect then reconnect then take battery out ? Or that is just for reinstalling?
Hi Nikko,
You’re right—reattach it when you reassemble the phone. I’ll re-word it to hopefully clarify that.
Arthur, you still need to re-word steps 7 & 8 ;-)
Excellent job highly appreciate by the way!
Regards,
Antoine L
Thanks Antoine!
I’m not sure what needs to be re-worded in step 8?
Can I use 72% ethanol instead of isopropyl alcohol?
As I understand it 72% is good for disinfecting, but at that concentration there's a lot of water and therefore residue once it evaporates. I think that you'll need a higher concentration to get the best results.
-
-
将塑料开启工具的边缘插入电池与手机中间的缝隙,将电池取出。
-
沿着电池的右侧边缘使用塑料开口工具,从不同的位置上撬起,将电池完全与后盖的残胶断开分离.
-
等待一分钟左右,让酒精削弱胶粘力。
-
用塑料开启工具平的一端小心的将电池抬起。
This can be very tricky because sometimes theres just too many glue on the back of the battery, and eventually the battery will be deformed.
Try a used plastic credit/gift card to apply gentle pressure to lift the battery out of the phone, the short edge of the card fits within the gap on the logic board side between the battery and video cables. You can also use it on the opposite side if there is room between the battery and iPhone frame. This has worked on all of the 4 and 4s models I've replaced screens on.
I offer an alternative image if interested.
i also skipped the battery removal step. the battery didn't get in the way, but it did make it difficult to see if the wifi grounding fingers (step 14) were underneath the case lip. everything worked in the end though so i don't think removing the battery is a strict requirement.
rippergirl - 回复
How can you not remove the battery in a battery replacement fix? Step 14, there are only 7 steps. Me thinks these comments are getting mixed up between different fixes!
bluezzer -
I did not remove the battery to do a Speaker replacement and had no issues with getting the Speaker out/in. So, steps 4 and 5 are required but not step 6.
I found it easier to start by pulling the plastic lip to loosen the battery, then, if needed, use the plastic tool to pry from the side.
I tried to get the battery out as depicted in the first picture. It deformed and is now broken. Not happy. It seems better to leave it or get it out by gently pulling the tab.
Paul Baars - 回复
Please, Please, PLEASE avoid using probing elements to try remove batteries. I have had dozens handed in to me with punctures and two that actually started smoking due to people trying to prise the battery out. DO NOT DO IT.
The best way I have found to remove the battery is this process;
1) Try remove it with the pull tab directly, some will come out, some will not. Do NOT use excessive pull force else it'll deform the battery and reduce the capacity.
2) If the pull test didn't work, then get a hot air gun on medium and warm up the area around the battery for about 30 seconds, focusing on the perimeter of the battery. If you see ANY popcorn'ing then you're too hot, you don't want to cook the battery.
2.1) Wait about 30 seconds for the heat to now wick underneath the battery to soften the adhesive.
2.2) Now try pull the battery up, the extra heat should have softened the glue that you can remove the battery without excessive force and without sticking objects under the battery.
-
-
-
通过拉着外漏在外头的透明塑料条,将电池从手机取出。
-
卸下电池。
Be VERY careful NOT to pull off the part of the connector that is on the logic board! Mine now has only contact but no solder until I can get a small enough soldering iron and a less shaky pair of hands!
I lost the 1.5mm and 1.7mm screws when replacing my 4s battery. Is there a place that sells just these two screws? I bought a 4s screw kit from Zeeton.com but figuring out which screw out the of 39 screws were the the 1.5mm and 1.7mm was impossible.
Buy a cheap pair of digital callipers ($20 -$30) and it will be clear. You can then use them to measure all kinds of things instead of squinting with a ruler.
bluezzer -
Was having a hard time getting the screws back into the battery connector. Read another tip online that helped - pushed the end of my phillips screwdriver into some soft candle wax which gave it just enough stickyness to have the screw stay attached to the screwdriver while I was moving it toward the hole. Thought I'd pass that along.
I did as wazzamagu did (and stated above), "My Pentalobe tool was slightly magnetized so I used that to bring the screws in for tightening with the Philips screwdriver." That made replacing the screws fairly easy. Thanks for all the advice on this page. It was not hard at all. Go slow and carefully, everything is smaller in there than I expected. The "searching" thing came up as it seems for most people, but just took a reboot and all is fine.
TO ALL WITH NETWORK PROBLEMS!
I had the same issue with "searching network". After resetting the network settings in settings it did work perfectly!
Took about 15 minutes. The only thing that was confusing was the reference to parts, using the partname, and I didn't know what they were referring to. So I had to figure it out by the photos. Slightly frustrating. Got it in and it worked. My problem then, was it kept SEARCHING and couldn't find my carrier. I followed everyones advice on here, plugged phone into my computer to itunes. then turned off network settings in settings, then turned them back on, and I got 3 bars. good to go.
sally -
For the past couple of months, my phone had been dying very fast. I knew that my phone's battery capacity was getting quite low as this phone is older now, and is out of warranty. So I ordered a replacement battery about a week ago, and just installed it yesterday. The install was pretty easy, if you pay attention to where everything belongs. But my draining issue has not gone away. It stays charged a bit longer, my capacity is at almost 100%, yet it can't even hold a charge over night. I'm not sure what is causing this and would love any tips or stories from someone else!! Please help!!
loucksls92 - 回复
Beim Einbauen des neuen Akkus ist es sinnvoll diesen zuerst anzuschließen und dann erst wieder in die richtige Position zu bringen da man so dass Anschlusskabel besser verlegen kann
OMG thank you iFIXIT, the apple store wanted 3 times the cost of this repair kit. It took less than 5 minutes with most of the time spent trying to prise out the battery as it was glued in nice and tight but steady pressure from the spudger did the trick.
I think the best advice would be to touch nothing with your fingers as with careful use of the spudger I was able to position the tensioner point no problem. Everything else was nice 'n' easy.
Finally there was no cell connection only Wifi when I powered up so I simply powered down and up again and all is well in the world!
Thanks again.
The battery was incredibly hard to remove. I slid the spudger underneath the battery from the right side as far as it would go. Then, I worked it from the bottom to the top. The battery still was adhered and wouldn't budge using the pull tab. I wound up leaving the spudger underneath the battery at the top and then pressing down on the bottom of the battery to get leverage. After a few strong pushes, and then swapping the top and bottom in the last sentence, the old battery came loose.
I used tweezers to hold the tiny screws and align them with the screwdriver head before taking the screw to the destination hole.
One more tip.. if you don't have any other cartons or containers convenient, use the box that the product comes in as a workspace for holding the tiny screws while you work.
good tips, i took a couple of photos so i knew what it should look like and removed the screws and placed them in the order i removed them pretty easy if you take your time and be gentle
Sam B -
Be VERY careful not to pull on the plastic tab before you fully detach the adhesive or else you will rip the tab clean off. If you did this it is still possible to remove the battery. I just used the guitar pick tool things to slowly work it through the adhesive and under the battery
Zach Mangs - 回复
Stuck on searching after unplugging and plugging in the battery?
This is due to the date and time being set back to default. To fix this you will need to synchronize the date and time back to what it is currently.
You can do this by either:
- Connecting the phone to either a Wi-Fi network, Cellular Network (Mobile Data).
- Connecting the phone to iTunes (It will synchronize the time automatically once iTunes is opened and can detect and access the iPhone).
Once the date and time is synced you will need to turn airplane mode off and one as it may display 'Searching... 3G' or if it still says searching (which most of the time happens if the sim card has a sim pin lock enabled on it) you will then need to turn the phone off and on.
Watched the video and ordered the kit, followed all the steps and it all went brilliantly - thank you all so much.
One thing I noted with the replacement battery - from AussieBattery here in Australia; not from iFixit - but the same problem might occur; is that the cable on the new battery had to be 'tamed' (bent here & there like on the old battery, before I could reseat the screws and even the battery itself. One again the black - pointy & flat ended - spudgers, that we use in desktop iMacs, were helpful in getting under that battery and releasing it from sticky-!&&*! I used a pair of '2.5' reading glasses for this job, but '3.0' might have been better, as those screws are INFINITESIMALLY small!!!!! :(
Thank you IFIXIT! The battery replacement went very well for me. I was exceedingly careful with the minuscule fasteners. Reading through the instructions, watching the video and reading these comments before jumping in helped. I found the parts and tools to be of good quality. I feel like I beat the system! I used a pair of diopter 3 reading glasses which was a real aid. I hope my comment encourages others...
My rare earth magnets came in handy when I managed to lose the little grounding connecter screws. Those little guys will go flying if, while trying to align them for reassembly, pressure gets applied in just the wrong way. I say one fly out and bounce off my shirt, then it was gone, on the floor I presume. I grabbed my stack of 8 little magnets, waved it around on the floor under where I was sitting and what do you know? A little screw was stuck to it! I never would've found it just by looking...
You really need to include information about the pressure sensor. It WILL inevitably pop out, leaving us wondering how and in what order it should be replaced. I had to look elsewhere for videos outside of iFixit to figure this out. Also, tell us which screwdriver to use using the label on the bit (PH000, P2, Y000, etc.). Providing only the sizes of the screws does nothing to help determine the appropriate bit to use when they aren’t labeled as such. Otherwise thank you!
I replaced the battery and the phone started right up. But I cannot get it to charge It was half charged when it went in new and I plugged it into a charger Checked it later - not charged. So tried another charger and the green charging light still will not come on . Any suggestions? Thanks Don
My iPhone 4s somehow has another connector on the battery. I cant connect the new battery to the phone. Its a complete different looking connector. And yes its never been replaced before or opened. The iPhone is one of the first versions for the german market after the fall of the simlock. Pls help
If it doesn’t look like what you’re seeing here, it’s probably not an iPhone 4S. Check the model number carefully. People mix up the regular and “S” models all the time. ;)
yoooo that was so easy and fun man!!!!!! love y’all
January 21st, 2020. My original iPhone 4s battery finally kicked the bucket. I just finished installing the new battery with ifixit.com and their parts kit. $16.99 and 30 mins of my time and the phone lit back up and is currently doing the charge for calibration. Thanks so much ifixit!
I succeed without any trouble. Tools and guide are excellent! Thank you
Great instructions. Couple of things. If new battery comes with a removal tag make sure you remove the old tag, Step 7 could be clearer, the pressure connector just falls loose when you first remove the battery connector and its hard to work out how correctly realign.
Excellent product - and now for a glass of Australian Shiraz to celebrate
Paul Upton - 回复
-
-
-
拆下这些将基座连接器电缆盖固定到逻辑主板上的螺钉:
-
一个1.5毫米十字头螺丝
-
一个1.2毫米十字头螺丝
-
拆下金属底座连接器电缆盖。
Are the screw sizes switche up by any chance? A 4S i have here has the left hole bigger and one of the screws didn't want to go into the right hole when it went nicely into the left one.
Was trying to fix guide but accidently messed some things up in formatting and I too also believe the picture is incorrectly displaying the 1.5mm(which is the left screw) and the 1.2mm(which is the right screw.
Organizer: tape cheap duct tape tacky side up to a tray. Get a ball point or roller ball pen. For every screw, write step number and a letter for color (R, O, Y, etc.) then stick the screw there. I bumped the table and nothing moved. Also use a big white towel as a work surface: nothing bounces away if you drop it. This helped re-assembly
Same for me as for various other posters here: the bigger screw goes on the left, the smaller on the right. Doesn’t fit the other way.
Switch the position of the screws, it’s incorrect in the pic.
-
-
-
-
把基座连接器电缆从固定逻辑主板和扬声器外壳侧面的粘合剂上剥下。
My gold adhesive has torn, exposing a sliver of the flat wire beneath it. I have put a bit of insulation tape to prevent any contact between the wire and the top of the vibrator and metal piece on the logic board. I don't know if this is sensible or not. Depends whether the gold adhesive is intended to be an electrical contact with these bits, or an insulator from these bits! I will post to update once the phone is powered up / blown up!
I just broke the cable with frame. Careful…
-
-
-
使用塑料打开工具的边缘将蜂窝天线电缆从逻辑主板上的插座上撬起。
-
将蜂窝式天线电缆从连接到逻辑板的金手指下方拆下。
Ok, I did all the steps and phone seems to be OK, wifi is actually working again, yaaay.
But cellular connection is messed up. It will have full reception (5 pins) for about 10 seconds, then drop to 1 pin for a couple seconds, then go into "searching" mode. After a few seconds in "searching" mode it will go back to full reception and the process repeats itself in a timely fashion, over and over again. Obviously I messed up somewhere but where? Which connections are faulty/beyond repair?
Colorblend - 回复
I dismantled the phone again and concluded that the digitizer cable was kind of loose (don't know if that affected anything, but i put it down firmly this time). I had 2 problems, the cellular connection I mentioned plus the phone would charge to 3 percent, die, and then repeat the procedure. What I did was I took out the battery, the tin plate above the cables, and lifted the dock connector. So I did not redo that much. I cleaned all contact surfaces as I had been told but chose to not do before.... I also took out the grounding clip by the battery connectors and bent it upwards quite a bit while also peeling away 2 mm of the black insulation material on the back of the phone to make sure the grounding clip connects well to the back of the phone. I also cleaned that surface with window cleaner, which is basically isoprypol alcohol as has been recommended. The cellular antenna connector I pushed down firmly to make sure it was connected, I was gentler the first time, now everything works.
Colorblend - 回复
Note that the antenna cable goes around the the right side of that little guiding hook/finger. On the photo it shows the cable on the left of it. The hook is almost right below the socket.
Thanks Jasperm, that info was a big help!
-
-
Sometimes found stuck to the inside of the back cover.
Don't do it!!! you can skip that, it will stay and its more of a pain to remove it.
Nic Harper - 回复
Mine too, thx :)
-
-
拆下以下四个将电缆盖固定到逻辑主板上的螺钉:
-
一个2.7毫米十字头螺丝
-
一个2.6毫米十字头螺丝
-
一个1.3毫米十字头螺丝
-
一个1.2毫米十字头螺丝
On reassembly, note that the metal lip below the (red) 2.7mm screw and to the right of the (green) 1.2mm screw goes between the ribbon cable and the main logic board, as can be seen in the picture for Step 12. If you don't get this right, the 2.7mm screw is difficult and, worse, there's a risk the edge of the lip will tear the ribbon cable.
I had challenges here. As noted, the metal lip below the (red) 2.7mm screw and to the right of the (green) 1.2mm screw goes between the ribbon cable and the main logic board. That lip points away from you, towards the screen, THEN BENDS UP towards the power button. You need to pull the metal shield down a little (which stresses the ribbon cable) to get the hook-shaped feature free.
griffn -
The fastening on the board came loose when trying to remove screw the 1.2 mm Phillips screw. So the screw hole for that screw is still attached to the cover that I removed.
Got to step 13 and could not remove the 1.3mm screw (yellow circle), even using a different Phillips head screwdriver than the one that came with the kit. So frustrating. Was able to remove the other screws leading up to this point without difficulty (used the saran wrap trick on the other screws to prevent stripping, but this 1.3mm screw just would not budge).
Ended up abandoning the screen replacement--luckily the phone works after putting it back together.
-
-
-
使用塑料打开工具的边缘将电缆盖突出部分从插入逻辑主板上的EMI屏蔽的插槽中撬起。
-
从最靠近顶部的边缘提起电缆盖,并将其从iPhone上取下。
If you just very slightly twist this plate clockwise as you are lifting it out, it will help as there is a little hooked piece at the lower edge on the very far right. You have to be careful not to turn it too much though because this hooked piece is right beside a ribbon that could be damaged.
If you're having trouble removing the EMF shield, try using a plastic prying tool to lift the top right part while pushing it ever so slightly downwards with a finger. Consult this video for details: https://youtu.be/8fujLMaxJsw?t=6m42s
-
-
-
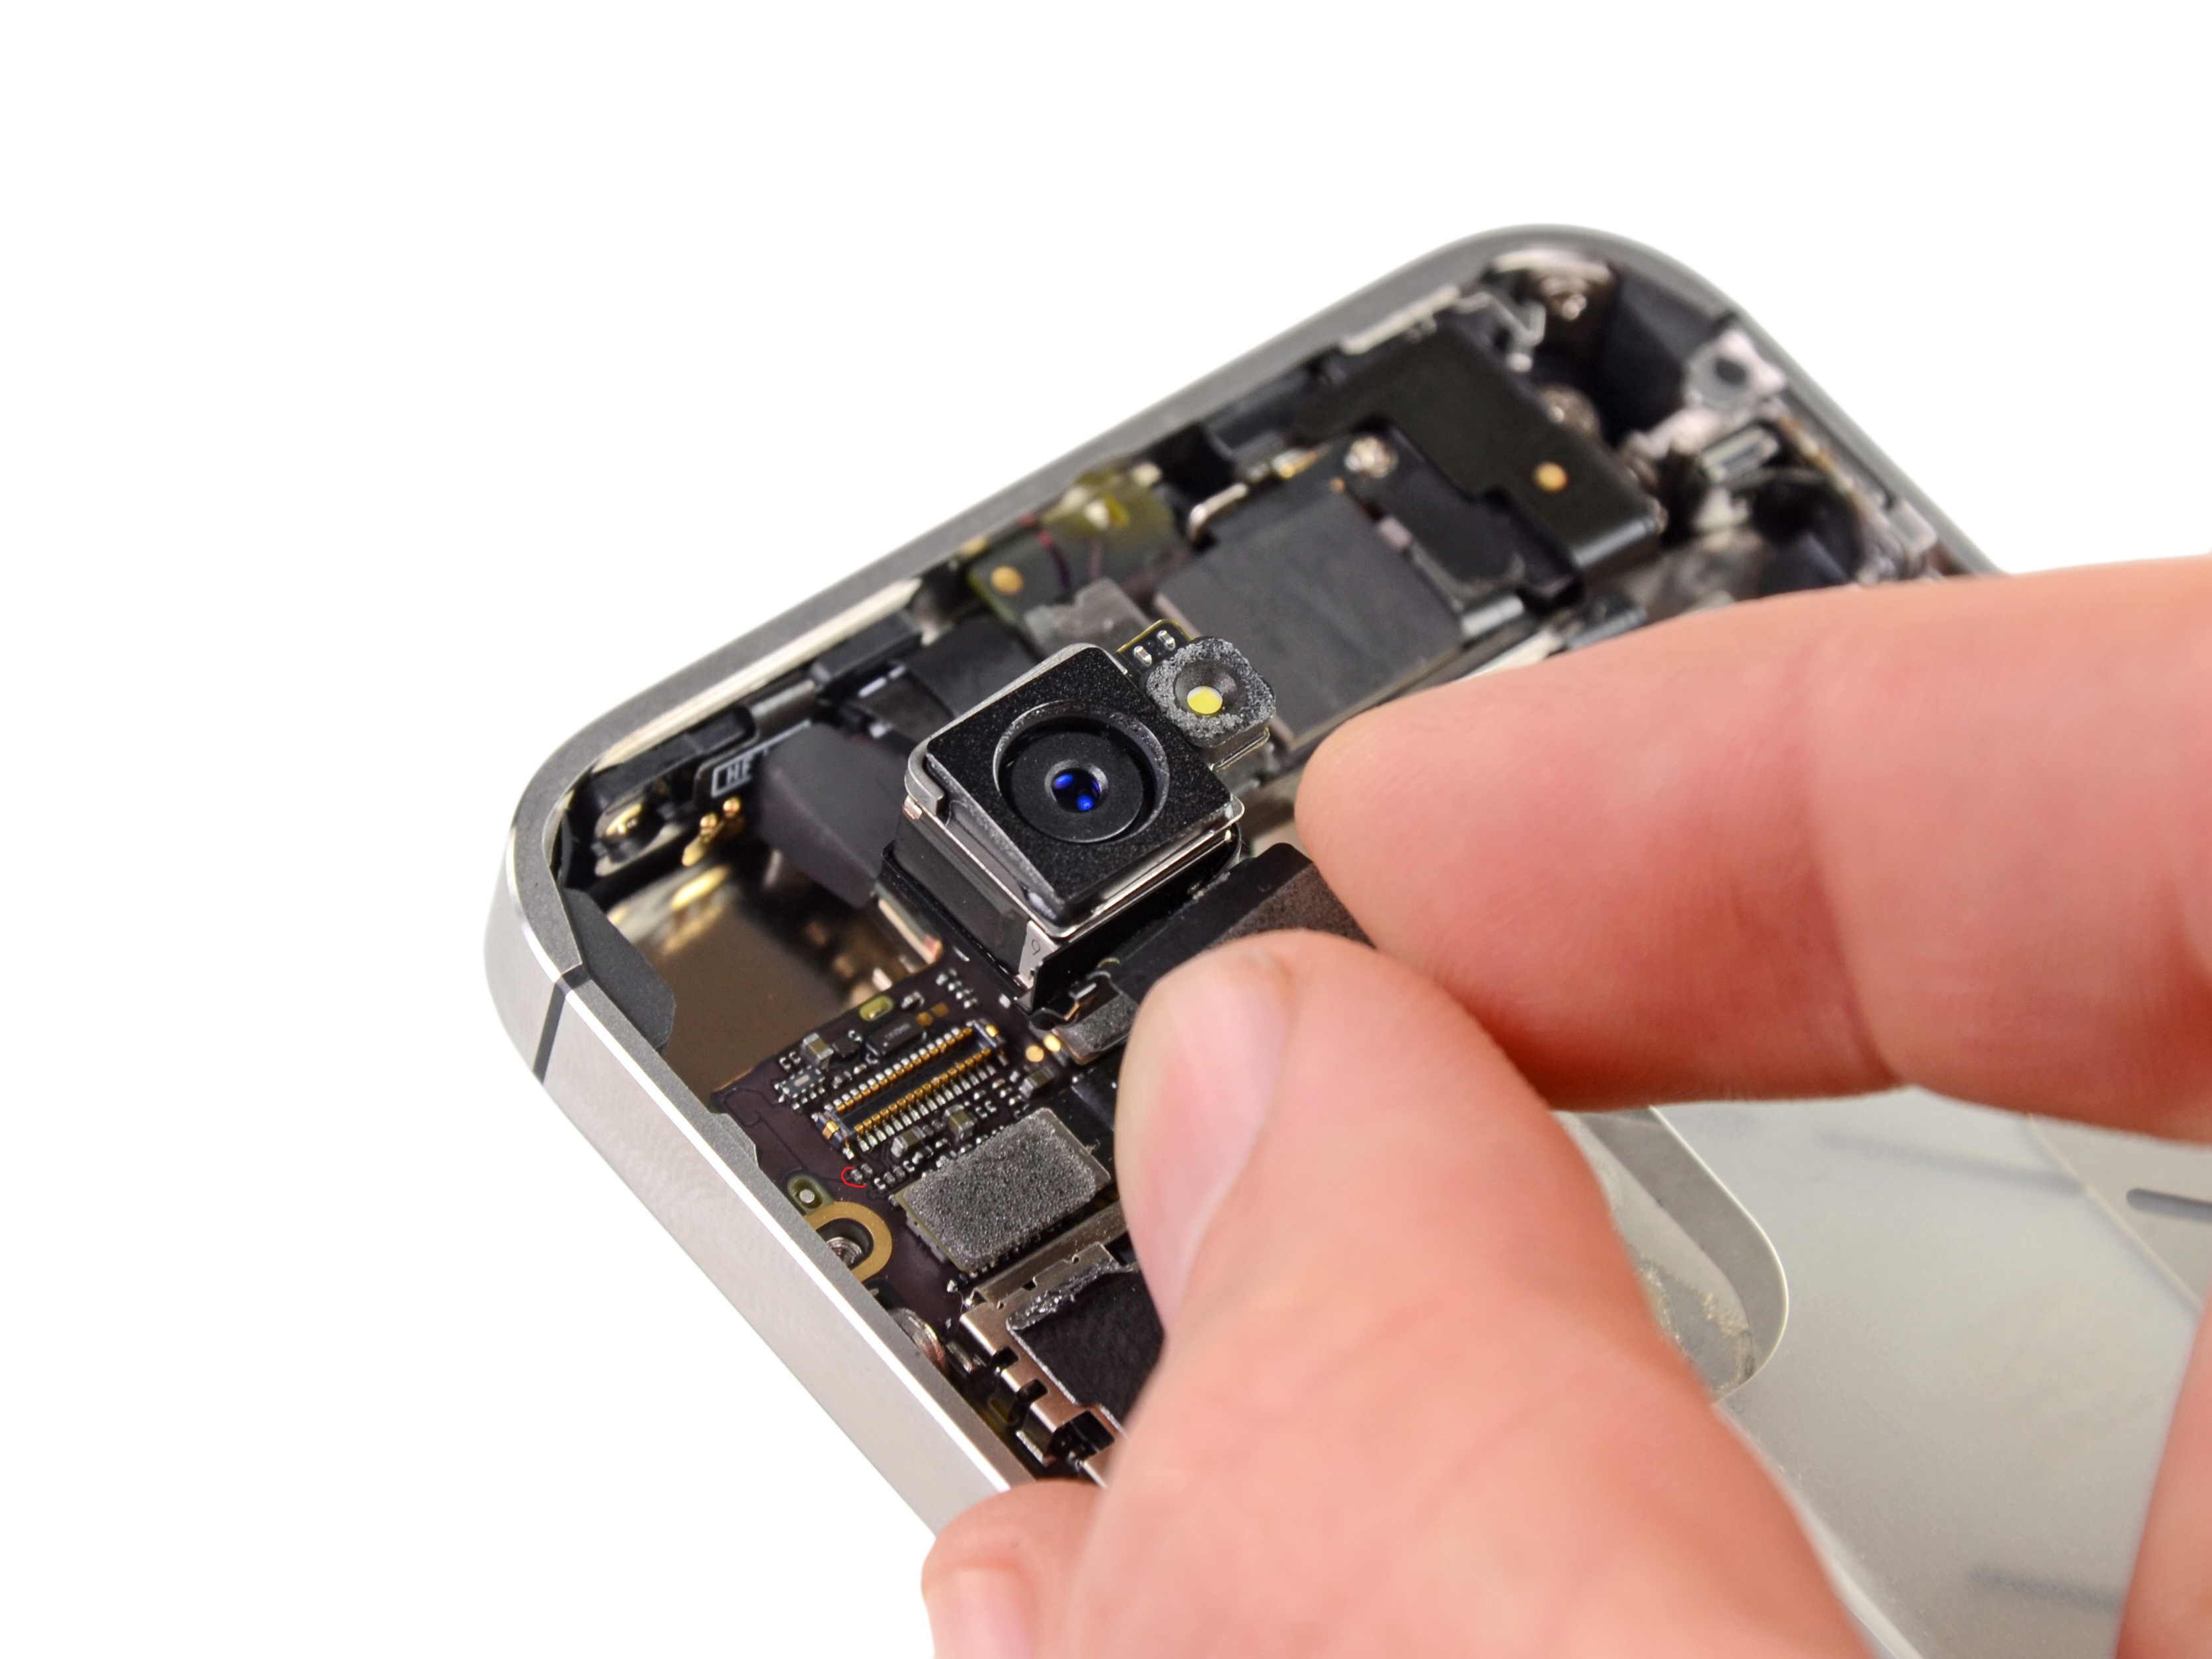
使用塑料打开工具的边缘将后置摄像头连接器从逻辑板上的插槽向上撬起。
-
从iPhone上取下后置摄像头。
Im pretty sure that when you reinsert the cam the grounding clip has go to between metal sticker and the cam body, or the camra wont be grounded
I've got a trouble at this step. Is there anybody who could help me out with my problem? When I was removing the camera module, accidently removed small element, which is marked with the red line http://i63.fastpic.ru/big/2014/1022/4e/9...
As I figured out - that is the SMD capacitor. After that Iphone was switched on, and it seems to be working fine at the moment, but I am very scared, if it will continue to work well without that small piece. Anybody to help?
In my case, the grounding clip was taped to the camera! In addition, my repair process stopped at this step as the left screw on the power button had come out and was floating around next to the camera slightly stuck to the tape. This was lucky since a loose screw in an iPhone under the logic board would be a bad omen.
-
-
-
用卡针或者回形针将SIM卡和卡托取出。
-
取掉SIM卡和卡托
I agree that the SIM card should be removed before you even start. After I completed this repair (waiting until this step to remove the SIM), the SIM card and holders won't go flush with the side of the phone anymore. The phone still works and everything else is fine, it's just annoying that I have a SIM holder sticking out about 1mm. I'm not certain this step caused this, but I'm just letting folks know that I agree with jmaelzer.
While "This may require a significant amount of force." may vary by individual device, I found it to be true. I used a straightened paper clip held with a (really good) pair of needle nose pliers and pushed straight in until it fully popped out.
Orac -
To be honest, it's really hard to remove SIM card without a correct tool.
You have to PUSH the paperclip IN, then the tray pops OUT.
I agree. Push in.
ivesrubl -
ifixit needs to edit this: "significant force" is NOT needed! I started to bend out the hole until I read the last post- just push the tool straight in, the SIM card will eject easily.
That may depend on the specific device; significant force *was* needed to eject it in the case of the phone I'm working on. Putting it back in, however, was very easy and didn't require any significant effort.
Orac -
Is there any reason why you still have the ribbon cable under the little metalic plate (right under the sticker that says "Authorized Service Provider Only") plugged in in STEP 10. And it is without any instruction step removed in STEP 12? I mean it's not like it is complicated, but when I got to that part I was confused there for a minute that I forgot some step, and then reassured myself that I did everything as it said in the manual.
There is a rubber spring that fits on the power button hinged wire bar that slipped out of place here (button was stuck, no click), take a look at it here: http://geulah.net/test/
-
-
-
按照以下顺序来取下逻辑板附近的五根线缆。
-
耳机插口/音量键 线缆
-
前置摄像头线缆
-
数字化线缆
-
显示线缆
-
电源键线缆 (在耳机插口/音量键线缆下方 如图二)
There is an additional cable that you have to disconnect that's under the headphone jack cable. You have to do this before you try to remove the logic board. Otherwise, you'll rip that cable.. and I just freaking did.
The digitizer cable won't reach! I've already ripped it off once. which disconnect are you talking about?
kct16k -
I just ripped off the power cable ... i can live without the power button though!
is that sarcasm or is there really a way to turn on the phone without the power button?
The only way to turn on an iPhone without a power button is to plug it in to power. If it was shut down while connected to a sync cable then disconnect and reconnect for it to turn on.
Ben -
I just broke off the power button as well because I forgot to disconnect the cable. Thank goodness for chargers and assistive touch!
Need to remove the shield over the connectors first. Look at the other guides for the 4S they show the 4 screws and how to lift the shield out, take out the camera etc.
True, these steps are missing from the instructions. See for example 15-17 steps here: iPhone 4S 屏幕更换
zzkovacs -
That power cable connector is very delicate. I managed to tear it just a tiny bit in the curve of the cable too. So I’ve got another part on order now. Apart from that the screen replacement went great ;) I’m not sure at which step the tear actually happened, it might have been during re-assembly when I was trying to get all these cables to stay on top of rather than go behind the motherboard. Realizing how easy that is to tear and keeping that in mind as you do this is important.
I ripped the power button cable(didn't see it), any chance it could be outlined with a dotted color in the future? (I'm bad at reading the warnings)
It was a lot easier for me to use a fingernail to remove these cables. It provides a lot less force, and is more likely to remove the cables without damaging them as they are very easy to break.
jack jones - 回复
Whoops… there are 5 cables to disconnect, not just the four shown in the first picture but one sneaky one hidden underneath these. It apparently rips off when forcefully removing the logic board. Guess ill have to wait for the replacement cable to arrive now.
-
-
-
使用撬棒的尖头来将小接地夹撬出。
-
小心的夹住接地夹然后将其与iPhone分离。
(be careful but gently forceful; the part doesn't come out without effort)
Carol Wade - 回复
Prying this off took the most effort as it's a squarish 'C' clip with two small 'teeth' like points that grip the bottom.
You can use the edge of a plastic opening tool to easily lift the other side of the grounding clip.
Top for taking the grounding clip off: use the spudger on that end, and use a prying tool ever so slightly on the opposite end to get it out of that little part catching it, then it will come out easily.
-
-
-
使用连接器支架钻子或小平头起子来移除耳机孔附近的4.8 mm支架。
The flathead screwdriver provided is much too small to remove this piece!
gluethje76 - 回复
I recommend that steps 20 and 21 are swapped. It's much easier to remove the wifi antenna flex from the board using the blue spudger if the board/PCB is still secured with the 4.8mm screw.
Removing the screw first makes the PCB move up too much when you're trying to detach the wifi flex and can lead to mishaps.
The iFixIt standoff screwdriver is a great help.
-
-
-
使用塑料撬棒的边缘处来断开 Wi-Fi天线线缆与逻辑板的连接。
Great Guide and thanks. Now...what if i snapped the wifi antenna cable together with its male connector from the board? Like tearing it apart ? Can this be replaced by any chance? Thanks!
Ok so no fret here if you accidentally pull off the metal insert placed on top of the actual antenna. This step needs to be rewritten imo, the deal here is that there is an actual 'socket' looking deal underneath here that you need to lift up. There is a metal tab semi'glued' to that part of the antenna and it does come off easily, however all you need to do is press them back together to get them back, I believe it to be a range 'extender' of sorts.
So your looking to actually lift up what looks a lot like a ribbon cable as well in this step. YOU SHOULD NOT HAVE A PIECE REMOVED IN THIS STEP, it's still in the case at this point.
I have connected my wifi antenna to the phone but when my phone switches on the wifi button is a grey colour and won't let me turn it on, help?
When reassembly - take care with flat cable, which might be pushing connector to side. If so - I found easy to put connector in place before tightening screws on step 23 and 22. Because then logic board can move a bit when repositioning connector and to slide right place before connecting it properly.
-
-
-
如果有,请撕下电源按钮附近的隐藏螺丝的黑色胶带。
-
卸下位于电源键附近固定逻辑板的2.6 mm Phillips螺丝。
Note that there is a rubber insulator that is loosely attached to the PBC that can be seen in the upper right corner of the red outline near the tag with Q5M on it. It falls off after the logic board is removed and should be replaced before reassembly.
where the heck does it go back on the logic board?! It fell off during removal and I cant seem to locate it in the pictures. :(
As noted: Put the bumper back right above the white bar code label. The label says Q5M on the far right side. The bumper goes on the edge of the board to protect the ribbon cables that bend over the board.
griffn -
step 13 - “One 1.3 mm Phillips screw”
step -22 “Notice the small rubber bumper under the screen & digitizer cables (which are detached at top above the Q-code)”
“Note that there is a rubber insulator that is loosely attached to the PBC that can be seen in the upper right corner of the red outline near the tag with Q5M on it”
now, the problem :-)
while assembly the iPhone I screw by mistake the 2.6 mm instead of the 1.3, and without noticing I break the 1.3 base screw from the motherboard :-/
Now, the rear camera is not working.
I couldn't figure in the picture above, if the rubber bumper you mean, is under that screw or above the Q5M tag ?
Can it be that the dewar camera don’t work because of that broken screw?
Any idea how to fix it?
Is there any option to buy the rubber bumper, if I lost it ?
Appreciate any help,
thanks!!
Caution: the image with the QR code is "mirrored" --> look at it "reversed" !
-
-
-
卸下下列将逻辑板与后壳固定的螺丝。
-
一个位于振动模块的2.5 mm Phillips 螺丝
-
一个 2.4 mm Phillips螺丝
-
一个3.6 mm螺丝,其位于逻辑板右侧最接近电池开口位置。
I wound up stripping one of the screws on this step. Was frustrating but I found if I too a sharp knife and gently went back n forth I was able to make a little notch to use a flat head and got it off. Other than that all went well.
-
-
-
小心的从扬声器外壳端提起逻辑板,并将其从iPhone顶部边缘滑出。
-
移走逻辑板。
After I had lifted the logic board and moved around a little a small rubber piece fell off. Approx. 1 cm long and 2 mm wide. I'm guessing it's for some sort of isolation between the board and the chassis. Where should it go when I reassemble the phone?
The piece I'm referring to can be seen on the table in the upper right corner in this video: http://www.youtube.com/watch?v=IVQtgD89e...
It sits between the logic board top-edge and the two ribbon leads from the screen. Its purpose is to stop the PCB cutting in to the FPC leads over time due to vibrations. If you require I can send a photo.
Found this thread
On reassembly, make sure you lift up the power button cable before installing circuit board. I thought I had all of the cables lifted until after getting to step 17 (in reverse) only to find out power cable was under the circuit board. Added 15 minutes to my process.
juanocasio - 回复
I had a similar problem as I was back tracking steps to perform something I missed and actually broken the power and sensor cable (the one that is connected to the digital board first during re-installation. A secondary order and another 20 minutes took care of it. Glad you were able to not hit that barrier.
Check this... Rubber Bumper Location =)
On reassembly, you are putting the plate under the spaghetti. I went back a few times to get all the cables out. Here is a check list before you tighten any logic board screws or try to jam the top edge of the board in place:
Counter clockwise from upper right near power button:
- Wi-Fi Cable from step 21
- 5 cables near the camera from step 17.The ‘blue’ power cable underneath loves to hide. The ‘orange’ front facing camera cable can get kinked under the board during re-install (no more selfies on this phone).
- Dock cable from step 9
- Cell Antenna from step 11
Go slow. Look twice.
Before logic board re assembly it is nice to use scotch tape ( temporarily) to bend all the connections above the battery compartment . Doing as such avoid to have the power button connection remaining below the logic board .
-
-
Hi. This little clip is responsible for the image stabilization on the 4S. When the iPhone 4S was launched, one of the things that were different from iPhone 4 was Image Stabilization, specially when the user was filming. This clip holds the camera module in place while the phone is shaking in the hands of the user. Pretty high tech :D
Apparently it had uncovered my iPhone before, because when I did not find this piece uncapped here. I need to know which function is on the iPhone and if it is very important. How could I get?
Hi, I had the phone apart to replace the wifi chip.
Has anyone found a source for the two nano sized SMD resistors, because this also causes "no wifi" syndrome due to them being important for the I2C lines.
thanks!!! -A email testing_h "at " yahoo.com
I think this is one of the parts I didn't put back in... Does it affect anything?
Also, Took apart my iPhone 4S to fix the screen and battery... Now the camera light doesn't turn on and I'm left with two pieces. Help!
Here are the parts: http://imgur.com/DsYtdlR
Left part: See step 5 - "Take notice of the small black ground clip on the upper screw of the battery connector".
Right part: See step 25 - "Be sure not to lose the small grounding finger for the rear facing camera near the power button".
I removed this in step 22 even though it only slightly alluded to it. If you did, too, don't panic. Go find your step 22 parts and verify it is there. :)
What are the consequences of losing the 'small grounding finger for the rear view camera'?
Hi. This little clip is responsible for the image stabilization on the 4S.
I did it. No problems!!!
I used a Tupperware orange peeler as a plastic opening tool and didn't touched any screws oder other inner parts.
I had to do it two times, because my old 4S 64GB has a broken WLAN Chip on the logic board, and my wifes 4S has broken her display glass. So I took her logic board into my 4S body. Now we have one running iPhone 4S 64GB instead of two broken phones.
HELP! Miy clip does look different, and i have no idea how to fit it in
This little piece was missing when I opened my phone, seems it was lost last time I sent it to the repair shop for screen replacement.. :-( but it does take pictures
-
-
将用塑料翘棒的边缘小心地将前置摄像头的金属固定盖板从您的iPhone上撬开。
-
移除前置摄像头盖板。
Step 26 cause me great pain as well. I couldn't get it loose with the plastic spudgers. I had to break out a tiny metal screwdriver. I was so paranoid that I was going to break the part or the clip. The trick is to get under the clip's "fingers" that fasten it on the sides. The issue is that even my small my plastic spudger was too big to fit in the available space. Ultimately I got it to work with a micro flathead screwdriver, but it wasn't without serious concern.
Yes, this is hard. It would be a lot easier if the guide had a picture of the retainer clip. I was successful with a spludger by lifting it on the upper left hand corner. Once you have it off, have a good look at it before putting it back on. Remember that it clips to the outside of the camera housing.
DO NOT DO THIS,
it is unnecessary to remove this plate or the front camera. its very difficult to remove and very difficult to replace. totally unnecessary step. just be careful moving the flex cables around, that's the only thing that is in the way, the camera does not hinder the power/sensor cable.
fyi my comment is based off replacing the power cable not the front camera, apparently the guides are just copied off one another. again, this is one of the hardest things ive done on an iPhone. if you are fixing the power cable, DO NOT pull out the front camera, NOT NEEDED and VERY HARD. im currently still trying to re-install the cover plate.
Andrew -
YES, DO NOT TAKE THIS PART OFF. The reason the guide says to take it off is because in step 30, it might get in the way. If you be a little more careful, the cable coming from the camera won't be a problem. However, if you do take the retainer and the camera off, you should expect your repair to last a couple more hours. I have spent several hours on some repairs trying to put the retainer back on, and then realized that it was 90% useless to do so.
I could not reassemble the retainer. The legs would not go back to where they were meant to go and I badly bent one in the process. I replaced the retainer with a small dop of Blu-Tack ("a reusable putty-like pressure-sensitive adhesive"). This gets squashed down when you replace the logic board. This keeps the camera correctly positioned and works OK so far.
If youare changed the earpiece you can skip step 26 till 31. got to step 32 and remove the black clip without disassembly the earpiece assembly and then tear of the speaker. follow the steps of the crazyphones on youtube guide.
thank you!!!
There is no need to remove the front facing camera or power button/flex. At this point you can just remove the retainer clip over the sensor assembly, pry the sensor assembly from it's holder, bring it back over and clear of the earpiece speaker, carefully pry the speaker from the frame, replace the speaker with new one, reassemble.
Getting this off with a micro flat head is best - putting it back on you need to slightly flare out the little fingers on the side two (facing top and bottom of phone-just enough to make getting it back on easie. Then using ifixit flat tweezers you can get in and pinch the fingers closed again once it's on.
I quickly regretted not having read the comments to this step and the next one. When replacing the power/sensor cable, this step isn’t necessary, provided you are careful enough with the earpiece speaker and the sensors which are next to the front facing camera.
DO NOT DO THIS unless you are sure you have to. This step and the next one are not necessary when replacing the power and sensor cable.
It is very very difficult to fix the front camera retainer again after removing it.
are the metal clips on the bracket supposed to go inside or outside?
-


要重新组装您的设备,请按照以下提示步骤。
要重新组装您的设备,请按照以下提示步骤。
101等其他人完成本指南。

6条评论
What if I can't put the two initial screws back?
desarme el telefono para cambiar la camara frontal y ahora no me funciona me aparace en negro que sera?
I did it and it worked. But be prepared and patient. :)
Nicely documented, a very nice graphical explanation, thumbs up!
My phone is not restarting after removing front and rear cameras
Well, after taking it apart I discovered why the front facing camera probably went bad - during production assembly the front camera cable got forced under the logic board, crimping it badly. I am sure this added to the tension placed on the cable which already has to make a couple of tight turns to reach the connector. Poor engineering.
The Liberation Kit just stripped the screw. Now what.
nimpsy - 回复
Had local iPhone repair shop remove the screw. Repair complete!
nimpsy -
I left the battery in and everything above the middle, using a pen knife to flex the logic board, I had plenty of room to else the old out and the new in.
Worked well and saved a lot of time.
Keith M - 回复
After reviewing the steps I decided to follow this guy's advice and left the battery in.....one less item to possibly foul up. I don't know if it made it any faster (first time to open my phone, so nothing to compare it to) but I can say that my phone is charging for the first time in 6 months :D
Jennifer -
BEFORE YOU START:
1) This is doable but not easy, quick or without risk.
2) If this is your 1st time, the whole process can take >2 hours (half of it reading this fixit manual and notes, which I highly recommend!)
3) I highly recommend placing a large, thin clean white cloth on the table. This prevents screws from rolling around and you will clearly see anything falling out.
4) If you have them, use tight surgical (latex) gloves. This prevents you from greasing up contacts.
5) Have e.g. a big old egg box ready, so you can place the screws in order (and maybe write step/screw size on the side).
6) I bought my display from "Generic" on Amazon ($20.36). Screen works fine and tools were ok but not great (screw drivers do not withstand force needed to unscrew some).
7) I had my own 2mm Phillips screw driver and a 2.4mm flat (for the big screws).
8) Have a nice cold beer by your side! Good luck!
superedu111 - 回复
Sounds like this comment relates to a screen replacement, not a rear panel replacement. No way a rear panel replacement would take 2 hours - can be done in 2 minutes!
Jonathan Deamer -
I was paranoid about stripping the pentalobes - I used the ifixit pentalobe screwdriver TOGETHER with a layer of Glad Wrap (cling film or saran wrap for the non-Aussies) over the pentalobe holes - absolutely no problems. Guess it helps the driver head gain purchase?
Anyway hat tip to this guy:
http://modmyi.com/forums/hardware/806092...
jimforbes - 回复
It's also called glad wrap in the US as well. :)
Scorppio500 Webmaster -
After seeing the comments about trouble finding the carrier, I shut down the phone, did a soft reset (by holding the power and home buttons until it started and then shut down and stayed off), and removed the SIM. After the repair, I replaced the SIM and plugged it in to the charger. It started up and found the carrier (Verizon, as it happens) immediately. I would guess that only the soft reset made a difference, but I did both.
DavidLewis - 回复
Thank you David, will I need to reload operating system if I replace thr logic board? I'm hoping to use a 32gb boards from a locked but working phone to place in my 8gb device. Thanks for your advice,
Sharif
Sharif Bagnulo -
I pried one end of the back off only to find 2 funny little screws holding the other end on so I took my Dremel, like Jack said, and ground those suckers out. Once I had the back off I loosened all the screws then turned it upside down and shook the crap out of it. The screws went flying everywhere and fell on the floor. Its my moms house so of course she's got gross brown carpet. How am I supposed to find my screws in that? I get the vacuum out and go over every inch of the floor to suck up all them screws. Then I dump the bag on the table and all I find is a bunch of hair and gods knows what else, but no screws. When I look for my phone I see its covered in all that stuff that came out of the vacuum. I mean, what's up with that? How can I work on my phone if its covered in dirt? Nobody said anything about that, did they? The average guy's gonna screw up his phone big time if he follows these instructions and nobody warns him about all the dirt that's gonna end up in his phone. Are you kidding me!! Now what?
Marv - 回复
Here's a little vacuum trick for anything small: put nylons/panty hose over the end of the hose and then you don't have to dig thru the bag contents.
paul -
Marv you a first class pleb! Please don't try and fix anything again. Tool
ticklejahfancy -
It's clear who's at fault here, Marv.
It's as clear as the day has long legs. It's your Mom's fault.
Milfs who make earth-tone carpet choices, are more likely to twerk, than tweek.
And as far as trimmin the hedges are concerned, she's more likely to float a turd in the punchbowl,
than to give you your inch.
I know you think I'm crazy. But everyone else agrees. We all politely try to the other way...
Your cuck stops here. We'll not near me, go over there...
Nathan Brazil -
my screws are stipped and i am going though the front glass to get to the logic board could some one give me a guide on how to get to the board please... thanks
Caleb Croft - 回复
all you need to do is remove the clip over the wifi antenna and the one that actually attaches the wifi antenna to the iphone two steps to do this job...
Ray Leahy - 回复
The physical battery replacement went off without a hitch, and saw that the phone had no network connection, but also had no way to unlock. The slide lock said "Slide for Emergency Call" over my custom wallpaper and sliding would give the passcode screen, but it would reject the 6 digit passcode (it would buzz and go dark after the 4th digit, re-awakening and putting in the last 2 would indicate bad passcode). Very frustrating! I get it into recovery mode and convinced iTunes to "update" the OS, but it still didn't let me in. I performed a restore to fully factory reset the phone, and it worked! Sort of... the start screen kept being replaced by "Temperature - phone needs to cool down" but it's cold. Temp sensor is on the battery and returning to old battery fixed it. New battery is bad, and phone is wiped. Fun night.
I'm going to guess that disabling the password might save you from a similar fate. So, I'll suggest BEFORE YOU START, backup your phone and disable the passcode. Good luck.
Ian Epperson - 回复
Same here.. Going through that terrible night myself! Guess you had to return your battery right?
Nuno Alves -
Is it possible to replace front glass only? If so, please provide a manuel
Iva - 回复
Yes, it is. But it's very difficult and risky. Forget it... Have a look here: https://youtu.be/L_kCY05jR10
Jiri Altman -
I didn’t find this particularly difficult, even though I’m pretty inexperienced at this sort of work. I watched the video overview to get me going and then followed the steps in the guide. My tips would be to keep the screws and parts organised as you dismantle, and ensure you read all the reassembly tips as you go; it’s easy to skip over them. I also found using the Liberty Kit to replace the pentalobe screws was worthwhile.
Poor old Marv of Feb 2015. Suggest he sticks to chopping logs.
graemebagnall - 回复
caught fire as soon as I replaced the back phone destroyed
Stuart Laurie - 回复
The battery on the phone is swollen so I need to replace it but I can’t turn it on to drain the battery, what do I do?
Beetroot - 回复