跳转到主内容

当前版本的文档还未经巡查,您可以查看最新的已查核版本

你所需要的

  1. , 后盖: 步骤 1 中的图像 1,2 , 后盖: 步骤 1 中的图像 2,2
    • 在开始之前,将您的iPhone电池放电低于25%。 已充电的锂离子电池如遇意外穿刺,可能会起火和/或爆炸。

    • 在开始拆卸前关闭iPhone的电源。

    • 您的iPhone 4后盖可能有两个#000十字螺丝或苹果的5点“Pentalobe”螺丝(第二张图)。 检查你有哪些螺丝,并确保你也有正确的螺丝刀,以拆下它们。

    • 拆卸两个3.6毫米或000 pentalobe菲利普斯#螺丝旁边的基座连接器。

    • 拆卸Pentalobe螺丝时,确保驱动器安装牢固,非常容易剥离。

  2. : 步骤 2 中的图像 1,2 : 步骤 2 中的图像 2,2
    • 把后盖向上推到边框的边缘。

    • 后盖大约移动 2 mm。

  3. : 步骤 3 中的图像 1,1
    • 用手指将后盖取下。还有一种方法,用吸盘取下。

    • 注意不要把后盖的塑料卡扣损坏。

    • 如果你要安装新的后盖,需要将摄像头的塑料保护贴纸和较大黑色区域的贴纸撕下。

  4. , 电池: 步骤 4 中的图像 1,1
    • 拧下电池扣屏蔽罩上单个2.5mm的菲利普斯十字螺丝。

    • 有些机器会有2颗螺丝:1颗在垫片下面,另外一颗在图示中的位置。

  5. : 步骤 5 中的图像 1,1
    • 用塑料撬棒将电池排线从主板的电池座上分离出来。

    • 将排线从电池座的底部向上挑起,不要过度拉伸否则将会损坏排线。

    • 注意小心将排线挑起即可不要撬到主板,如果将电池座撬起,将彻底损坏电池座。

    • 取下天线的金属屏蔽盖。

  6. : 步骤 6 中的图像 1,3 : 步骤 6 中的图像 2,3 : 步骤 6 中的图像 3,3
    • 用塑料拉手轻轻将电池从机身中拉出。

    • 如果在电池拉出前塑料拉手坏了,沿着塑料拉手方向小心的用手机撬棒在电池背部滑动几下除去胶条。在别的部位可能会造成损坏。

    • 如果你的更换电池采用塑料套管,请在安装前将其从带状电缆中拉出来将其取下。

    • 在扣电池座以前,确保排线接口与电池座位置相符(图中红色区域所示)。

    • 在重新安装电池之前,先对金属接口机油进行处理比如清洁剂。手指上的油脂是潜在的危险对于无线链接模块。

    • 进行强制重启在安装完成后,可以有效的避免一些错乱的状况。

  7. , 主板: 步骤 7 中的图像 1,2 , 主板: 步骤 7 中的图像 2,2
    • 用卡针或者回形针推出SIM卡和卡托。

    • 注意要控制好力量。

    • 取出SIM卡和卡托。

  8. : 步骤 8 中的图像 1,2 : 步骤 8 中的图像 2,2
    • 取下以下2颗螺丝:

    • 1颗1.2mm的菲利普螺丝

    • 1颗1.6mm的菲利普螺丝

    • 取出机身上固定尾插排线的薄的金属盖板。

    • 在重组机器前,需要对尾插排线的金属接触点进行脱脂处理比如用洗洁精,手指上的油脂是潜在的危险会导致无线射频问题。

  9. : 步骤 9 中的图像 1,2 : 步骤 9 中的图像 2,2
    • 用iPod开口工具从尾插排线的两侧轻轻松开主板上的尾插排线。

  10. : 步骤 10 中的图像 1,2 : 步骤 10 中的图像 2,2
    • 小心的拉起带状尾插排线然后放在扬声器一侧。

    • 不要过度用力从主板上拉起带状尾插排线时。那样做会撕裂尾插排线。

  11. : 步骤 11 中的图像 1,1
    • 用塑料开口工具松开底部扣在主板座子上的天线排线。

  12. : 步骤 12 中的图像 1,1
    • 松开把主板底部固定在内板上的1.9mm飞利浦螺丝。

  13. : 步骤 13 中的图像 1,1
    • 松开把WiFi天线固定在主板上的5颗螺丝:

    • 1颗2.3mm飞利浦螺丝

    • 2颗1.6mm飞利浦螺丝

    • 1颗1.4mm飞利浦螺丝

    • 1颗4.8mm飞利浦螺丝

    • 重组机器时最先拧4.8mm飞利浦螺丝然后拧2.3mm飞利浦螺丝。这样可以确保不会混淆,避免打穿损坏LCD显示屏和触摸板。

    • 重装机器时确保长的4.8mm飞利浦螺丝装回到正确的位置。这颗螺丝是WiFi天线的接地线,是引起WiFi信号差的元凶在重装机器后。

  14. : 步骤 14 中的图像 1,3 : 步骤 14 中的图像 2,3 : 步骤 14 中的图像 3,3
    • 用iPod开口工具松开机身顶部边缘扣在主板上天线排线。

    • 使用尖头撬棒挑开内部框架上WiFi盖板的扣子。

    • 从机身中取出WiFi天线。确保不要弄丢覆盖在4.8mm螺丝上的金属卡扣和4.8mm螺丝。这就是WiFi异常的根本原因在重装机器之后。

    • 在重组之前,确保对所有的金属接触点进行脱脂处理比如用洗洁精。手指上的油脂是潜在的危险会造成无线射频问题。注意不要用洗洁精清洗天线排线本身。。

  15. : 步骤 15 中的图像 1,2 : 步骤 15 中的图像 2,2
    • 用iPod开口工具松开扣在主板上的后置摄像头排线。

    • 取下后置摄像头。

  16. : 步骤 16 中的图像 1,2 : 步骤 16 中的图像 2,2
    • 撕开贴在螺丝上的圆形白色贴纸(保修防水贴纸)在靠近电池拉手处。

    • 松开隐藏在贴纸下方的2.4mm飞利浦螺丝。

  17. : 步骤 17 中的图像 1,1
    • 用塑料开口工具边缘松开扣在主板座子上的排线:

    • 触摸排线(从底部撬起)

    • 显示排线(从底部撬起)

    • 耳机插孔和音量键排线(从顶部撬起)

    • 顶部麦克风和电源键排线(从顶部撬起)

    • 前置摄像头排线(从顶部撬起)

  18. : 步骤 18 中的图像 1,1
    • 用小的平口螺丝刀取下靠近耳机插孔的4.8mm支架螺丝。

    • 你可以通过专用的压铆螺柱螺丝刀或螺丝刀组更轻松地卸下它们。

    • 简单说来,一个小的平头螺丝刀可以做到——但是需要额外的小心,来保证不损坏周围的部件。

    • 当组装设备,这个支架由于和WiFi高度齐平保护WiFi在步骤13中被移除。如果不取出,上面的保护框架和后面的支架不会吻合在步骤2时。和耳机插孔的距离应充裕控制好。

    • 在重新安装主板时,确保主板孔位覆盖支架螺丝的位置,否则螺丝是拧不进去的。

    • 在重组机器时,确保小的橡胶垫圈安装在机身顶部接触主板的部位。

    • 没有这部分,主板会损坏周围的带状排线

  19. : 步骤 19 中的图像 1,1
    • 从机身中取出主板,注意任何扣在主板上的排线。

    • 注意不要损坏很脆的小的金色卡扣(图中红圈处,靠近底部)。

    • 在重装机器时,不要损坏主板下方的天线排线。

  20. 这个步骤还没有翻译 帮忙翻译一下

    : 步骤 20 中的图像 1,2 : 步骤 20 中的图像 2,2
    • Use the edge of a plastic opening tool to lift the thin steel front camera retainer off the front camera.

    • Remove the front camera retainer.

    • During reassembly, position the clip's tabs on the outside of the receiving metal slots.

  21. 这个步骤还没有翻译 帮忙翻译一下

    : 步骤 21 中的图像 1,1
    • Carefully lift the front facing camera out of the iPhone.

    • It may be helpful to use tweezers to reinstall the front camera retainer.

  22. 这个步骤还没有翻译 帮忙翻译一下

    : 步骤 22 中的图像 1,2 : 步骤 22 中的图像 2,2
    • Remove the following two screws securing the vibrator to the inner frame:

    • One 6 mm Phillips

    • One 1.4 mm Phillips

    • Remove the vibrator from the inner case.

  23. 这个步骤还没有翻译 帮忙翻译一下

    : 步骤 23 中的图像 1,1
    • Use the edge of a plastic opening tool to pry the earpiece speaker away from the adhesive securing it to the front panel.

    • Be sure to pry beneath the entire speaker, and not inside it, which may cause it to split open.

  24. 这个步骤还没有翻译 帮忙翻译一下

    : 步骤 24 中的图像 1,2 : 步骤 24 中的图像 2,2
    • Remove the two Phillips #000 screws securing the power button bracket to the outer case.

    • Take extra care with the display cables, which can prevent easy access to the right-hand screw. The cables are easily damaged.

    • Carefully pull the power button bracket up and out of the outer case.

    • This bracket is made of cast aluminum and is very easily cracked. Proceed with caution.

  25. 这个步骤还没有翻译 帮忙翻译一下

    : 步骤 25 中的图像 1,1
    • Use a pair of tweezers to pull the body of the headphone jack out of the outer case.

    • Take extra caution to avoid ripping the thin cable.

  26. 这个步骤还没有翻译 帮忙翻译一下

    : 步骤 26 中的图像 1,1
    • Grab the power & sensor cable near the microphone and peel it off the front panel, being careful not to rip it in the process.

    • Take note of the gold, rectangular microphone attached vertically to the case. Take care not to rip it when removing the cable.

  27. 这个步骤还没有翻译 帮忙翻译一下

    : 步骤 27 中的图像 1,1
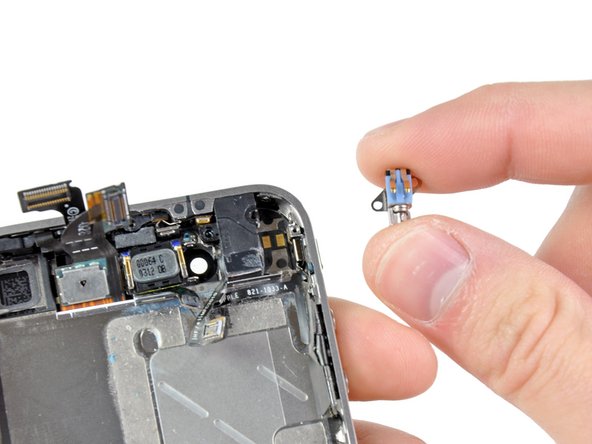
    • If you are replacing the power & sensor cable with a new unit, use the edge of a plastic opening tool to peel the electronic power switch off its metal bracket.

    • Also be sure to transfer the proximity sensor foam/UV-filter adhered to the old power & sensor cable if your new one does not already come with one. It looks like a small square and can be peeled off with tweezers.

    • Transfer the bracket to your new power & sensor cable.

终点

509等其他人完成本指南。

24条评论

Be careful removing the headphone adapter, the ribbon is very easy to rib with the metal brace beneath it.

Ryan Bahr - 回复

Thank you very much for the, it has been very useful for my to change the power and sensor cable.

You are doing a very good job in this web.

rafar1980 - 回复

Now this is more helpful, than the power button repair guide that they gave us. This one still kind of leaves me hanging on how I'm supposed to put the silver button back into the hole so that it makes contact with the orange dome(aka the powerbutton).

Anthony - 回复

I replaced the Home button and the Power & Sensor cable, along with battery. Let me explain some caveats with ifixit's parts (OEM Apple parts):

-The power-sensor part does not include a new gasket/filter for the sensor- recommend tweezers and care.

-The power-sensor cable needs the foam pad transferred with the adhesive- extreme care with removal.

-IF the power button isn't working it is likely the cable, not the button.

-I used a small ice cube tray.

-It took me an hour (I had to get up and walk away...frustration factor high with the delicate flex cables and adhesive). Lit magnifier is welcome. Definitely use a spudge stick.

-I broke 2 of the 4 shield/antenna tabs that you need to tuck down from the speaker on re-assembly. I didn't force them, but so easy to press too hard in seating the speaker.

- I do repairs on a grounded-ESD mat and wore wriststrap.

-Right screw on the power button brace is PITA to access...careful pressing on the display flex cables to access the tiny screw. Magnetize your bit!

meekgeek - 回复

Great guide and perfect web site. It is extremely easy to find what you are looking for and order the components you need.

alessandronapoli - 回复

添加评论

浏览统计数据:

过去 24 小时: 2

过去 7 天: 18

过去 30 天: 52

总计 430,713