跳转到主内容

当前版本的文档还未经巡查,您可以查看最新的已查核版本

你所需要的

  1. 这个步骤还没有翻译 帮忙翻译一下

    : 步骤 1 中的图像 1,1
    • Before you begin, discharge your iPhone battery below 25%. A charged lithium-ion battery can catch fire and/or explode if accidentally punctured.

    • Power off your iPhone before beginning disassembly.

    • Your phone's rear cover may have two #000 Phillips screws or Apple's 5-Point "Pentalobe" screws. Check which screws you have, and ensure you also have the correct screwdriver in order to remove them.

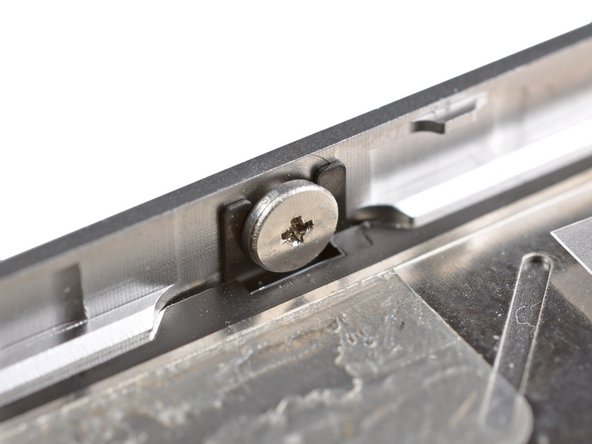
    • Remove the two 3.6 mm Pentalobe or Phillips #000 screws next to the dock connector.

  2. 这个步骤还没有翻译 帮忙翻译一下

    : 步骤 2 中的图像 1,2 : 步骤 2 中的图像 2,2
    • Push the rear panel toward the top edge of the iPhone.

    • The panel will move about 2 mm.

  3. 这个步骤还没有翻译 帮忙翻译一下

    : 步骤 3 中的图像 1,1
    • Pinch the rear panel with your fingers, and lift it away from the iPhone. Alternatively, use a Small Suction Cup .

    • Be careful not to damage the plastic clips attached to the rear panel.

  4. , 电池: 步骤 4 中的图像 1,1
    • 拧下电池扣屏蔽罩上单个 1.5mm 的菲利普斯十字螺丝,这是用来固定电池接口和主板的。

  5. : 步骤 5 中的图像 1,1
    • 用塑料撬棒将电池排线从主板的电池座上分离出来。

    • 注意小心将排线挑起即可不要撬到主板,如果将电池座撬起,将彻底损坏电池座。

    • 取下天线的金属屏蔽盖。

  6. : 步骤 6 中的图像 1,2 : 步骤 6 中的图像 2,2
    • 用塑料拉手轻轻将电池从机身中拉出。

    • 如果在电池拉出前塑料拉手坏了,沿着塑料拉手方向小心的用手机撬棒在电池背部滑动几下除去胶条。在别的部位可能会造成损坏。

    • 如果你的更换电池采用塑料套管,请在安装前将其从带状电缆中拉出来将其取下。

    • 在扣电池座以前,确保排线接口与电池座位置相符。

    • 在重新安装电池之前,先对金属接口机油进行处理比如清洁剂。手指上的油脂是潜在的危险对于无线链接模块。

    • 进行强制重启在安装完成后,可以有效的避免一些错乱的状况。

  7. 这个步骤还没有翻译 帮忙翻译一下

    : 步骤 7 中的图像 1,2 : 步骤 7 中的图像 2,2
    • Remove the two 1.8 mm Phillips screws securing the dock connector cable to the logic board.

    • Remove the thin metal dock connector cable cover.

  8. 这个步骤还没有翻译 帮忙翻译一下

    : 步骤 8 中的图像 1,1
    • Use the edge of a plastic opening tool to pry the dock cable up from its socket on the logic board.

  9. 这个步骤还没有翻译 帮忙翻译一下

    : 步骤 9 中的图像 1,1
    • Peel the dock connector cable off the adhesive securing it to the logic board and the side of the speaker enclosure.

  10. 这个步骤还没有翻译 帮忙翻译一下

    : 步骤 10 中的图像 1,2 : 步骤 10 中的图像 2,2
    • Remove the 1.6 mm Phillips screw securing the pressure contact to the logic board near the vibrator.

    • Remove the pressure contact.

  11. 这个步骤还没有翻译 帮忙翻译一下

    : 步骤 11 中的图像 1,2 : 步骤 11 中的图像 2,2
    • Use the edge of a plastic opening tool to pry the cellular antenna cable up from its socket on the logic board.

    • De-route the cellular antenna cable out from under the metal fingers attached to the logic board.

    • When reconnecting the antenna wire be VERY certain that the round connector at the end of the wire is centered on its mating half on the motherboard before applying pressure. Failure to do so will likely destroy both halves of the connector.

  12. 这个步骤还没有翻译 帮忙翻译一下

    : 步骤 12 中的图像 1,1
    • Remove the following five screws:

    • Three 1.3 mm Phillips screws

    • One 1.5 mm Phillips screw

    • One 2.4 mm Phillips screw

  13. 这个步骤还没有翻译 帮忙翻译一下

    : 步骤 13 中的图像 1,2 : 步骤 13 中的图像 2,2
    • Lift the cable cover from its edge nearest the top of the iPhone.

    • Pull the cable cover tabs out of their slots cut into the EMI shield on the logic board and remove it from the iPhone.

  14. 这个步骤还没有翻译 帮忙翻译一下

    : 步骤 14 中的图像 1,2 : 步骤 14 中的图像 2,2
    • Use the edge of a plastic opening tool to pry the rear camera connector up from its socket on the logic board.

    • Be careful not to break any components off the surrounding area on the logic board as you pry upwards.

    • Remove the rear camera from the iPhone.

    • Be careful not to scratch the back of the display assembly after the removal of the rear facing camera.

  15. 这个步骤还没有翻译 帮忙翻译一下

    : 步骤 15 中的图像 1,1
    • Disconnect the five cables near the top of the logic board in the following order:

    • Headphone jack/volume button cable

    • Power button cable

    • Front facing camera cable

    • Digitizer cable

    • Display data cable

    • To disconnect the cables, use the edge of a plastic opening tool to gently lift their connectors up and out of the sockets on the logic board.

    • Be careful not to break any of the small and delicate surface mount components as you disconnect the cables.

  16. 这个步骤还没有翻译 帮忙翻译一下

    : 步骤 16 中的图像 1,1
    • Remove the 1.5 mm Phillips #000 screw near the headphone jack.

  17. 这个步骤还没有翻译 帮忙翻译一下

    : 步骤 17 中的图像 1,1
    • Lift the small grounding clip up off the logic board and remove it from the iPhone.

  18. 这个步骤还没有翻译 帮忙翻译一下

    : 步骤 18 中的图像 1,1
    • Use the edge of a plastic opening tool to disconnect the Wi-Fi antenna cable connector from the logic board.

    • When reconnecting the wifi ribbon connector to the mother board be VERY certain that the round connector at the end of the ribbon cable is centered on its mating half on the motherboard before applying pressure. Failure to do so will likely destroy both halves of the connection.

  19. 这个步骤还没有翻译 帮忙翻译一下

    : 步骤 19 中的图像 1,2 : 步骤 19 中的图像 2,2
    • If present, remove the piece of tape covering a Phillips screw near the power button.

  20. : 步骤 20 中的图像 1,1
    • 移除 2.5 mm十字 #000 号螺丝

    • 移除在耳机口附近的 4.8 mm专用压铆螺柱螺丝

    • 你可以通过专用的压铆螺柱螺丝刀或螺丝刀组更轻松地卸下它们。

    • 简单说来,一个小的平头螺丝刀可以做到——但是需要额外的小心,来保证不损坏周围的部件。

  21. 这个步骤还没有翻译 帮忙翻译一下

    : 步骤 21 中的图像 1,1
    • Remove the 3.4 mm Phillips screw near the vibrator motor.

    • Remove the two 3.6 mm standoff screws along the side of the logic board nearest the battery opening.

  22. 这个步骤还没有翻译 帮忙翻译一下

    : 步骤 22 中的图像 1,1
    • Carefully lift the logic board from the end closest to the speaker enclosure and slide it away from the top edge of the iPhone.

    • Remove the logic board.

    • Before reassembly, be sure to clean all metal-to-metal contact points on the logic board (not the mating halves of connectors) with a de-greaser such as windex or isopropyl alcohol. The oils on your fingers have the potential to cause grounding issues.

    • There's a small rectangular rubber pad at the top of the logic board that prevents the display cables from chafing against the edge of the board. If it comes loose during your repair, make sure to position it correctly when reinstalling your logic board.

  23. 这个步骤还没有翻译 帮忙翻译一下

    : 步骤 23 中的图像 1,1
    • Be sure not to lose the small grounding finger for the rear facing camera near the power button.

  24. 这个步骤还没有翻译 帮忙翻译一下

    : 步骤 24 中的图像 1,2 : 步骤 24 中的图像 2,2
    • Use the edge of a plastic opening tool to pry the vibrator off the adhesive securing it to the frame of the iPhone.

    • Remove the vibrator.

  25. 这个步骤还没有翻译 帮忙翻译一下

    : 步骤 25 中的图像 1,1
    • Remove the two 2.4 mm Phillips screws from the sides of the speaker enclosure assembly.

  26. 这个步骤还没有翻译 帮忙翻译一下

    : 步骤 26 中的图像 1,1
    • Remove the small plastic bracket that was installed under the screw closest to the dock connector cable.

  27. 这个步骤还没有翻译 帮忙翻译一下

    : 步骤 27 中的图像 1,2 : 步骤 27 中的图像 2,2
    • Remove the speaker enclosure assembly from the iPhone.

    • Before reinstalling the speaker enclosure assembly's screws, be sure the Wi-Fi grounding fingers are installed below the lip in the iPhone's metal case as seen in the second picture.

    • Before reassembly, be sure to clean all metal-to-metal contact points between the grounding fingers of the Wi-Fi antenna and the case of the iPhone with a de-greaser such as windex or isopropyl alcohol. The oils on your fingers have the potential to cause wireless interference issues.

  28. 这个步骤还没有翻译 帮忙翻译一下

    : 步骤 28 中的图像 1,1
    • Remove the small pieces of black tape covering the display mounting tabs.

  29. 这个步骤还没有翻译 帮忙翻译一下

    : 步骤 29 中的图像 1,1
    • Remove the 1.6 mm Phillips screw securing the display assembly near the power button.

  30. 这个步骤还没有翻译 帮忙翻译一下

    : 步骤 30 中的图像 1,1
    • Remove the 1.6 mm Phillips screw near the headphone jack.

  31. 这个步骤还没有翻译 帮忙翻译一下

    : 步骤 31 中的图像 1,1
    • Remove the 1.6 mm Phillips screw near the lower microphone.

  32. 这个步骤还没有翻译 帮忙翻译一下

    : 步骤 32 中的图像 1,1
    • Remove the 1.6 mm Phillips screw near the dock connector cable.

  33. 这个步骤还没有翻译 帮忙翻译一下

    : 步骤 33 中的图像 1,2 : 步骤 33 中的图像 2,2
    • Loosen the three large-headed Phillips screws along the volume button side of the iPhone about one half turn.

    • It is not necessary to completely remove these screws. When reinstalling the display assembly, be sure the washers are closest to the screw head (as seen in the second picture).

  34. 这个步骤还没有翻译 帮忙翻译一下

    : 步骤 34 中的图像 1,1
    • Loosen the three large-headed Phillips screws along the other side of the iPhone about one half turn.

  35. 这个步骤还没有翻译 帮忙翻译一下

    : 步骤 35 中的图像 1,3 : 步骤 35 中的图像 2,3 : 步骤 35 中的图像 3,3
    • Use the edge of a plastic opening tool to gently pry up the display assembly around its perimeter.

    • Press gently on the home button to push it through the display and make sure it stays behind as the display separates from the iPhone. Otherwise, the home button cable may tear.

    • De-route the digitizer and LCD cables through the steel inner frame.

    • When reinstalling the display, carefully straighten the digitizer and LCD data cables, and feed them through the slot cut in the steel frame. This photo shows the display assembly being installed incorrectly, with a fold in the digitizer cable.

    • When the front panel has been correctly installed, both the LCD and digitizer cables should be immediately next to one another and should be the same length, as shown in the second photo.

    • If the digitizer cable has been installed incorrectly, it will not reach its socket on the logic board. Do not attempt to pull it through by force, or it will tear. Remove the display assembly, straighten the cable, and feed it through to its full length, as shown.

    • During reassembly, do not touch the metallic area at the base of the LCD data cable, as this can cause problems with the LCD. If you do touch it accidentally, clean it gently with an alcohol wipe before continuing.

  36. 这个步骤还没有翻译 帮忙翻译一下

    : 步骤 36 中的图像 1,2 : 步骤 36 中的图像 2,2
    • Remove the display assembly from the iPhone.

    • Be sure to separate the home button from the front panel. If the home button sticks to the front panel you may tear the home button cable.

    • When replacing the display assembly, note the following:

    • You may have to reuse the earpiece grille and the clear plastic ring around the front facing camera from the old/damaged assembly. This will depend on where you buy the replacement part.

    • Your replacement display may come with colored plastic film on the back of the LCD. If so, use the pull tab near the home button to peel the plastic film from the LCD before installing the new display in your iPhone.

    • After reassembly, note the following:

    • Clean the touchscreen surface with an alcohol wipe prior to turning the iPhone back on. The alcohol helps dissipate any lingering static electricity, which can cause problems with the display.

    • After reassembly, connect the iPhone to an AC power source before turning it on for the first time. Once the iPhone has booted up successfully, you can disconnect the AC power.

终点

622等其他人完成本指南。

44条评论

Thanks guys' u are always awesome!!!

Cheik sana - 回复

I could not remove the logic board because it will not release at the top left. Have I missed something.

elaineleiker - 回复

Their are only 3 things that are holding down anything in the cell phone world screws adhesive or clips their are 5 screws connecting the board make sure all 5 are removed theirs also kinda a clip it fits under be careful not to brake that when taking it out

brandon hobbs -

Had it done in1.5hrs exact. Very helpful as always, thanks IFIX IT.

Its a good note to posted's and label where the screw is from, since they are so small and a pain to remember where its going.

mirandaroque - 回复

The Digitizer Cable seems to be too short. Trying to make it reach. It doesn't reach its place on the logic board. Going to disassemble and start over. (Step 15)

Any pointers?

chris - 回复

添加评论

浏览统计数据:

过去 24 小时: 6

过去 7 天: 34

过去 30 天: 114

总计 368,174