跳转到主内容
加入维修社区 - 创建账户

iPhone 3G的前面板更换

你所需要的

视频概述

  1. iPhone 3G的前面板更换, 破碎的玻璃面板: 步骤 1 中的图像 1,3 iPhone 3G的前面板更换, 破碎的玻璃面板: 步骤 1 中的图像 2,3 iPhone 3G的前面板更换, 破碎的玻璃面板: 步骤 1 中的图像 3,3
    • 如果您的前盖板玻璃碎裂,请保持它现在的状况,并在修理时贴上胶带防止人身伤害。

    • 把透明胶带粘满整个前面板

    • 这将使拆机时玻璃碎片不会散开

    • 戴上安全眼镜,以保护你的眼睛免受任何玻璃的伤害。

  2. iPhone 3G的前面板更换, 屏幕: 步骤 2 中的图像 1,1
    • 移除位于手机底部充电口的两颗 #00 螺丝。

    • 当你把iPhone拆开时,要小心螺丝类型,避免螺丝拧错造成设备损坏。

  3. iPhone 3G的前面板更换: 步骤 3 中的图像 1,1
    • 从吸盘中取出金属手柄。更容易和更安全地抓住吸盘的底部,而不是金属手柄。

    • 打开iPhone时要非常小心,这样显示屏下方的电缆就不会被扯断。

    • 在银色挡板和黑色显示组件之间有一个橡胶垫圈。在这个步骤中需要一点力来分离iPhone的显示器组件。

    • 在主屏幕按钮附近使用一个小吸盘轻轻地拉动iPhone显示屏组件的下部。

    • 如果显示组件损坏得太厉害,不能允许吸盘粘附,可以使用带有强粘合剂的胶带,例如布基胶带。

  4. iPhone 3G的前面板更换: 步骤 4 中的图像 1,1
    • 显示器组件仍然通过几根电缆连接到iPhone,所以不要试图完全移除它。

    • 拿起显示组件直到它的角度大约为45度。

  5. iPhone 3G的前面板更换: 步骤 5 中的图像 1,1
    • 继续用一只手拿住显示部件,然后用你的另一只手用撬棒断开标着“1”的排线。

    • 排线“1”连接到了一个插入式的插座。线缆末端的接头仅需插入主板上的的插座即可。没有其他的机械锁定结构。

  6. iPhone 3G的前面板更换: 步骤 6 中的图像 1,1
    • 旋转显示屏部件至大约垂直。这将便于断开剩下排线。

    • 使用撬棒断开标有 “2” 的排线。

  7. iPhone 3G的前面板更换: 步骤 7 中的图像 1,2 iPhone 3G的前面板更换: 步骤 7 中的图像 2,2
    • 排线“3”由一个 FPC 排线座固定住。你需要在将排线滑出之前解锁连接器。锁定结构在线缆被插入侧的对侧——它需要旋转90度。使用塑料撬棒以抬起锁定结构。

    • 排线锁片非常脆弱并且通常和排线座的主体有着不一样的颜色。(见排线座打开和关上的详情图)

    • 将黑色排线滑出插槽,然后将iPhone的显示部件移除。

    • 在锁片不解锁的情况下无法正确地将排线插入连接器。确保在插入/拔出排线时,锁片是解锁的状态。

  8. iPhone 3G的前面板更换: 步骤 8 中的图像 1,1
    • 移除在显示屏部件角落的单个十字形#00螺丝。

  9. iPhone 3G的前面板更换: 步骤 9 中的图像 1,1
    • 移除显示屏部件右侧的两颗十字形 #00 螺丝。

  10. iPhone 3G的前面板更换: 步骤 10 中的图像 1,1
    • 将显示部件转过来,如果在显示部件边缘有一小条黑色的胶带,请将其小心地揭下。

    • 保持这条胶带的粘性可能很棘手。我们建议将这条胶带贴在一张涂蜡的纸上(任何的贴纸下方的离型纸都可以)。

  11. iPhone 3G的前面板更换: 步骤 11 中的图像 1,1
    • 移除显示屏部件左侧的三颗十字形 #00 螺丝。

  12. iPhone 3G的前面板更换: 步骤 12 中的图像 1,1
    • 将显示部件再次翻起,将金属撬棒小心地插入显示部件边缘的两条导轨之间。轻轻地旋转撬棒来将LCD显示屏从玻璃面板分离。

  13. iPhone 3G的前面板更换: 步骤 13 中的图像 1,1
    • 将液晶显示器(LCD)从玻璃上的排线滑开来分离液晶显示器(LCD)和玻璃

  14. iPhone 3G的前面板更换, 前面板: 步骤 14 中的图像 1,1
    • 这张图显示了移除LCD后应该剩下的部分。

  15. iPhone 3G的前面板更换: 步骤 15 中的图像 1,3 iPhone 3G的前面板更换: 步骤 15 中的图像 2,3 iPhone 3G的前面板更换: 步骤 15 中的图像 3,3
    • 接下来的步骤会要用到热风枪,请务必加倍的小心!请用非常低的温度设置,确保不要让触摸屏上的塑料或者Home键之类的地方熔化了。金属框架导热性非常强,所以小心别触摸这些烫手的区域。

    • 如果玻璃的顶部或者底部碎了,取出碎片时要格外耐心和小心。极端状况下您可能要小心地去除黏在塑料上面的玻璃碎片。

    • 使用热风枪或者吹风机加热触摸屏的左上角区域。

    • 用指甲慢慢把左上角抬起来。触屏的塑料面板是用粘合剂固定在屏幕上的,所以可能要一点力气和耐心来把这个角撬起来。

    • 如果撬塑料面板时感觉到需要很大的力气,请再次使用热风枪加热。

    • 对于右侧重复这个加热-抬起的流程。

  16. iPhone 3G的前面板更换: 步骤 16 中的图像 1,2 iPhone 3G的前面板更换: 步骤 16 中的图像 2,2
    • 顶部松开后,使用热风枪加热触屏的侧面。

    • 使用撬棒撬开屏幕两侧的塑料件。

  17. iPhone 3G的前面板更换: 步骤 17 中的图像 1,3 iPhone 3G的前面板更换: 步骤 17 中的图像 2,3 iPhone 3G的前面板更换: 步骤 17 中的图像 3,3
    • 用热风枪加热底部的角落。

    • 继续用手指甲撬起来这些角落。

    • 从触摸屏上取下这些塑料。

  18. iPhone 3G的前面板更换: 步骤 18 中的图像 1,1
    • 为了更好地粘贴新面板,请尽可能清理前面板框架上残留的粘合剂。

    • 这会确保贴合度并确保新粘合剂能更好粘附。

  19. iPhone 3G的前面板更换: 步骤 19 中的图像 1,3 iPhone 3G的前面板更换: 步骤 19 中的图像 2,3 iPhone 3G的前面板更换: 步骤 19 中的图像 3,3
    • 将定制的粘合条/双面胶黏贴在前塑料面板的上部区域。

    • 使用撬棒扁平的一段将其压到塑料框架上。

    • 这样做可以去除气泡并且确保良好的贴合效果。

  20. iPhone 3G的前面板更换: 步骤 20 中的图像 1,3 iPhone 3G的前面板更换: 步骤 20 中的图像 2,3 iPhone 3G的前面板更换: 步骤 20 中的图像 3,3
    • 将第二条粘合条/双面胶粘在前面板框架的Home键一端。

    • 用撬棒的扁平一端在胶条上滑动,让它粘牢,挤出贴纸下面的气泡。

  21. iPhone 3G的前面板更换: 步骤 21 中的图像 1,3 iPhone 3G的前面板更换: 步骤 21 中的图像 2,3 iPhone 3G的前面板更换: 步骤 21 中的图像 3,3
    • 首先使用撬棒尖的一端,将前面板塑料上的背衬剥离下来。

    • 这背衬还挺薄,确保你只是把背衬撕下来了而没把粘合剂一起撕掉。

  22. iPhone 3G的前面板更换: 步骤 22 中的图像 1,3 iPhone 3G的前面板更换: 步骤 22 中的图像 2,3 iPhone 3G的前面板更换: 步骤 22 中的图像 3,3
    • 撕下前面板玻璃内测的保护性塑料膜。

    • 一共有三个独立的部件:确保撕下了Home键部分中央的玻璃部分以及线下边的部分。没撕干净会导致粘合不牢固然后显示模糊。

    • 尽量别触碰玻璃内侧,你不想在显示屏玻璃层之间留下指纹的。

  23. iPhone 3G的前面板更换: 步骤 23 中的图像 1,3 iPhone 3G的前面板更换: 步骤 23 中的图像 2,3 iPhone 3G的前面板更换: 步骤 23 中的图像 3,3
    • 将前面板的排线折叠,使其远离Home键的凹槽,免得碍事。

    • 连接线标有“#2”的那根线在组装前后面板时要按照图片所示的位置放。

  24. iPhone 3G的前面板更换: 步骤 24 中的图像 1,2 iPhone 3G的前面板更换: 步骤 24 中的图像 2,2
    • 确保上部排线已妥善折叠,将前玻璃的上边缘与前面板框架对齐。

  25. iPhone 3G的前面板更换: 步骤 25 中的图像 1,2 iPhone 3G的前面板更换: 步骤 25 中的图像 2,2
    • 将前面板和前面板框架按压在一起,确保Home键那一块是完全对齐的。

  26. iPhone 3G的前面板更换: 步骤 26 中的图像 1,1
    • 大力按压手机的两端,确保粘合剂给部件粘牢了。

结论

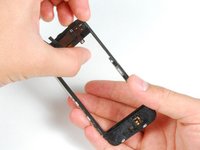
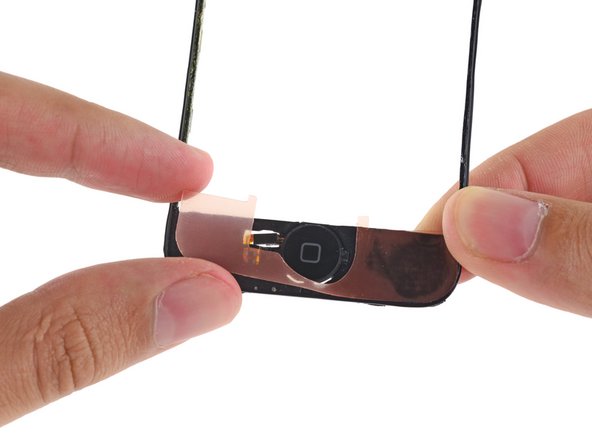
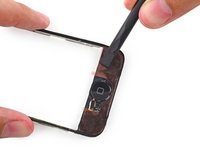
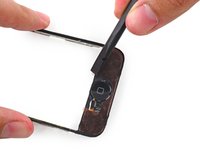
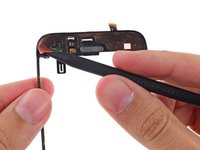
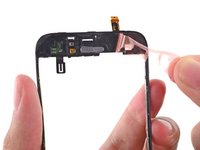
要把您的设备重新组装好,请按照相反的顺序执行说明中的步骤。

479等其他人完成本指南。

由衷感谢以下译者:

en zh

100%

Brian P正在帮助我们修复这个世界! 您也想加入吗?
开始翻译 ›

团队

iFixit iFixit 的会员

Staff

123 名成员

创作了23,908篇指南

17指南评论

Success! It took me quite abit longer than some of those above, but in under 3hrs, it was complete. I am totally satisfied; the only potential problem I've found is that the rubber originally covering the front panel glass and the front panel plastic on the side--i.e., the rubber filling in the gap between the glass and the metal bevel/bezel?sp?--had been partially destroyed during the repair. Now there are spots at the top and bottom where dust could potentially get into the internals more easily. As it is, I opened my phone and it was extremely dusty, so that if it worked well with that kind of dust, I suppose it'll be alright with some more. Besides, now I know how to open it up and clean it! Thanks iFixit! You saved me $140, which is what Apple would have charged to fix my screen.

ataraxiaone - 回复

Everything worked except now my home button does not work, help please.

Chelsea - 回复

来自 Chelsea 的话:

Everything worked except now my home button does not work, help please.

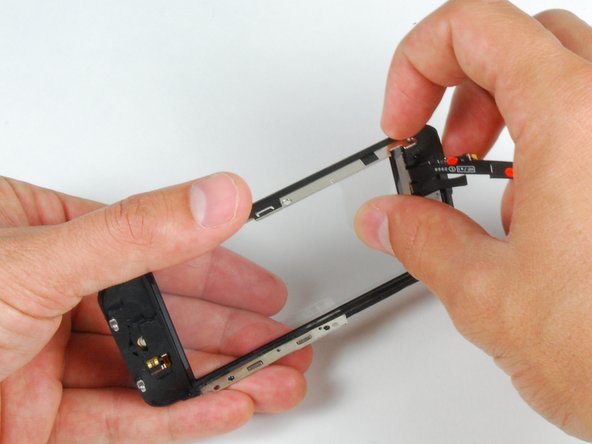
Is the front panel completely snapped into place? I believe there are some contacts on the front panel that have to touch contacts on the inside of the phone for the home button to work.

bryanboyer - 回复

I have followed all the steps and the phone has turned on, BUT it wont let me slide to open. HELP!!

sally - 回复

I'm assuming Sally found the problem to this issue of the phone working but I just had the same problem of no touch screen even though the phone and screen were working otherwise.

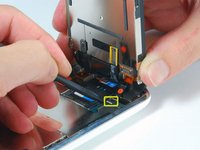
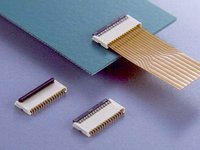
Re-open the phone and ensure Cable #2 just isn't attached properly. If this is loose or not correctly connected then the screen will come on but the touch screen won't work.

andrew -

添加评论

浏览统计数据:

过去 24 小时: 374

过去 7 天: 2,816

过去 30 天: 7,725

总计 695,207