简介
请使用本指南来更换10.5寸iPad Pro的电池。
由于本指南某些步骤中电池可能仍然连接到主板上,请在尝试本指南之前将iPad保持通电状态,直到电池完全耗尽(iPad自动关闭)。如果意外刺穿已充电的锂离子电池,可能会导致起火甚至爆炸,请务必注意。
请准备足够多浓度超过90%的酒精,以帮助更轻松地移除电池并清除残留物。
如果您的电池已膨胀,请采取适当的预防措施。
你所需要的
-
-
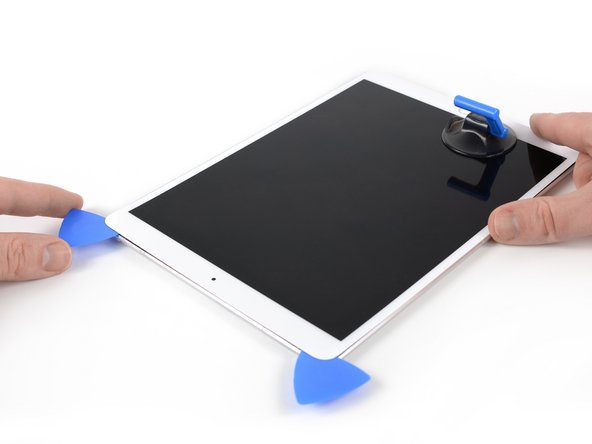
将吸盘放在iPad的主页按钮旁边,按下以创建密封。
-
牢固地拉起吸盘,以在前面板和后壳之间创建一个小缝隙。
-
一旦打开了足够的缝隙,请将撬片插入缝隙中。
i used a proper suction tile puller (small one from DIY store used to hold bathroom tiles) to lift the screen off after heating around the edge using a heat gun. Be careful - It didn't damage anything. The tiny suction things that come with those iPhone kits are not strong enough for this. The one in picture might be good, but looks similar to the kits ones that have key ring.
The suction cup that comes with the iPad battery replacement is plenty large enough and strong enough.
CAUTION, do not push the picks in more than a the width of the replacement screen adhesive strips. You will damage the $200 screen, maybe break the glass. The screen is multiple layers and the picks can get in-between the layers if you push too far in. I got into trouble at the lower left corner. After getting the screen loose, I found that I only need a 2-3 millimeters on the sides and bottom, and four or five millimeters in the corners.
-
-
-
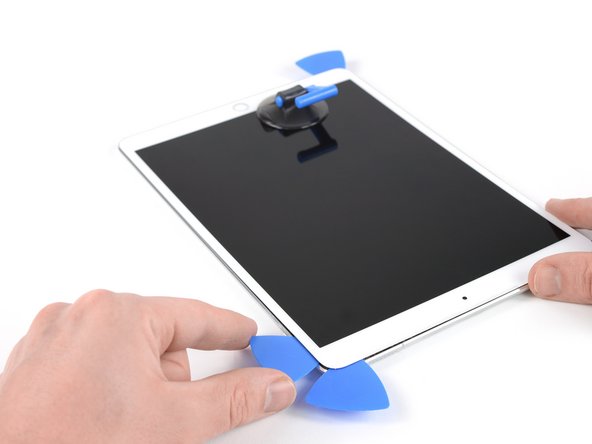
沿屏幕面板边缘划动撬片,向左下角切割屏幕下方的粘胶。
-
暂时将撬片留在原位,以防止粘胶重新粘合。
-
-
-
加热iPad的左边约两分钟,或者直到它变得稍微烫手。
-
如有必要,重新加热iOpener几秒钟,直到它稍微烫手。注意不要过热iOpener,否则它可能会爆裂。
-
在iPad的左下角插入第二个撬片。
-
将第二个撬片沿屏幕面板的左侧划动,以分离下面的粘胶。
-
将第二个撬片留在iPad的左上角附近,以防止粘胶重新粘合。
-
-
-
加热iPad的右边约两分钟,或者直到它变得稍微烫手。
-
在iPad的右上角插入第四个撬片。
-
将撬片向下划动到右下角以切割粘胶。
-
将撬片沿右下角划动,如果需要,可以暂停切割,继续加热,然后切割底边上剩余的粘胶,但在到达主页按钮之前停止。
We must be very careful when we are prying left and right size bezel to peel off the screen as there very little gap between edges and LCD. Slightly inside push can crack LCD. We need to pay full care and raising edges very very slowly.
iRepairMan - 回复
-
-
-
在iPad顶部靠近(但不直接在)前置摄像头处插入第五个撬片。
-
轻轻扭动开胶片以将屏幕组件与iPad分离。
-
如果需要,加热更多并/或切割任何阻止显示屏分离的剩余胶粘剂。
Be very gentle when twisting. My screen broke in this step. I would not twist it but try to remove glue further as there is a aluminium support of the screen in the wide area beneath the light sensors and there is glue on that also preventing in easy lifting the screen. Just be careful not to damage the light sensors and camera.
-
-
-
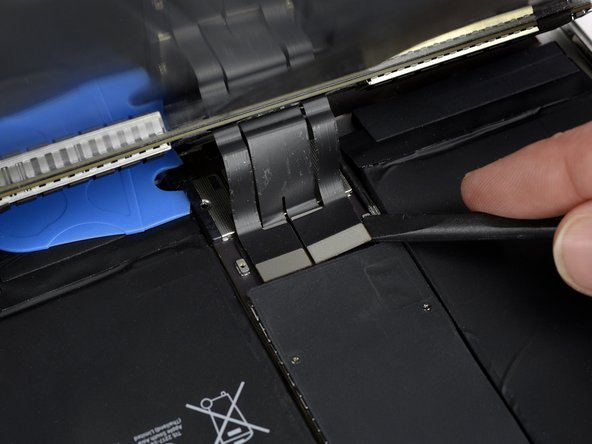
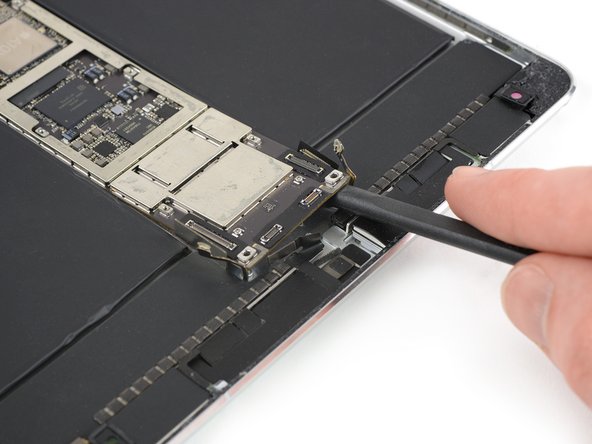
将屏幕组件的顶端边缘提起,然后小心地向上(朝前置摄像头和耳机插孔的方向)滑动,直到屏幕底部固定电池接口的螺丝露出。
How do you go about getting to this battery connector as it is covered by a large metal shield above the logic board, if you do not disconnect the battery you risk frying the back light.
The metal shield is not relevant for this. You can leave it in place or remove it if it comes of. Once the screw of the plate is removed you will be able to lift the print a little bit and put someting between the battery connector and the board connector. The connector is beneath the print. Look further on to see a deck card is used for this.
-
-
This picture looks nothing like my A2152 battery connector. I can’t really tell what is happening here.
todd sorel - 回复
-
-
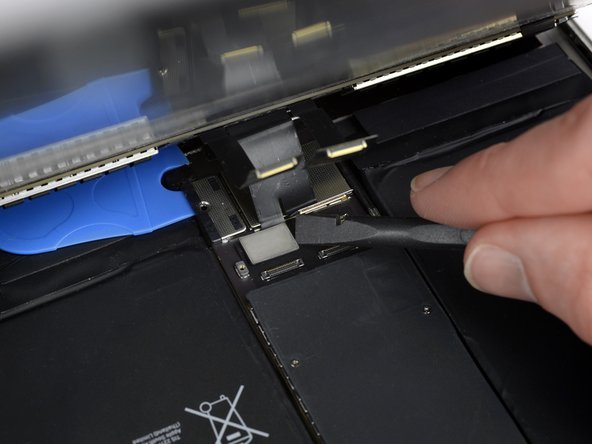
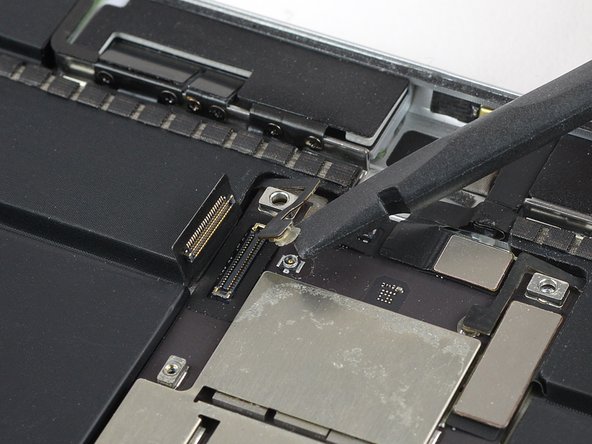
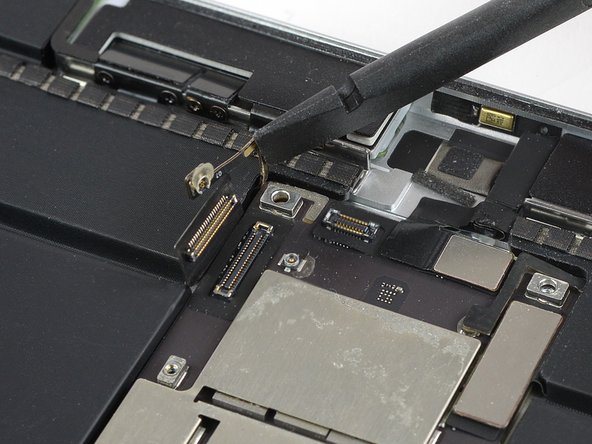
要断开电池连接,请将电池隔离器的一个齿或拆机片的尖端滑入电池电源接口下,以确保电源电路被切断。
-
在工作过程中,将电池隔离器保持在原位。
I found it very hard to fit something under the battery power connector. I did not have a battery blocker, so I tried a playing card. I was not able to slide it between the springs. The section of the battery power connector, above the cantilever springs, did not seem to want to give at all, like in the picture above. If other people had success, I would love to hear how.
I didn’t have success either, but i kept myself grounded, and avoided battery contact as much as possible.
I used a playing card cut to shape. I had to make a couple, to try a few times.. It does go in eventually. Not deep, but enough to break connection. You can test by trying to switch on iPad.
It took some time but I was able to get it under the back part and slide it forward.
You must disconnect the battery before plugging the new screen. I think i didn't break the circuit in first attempt and shorted the screen, the result was half of the screen didn't work. I used a playing card. Second attempt was successful with new screen.
I believe I have a good solution to this problem. I was dissatisfied with the thickness of the battery blocker, or even a thin guitar pick, for that matter; both required force and I feared bending the springs or leaving the connection intact.
What worked for me was cutting a small strip of non-conductive, static-proof film (the kind that RAM and other sensitive components come in). There was every reason to trust in its non-conductivity but just to be sure, I used a VOM to test; its resistance was out of the VOMs range, meaning that its conductivity was nil. I used a spudger to gently lift the logic board off of the battery contacts and slid the non-conductive strip in between; went without a hitch.
When reassembling, I laid the strip on the battery contacts, laid the logic board on top, installed it, connected the display panel and gently drew the slip out and installed the battery screw. Worked like a charm.
These are some extremely misleading set of instructions and picture. Much better if you have the battery discharged, so don't need to worry about blocking the connector. But DO NOT force anything in the through the socket and certainly do not try to bend up the soldered cover, as it appears to be happening in the picture. You will break the connector, most likely resulting in ipad shutting down every 3 minutes from the notorious "thermal sensor missing" panic system crash.
-
-
-
缓慢抬起显示屏的顶部边缘,注意不要拉扯屏幕排线。
-
拧下固定屏幕排线盖板两颗1.3毫米十字螺丝。
-
拆下屏幕排线盖板。
Here it is very precocious steps to do. Flx cables to connectors are small in size and we cannot lift the display vertically. Therefore, we may struggle to unscrew the metal shield. We need to use smaller size of philip screw driver or place vertically the display to create enough gap between philip screw driver and the cover bracket. Similarly, when we are replacing new display we need to be carefully connect four flex cable with connectors with logic board.
iRepairMan - 回复
agree, with re-assembly very tiny screws and awkward positioning, the back two cables pop off if not careful.
I did this step using just the tip of the PH000 screwdriver, it made it much easier to get my hands into the small space, the replacement screen from ifixit had tighter cables that I was not comfortable stretching out to go to a 90* angle to screw back on. Make sure your tip is magnetized for best results :)!
Meaning no disrespect for this excellent guide, I found this photo to be a bit misleading; at least in my case. It clearly shows about 90˚ between the case and the display. I tested the limits with the one I was repairing and could find no way to raise the display far enough to clear a screwdriver without jeopardizing the cables. I resorted to the same solution that Amber Wooldridge discovered; using a PH000 bit and hand-tightening. I had a tiny needle-nosed plier that I used to tighten them a bit (but very gently).
-
-
-
用撬棒轻轻撬起它们并断开连接。
I went to replace the LCD assembly on an ipad Air 3, and one of the flex cables on the new LCD assembly broke in half. The flex cables on the old assembly work well and are intact. Is it possible to transfer the old flex cable(s) to the new assembly, or can I solder the broken pieces of the new flex cable together? I have also contacted the part supplier about this and am awaiting a response.
-
-
-
-
取下屏幕组件。
Definitely test your iPad’s functions before sealing it up. I needed to reopen the display to reconnect the display connectors in order to have the display functioning properly. As a result, the adhesive strips did not work as well and I needed to tape some of the edges closed with a small section of strong clear packing tape.
I stuck the adhesive to the chassis first. That was messy because the plastic that covers the adhesive seems to be for screen side first. So you end up exposing both sides and those collect dust. I now realise you're supposed to put the adhesive on screen first. Not sure if it would have made much difference in the outcome (mine screen is not stuck in some places).
I found this out too. I had two sealing kits and they were both meant to be fixed on the screen first. I did not managed to get the screen to stick with the body as well. Now used some B6000 glue in addition.
agrior -
-
-
-
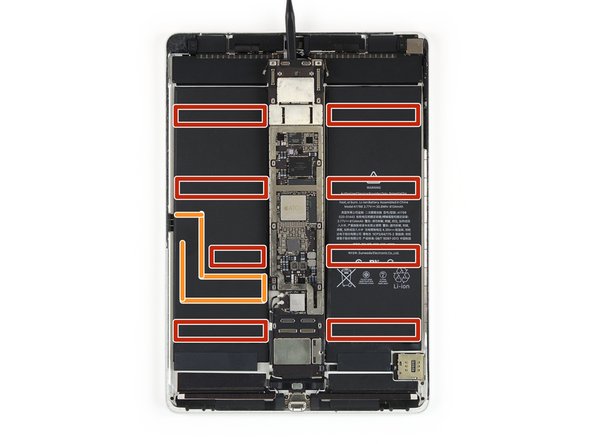
使用十字螺丝刀拧下固定屏蔽罩的十颗螺丝:
-
八颗1.3毫米螺丝
-
两颗稍长一些的螺丝
The top two screws are longer than the rest on my iPad. Be careful to put them back in the right spots.
-
-
-
使用扁平的撬棒,从靠近前置摄像头的顶部边缘开始,撬起屏蔽罩。
-
继续小心地撬起屏蔽罩,直到您可以将其取下。
The two screws adjacent to the camera location are slightly longer! Make sure you don’t mix them up with the other eight, as shorter ones will not work in this location.
Thanks! I’ve updated the step with your tip!
-
-
-
用撬棒撬起并断开左侧的排线和天线。轻轻地将它们折叠到一边。
wo finde ich das AntennenKabel , das ist abgerissen ?
Wo finde ich das Antennenkabel rechts und links das ist bei mir abgerissen ?
We also have no antenna cable as shown…
Brian Gray - 回复
I think you need to assume that there is glue present and apply heat anyway. In my case the cable was not glued to the board but the connector was. So when I tried to gently lever the connector up, the cable ripped off the connector.
If you look at the picture shown in step 21, you can actually see the glue on the connector.
The left and right small antenna connectors are extremely delicate! They can crack if bent back too much and it's difficult to avoid bending them too much when removing and re-installing the logic board. This will cause the cellular radio and GPS to be inoperable. To be safe, remove antenna assembly (not shown in this guide) prior to removing the logic board.
To add to my comment, I'm actually working to replace the left and right small antenna connectors due to me breaking them. I'd recommend removing the top left and right speakers and just fully removing the two antenna connectors prior to removing the logic board. You do not need to fully remove the cellular antenna assemblies, just unscrew the plate/connector (with annoying perpendicular screws too) that cover the other ends of the small antenna connectors (easy to figure out once you remove the speakers).
To remove the speakers remove 3 screws, then just pry carefully (they have adhesive tape holding them down).
-
-
-
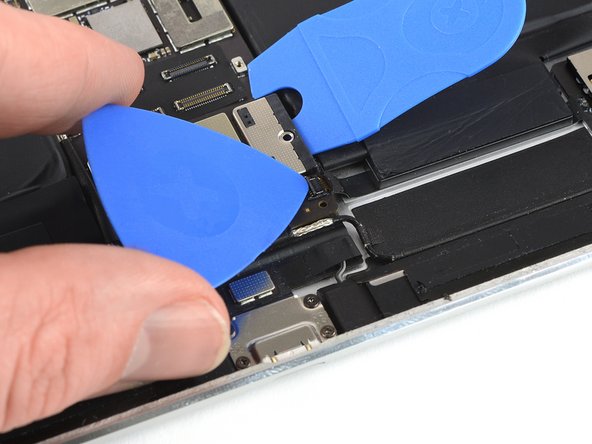
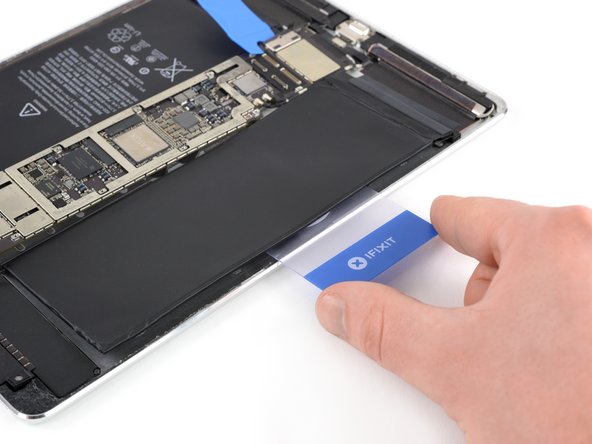
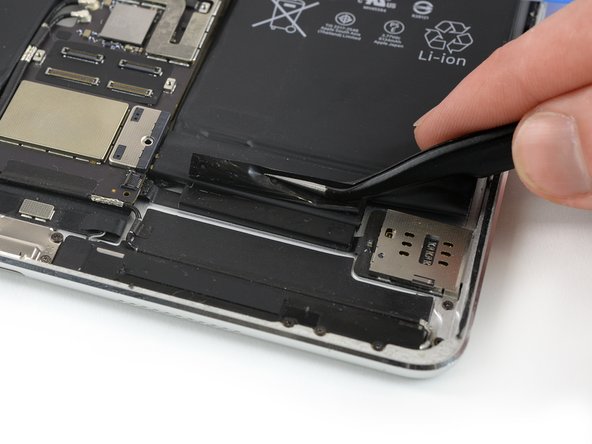
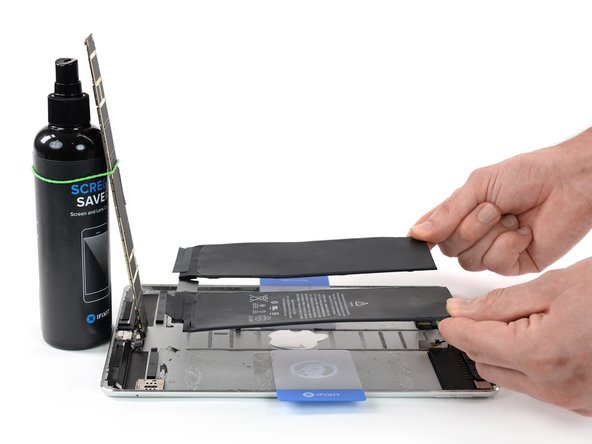
从电池插座上取下电池挡片。
-
将电池挡片的一侧划入电池插座下,并确保不遮挡SIM卡托排线的ZIF插座。
What should I do to block the battery instead?
"The battery isolation pick or battery blocker is an outdated way of isolating the battery, as you risk damaging the battery pins underneath the logic board."
As the previous comment says, if this is an "outdated way" then what is the up to date way?
-
-
-
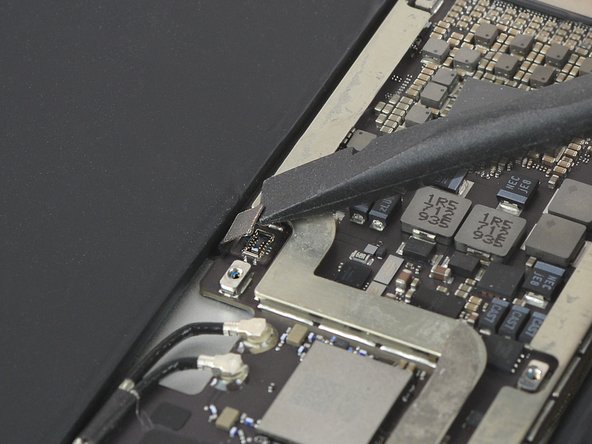
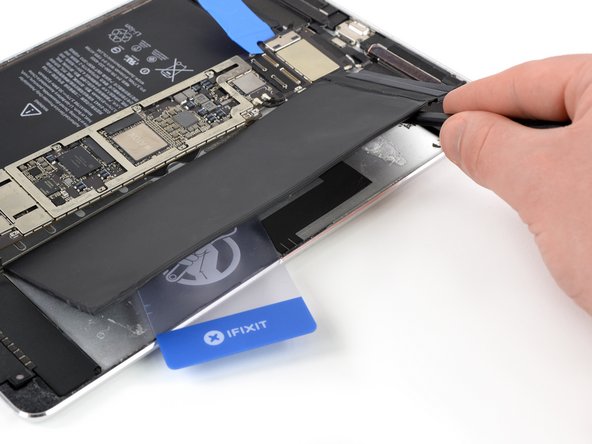
用拆机片翘起ZIF插座上的锁扣。
-
用镊子拉出并断开SIM卡托排线。
I don't have this connector on my 10.5 Pro. Maybe this is only for equipment with cellular. This needs to be confirmed by an expert.
-
-
-
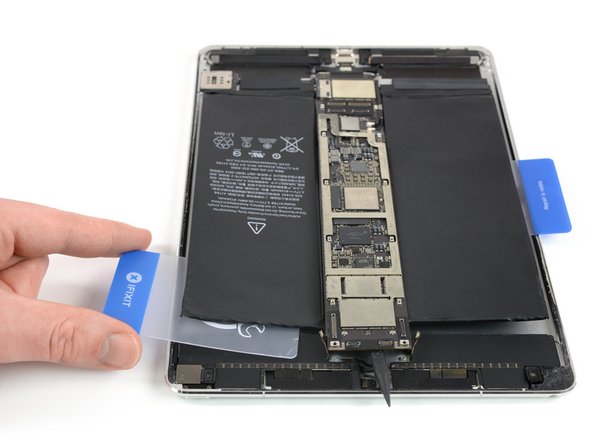
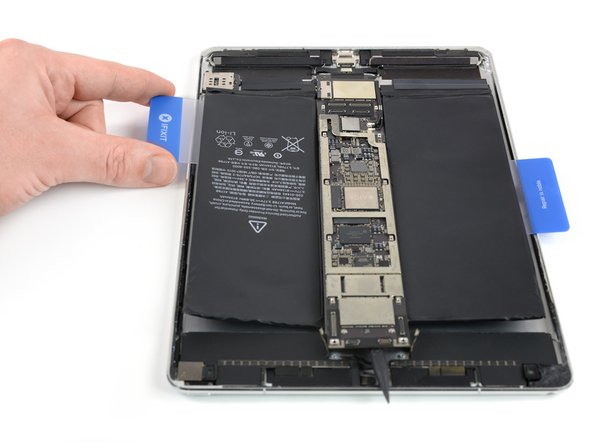
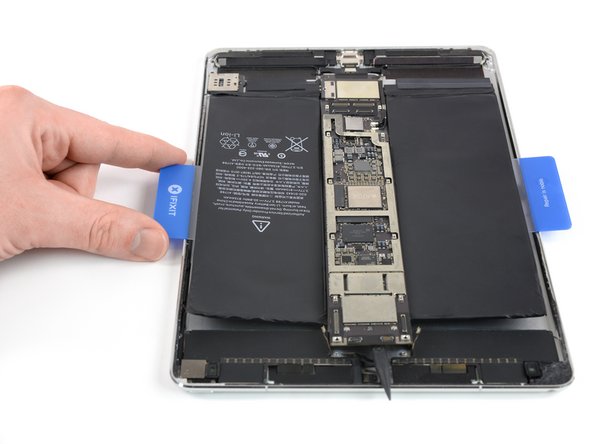
用镊子剥下剩余的胶带。
-
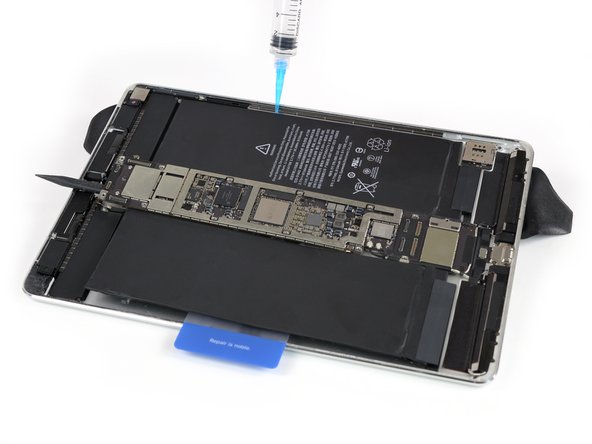
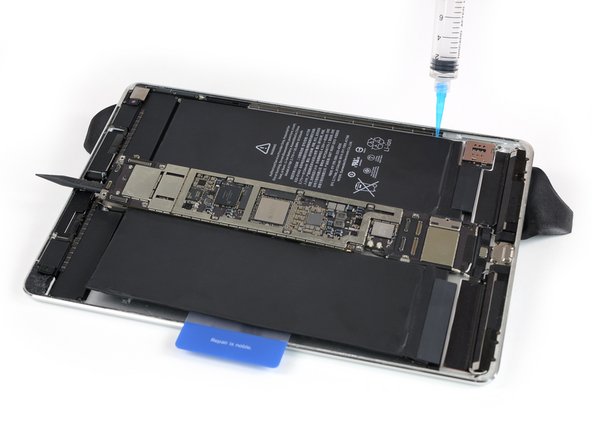
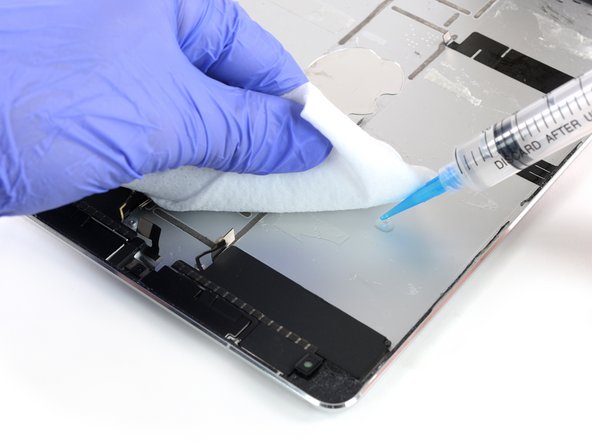
在安装新电池之前,请使用酒精和无纺布清洁粘合区域,以确保新电池适合并且粘合正确。
After a successful battery replacement we ran into an issue where the iPad Pro would crash once or twice a day. I made sure to calibrate the battery per repair instructions but that didn’t fix the issue. I got it resolved after backing up the iPad and then putting it into DFU mode through iTunes and installed a fresh copy of iPadOS and then restore from backup. That fixed the issue of iPad crashing. Hope this helps if you run into a similar issue.
-


比较您的新替换零件与原零件。在安装之前,您可能需要将剩余的部件转移到新零件上或去掉新零件上的粘胶背衬。
重新组装您的设备时,请按相反的顺序按照以下说明进行。
如果可能的话,在重新封闭平板电脑之前,请打开您的iPad并进行修复测试。
为了获得最佳性能,请在完成本指南后校准您新安装的电池:将其充电至100%,并继续充电至少2小时。然后使用您的设备,直到它因电量不足而关闭。最后,将其连续充电至100%。
将您的电子废物交给R2 or e-Stewards 认证的回收商妥善处理。
修复未如预期进行?查看我们的论坛以获取故障排除帮助。
比较您的新替换零件与原零件。在安装之前,您可能需要将剩余的部件转移到新零件上或去掉新零件上的粘胶背衬。
重新组装您的设备时,请按相反的顺序按照以下说明进行。
如果可能的话,在重新封闭平板电脑之前,请打开您的iPad并进行修复测试。
为了获得最佳性能,请在完成本指南后校准您新安装的电池:将其充电至100%,并继续充电至少2小时。然后使用您的设备,直到它因电量不足而关闭。最后,将其连续充电至100%。
将您的电子废物交给R2 or e-Stewards 认证的回收商妥善处理。
修复未如预期进行?查看我们的论坛以获取故障排除帮助。
47等其他人完成本指南。


12条评论
If you say the “the battery isolation method in this guide is outdated” then what is the correct way to isolate the battery?!?! The rest of the guide makes no mention of the correct/prefered method of isolating the battery.
How is it that the author took the time to update the guide with that message but failed to mention what should be done instead
Good point! We are currently still researching a more reliable alternative to the battery isolation procedure. As of now, the battery blocker method still works—it just has substantial dangers. This is especially true for iPad Pros, where the Logic Board is adhered to the frame. I’ve reworded the warnings to reflect this.
Hi can you advise please? In step 25 the SIM card tray flex cable is disconnected, no problem apart from i don’t have a SIM card tray flex cable in the A1701 that i’m repairing!! Urgent assistance required please. Regards R
You have the Wi-Fi model, which will look slightly different and have different procedures compared to the cellular model. You can skip the SIM flex cable step.
Ich habe diese Antennenkabel defekt wo bekomme ich sie oder für was sind die ?
hi
I fixed my battery according to the guide.
I have two problem
1. battery screw not able screw back in. but I am able to turn on iPad.
2. after turning on I am not able to unlock because on the keypad 1, 2, 3, these keys not responding to the touch. all other keys are touch responsive.
kindly help me with these two issues.
many thanks
I just finished following this guide, thank you so much for writing it!
I know that 18 of the 43 involve dealing with glue, but JEEZ that’s still underselling how much glue is in this thing.
The iOpener worked surprisingly well for removing the display. But the iFixit adhesive remover was not effective for removing the old battery. After 5 minutes, the solvent only ate around the edges of the adhesive strips and made a huge gooey mess with the center still sticky. After 10 minutes the glue had already re-adhered. I recommend anyone reading this try heat first, and see whether that works for you.
FWIW, I skipped the steps with the battery blocker since there doesn’t seems to be consensus on how to do it safely. I just made sure the battery was completely dead so the backlight couldn’t turn on and fry anything even if it wanted to.
Either way, after about 3 hours start to finish including cleanup (man there was a lot of cleanup) I’m very happy to say that I have a new battery and everything is working perfectly!!
thanks for the guide, after fighting against the glue, and sweeting like i was running a marathon i just replaced the stupid battery, the only problem, its that the top right speaker sounds baad, like its loose or something, and its weird, because i never touch it, ill try to open it tomorrow and see what's the problem
The guide should include a warning not to clean the glue around the edges of the screen after opening. Or, at least not use any solvent. Any liquid you use will leak in between the digitizer and LCD, hence ruining your display. Another comment though, why the battery I bought like two weeks ago is made in May of 2019?
Shi-zun Fu - 回复
I was lucky enough to take off the adhesive from the Logic board and the battery without using any solvents and used just my hair dryer. You definitely need to be patient with the process and not force it. Putting the new battery back on, as well as putting back on the display, and camera was super quick. Those darn new screen adhesives are a pain to put on but once the screen sits flush with the body, it was totally worth it. Think I spend about an hour and a half total. Battery isolation with the little pick did help out and felt safe having it in place throughout the repair process. Having the locations of where the battery adhesives were located, as well as the Smart connector was super clutch! I appreciate the disclaimers and warnings all throughout the repair guide.
Just to provide some failing experience and heads-up: My LCD screen has cracks and flickering after the battery replacement. I think it’s because when removing the screen I used the suction cup too frequently and added too much pressure to the screen when using it. Try to use the iOpener and the pick for most of the time for removing the screen.