跳转到主内容

当前版本的文档还未经巡查,您可以查看最新的已查核版本

仅作为前提条件
本指南仅用作其他指南的先决条件。不能单独食用。

你所需要的

  1. 这个步骤还没有翻译 帮忙翻译一下

    : 步骤 1 中的图像 1,2 : 步骤 1 中的图像 2,2
    • Use tweezers to peel up and remove the small piece of tape covering the front-facing camera cable connector.

  2. 这个步骤还没有翻译 帮忙翻译一下

    : 步骤 2 中的图像 1,2 : 步骤 2 中的图像 2,2
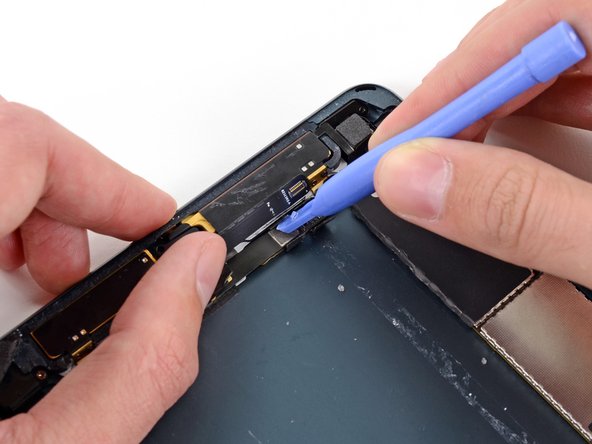
    • The front-facing camera cable connector is secured with pieces of tape that wrap up around the sides of the cable and are fastened to two small metal plates.

    • Use a plastic opening tool to gently pry the upper metal plate up from the front-facing camera cable connector.

    • Being careful not to break the plate or the tape attached to it, pry it up and fold it away from the front-facing camera cable connector.

  3. 这个步骤还没有翻译 帮忙翻译一下

    : 步骤 3 中的图像 1,2 : 步骤 3 中的图像 2,2
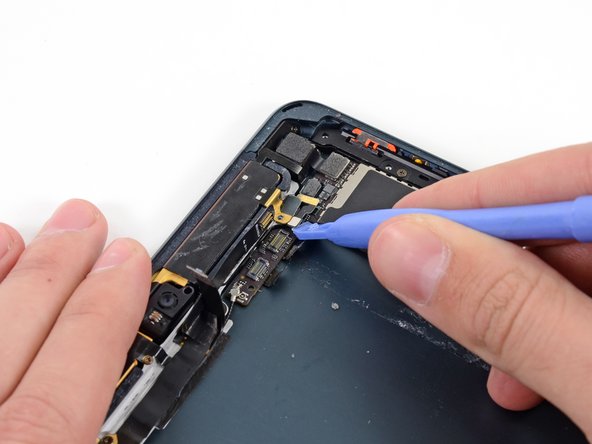
    • Gently pry the second (lower) metal plate up from the front-facing camera cable connector.

    • Again, carefully pry the plate up and away from the front-facing camera cable connector.

  4. 这个步骤还没有翻译 帮忙翻译一下

    : 步骤 4 中的图像 1,2 : 步骤 4 中的图像 2,2
    • Use a plastic opening tool to pry the front-facing camera cable's connector up from its socket on the logic board.

  5. 这个步骤还没有翻译 帮忙翻译一下

    : 步骤 5 中的图像 1,2 : 步骤 5 中的图像 2,2
    • Gently fold the front-facing camera cable up and out of the way of the logic board.

  6. 这个步骤还没有翻译 帮忙翻译一下

    : 步骤 6 中的图像 1,2 : 步骤 6 中的图像 2,2
    • Use tweezers to peel up and remove the small piece of tape covering the headphone jack cable connector.

  7. 这个步骤还没有翻译 帮忙翻译一下

    : 步骤 7 中的图像 1,2 : 步骤 7 中的图像 2,2
    • Use a plastic opening tool to gently pry the lower metal plate up from the headphone jack cable connector.

    • Being careful not to break the plate or the tape attached to it, pry it up and fold it away from the headphone jack cable connector.

  8. 这个步骤还没有翻译 帮忙翻译一下

    : 步骤 8 中的图像 1,2 : 步骤 8 中的图像 2,2
    • Pry the second (top) metal plate up from the front-facing camera cable connector.

    • Again, carefully pry the plate up and away from the headphone jack cable connector.

  9. 这个步骤还没有翻译 帮忙翻译一下

    : 步骤 9 中的图像 1,2 : 步骤 9 中的图像 2,2
    • Use a plastic opening tool to pry the headphone jack cable's connector up out of its socket on the logic board.

  10. 这个步骤还没有翻译 帮忙翻译一下

    : 步骤 10 中的图像 1,2 : 步骤 10 中的图像 2,2
    • Gently bend the headphone jack cable back, away from the logic board.

  11. 这个步骤还没有翻译 帮忙翻译一下

    : 步骤 11 中的图像 1,2 : 步骤 11 中的图像 2,2
    • Use a plastic opening tool to pry the top left antenna cable up from its socket on the logic board.

  12. 这个步骤还没有翻译 帮忙翻译一下

    : 步骤 12 中的图像 1,1
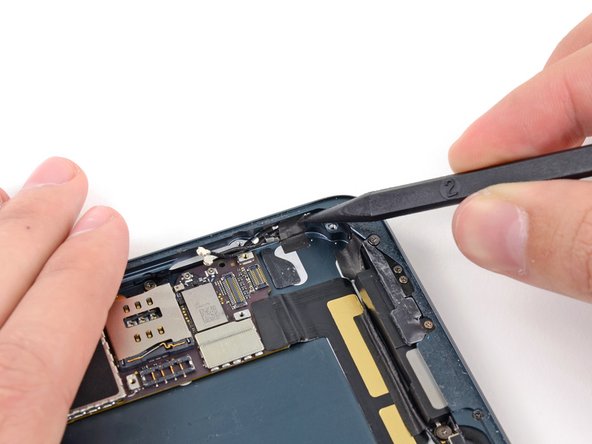
    • Remove the following three screws securing the top right antenna to the rear case:

    • Two 1.3 mm #00 Phillips screws from the side of the antenna's socket.

    • One 1.8 mm #00 Phillips screw.

  13. 这个步骤还没有翻译 帮忙翻译一下

    : 步骤 13 中的图像 1,3 : 步骤 13 中的图像 2,3 : 步骤 13 中的图像 3,3
    • Disconnect the top right antenna's coaxial cable from the logic board with a plastic opening tool.

    • Gently bend the cable and screw tab up out of the way of the logic board.

  14. 这个步骤还没有翻译 帮忙翻译一下

    : 步骤 14 中的图像 1,2 : 步骤 14 中的图像 2,2
    • Use a plastic opening tool to pry the rear-facing camera cable up from its socket on the logic board.

  15. 这个步骤还没有翻译 帮忙翻译一下

    : 步骤 15 中的图像 1,2 : 步骤 15 中的图像 2,2
    • Pry the top right antenna's ribbon cable up from its socket on the logic board with a plastic opening tool.

  16. 这个步骤还没有翻译 帮忙翻译一下

    : 步骤 16 中的图像 1,2 : 步骤 16 中的图像 2,2
    • Use tweezers to peel up and remove the small piece of tape covering the button ribbon cable ZIF connector.

  17. 这个步骤还没有翻译 帮忙翻译一下

    : 步骤 17 中的图像 1,2 : 步骤 17 中的图像 2,2
    • Use the tip of a spudger to lift up the tab on the button ribbon cable ZIF connector.

  18. 这个步骤还没有翻译 帮忙翻译一下

    : 步骤 18 中的图像 1,2 : 步骤 18 中的图像 2,2
    • Use tweezers to pull the button ribbon cable straight out of its ZIF socket on the logic board.

  19. 这个步骤还没有翻译 帮忙翻译一下

    : 步骤 19 中的图像 1,3 : 步骤 19 中的图像 2,3 : 步骤 19 中的图像 3,3
    • Gently peel back the wide piece of tape covering the top of the right speaker.

  20. 这个步骤还没有翻译 帮忙翻译一下

    : 步骤 20 中的图像 1,3 : 步骤 20 中的图像 2,3 : 步骤 20 中的图像 3,3
    • Continue peeling the tape, and remove it from the iPad.

  21. 这个步骤还没有翻译 帮忙翻译一下

    : 步骤 21 中的图像 1,3 : 步骤 21 中的图像 2,3 : 步骤 21 中的图像 3,3
    • Use the flat end of a spudger to disconnect the two bottom antenna cable connectors from their sockets on the logic board.

  22. 这个步骤还没有翻译 帮忙翻译一下

    : 步骤 22 中的图像 1,2 : 步骤 22 中的图像 2,2
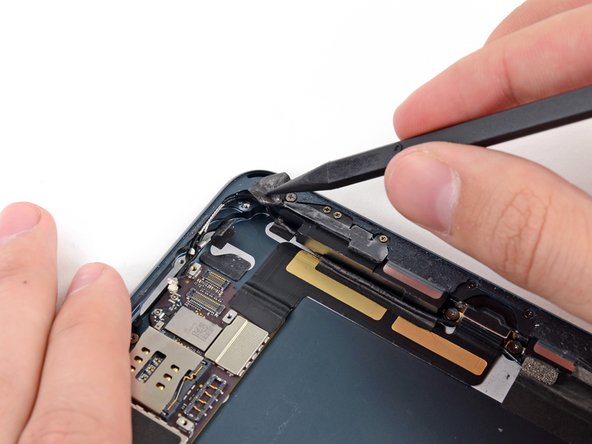
    • Use the tip of a spudger to peel back the small piece of tape covering both antenna cables on the bottom right side of the iPad.

    • Leave the lower part of the tape stuck to the back of the rear case to aid in reassembly.

  23. 这个步骤还没有翻译 帮忙翻译一下

    : 步骤 23 中的图像 1,2 : 步骤 23 中的图像 2,2
    • With the tip of a spudger, peel up the larger piece of tape covering both antenna cables near the bottom of the rear case.

    • Do not try to remove this piece of tape; it is wrapped around the top antenna cable.

  24. 这个步骤还没有翻译 帮忙翻译一下

    : 步骤 24 中的图像 1,3 : 步骤 24 中的图像 2,3 : 步骤 24 中的图像 3,3
    • Use the tip of a spudger to pry the small metal retaining clip off the left antenna cable, then de-route the cable from the clip.

  25. 这个步骤还没有翻译 帮忙翻译一下

    : 步骤 25 中的图像 1,2 : 步骤 25 中的图像 2,2
    • De-route the antenna cable from the corner of the iPad.

  26. 这个步骤还没有翻译 帮忙翻译一下

    : 步骤 26 中的图像 1,2 : 步骤 26 中的图像 2,2
    • Use the tip of a spudger to remove the small piece of tape securing the antenna cable in the bottom right corner of the iPad.

  27. 这个步骤还没有翻译 帮忙翻译一下

    : 步骤 27 中的图像 1,1
    • Peel the cable back from the corner of the iPad.

  28. 这个步骤还没有翻译 帮忙翻译一下

    : 步骤 28 中的图像 1,3 : 步骤 28 中的图像 2,3 : 步骤 28 中的图像 3,3
    • Use the tip of a spudger to pry the antenna cable tape up from the rear case of the iPad.

    • Gently pull the antenna cable out of the way as you work along the piece of tape, to keep it from resealing.

  29. 这个步骤还没有翻译 帮忙翻译一下

    : 步骤 29 中的图像 1,2 : 步骤 29 中的图像 2,2
    • Pull the antenna cable from the slot behind the Lightning connector.

终点

0条评论

添加评论

浏览统计数据:

过去 24 小时: 4

过去 7 天: 8

过去 30 天: 8

总计 227