跳转到主内容

此翻译可能不反映源指南的最新更新。 帮助更新翻译查看源指南

iPad Mini CDMA 前面板更换

仅作为前提条件
本指南仅用作其他指南的先决条件。不能单独食用。

你所需要的

  1. iPad Mini CDMA 前面板更换, 前面板: 步骤 1 中的图像 1,3 iPad Mini CDMA 前面板更换, 前面板: 步骤 1 中的图像 2,3 iPad Mini CDMA 前面板更换, 前面板: 步骤 1 中的图像 3,3
    • 如果您的显示屏玻璃已经碎裂,防止显示屏玻璃在您维修时进一步伤害到您,请使用胶带来固定已经碎裂的屏幕。

    • 给iPad 的正面整面贴上胶带。

    • 这一步将保证在您翘起和移除显示屏时能够保持完整。

    • 尽量根据下面的指南进行操作。但,一旦玻璃破碎,请停下拆解并使用金属撬刀撬出玻璃,避免更多的碎裂。

    • 戴上安全眼镜来保护你的眼睛。 小心操作不要损坏了LCD内屏。

    In case of broken glass, here are some hints:

    - I prefer 3M "3350" tape; a metalized polypropylene tape with an acrylic adhesive. It's a very thin, silvery HVAC tape, not your standard duct tape.

    - Test your tape to make sure it sticks really well to the glass.

    - Use isopropyl alcohol on a paper towel to remove fingerprints and other dirt to help the tape stick to the screen.

    - Use the widest tape you can find, and apply it evenly, without trapping bubbles, without crinkles: This greatly improves your chance of success with the suction cup later.

    - Cut tape pieces long enough and go over the (rounded) edge; afterwards carefully run a scalpel alongside the edge (between bezel and glass) to trim off any excess.

    - Don't overlap edges of the tape: butt-join them instead.

    - If needed: repeat in other direction.

    - If needed: Cut square piece of tape (size of suction cup) and place it where you want to lift the glass, so that the suction cup doesn't cover any butt-joins.

    Good luck, you brave person!

    volty - 回复

    This is the second broken screen I’ve fixed. Overlapped package tape carefully stuck to the glass and trimmed to the edges will contain most of the shards. I found that a hair dryer works for softening the glue. After getting under an edge with the suction cup I carefully followed the opening sequence using a combination of plastic picks and a single edge razor blade to get under the small pieces. It was slow going with lots of reheating with the dryer (about 45 minutes), but the taped glass came off without glass everywhere.

    Bill Roughen - 回复

  2. iPad Mini CDMA 前面板更换: 步骤 2 中的图像 1,1
    • 将iOpener放置在iPad左侧。也就是Home键左侧位置。

    • 将iOpener放置至少5分钟来软化玻璃下面的粘合剂。

    I worked at it for over 2 hours before deciding to microwave the opener for 45 seconds at a time. That seemed to do the trick.

    jaromhyde - 回复

  3. iPad Mini CDMA 前面板更换: 步骤 3 中的图像 1,3 iPad Mini CDMA 前面板更换: 步骤 3 中的图像 2,3 iPad Mini CDMA 前面板更换: 步骤 3 中的图像 3,3
    • 将吸盘小心的放在刚加热的一侧中间的位置。

    • 确保吸盘已经牢牢吸住前玻璃面板。

    • 使用一只手在固定住iPad,另一只手慢慢提起吸盘,将前玻璃面板与后壳分离。

    • 小心将玻璃面板提起能够将撬棒插入的高度。 抬的过高玻璃会有破损的风险。

    This step is totally pointless if you have a shattered screen. The suction cup is rendered useless. Any tips on what to do if you can't get any suction due to a shattered screen?

    robloomis - 回复

    just pick out the glass shards if it is cracked that bad you are better off scrapping the digitizer

    echow2001 -

    for shattered screens I cover the screen with tape. I find packing tape works best for me.

    George - 回复

  4. iPad Mini CDMA 前面板更换: 步骤 4 中的图像 1,3 iPad Mini CDMA 前面板更换: 步骤 4 中的图像 2,3 iPad Mini CDMA 前面板更换: 步骤 4 中的图像 3,3
    • 拉住吸盘,在玻璃和机壳之间的缝隙处放置一个撬片。

    • 切勿将撬片插入深度超过黑色边框,这样深入过度可能会使LCD屏幕受损。

    • 然后拉动吸盘塑料部分来将吸盘从显示模组上取下。

    you have to pull up on the suction cup harder than you might be comfortable with!

    jfaulks1 - 回复

    thanks jfaulks1 (I did not copy and paste lol)

    iliketrains kid - 回复

  5. iPad Mini CDMA 前面板更换: 步骤 5 中的图像 1,1
    • 重新加热iOpener

    • 小心,请勿在维修过程中过度加热iOpener。 在重新加热iOpener之前请至少等待10分钟。

    • 将其放在ipad左侧几分钟来重新加热。

  6. iPad Mini CDMA 前面板更换: 步骤 6 中的图像 1,3 iPad Mini CDMA 前面板更换: 步骤 6 中的图像 2,3 iPad Mini CDMA 前面板更换: 步骤 6 中的图像 3,3
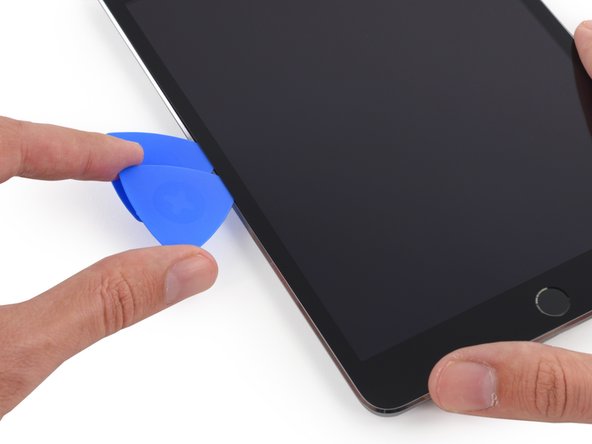
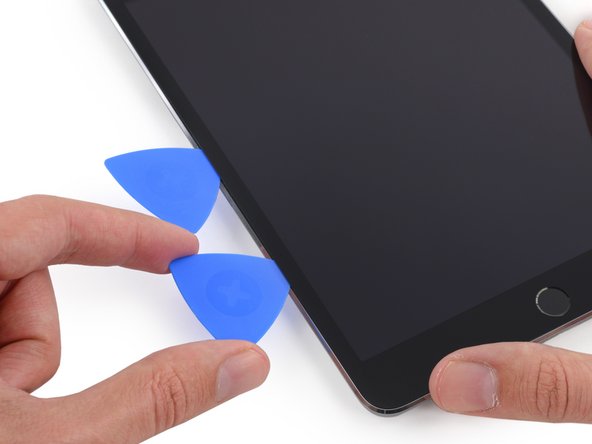
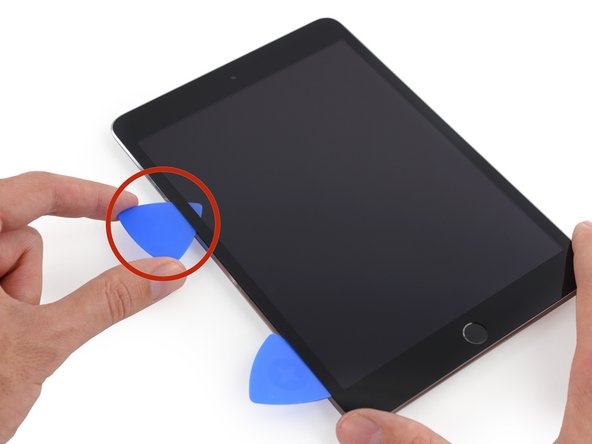
    • 沿着第一个撬片的开的口处插入另外一个翘片同时向下滑动,让撬片分离粘合剂。

    • 在下来的步骤中,如果您遇到了巨大的阻力,请停下来,重新加热工作的部位。 暴力使用撬片会导致玻璃破裂。

  7. iPad Mini CDMA 前面板更换: 步骤 7 中的图像 1,3 iPad Mini CDMA 前面板更换: 步骤 7 中的图像 2,3 iPad Mini CDMA 前面板更换: 步骤 7 中的图像 3,3
    • 继续沿着下方继续滑动来将粘合剂分离。

    • 如果撬片卡住了,请沿着iPad的侧面滚动撬片,然后继续进行分离工作。

  8. iPad Mini CDMA 前面板更换: 步骤 8 中的图像 1,3 iPad Mini CDMA 前面板更换: 步骤 8 中的图像 2,3 iPad Mini CDMA 前面板更换: 步骤 8 中的图像 3,3
    • 将第一个插入iPad的撬片向上滑动到iPad的左上角

    • 撬片可能会出现图片上的情况,请不要慌张。 只需将撬片拉出一点点来继续进行维修工作。 但要避免这种情况,因为粘合剂可能会粘附在LCD显示屏上变得难以清理。

  9. iPad Mini CDMA 前面板更换: 步骤 9 中的图像 1,1
    • 重新加热iOpener 并将其放置在iPad顶部边缘位置且高于前置摄像头。

    • 小心,请勿在维修过程中过度加热iOpener。 在重新加热iOpener之前请至少等待10分钟。

    • 如果您有可以弯折的iOpener,您可以弯折其使其同时加热左上角边缘位置。

    I left my iOpener on the bezel the entire time I slid picks in. worked great

    jfaulks1 - 回复

  10. iPad Mini CDMA 前面板更换: 步骤 10 中的图像 1,3 iPad Mini CDMA 前面板更换: 步骤 10 中的图像 2,3 iPad Mini CDMA 前面板更换: 步骤 10 中的图像 3,3
    • 在左顶部插入撬片来分离粘合剂。

    Gezz this is though! Cracked the glass while replacing it.

    Padraic Hoselton - 回复

    :( sad (rip glass lol)

    iliketrains kid - 回复

  11. iPad Mini CDMA 前面板更换: 步骤 11 中的图像 1,3 iPad Mini CDMA 前面板更换: 步骤 11 中的图像 2,3 iPad Mini CDMA 前面板更换: 步骤 11 中的图像 3,3
    • 滑动撬片直到快接近前置摄像头位置时停下

    • 第三张图片展示了iPad前置摄像头的位置。

    • 避免使用撬片直接滑过前置摄像头,这样做可能会污损到摄像头。 接下来的步骤将会详细说明如何避免损伤前置摄像头。

  12. iPad Mini CDMA 前面板更换: 步骤 12 中的图像 1,3 iPad Mini CDMA 前面板更换: 步骤 12 中的图像 2,3 iPad Mini CDMA 前面板更换: 步骤 12 中的图像 3,3
    • 轻轻拉出些许撬片,并沿着前置摄像头顶部位置慢慢的滑动。

  13. iPad Mini CDMA 前面板更换: 步骤 13 中的图像 1,3 iPad Mini CDMA 前面板更换: 步骤 13 中的图像 2,3 iPad Mini CDMA 前面板更换: 步骤 13 中的图像 3,3
    • 将刚才那片撬片稍微滑过前置摄像头然后放在原位不动。

    • 拿另一片撬片插入到摄像头的左侧位置然后滑动到转角位置,完成对该边缘部分的粘合剂分离工作。

    • 将第二片撬片放在转角处,防止粘合剂冷却后重新粘连。

  14. iPad Mini CDMA 前面板更换: 步骤 14 中的图像 1,3 iPad Mini CDMA 前面板更换: 步骤 14 中的图像 2,3 iPad Mini CDMA 前面板更换: 步骤 14 中的图像 3,3
    • 将刚才那片撬片稍微深入iPad之中,从摄像头处滑动到右上角。

    Shattered my screen pretty bad here, making it so that whenever I continued to move the pick the glass separated and I couldn’t continue moving it. Be VERY gentle moving the pick; almost no force is required.

    Jasper Holden - 回复

  15. iPad Mini CDMA 前面板更换: 步骤 15 中的图像 1,1
    • 将三个撬片放置在转角处,防止粘合剂重新与粘连前面板。

    • 重新加热iOpener然后将其放置在iPad未撬开的右侧,音量和电源键一侧。

  16. iPad Mini CDMA 前面板更换: 步骤 16 中的图像 1,2 iPad Mini CDMA 前面板更换: 步骤 16 中的图像 2,2
    • 滑动右上角的撬片,分离那部分的粘合剂。

    • 将这个撬片就放在这,防止粘合剂重新粘连。 重新拿一个撬片来进行下一步。

  17. iPad Mini CDMA 前面板更换: 步骤 17 中的图像 1,3 iPad Mini CDMA 前面板更换: 步骤 17 中的图像 2,3 iPad Mini CDMA 前面板更换: 步骤 17 中的图像 3,3
    • 在右侧插入一个新的撬片来分离粘合剂,滑动到中部位置时停下。

  18. iPad Mini CDMA 前面板更换: 步骤 18 中的图像 1,3 iPad Mini CDMA 前面板更换: 步骤 18 中的图像 2,3 iPad Mini CDMA 前面板更换: 步骤 18 中的图像 3,3
    • 继续滑动到右下角处,来分离粘合剂。

  19. iPad Mini CDMA 前面板更换: 步骤 19 中的图像 1,1
    • 就把撬片放在停下的位置,然后重新加热iOpener。

    • 记住,切勿过度加热iOpener-加热间隔为10分钟。

    • 然后将iOpener放置在iPad的底部几分钟来软化玻璃面板下的粘合剂。

  20. iPad Mini CDMA 前面板更换: 步骤 20 中的图像 1,3 iPad Mini CDMA 前面板更换: 步骤 20 中的图像 2,3 iPad Mini CDMA 前面板更换: 步骤 20 中的图像 3,3
    • 滑动左下边的撬片来分离粘合剂。

    • 滑动到左下角时停止滑动。 然后放置在此

    • 这里有几个地方需要避免撬动到。 详见第三张图片。

    • 天线

    • Home键

    • 数字化线缆

    • 接下来的步骤将会指导您如何避免伤害这些部件。 只加热和撬动指南所指示的部位。

  21. iPad Mini CDMA 前面板更换: 步骤 21 中的图像 1,3 iPad Mini CDMA 前面板更换: 步骤 21 中的图像 2,3 iPad Mini CDMA 前面板更换: 步骤 21 中的图像 3,3
    • 将原撬片放置在原位,以防粘合剂重新粘合。

    • 拿一片新的撬片,轻轻的从左手边的天线处滑动到home键前

    • 只能从iPad外边缘向内滑动 请勿按照相反方向滑动 这样可能会损坏天线。

    • 如果您需要再次滑动来清理粘合剂,请取出撬片然后从外边缘重新插入再向内滑动。

    • 将撬片放置不动。

  22. iPad Mini CDMA 前面板更换: 步骤 22 中的图像 1,3 iPad Mini CDMA 前面板更换: 步骤 22 中的图像 2,3 iPad Mini CDMA 前面板更换: 步骤 22 中的图像 3,3
    • 拿一片新的撬片来从刚才那片撬片在右边Home键下继续滑动。

    • 在右手边大约1英尺的地方停下来,避免切割到数字化线缆。

    • 将撬片稍微深入,然后向Home键处滑动。

    • 再一次提醒,确保完全插入然后再滑动撬片。 不然的话这样会损坏玻璃面板下的天线。

  23. iPad Mini CDMA 前面板更换: 步骤 23 中的图像 1,1
    • 重新加热iOpener 将其放在iPad的顶端。

  24. iPad Mini CDMA 前面板更换: 步骤 24 中的图像 1,2 iPad Mini CDMA 前面板更换: 步骤 24 中的图像 2,2
    • 小心操作这一步,花点时间保证粘合剂是热和软的,同时确保您的撬片已经分离开了该分离的粘合剂。 不要怕返工和重新加热。

    • 在iPadHome键相对的顶部您应该在每个角落里插了撬片。 扭动撬片,轻轻地提起玻璃面板,分离最后残留的粘合剂。

    • 如果在打开过程中遇到很大的阻力,请立即停止扭动撬片。 将撬片放置原位,重新加热iOpener,将其放置在难以开启的位置,然后插入撬片来重新分离一遍粘合剂。

  25. iPad Mini CDMA 前面板更换: 步骤 25 中的图像 1,2 iPad Mini CDMA 前面板更换: 步骤 25 中的图像 2,2
    • 慢慢地轻轻地提起玻璃面板,以便沿着下边缘进一步分离粘合剂。

    Really, add a few more pics and a few more picks, see how long and difficult you can make this guide. 26 steps to get the top screen off is ridiculous.

    B. A. Computer Services - 回复

  26. iPad Mini CDMA 前面板更换: 步骤 26 中的图像 1,2 iPad Mini CDMA 前面板更换: 步骤 26 中的图像 2,2
    • 一旦所有的粘合剂被分离了,玻璃面板就可以像翻书一样将其放置在您的工作台上。

    I recommend wearing latex gloves or be sure not to put too many finger prints on the front or back of this front glass when lifting it or completing the remainder of the steps. I made this mistake and upon installing the new LCD and putting the iPad back together I realized that I left a few finger prints on the inside of the front glass. After re-securing the adhesive strips putting the iPad back together there are now unremovable fingerprints visible when the LCD is turned off. Just a recommendation on the gloves or be sure to wipe both sides of the front glass clean before putting all back together.

    Christian Screen - 回复

  27. iPad Mini CDMA 前面板更换: 步骤 27 中的图像 1,3 iPad Mini CDMA 前面板更换: 步骤 27 中的图像 2,3 iPad Mini CDMA 前面板更换: 步骤 27 中的图像 3,3
    • 前置摄像头的保护壳可能会粘在前面板上; 将保护壳从面板上取下,并放回相机上以保护相机模组。

    • 从保护壳一角晃动其,让其从前面板上的粘合剂上分离下来。

    • 将前置摄像机外壳放回后壳中的凹槽。

    this didn’t happen to me BUT the glue was still sticking to the top of the glass because one pick had gone OVER the glue and the other under, so I had to pull the glue off and cut it with scissors

    jfaulks1 - 回复

    OK this was glue, it was the tape from step 35!

    jfaulks1 - 回复

结论

要重新组装您的设备,请按照本指南的相反顺序进行操作。

另外一个人完成了本指南。

由衷感谢以下译者:

en zh

96%

Leon赵国鑫正在帮助我们修复这个世界! 您也想加入吗?
开始翻译 ›

团队

iFixit iFixit 的会员

Staff

135 名成员

创作了16,732篇指南

0条评论

添加评论

浏览统计数据:

过去 24 小时: 0

过去 7 天: 0

过去 30 天: 0

总计 559