跳转到主内容

当前版本的文档还未经巡查,您可以查看最新的已查核版本

你所需要的

  1. 这个步骤还没有翻译 帮忙翻译一下

    : 步骤 1 中的图像 1,3 : 步骤 1 中的图像 2,3 : 步骤 1 中的图像 3,3
    在这个步骤中使用的工具:
    Safety Glasses
    $3.19
    购买
    • If your display glass is cracked, keep further breakage contained and prevent bodily harm during your repair by taping the glass.

    • Lay overlapping strips of clear packing tape over the iPad's display until the whole face is covered. For particularly bad breaks, you may need to lay down two layers.

    • This will keep glass shards contained and provide structural integrity when prying and lifting the display.

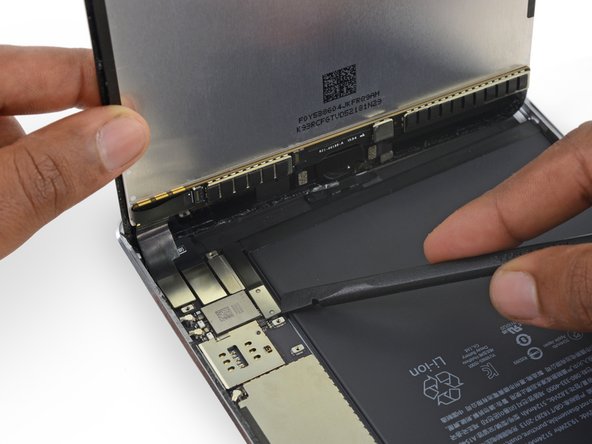
    • Do your best to follow the rest of the guide as described. However, once the glass is broken, it will likely continue to crack as you work, and you may need to use a metal prying tool to scoop the glass out.

    • Protect your eyes! This procedure will cause small pieces of glass to fly directly toward your face. Do not attempt without safety glasses.

  2. , 分离屏幕: 步骤 2 中的图像 1,1
    • 把加热过的 iOpener 放在iPad 的左侧屏幕边缘。

    • 保持这样约5分钟让屏幕下的胶水软化。

  3. : 步骤 3 中的图像 1,3 : 步骤 3 中的图像 2,3 : 步骤 3 中的图像 3,3
    • 沿加热位置, 将吸盘放在其正中间的位置。

    • 确保吸盘已经完全贴合在屏幕没有空洞和气泡。

    • 一只手将 iPad 固定在桌面上, 另一只手轻轻将吸盘提起来, 让屏幕和外壳留一条小缝。

    • 只需要分离一条小缝,能够让插入一个小撬片就够了,过分用力会破坏你的屏幕。

  4. : 步骤 4 中的图像 1,2 : 步骤 4 中的图像 2,2
    • 提起吸盘的同时,将一个撬片插入屏幕和机身中间的缝隙。

    • 撬片只需要插入一点点,不要超过2毫米(2mm),插入过多可能会损坏背光模组,LCD屏幕或者触摸屏。

  5. : 步骤 5 中的图像 1,1
    • 重新加热并放置 iOpener。

    • 不要过度加热 iOpener。两次加热之间, 至少间隔 10 分钟。

  6. : 步骤 6 中的图像 1,3 : 步骤 6 中的图像 2,3 : 步骤 6 中的图像 3,3
    • 在之前撬片的同侧,插入另外一个撬片, 然后轻轻沿屏幕边缘滑动,让胶水慢慢分离开。

    • 在维修的整个过程中,如果任何时候你感觉阻力变大了,就停下来重新加热屏幕。过度用力, 将会破坏你的屏幕。

  7. : 步骤 7 中的图像 1,3 : 步骤 7 中的图像 2,3 : 步骤 7 中的图像 3,3
    • 继续沿屏幕底部滑动撬片以分离胶水。

    • 如果撬片被胶水卡住, 可以尝试让撬片沿屏幕滚动一下试试能不能分离胶水。

  8. : 步骤 8 中的图像 1,2 : 步骤 8 中的图像 2,2
    • 将第一个撬片沿屏幕上沿滑动。

  9. : 步骤 9 中的图像 1,1
    • 重新加热 iOpener 并将他放在屏幕上沿, 也就是摄像头那侧。

    • 不要过度加热 iOpener。两次加热之间, 至少间隔 10 分钟。

    • 如果你有一个可以折叠的 iOpener, 可以将它折叠起来, 同时加热屏幕左上角和上侧

  10. : 步骤 10 中的图像 1,3 : 步骤 10 中的图像 2,3 : 步骤 10 中的图像 3,3
    • 将撬片慢慢滑动到左上角以分离胶水

  11. : 步骤 11 中的图像 1,3 : 步骤 11 中的图像 2,3 : 步骤 11 中的图像 3,3
    • 继续沿上边缘滑动撬片 ,直到撬片到达前置摄像头位置。

    • 触碰到前置摄像头的时候, 稍微把撬片拔出来一些再继续滑动撬片。

    • 不要将撬片放到前置摄像头上方去, 否则可能会将胶水不小心涂抹在镜头之上甚至是损坏摄像头。下面的步骤中将会会详细的介绍如何操作。

  12. : 步骤 12 中的图像 1,3 : 步骤 12 中的图像 2,3 : 步骤 12 中的图像 3,3
    • 当滑动撬片稍微越过前置摄像头的时候,停下来, 将撬片留在那里。

    • 再拿一个撬片插入摄像头左侧, 将他沿左侧滑动回屏幕左上角以便彻底分离残留的胶水。

    • 将此撬片留在角落处,防止冷却后,胶水又将屏幕粘回去。

  13. : 步骤 13 中的图像 1,2 : 步骤 13 中的图像 2,2
    • 将此前停留在摄像头右侧的撬片稍微深入缝隙中, 并将其沿屏幕边缘滑动到右上角。

  14. : 步骤 14 中的图像 1,1
    • 将这三个撬片都维持在现在的位置, 防止胶水复粘屏幕。

    • 重新加热 iOpener 后,将它放在屏幕右侧(音量键和电源键侧)。

  15. : 步骤 15 中的图像 1,3 : 步骤 15 中的图像 2,3 : 步骤 15 中的图像 3,3
    • 再拿一个撬片将其插入屏幕右侧,并沿屏幕下方移动分离胶水。

  16. : 步骤 16 中的图像 1,3 : 步骤 16 中的图像 2,3 : 步骤 16 中的图像 3,3
    • 继续沿屏幕右侧向下方滑动撬片,如果有必要,可以重新使用 iOpener 加热。

  17. : 步骤 17 中的图像 1,1
    • 将撬片留在角落, 重新加热 iOpener。

    • 不要过度加热 iOpener。两次加热之间, 至少间隔 10 分钟。

    • 将加热过的 iOpener 放在屏幕下侧(home 按钮那侧),停留一会让胶水软化。

  18. : 步骤 18 中的图像 1,3 : 步骤 18 中的图像 2,3 : 步骤 18 中的图像 3,3
    • 再拿一个的撬片, 在上一个撬片的下面一点的地方插入。

    • 沿边沿轻轻旋转新的撬片分离屏幕。

  19. : 步骤 19 中的图像 1,2 : 步骤 19 中的图像 2,2
    • 沿屏幕下沿向左侧滑动撬片, 在距离home 按钮约1厘米左右的位置停下来。

  20. : 步骤 20 中的图像 1,2 : 步骤 20 中的图像 2,2
    • 再拿一个撬片, 从屏幕左下角插入。

  21. : 步骤 21 中的图像 1,2 : 步骤 21 中的图像 2,2
    • 沿偏远轻轻旋转撬片以分离屏幕。

  22. : 步骤 22 中的图像 1,3 : 步骤 22 中的图像 2,3 : 步骤 22 中的图像 3,3
    • 继续沿屏幕下沿向右侧移动撬片, 直到离home 按钮约一厘米的地方停下。

  23. : 步骤 23 中的图像 1,3 : 步骤 23 中的图像 2,3 : 步骤 23 中的图像 3,3
    • 稍稍扭一下屏幕上侧的两个撬片以分离剩余的胶水。

    • 从屏幕上侧抬起, 分离屏幕。

  24. , 电池接口: 步骤 24 中的图像 1,1
    • 为了防止给排线施加任何不必要的压力 , 需要用一只手扶助屏幕, 间屏幕和机身保持直角, 直到彻底分离。

    • 从电池连接器和屏幕排线保护盖上, 拆下4颗 PH 1.2 mm 十字螺丝 。

  25. : 步骤 25 中的图像 1,1
    • 拆下排线保护盖

  26. : 步骤 26 中的图像 1,2 : 步骤 26 中的图像 2,2
    • 在拆除任何按压固定的链接器时, 务必垂直用力,不要撕扯排线。

    • 用一个平头撬棒将电池连接器移除。

    • 将电源排线稍稍卷起来一点, 防止排线不小心再次触碰到连接器导致误开机等问题。

  27. , 拆除屏幕: 步骤 27 中的图像 1,3 , 拆除屏幕: 步骤 27 中的图像 2,3 , 拆除屏幕: 步骤 27 中的图像 3,3
    • 用一个尖头撬棒分离屏幕排线。

    • 用一个尖头排线分离传感器排线。

    • 在拆除排线时, 务必注意排线连接器很脆弱, 需要从排线连接器的边缘用力, 如果从中间用力,可能回导致连接器弯曲损坏。

  28. : 步骤 28 中的图像 1,1
    • 拆除屏幕组件。

  29. 这个步骤还没有翻译 帮忙翻译一下

    : 步骤 29 中的图像 1,2 : 步骤 29 中的图像 2,2
    • Run the pointed end of a spudger between the looped tape and the plastic cellular antenna housing to make it easier to peel the tape up.

  30. 这个步骤还没有翻译 帮忙翻译一下

    : 步骤 30 中的图像 1,3 : 步骤 30 中的图像 2,3 : 步骤 30 中的图像 3,3
    • Use tweezers to peel up the looped tape adhered over the upper component cable bracket.

  31. 这个步骤还没有翻译 帮忙翻译一下

    : 步骤 31 中的图像 1,1
    • Remove the following four Phillips screws holding the upper component bracket in place:

    • Two 2.1 mm screws

    • Two 1.2 mm screws

  32. 这个步骤还没有翻译 帮忙翻译一下

    : 步骤 32 中的图像 1,1
    • Remove the upper component cable bracket.

  33. 这个步骤还没有翻译 帮忙翻译一下

    : 步骤 33 中的图像 1,2 : 步骤 33 中的图像 2,2
    • Use the flat end of a spudger to lift the rear-facing camera cable connector from its socket on the logic board.

  34. 这个步骤还没有翻译 帮忙翻译一下

    : 步骤 34 中的图像 1,2 : 步骤 34 中的图像 2,2
    • Use a spudger or plastic opening tool to pry the rear facing camera the rear enclosure.

    • This may take some force, as the camera is strongly adhered to the case.

  35. 这个步骤还没有翻译 帮忙翻译一下

    : 步骤 35 中的图像 1,2 : 步骤 35 中的图像 2,2
    • Remove the rear facing camera.

终点

3等其他人完成本指南。

Evan Noronha

于02/05/15注册

223,424 声望

创作了168篇指南

0条评论

添加评论

浏览统计数据:

过去 24 小时: 1

过去 7 天: 3

过去 30 天: 15

总计 2,322