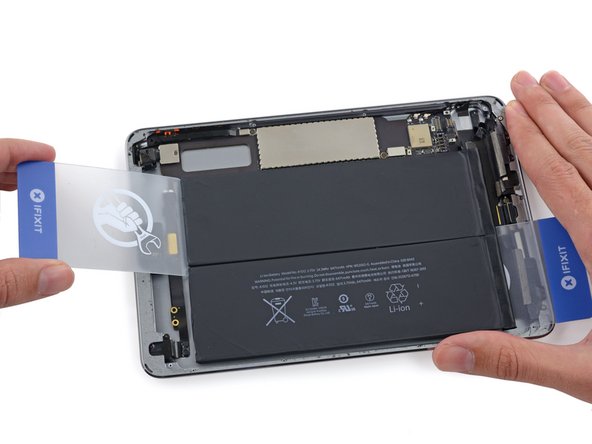
跳转到主内容

此翻译可能不反映源指南的最新更新。 帮助更新翻译查看源指南

iPad Mini 2 Wi-Fi 电池更换

你所需要的

  1. iPad Mini 2 Wi-Fi 电池更换, 加热iOpener: 步骤 1 中的图像 1,2 iPad Mini 2 Wi-Fi 电池更换, 加热iOpener: 步骤 1 中的图像 2,2
    • 在操作前我们推荐你清空微波炉,在底部的任何讨厌的食物残渣最终都可能粘在iOpener上。

    • 将iOpener放在微波炉中央 。

    • 对于旋转式微波炉:确保盘子可以自由旋转。如果转盘卡住了,iOpener可能会过热并燃烧

  2. iPad Mini 2 Wi-Fi 电池更换: 步骤 2 中的图像 1,1
    • 加热iOpener三十秒

    • 在整个维修过程中,如果iOpener 冷却了,在微波炉中每次重新加热额外的三十秒。

    • 注意在维修过程中不要过度加热iOpener,过热可能会导致iOpener爆炸。

    • 如果iOpener过热膨胀,千万不要触碰iOpener。

    • 如果iOpener中间部分依然烫的没法碰,请等待冷却后再使用,加热好的iOpener 应该可以保持热度十分钟

  3. iPad Mini 2 Wi-Fi 电池更换: 步骤 3 中的图像 1,1
    • 把iOpener从微波炉中拿出来,捏着两边扁平边缘中的一个以避免碰到中心热的部分。

    • iOpener会非常烫,所以拿着它的时候千万要小心。必要的时候可以使用烤箱手套。

  4. iPad Mini 2 Wi-Fi 电池更换, 加热iOpener的替代方案: 步骤 4 中的图像 1,2 iPad Mini 2 Wi-Fi 电池更换, 加热iOpener的替代方案: 步骤 4 中的图像 2,2
    • 如果你没有微波炉,请按照此步骤在沸水中加热iOpener。

    • 在锅或平底锅里装满足够的水来完全淹没iOpener。

    • 把水加热到沸腾。关火。

    • 将iOpener放入热水中2-3分钟。确保iOpener完全浸入水中。

    • 用钳子从热水中提取加热的iOpener。

    • 用毛巾彻底擦干iOpener。

    • iOpener会很燙,所以拿取時請小心的從iOpener的邊邊拿

    • 你的iOpener已准备好使用!如果你需要重新加热iOpener,请将水加热到沸点,关火,并将iOpener放入水中2-3分钟。

  5. iPad Mini 2 Wi-Fi 电池更换, 液晶显示板: 步骤 5 中的图像 1,3 iPad Mini 2 Wi-Fi 电池更换, 液晶显示板: 步骤 5 中的图像 2,3 iPad Mini 2 Wi-Fi 电池更换, 液晶显示板: 步骤 5 中的图像 3,3
    • 如果你的屏幕已经损坏,那么请效益以防止其进一步损坏或者因触摸而导致身体受伤。

    • 在iPad显示屏上重叠贴上透明胶带直到iPad的整块显示屏都被覆盖。

    • 最好尽你的最大努力来完成指南。但是,一旦玻璃已经损坏,它就会随着您的使用而继续损坏,所以你可能需要使用金属撬具来讲玻璃取出。

    • 请佩戴护目镜来保护您的眼睛并且小心以防损坏LCD屏幕。

  6. iPad Mini 2 Wi-Fi 电池更换: 步骤 6 中的图像 1,1
    • 抓住iOpener的标签,把它放在iPad的home 键左侧

    • 放置五分钟来让它使玻璃下的粘合剂软化

  7. iPad Mini 2 Wi-Fi 电池更换: 步骤 7 中的图像 1,3 iPad Mini 2 Wi-Fi 电池更换: 步骤 7 中的图像 2,3 iPad Mini 2 Wi-Fi 电池更换: 步骤 7 中的图像 3,3
    • 小心地将吸盘放在已经加热的一侧。

    • 确保吸盘已经在屏幕上吸紧

    • 一边用一只手握住iPad,一边将吸盘向上轻轻拉以此将前面板玻璃与后面板轻轻地分开。

    • 注意,只将玻璃抬起足够放入拆屏工具的空间(抬起过多将会是你置身于使玻璃破碎的险境中)。

  8. iPad Mini 2 Wi-Fi 电池更换: 步骤 8 中的图像 1,3 iPad Mini 2 Wi-Fi 电池更换: 步骤 8 中的图像 2,3 iPad Mini 2 Wi-Fi 电池更换: 步骤 8 中的图像 3,3
    • 在使用吸盘抬起玻璃时,沿着iPad玻璃与机体之间的缝隙滑动拆屏工具。

    • 不要将工具插入得比屏幕黑色边框更深。插入太深可能会导致LCD屏幕的损坏。

    • 将吸盘从密封状态中释放并从显示组件上取下吸盘。

  9. iPad Mini 2 Wi-Fi 电池更换: 步骤 9 中的图像 1,1
    • 重新加热并在此运用iOpener

    • 注意不要在维修过程中过度加热iOpener。总是在重新加热之前等待至少十分钟。

    • 把它放在iPad左边框上几分钟以重新加热iPad的左边框。

  10. iPad Mini 2 Wi-Fi 电池更换: 步骤 10 中的图像 1,3 iPad Mini 2 Wi-Fi 电池更换: 步骤 10 中的图像 2,3 iPad Mini 2 Wi-Fi 电池更换: 步骤 10 中的图像 3,3
    • 沿着第一个撬片的开的口处插入另外一个翘片同时向下滑动到iPad的角落处,让撬片分离粘合剂。

    • 在接下来的步骤中,如果您在玻璃面板下滑动时遇到恨大的阻力,请停下来,重新加热难以开启部分的面板,再重新滑动撬片来分离粘合剂。 暴力撬开面板会导致玻璃破裂。

  11. iPad Mini 2 Wi-Fi 电池更换: 步骤 11 中的图像 1,3 iPad Mini 2 Wi-Fi 电池更换: 步骤 11 中的图像 2,3 iPad Mini 2 Wi-Fi 电池更换: 步骤 11 中的图像 3,3
    • 继续沿着下方继续滑动来将粘合剂分离。

    • 如果撬片卡住了,请沿着iPad的侧面滚动撬片,然后再继续进行分离工作。

  12. iPad Mini 2 Wi-Fi 电池更换: 步骤 12 中的图像 1,3 iPad Mini 2 Wi-Fi 电池更换: 步骤 12 中的图像 2,3 iPad Mini 2 Wi-Fi 电池更换: 步骤 12 中的图像 3,3
    • 将第一个插入iPad的撬片向上滑动到iPad的左上角

    • 撬片可能会出现图片上的情况,请不要慌张。 只需将撬片拉出一点点来继续进行维修工作。 但要避免这种情况,因为粘合剂可能会粘附在LCD显示屏上变得难以清理。

  13. iPad Mini 2 Wi-Fi 电池更换: 步骤 13 中的图像 1,1
    • 重新加热iOpener 并将其放置在iPad顶部边缘位置,前置摄像头之上。

    • 小心,请勿在维修过程中过度加热iOpener。 在重新加热iOpener之前请至少等待10分钟。

    • 如果您有可以弯折的iOpener,您可以弯折其使其同时加热左上角边缘位置。

  14. iPad Mini 2 Wi-Fi 电池更换: 步骤 14 中的图像 1,3 iPad Mini 2 Wi-Fi 电池更换: 步骤 14 中的图像 2,3 iPad Mini 2 Wi-Fi 电池更换: 步骤 14 中的图像 3,3
    • 在左上角滑动撬片,来分离粘合剂。

  15. iPad Mini 2 Wi-Fi 电池更换: 步骤 15 中的图像 1,3 iPad Mini 2 Wi-Fi 电池更换: 步骤 15 中的图像 2,3 iPad Mini 2 Wi-Fi 电池更换: 步骤 15 中的图像 3,3
    • 滑动撬片直到快接近前置摄像头位置时停下

    • 第三张图片展示了iPad前置摄像头的位置。

    • 避免使用撬片直接滑过前置摄像头,这样做可能会污损到摄像头。 接下来的步骤将会详细说明如何避免损伤前置摄像头。

  16. iPad Mini 2 Wi-Fi 电池更换: 步骤 16 中的图像 1,3 iPad Mini 2 Wi-Fi 电池更换: 步骤 16 中的图像 2,3 iPad Mini 2 Wi-Fi 电池更换: 步骤 16 中的图像 3,3
    • 轻轻拉出些许撬片,并沿着前置摄像头顶部位置慢慢的滑动。

  17. iPad Mini 2 Wi-Fi 电池更换: 步骤 17 中的图像 1,3 iPad Mini 2 Wi-Fi 电池更换: 步骤 17 中的图像 2,3 iPad Mini 2 Wi-Fi 电池更换: 步骤 17 中的图像 3,3
    • 将刚才那片撬片稍微滑过前置摄像头然后放在原位不动。

    • 拿起另外一个撬片,插入摄像头的左侧,重新滑过刚才撬片滑过的路径,来完全分离残留的粘合剂。

    • 将第二块撬片就放在转角那里,防止粘合剂冷却后重新粘和上。

  18. iPad Mini 2 Wi-Fi 电池更换: 步骤 18 中的图像 1,3 iPad Mini 2 Wi-Fi 电池更换: 步骤 18 中的图像 2,3 iPad Mini 2 Wi-Fi 电池更换: 步骤 18 中的图像 3,3
    • 将第一块撬片稍微深入iPad之中,从摄像头处滑动到右上角。

  19. iPad Mini 2 Wi-Fi 电池更换: 步骤 19 中的图像 1,1
    • 将撬片放在原位,以防粘合剂再次粘连。

    • 重新加热iOpener将其放在有锁定和音量按钮一侧。

  20. iPad Mini 2 Wi-Fi 电池更换: 步骤 20 中的图像 1,2 iPad Mini 2 Wi-Fi 电池更换: 步骤 20 中的图像 2,2
    • 滑动右上角的撬片,来完全分离右上角的玻璃。

    • 将这个撬片就放在这,防止粘合剂重新粘连。 重新拿一个撬片来进行下一步。

  21. iPad Mini 2 Wi-Fi 电池更换: 步骤 21 中的图像 1,3 iPad Mini 2 Wi-Fi 电池更换: 步骤 21 中的图像 2,3 iPad Mini 2 Wi-Fi 电池更换: 步骤 21 中的图像 3,3
    • 在右侧插入一个新的撬片来分离右上角和中间的粘合剂。

  22. iPad Mini 2 Wi-Fi 电池更换: 步骤 22 中的图像 1,3 iPad Mini 2 Wi-Fi 电池更换: 步骤 22 中的图像 2,3 iPad Mini 2 Wi-Fi 电池更换: 步骤 22 中的图像 3,3
    • 一直将撬片滑到iPad的右下角处,来分离粘合剂。

  23. iPad Mini 2 Wi-Fi 电池更换: 步骤 23 中的图像 1,1
    • 就把撬片放在停下的位置,然后重新加热iOpener。

    • 切记,切勿过度加热iOpener,每次加热不能超过10分钟。

    • 将加热过的iOpener放置在Home键一端,放置几分钟来软化下面的粘合剂。

  24. iPad Mini 2 Wi-Fi 电池更换: 步骤 24 中的图像 1,3 iPad Mini 2 Wi-Fi 电池更换: 步骤 24 中的图像 2,3 iPad Mini 2 Wi-Fi 电池更换: 步骤 24 中的图像 3,3
    • 滑动左下边的撬片来分边角处的离粘合剂。

    • 滑动到左下角时停止滑动。 然后放置在此。

    • 在下面板下面有很多东西需要规避,请仔细研究第三张图像:

    • 天线

    • Home键

    • 排线

    • 接下来的步骤将会指导您如何避免伤害这些部件。 只加热和撬动指南所指示的部位。

  25. iPad Mini 2 Wi-Fi 电池更换: 步骤 25 中的图像 1,3 iPad Mini 2 Wi-Fi 电池更换: 步骤 25 中的图像 2,3 iPad Mini 2 Wi-Fi 电池更换: 步骤 25 中的图像 3,3
    • 将上一步的原撬片放置在原位,以防粘合剂重新粘合。

    • 拿一片新的撬片,轻轻的从左天线处滑动到home键前。

    • 只能从iPad外边缘向内滑动 请勿按照相反方向滑动 这样可能会损坏天线。

    • 如果您需要再次滑动来清理粘合剂,请取出撬片然后从外边缘重新插入再向内滑动。

    • 将撬片放置不动。

  26. iPad Mini 2 Wi-Fi 电池更换: 步骤 26 中的图像 1,3 iPad Mini 2 Wi-Fi 电池更换: 步骤 26 中的图像 2,3 iPad Mini 2 Wi-Fi 电池更换: 步骤 26 中的图像 3,3
    • 拿一片新的撬片来从刚才那片撬片右边Home键下方继续滑动。

    • 在距离右侧边缘约一英寸的位置前停下,以避免切割到排线。

    • 将撬片深入,再往回滑动至Home键处。

    • 再次,请确保只有当撬片完全插入iPad时,才能向iPad的中心滑动; 否则可能会损坏玻璃面板下方的天线。

  27. iPad Mini 2 Wi-Fi 电池更换: 步骤 27 中的图像 1,1
    • 将重新加热过后的iOpener放置在iPad顶部。

  28. iPad Mini 2 Wi-Fi 电池更换: 步骤 28 中的图像 1,2 iPad Mini 2 Wi-Fi 电池更换: 步骤 28 中的图像 2,2
    • 小心操作这一步,花点时间保证粘合剂是热和软的,同时确保您的撬片已经分离开了该分离的粘合剂。 不要怕返工和重新加热。

    • 在iPadHome键相对的顶部您应该在每个角落里插了撬片。 扭动撬片,轻轻地提起玻璃面板,分离最后残留的粘合剂。

    • 如果在打开过程中遇到很大的阻力,请立即停止扭动撬片。 将撬片放置原位,重新加热iOpener,将其放置在难以开启的位置,然后插入撬片来重新分离一遍粘合剂。

  29. iPad Mini 2 Wi-Fi 电池更换: 步骤 29 中的图像 1,2 iPad Mini 2 Wi-Fi 电池更换: 步骤 29 中的图像 2,2
    • 慢慢地轻轻地提起玻璃面板,以便沿着下边缘进一步分离粘合剂。

  30. iPad Mini 2 Wi-Fi 电池更换: 步骤 30 中的图像 1,2 iPad Mini 2 Wi-Fi 电池更换: 步骤 30 中的图像 2,2
    • 一旦所有的粘合剂被分离了,玻璃面板就可以像翻书一样将其放置在您的工作台上。

  31. iPad Mini 2 Wi-Fi 电池更换: 步骤 31 中的图像 1,3 iPad Mini 2 Wi-Fi 电池更换: 步骤 31 中的图像 2,3 iPad Mini 2 Wi-Fi 电池更换: 步骤 31 中的图像 3,3
    • 前置摄像头的保护壳可能会粘在前面板上; 将保护壳从面板上取下,并放回相机上以保护相机模组。

    • 从保护壳一角晃动其,让其从前面板上的粘合剂上分离下来。

    • 将前置摄像机外壳放回后壳中的凹槽。

  32. iPad Mini 2 Wi-Fi 电池更换: 步骤 32 中的图像 1,2 iPad Mini 2 Wi-Fi 电池更换: 步骤 32 中的图像 2,2
    • 移除固定LCD面板的Phillips #00 螺丝

    • 3颗3.3 mm 螺丝

    • 4颗4.5 mm 螺丝

    • 如果有胶带覆盖在螺丝上,那就用镊子将其剥下。

  33. iPad Mini 2 Wi-Fi 电池更换: 步骤 33 中的图像 1,2 iPad Mini 2 Wi-Fi 电池更换: 步骤 33 中的图像 2,2
    • 切勿现在尝试将LCD面板完全分离开来,它仍与iPad通过位于Home键附近的几条线缆相连。 只可以从前置摄像头处提起。

    • 在LCD面板与LCD屏蔽版之间插入撬棒扁平的一端,轻轻地将其撬起。

  34. iPad Mini 2 Wi-Fi 电池更换: 步骤 34 中的图像 1,3 iPad Mini 2 Wi-Fi 电池更换: 步骤 34 中的图像 2,3 iPad Mini 2 Wi-Fi 电池更换: 步骤 34 中的图像 3,3
    • 液晶显示屏由温和的粘合剂固定,在将LCD面板从屏蔽板上翻转之前,请分离粘合剂。

    • 在LCD和LCD蔽板之间插入撬棒,并将其滑到iPad的远端。

  35. iPad Mini 2 Wi-Fi 电池更换: 步骤 35 中的图像 1,2 iPad Mini 2 Wi-Fi 电池更换: 步骤 35 中的图像 2,2
    • 两个宽胶带将LCD与扬声器相连。

    • 一只手抓住LCD,另一只手抓住iPad下面的主体。

    • 切勿尝试从iPad上完全取出LCD。

    • 轻轻地将LCD从扬声器上的胶带中拉出来,小心不要拉动排线。

  36. iPad Mini 2 Wi-Fi 电池更换: 步骤 36 中的图像 1,2 iPad Mini 2 Wi-Fi 电池更换: 步骤 36 中的图像 2,2
    • 切勿尝试将LCD面板完全分离开来,它仍与iPad通过位于Home键附近的几条线缆相连。 只可以从前置摄像头处提起。

    • 将LCD像翻书一样,抓住前置摄像头的那一端,将其从后壳中翻转过来。

    • 小心,在你翻转的时候,时刻盯着LCD线缆

    • 将LCD放置在前面板上,确保能够触及到显示排线。

  37. iPad Mini 2 Wi-Fi 电池更换: 步骤 37 中的图像 1,3 iPad Mini 2 Wi-Fi 电池更换: 步骤 37 中的图像 2,3 iPad Mini 2 Wi-Fi 电池更换: 步骤 37 中的图像 3,3
    • 在液晶显示屏和粘贴标签之间滑动撬棒的尖端以分离LCD。

    • 在两个粘合片之间轻轻推动; 小心不要损坏附近任何的电缆。

  38. iPad Mini 2 Wi-Fi 电池更换: 步骤 38 中的图像 1,1
    • 移除LCD屏蔽版上的七颗1.8mm Phillips #00 螺丝。

  39. iPad Mini 2 Wi-Fi 电池更换: 步骤 39 中的图像 1,3 iPad Mini 2 Wi-Fi 电池更换: 步骤 39 中的图像 2,3 iPad Mini 2 Wi-Fi 电池更换: 步骤 39 中的图像 3,3
    • 使用撬棒扁平的一段撬起LCD 屏蔽板。

    • 移除LCD屏蔽版。

  40. iPad Mini 2 Wi-Fi 电池更换, LCD面板: 步骤 40 中的图像 1,1
    • 从显示屏电路支架上取下以下十字螺丝#00螺丝:

    • 一颗2.7mm螺丝

    • 两颗1.4mm螺丝

  41. iPad Mini 2 Wi-Fi 电池更换: 步骤 41 中的图像 1,1
    • 从iPad上取下显示屏电路支架。

  42. iPad Mini 2 Wi-Fi 电池更换: 步骤 42 中的图像 1,3 iPad Mini 2 Wi-Fi 电池更换: 步骤 42 中的图像 2,3 iPad Mini 2 Wi-Fi 电池更换: 步骤 42 中的图像 3,3
    • 使用撬棒的点轻轻地将电池连接器从主板上的插座上提起。

    • 要小心,只能撬起电池连接器,而不是在插座本身上。 如果您在主板插槽上撬起,则可能会完全破坏连接器。

  43. iPad Mini 2 Wi-Fi 电池更换: 步骤 43 中的图像 1,2 iPad Mini 2 Wi-Fi 电池更换: 步骤 43 中的图像 2,2
    • 使用平头端将LCD连接器从主板上的插座上提起。

    • 不要撬开连接器旁边的大IC,否则可能会破侧面轻轻地撬坏连接器。 从连接器的起,如图所示。

  44. iPad Mini 2 Wi-Fi 电池更换: 步骤 44 中的图像 1,1
    • 从iPad上取下LCD面板。

  45. iPad Mini 2 Wi-Fi 电池更换, 前面板: 步骤 45 中的图像 1,2 iPad Mini 2 Wi-Fi 电池更换, 前面板: 步骤 45 中的图像 2,2
    • 使用撬棒将数字转换器电缆连接器从插座上提起。

  46. iPad Mini 2 Wi-Fi 电池更换: 步骤 46 中的图像 1,3 iPad Mini 2 Wi-Fi 电池更换: 步骤 46 中的图像 2,3 iPad Mini 2 Wi-Fi 电池更换: 步骤 46 中的图像 3,3
    • 将撬棒滑入数字面板的电池侧,开始与后壳分离。

    • 将数字面板抬起以去除最后的粘合剂。

  47. iPad Mini 2 Wi-Fi 电池更换: 步骤 47 中的图像 1,1
    • 从iPad上提起并取出前面板。

  48. iPad Mini 2 Wi-Fi 电池更换, 電池組: 步骤 48 中的图像 1,2 iPad Mini 2 Wi-Fi 电池更换, 電池組: 步骤 48 中的图像 2,2
    • 電池用一些粘合劑固定在iPad外殼上,這些粘合劑需要加熱才能分開。

    • 加熱一個iOpener,並將其放在iPad背面的中心。

    • 大約兩分鐘後,取出iOpener並將其放在iPad的右側,即離相機最遠的一側。

  49. iPad Mini 2 Wi-Fi 电池更换: 步骤 49 中的图像 1,2 iPad Mini 2 Wi-Fi 电池更换: 步骤 49 中的图像 2,2
    • 在以下過程中,您將在iPad的電池和後蓋之間滑動薄塑料卡,以分離將電池固定到位的膠粘劑。 小心保持卡片盡可能平坦,以避免彎曲電池,這可能會損壞電池,並釋放出危險的化學物質。

    • 將iPad重新翻過來,並將塑料卡插入距離邏輯板和右揚聲器最近的電池下。

    • 如果遇到明顯的阻力,重新加熱iOpener並重複上一步,使粘合劑有更多的時間軟化。

  50. iPad Mini 2 Wi-Fi 电池更换: 步骤 50 中的图像 1,2 iPad Mini 2 Wi-Fi 电池更换: 步骤 50 中的图像 2,2
    • 取下塑料卡並將其插入距離殼體邊緣最近的電池。

  51. iPad Mini 2 Wi-Fi 电池更换: 步骤 51 中的图像 1,2 iPad Mini 2 Wi-Fi 电池更换: 步骤 51 中的图像 2,2
    • 在靠近前置攝像頭的邏輯板一側的電池下方插入第二張塑料卡。

  52. iPad Mini 2 Wi-Fi 电池更换: 步骤 52 中的图像 1,2 iPad Mini 2 Wi-Fi 电池更换: 步骤 52 中的图像 2,2
    • 將電池下面的第二張卡插入耳機插孔附近。

  53. iPad Mini 2 Wi-Fi 电池更换: 步骤 53 中的图像 1,2 iPad Mini 2 Wi-Fi 电池更换: 步骤 53 中的图像 2,2
    • 抓住兩張卡,然後慢慢將機箱側電池從後殼拉出約兩英寸。

    • 慢慢地剝離,盡量不要彎曲電池。

  54. iPad Mini 2 Wi-Fi 电池更换: 步骤 54 中的图像 1,2 iPad Mini 2 Wi-Fi 电池更换: 步骤 54 中的图像 2,2
    • 將右側卡向另一個電池下方移動。

  55. iPad Mini 2 Wi-Fi 电池更换: 步骤 55 中的图像 1,2 iPad Mini 2 Wi-Fi 电池更换: 步骤 55 中的图像 2,2
    • 將左側卡向上移動到另一個電池下方。

  56. iPad Mini 2 Wi-Fi 电池更换: 步骤 56 中的图像 1,3 iPad Mini 2 Wi-Fi 电池更换: 步骤 56 中的图像 2,3 iPad Mini 2 Wi-Fi 电池更换: 步骤 56 中的图像 3,3
    • 握住兩張卡,用它們從後殼上取下電池。

    • 從iPad中取出電池。

结论

要重装你的设备,参照这些步骤倒序操作。

86等其他人完成本指南。

由衷感谢以下译者:

en zh

75%

Dorothy Boyd正在帮助我们修复这个世界! 您也想加入吗?
开始翻译 ›

Sam Goldheart

于10/18/12注册

465,611 声望

创作了538篇指南

团队

iFixit iFixit 的会员

Staff

135 名成员

创作了16,731篇指南

15条评论

I was able to change the battery but I will say the hardest part was heating the screen to get it off. The guide was great.

Joseph Gavin - 回复

I have just installed replacement battery in iPad mini 2. Changing for about 2-1/2 hours only shows logo, and slightly warm.

battery shows same markings as original, I have also recently done iPhone 5 and Nexus 7 , both went well,. I'm concerned something is wrong with this installation, can anyone advise? Many thanks

Ross

ross melville - 回复

Just did a battery replacement on my iPad Mini 2. Everything seemed to go ok; ipas started up, touch screen is working, can connect to network, launch apps but the battery won’t take a charge. Help?

gamspaugh - 回复

Just completed my first attempt to replace the battery. All went well following the instructions here, but the photos could use some loving when it comes to some red arrows pointing to specific points. Also a little better contrast of separation points like adhesive tape areas and the lcd shield. other than that this was not to hard for me to complete especially with all of the added comments by others throughout the steps.

Next is the reverse process once I do some cleaning and prepare the replacement adhesive strips.

markbdb2011 - 回复

I would have really found it useful to have some detailed guidance on how to reapply the adhesive. The adhesive strips are packaged in such a way that it actually makes applying them much more difficult… unless there’s some trick that I couldn’t figure out. Hence, the value of some instructions.

The sheet with the adhesives has a clear cover over the side of the strips that adheres to the glass, with a blue cover strip and tab for easy removal on the side that adheres to the body. This would lead you to believe that you should adhere it to the glass first, and then press the glass onto the body. But the adhesive has many notches and curves and if you don’t get them aligned on the glass correctly, they could cover the light sensor or camera, interfere with the button, etc. Thus it seems you have to first stick it to the body, meaning you have completely exposed double-sided adhesive that you’re wrestling with, sticking to itself, etc.

If this is NOT how it’s done, some instructions would seem necessary.

Ray Everett - 回复

添加评论

浏览统计数据:

过去 24 小时: 20

过去 7 天: 166

过去 30 天: 675

总计 125,549