跳转到主内容

iPad 显示屏组件涂抹粘合剂

你所需要的

  1. iPad 显示屏组件涂抹粘合剂, iPad 显示屏组件涂抹粘合剂: 步骤 1 中的图像 1,2 iPad 显示屏组件涂抹粘合剂, iPad 显示屏组件涂抹粘合剂: 步骤 1 中的图像 2,2
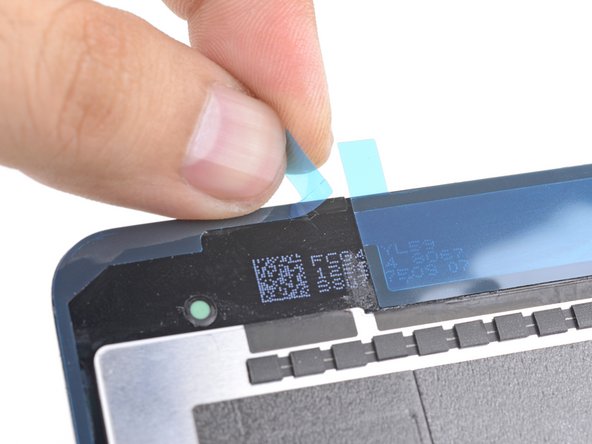
    • 在涂抹新的粘合剂之前,请彻底清洁显示屏部件和框架上的所有残留物。
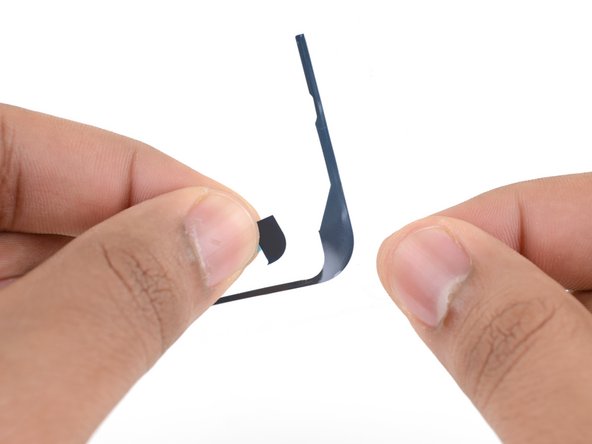
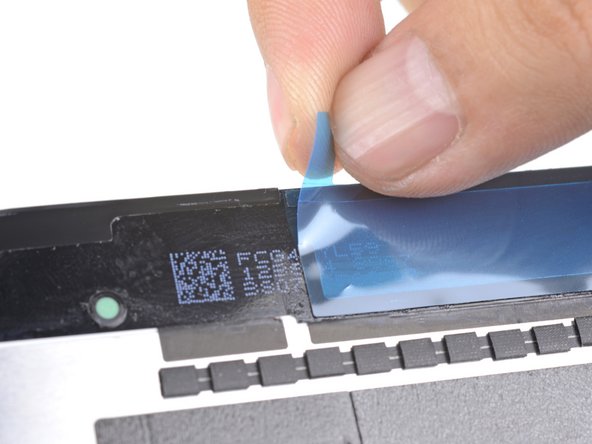
    • 使用镊子拉起残留的胶带部分。

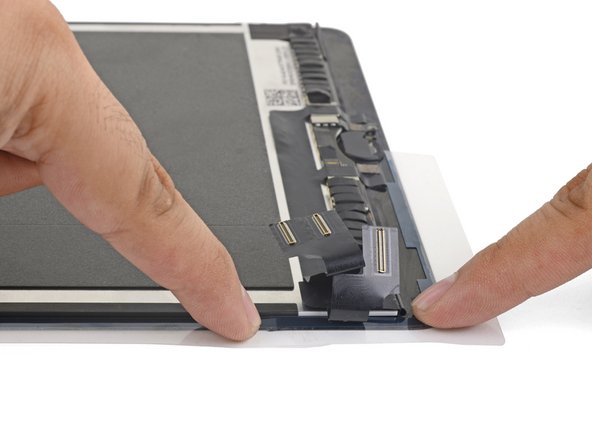
    • 使用开启工具或撬棒刮去残留物。你可以使用高浓度(超过90%)的异丙醇软化粘合剂。
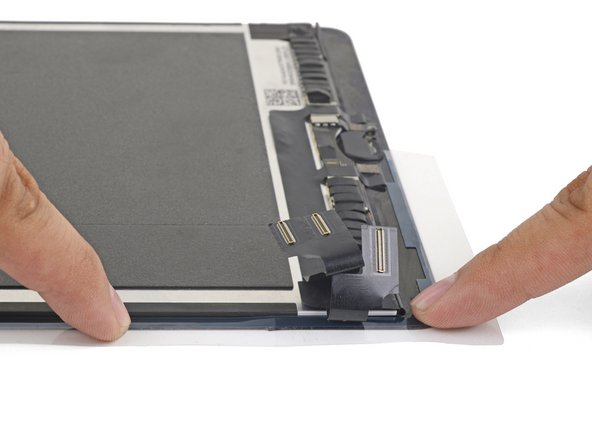
    • 朝一个方向擦拭以清除残留物,以免弄脏。

    • 请勿使用金属工具刮擦,否则将刮擦显示屏部件的表面。

  2. iPad 显示屏组件涂抹粘合剂: 步骤 2 中的图像 1,1
    • 将替换的胶带布放置在显示屏部件周围,以使其与正确的侧面相对应。

  3. iPad 显示屏组件涂抹粘合剂: 步骤 3 中的图像 1,2 iPad 显示屏组件涂抹粘合剂: 步骤 3 中的图像 2,2
    • 每条胶粘带都被包裹在四层塑料中,上面三层,下面一层。

    • 剥下并从左侧粘合条上去除最上面的塑料背衬。

    • 剥下并从胶条上除去底部塑料背衬。

    • 胶条的顶部仍应覆盖彩色塑料层以及透明的塑料硬化层。

    • 现在,胶条的底部应露出并有粘性了。

  4. iPad 显示屏组件涂抹粘合剂: 步骤 4 中的图像 1,2 iPad 显示屏组件涂抹粘合剂: 步骤 4 中的图像 2,2
    • 如果条带上有多余的粘合剂,而你的特定型号的iPad不需要这些粘合剂,请立即将其除去。

  5. iPad 显示屏组件涂抹粘合剂: 步骤 5 中的图像 1,3 iPad 显示屏组件涂抹粘合剂: 步骤 5 中的图像 2,3 iPad 显示屏组件涂抹粘合剂: 步骤 5 中的图像 3,3
    • 将左粘胶条与显示屏配件的左边缘对齐。

    • 从一个角开始,将胶粘带放在显示屏组件上,然后将胶粘带压入到位。

  6. iPad 显示屏组件涂抹粘合剂: 步骤 6 中的图像 1,3 iPad 显示屏组件涂抹粘合剂: 步骤 6 中的图像 2,3 iPad 显示屏组件涂抹粘合剂: 步骤 6 中的图像 3,3
    • 用正确的胶带重复该过程。

    • 剥离并从条带上去除最上面的保鲜层。

    • 剥离并从带材上除去底部衬里层。

    • 将胶条对准显示屏配件的右边缘。

    • 从一个角开始,将胶粘带放在显示屏组件上,然后按入到位。

  7. iPad 显示屏组件涂抹粘合剂: 步骤 7 中的图像 1,3 iPad 显示屏组件涂抹粘合剂: 步骤 7 中的图像 2,3 iPad 显示屏组件涂抹粘合剂: 步骤 7 中的图像 3,3
    • 对顶部胶条重复该过程。

    • 剥离并从条带上去除最上面的背衬。

    • 剥下并从胶条上除去底部衬板。

    • 将条带对准显示屏配件的顶部,以使直线粘合线弥合左右条带之间的间隙。

    • 将胶带按入到位。

  8. iPad 显示屏组件涂抹粘合剂: 步骤 8 中的图像 1,3 iPad 显示屏组件涂抹粘合剂: 步骤 8 中的图像 2,3 iPad 显示屏组件涂抹粘合剂: 步骤 8 中的图像 3,3
    • 剥下所有三个粘合条部分的透明塑料硬化层,并将其去除。

    • 胶带仍应覆盖彩色塑料衬里。

  9. iPad 显示屏组件涂抹粘合剂: 步骤 9 中的图像 1,1
    • 继续进行重新组装过程,直到准备好密封设备为止。

  10. iPad 显示屏组件涂抹粘合剂: 步骤 10 中的图像 1,3 iPad 显示屏组件涂抹粘合剂: 步骤 10 中的图像 2,3 iPad 显示屏组件涂抹粘合剂: 步骤 10 中的图像 3,3
    • 剥下并去除三个彩色塑料背衬,露出粘合剂。

    • 合上设备,在其上堆放一些沉重的书三十分钟,以帮助进行新的粘合。

    • 或者,你可以使用设备周围的屏幕虎钳固定新粘合剂。

结论

维修未按计划进行?请查阅 论坛 来寻求帮助。

55等其他人完成本指南。

由衷感谢以下译者:

en zh

100%

Yuting Zhao正在帮助我们修复这个世界! 您也想加入吗?
开始翻译 ›

Arthur Shi

于01/03/18注册

249,849 声望

创作了503篇指南

团队

iFixit iFixit 的会员

Staff

135 名成员

创作了16,732篇指南

10条评论

Thanks, I was able to fix my wife’s shattered digitizer screen on the iPad 6th gen with this guide!

Kevin Chatterton II - 回复

I managed to get it done, but this was a personal nightmare for me and more difficult than replacing the battery in my ipad. There are too many instruction that say “remove plastic” and I have no idea which layer; there was nothing on the packaging to indicate which side was up or which side was the front and I ended up guessing the wrong direction because it “looked” right, but wasn’t. A simple sticker on the packaging indicating a direction would have removed all of the frustration. I only managed to figure it out by removing all of the plastic so that the sticky side of the adhesive was exposed and then I could finally see how it was supposed to fit and how I was supposed to press down with the other side of the plastic to push the adhesive side into the frame.

twizzlercraze72 - 回复

Fixed a cracked iPad 4 mini screen; I agree with twizzlercraze72. Some kind of labeling would have saved so much peeling and re-sticking. I ended up with a gap next to my home button. An expensive lesson to learn.

CBrewington - 回复

For me, actually replacing the battery wasn’t too bad, but I ended up using too much isopropyl to clean off the old glue, and it seeped under the display and ruined it. Wish Apple didn’t use so much glue. It massively impedes repairability, which is not very environmentally sound. My iPad was perfect apart from the battery - it’s now got a perfect battery but the iPad is ruined :-(

Alex Harness - 回复

Same here :(. $50 repair just turned into $250!

Paul Manos -

添加评论

浏览统计数据:

过去 24 小时: 28

过去 7 天: 175

过去 30 天: 717

总计 38,998