简介
使用本指南更换 iPad Air 中的电池。
为了安全起见,请在开始工作之前耗尽 iPad 的电池电量——如果电池意外损坏,已充电的锂离子电池可能会着火或爆炸。 如果你的电池膨胀,请采取额外的预防措施。
警告:本指南中的电池隔离方法已过时,可能会对逻辑板的电池引脚造成不可逆转的损坏,从而有效地破坏逻辑板。 如果你选择以这种方式隔离电池,请注意所有警告并极其小心地工作。 如果你选择在不隔离电池的情况下完成指南,除非在完全必要的情况下(例如拆除螺丝时),请避免使用金属工具,以防止电池短路和损坏敏感电路元件。
你所需要的
-
-
加热iOpener三十秒
-
在整个维修过程中,如果iOpener 冷却了,在微波炉中每次重新加热额外的三十秒。
DO NOT USE IN NON ROTATING MICROWAVE! It will pop a hole. I had it in for 45 seconds the first time. It wasn't very hot inside and I saw it started to leak on the paper towel I put under it. Just a fair bit of advice. I think I will just stick with the heat gun. Loud but useful.
I heated mine up for 30 seconds, tested, then again for 30 seconds. It felt adequately hot. Leaving it on the left side, per the instruction, for a minute did not loosen the adhesive. I ended up pulling the suction cup hard enough to shadder the old screen. Moral of the story, I don't think it gets hot enough safely to have an affect.
There is a clear problem here with the heating part using the iopener things....no details are given. Whoever is testing them needs to make it clear - What temperature does it need to be? And for which phone models, because they differ in what's needed. It's only £10-15 for a laser guided temp sensor unit, and the designers/repairers should have one of those already for doing these kinds of repairs. Explaining half a repair, is worse than not explaining at all :-(
All phones/devices differ it’s unrealistic and unsafe to put a exact time/temperature needed to soften the adhesive. It’s really quite simple you warm the device evenly and in a controlled manner just enough to enable pry tools and picks to begin separating. Best tool in my opinion but again this is because I have experience is a hot plate and heat gun both of which are used at nearly the lowest settings and I can handle flat palming the plate for almost 10 seconds I leave the device to conduct heat until approx it’s about 110 at most 120 ish this will be plenty to soften all the adhesive if any problem areas I use heat gun while prying. Again you need go slowly and learn with a throw away phone
If I may suggest include your microwave wattage so people can get an idea on time for there own
I agree with this.
I ended up using a hair dryer. That iOpener thing took forever.
30 seconds sure isn’t cutting it… 45 didn’t get the screen of my iPad air 2 to budge either… even after resting on the ipad for 4 minutes.
60 seconds in the microwave, the iOpener burst.
I’ll get a new one and try once more with heating it 45 seconds and repeat that for 30 minutes like others have said here. If that doesn’t work it’ll have to be the heat gun.
K
I can’t recommend the microwave. If the the iOpener becomes too hot, it bursts. Better put the opener in cooking water. Dry it and use it. Instead of an iOpener you can use hot/cool packs as well.
Great idea with using the heat packs. I will try that next time. Thank you
Collins -
Trust the directions! I forgot and left it in the Microwave too long and after 1 minute I had Mt Vesuvius - the iOpener burst and spewed the goodies out. The problem is, the Digitizer can be damaged by a hot air gun, so I had to tough out and remove the glue the hard way. I made it … with lots of patience! Tough lesson.
I also used a hairdryer. I used it on the low setting and I cut a piece of carboard to protect the rest of the screen. The iFixit tool and method is vert tedious and very time consuming in comparison. With the hairdryer method you can literally have the display apart in a few minutes. Using your other hand nearby the area you are heating it should be very hot but not enough to burn your hand. You only have to heat metal part of case near glass edge. If you have a cellular model then you need to be very careful because the black antenna area is plastic. So less heat and work your way up in adding heat just enough to separate around the area but not so much you melt the plastic!
iOpener was the worst part of the kit. Followed directions for :30 in microwave and took 4 trips to the microwave to loosen adhesive on left side of home button. I thought I was figuring it out and it was working well… even set a timer to wait 10 minutes between heating it up. Was on the right side and was on my 12th heat up when it exploded in the microwave. My only tip is that if you set it clear side up, as soon as you see any bubbles or boiling in the liquid, STOP! If you put a pot holder over the iOpener and press slightly to make good surface contact, that seemed to help. I finished heating with a “Corn Sack” that held heat better than the provided iOpener.
Mon iopener n'a pas tenu une réparation. Je ne vous conseille pas ce produit
Bonjour,
Nous sommes désolés que votre réparation ne se soit pas déroulée comme prévu. Il se peut que le produit était défectueux. Veuillez contacter notre service client support@ifixit.com (boutique américaine) ou eustore@ifixit.com (boutique européenne) en décrivant ce qui s’est passé.
Readers looking for temperature advice might check the comments of the previous instruction, as there are more there. I used an immersion bath to heat this to 180F and applied it to the device until the outside temperature of the opener read 150F with an IR thermometer. Removing the screen took very little force with this method.
Thank you for posting some actual temperatures. I have a heat gun with a very fine self-temperature regulation setting capability.
I will set it for 150-180 F, and use that to soften the adhesive.
Get a heat gun.
I followed the directions and heated my iOpener for 30 seconds in a 1000 watt microwave, and it came out at 160 degrees F, as verified by a infrared thermometer. A second heating about 15 minutes later in the micro and it came out at 190 degrees F. Plenty hot enough to soften the adhesive for removing the back on my S8. Based on the comments above I think people just need to use more patience.
I used various time settings. It got very hot. It would soften the glue but not a whole lot. If my screen had been intact and I was replacing something that was not a digitizer, it may have worked. A broken screen makes the process significantly more difficult. I ended up breaking the home button cable. Good bye TouchID…
It appeared 30 seconds were not enough, so I heated it more, by 5 seconds at a time until I got the right temperature about 70 degrees Celsius (measured with infrared pistol) to get the screen heated up to 60 C, the best for softening the glue. But the heat was quickly dissipating by the big aluminum back cover, so the best I got in 2 minutes of applying iOpener was around 45 C, which made the procedure difficult and having risk of breaking the screen. So I eventually abandoned iOpener and user a hot air gun with precise temperature setup. I set it to 90 C, which allowed me to open my iPad quickly and safely.
You need to remember here are different sizes of microwaves. I had the same issue.
Heating on a smaller unit I used 45-60 seconds. That worked but was time comsuming
Yeah, the iOpener didn't work for me either.... ended up using a hair dryer and that worked. The iOpener was too warm to soften the glue in my case.
-
-
-
把iOpener从微波炉中拿出来,捏着两边扁平边缘中的一个以避免碰到中心热的部分。
I did this repair. I used a hair dryer, I think it works better: gets very hot fast.
I did too, you get far more control and no expense on fancy equipment.
Readers looking for temperature advice might check the comments of the previous instruction, as there are more there. I used an immersion bath to heat this to 180F and applied it to the device until the outside temperature of the opener read 150F with an IR thermometer. Removing the screen took very little force with this method. I don’t know how much microwaves vary in heating consistency with these pads, but knowing how inconsistent the temperature of a bowl of plain rice gets in my microwave, I wasn’t interested in even trying to use it for this.
I vote for the hair dryer. The other methods work too but if you aren’t having any luck, switch to the hair dryer. While holding the iPad in my hand, I found that I am aiming the dryer at my finger at the same time and it gauges how hot it is. I stop when my finger can’t take it - maybe five seconds up close. Repeat as needed like I did.
If the maximum temperature for this iOpener is lower than the gadget glue minimum temperature, this device does not make sense.
I think the maximum temperature for this iOpener is below 100⁰C and most gadget glue minimum temperature is higher than 100⁰C. So the iOpener is useless for many opening steps in repair guides. But who knows because temperature range is not specified for this iOpener.Jarl Friis - 回复
-
-
-
在锅或平底锅里装满足够的水来完全淹没iOpener。
-
把水加热到沸腾。关火。
-
将iOpener放入热水中2-3分钟。确保iOpener完全浸入水中。
-
用钳子从热水中提取加热的iOpener。
-
用毛巾彻底擦干iOpener。
-
你的iOpener已准备好使用!如果你需要重新加热iOpener,请将水加热到沸点,关火,并将iOpener放入水中2-3分钟。
What do I do if I don’t have a iopener?
Use a hair dryer
2 or 3 cups Rice in a sock, heat for about 2 minutes. But, I recommend the iopener.
When boiling in water you can put the iopener in a ziplock to keep it dry.
Even if you don't put in a ziplock bag, I found that the surface is mostly hydrophobic so drying it is very easy. I also didn't have tongs, but the bag is denser than water, so it sank and I attached clothes pins to the ends and was able to remove it with those.
2-3 minutes in near boiling water, then 2-3 minutes on my s10+ and it was super easy to cut the glue off.
I have a question, if I have a pan, and I have water, and a mean to boil the water, won't it be easier and cheaper to just use that.
Have you tried it? Water limits your temperature to 100℃, whereas 'pan on the stove' can easily get up to twice that. If your pan is even slightly warped, you'll have a few hot spots of direct conduction with convection everywhere else, heating things unevenly. Assuming you get the device up to temperature, how will you get it out without scratching it or burning yourself? After you're finished, do you really want to prepare food in the pan you warmed up adhesives and trace manufacturing substances in?
.
Boiling something form fitting to heat your device with is a lot more foolproof, and not being foolish is easier and cheaper. Direct pan heating can work, but you are leaving yourself open to a lot more problems than just taking the safe route.
-
-
-
如果您的显示屏玻璃已经碎裂,防止显示屏玻璃在您维修时进一步伤害您,请使用胶带来固定已经碎裂的屏幕。
-
给iPad 的正面整面贴上胶带。
-
尽量根据下面的指南进行操作。但,一旦玻璃破碎,请停下拆解并使用金属撬刀撬出玻璃,避免更多的碎裂。
If you add clear packaging tape, it will create bubbles and the suction cup will become inefficient. To me it was impossible to remove the glass with the suction cup. Since the glass was very cracked, I had to resort to some tweaking with strong tape and pull the this off.
jfmartin67 - 回复
If your screen is significantly cracked to the left edge, abandon this entire setup, prepare yourself for a 5-6 hour repair, expect a lot of patience, a lot of cursing and some good old American ingenuity. The suction cup and picks will not work. You have to carefully crack the glass yourself (w/out damaging the panel underneath and carefully pull it apart from the inside to the outside edges. Use a hairdryer to soften the glue under the cracked panel along the edges. Then use an exacto-knife to separate the pieces of the glued panel from the frame body, all the way around the device. Watch out for the home button ribbon connector when using the exacto-knife. There will be glue residue left over, carefully apply some goo-gone to a small area of a paper towel and wipe gently around the frame body to loosen the glue. Then use the plastic spudger tool to scrape off the excess glue.
The iPad repair is VERY difficult. If you are a working adult, hire a pro. This is not for the faint of heart.
The hairdryer option was way faster and easier than the iOpener. Be VERY careful not to damage the LCD- one small mistake will cost you an extra $100!
but I’m not American
If your digitizer is shattered, the tape will help, but you’re going to need extra picks. Or a razor blade. See below.
Friendly observation that the image on this step is actually of an older ipad model as the side bezels are far too big. I don't know if that matters to anybody but a noob might see it and think this manual doesn't apply to them. : )
notalawyer - 回复
Thank you! Yes things like this matter so much. I successfully replaced an iPhone 6LCD&Screen from the guide. Next was my iPad 2 and the guide said nothing about the power flex cable. They were only stressing about not severing the wifi cable. I followed instructions carefully. Got the screen off and bam. Power flex severed because it was left out of the guide. I saw it in the comments after. I’ll never follow a guide here again without reading the comments. I did receive a discount code for my next purchase but it still caused a lot of inconvience.
I had the same experience. My glass was cracked all the way to the left side and the suction cup would not pull the glass up. The packaging tape also didn't help. The heat caused it to lift. I finally abandoned the tape, used a heat gun aimed very carefully at each broken piece of the screen. The picks did work with patience, but I just pulled off each broken part of the glass. I also found that pulling up on one broken part while heating in front of me would let the next piece pull up. I continued heating and breaking all the way around. Do the right side last. Took about 1 hour to get it off, and another hour to clean the old glue off the frame. BTW thanks to this web site and all the comments! No way I would have done this without all the help here! I am now clean and waiting for my new digitizer. I couldn't free the battery (below), so I left it powered up, and verified it till worked before throwing away the old glass. Vince
Taping with package tape doesn't work. You'll need a very large piece of tape if you go this route.
Just finished successful repair. I would add this: most folks will be here because of cracked screen. This is not easy; believe the 'complex' rating on this repair. I put tape on my screen because it was badly cracked. This made the suction cup useless, because it just sucked the tape off the scree.n. I used the razor blade technique which worked great, it should be used in the demo, and a good blade should be in the kit.
I thought this shouldn’t be too hard - I only had some cracks in the glass, but then at every spot I worked on, the glass turned into nothing but tons of tiny shards. I had to use the points of the tweezers plowing along only the outer edge all the way around, sometimes with a razor blade and often using a hair dryer up close (briefly, over and over). After I got every bit of glass out, I used ordinary rubbing alcohol and Q-tips but I had to rub hard and quickly 100 times on each area to slowly dissolve the glue. I only scratched the LCD once slightly with a tweezer slip. The large chucks of display held together by the packing tape needs something under it to protect the LCD while you are working.
Using Goo Gone to get rid of the adhesive residue is 20 times faster than using rubbing alcohol, even if it is 91% isopropyl alcohol.
Skipping the iOpener and using a hair blowdryer, and using Goo Gone in place of the rubbing alcohol are 2 simple changes that will make this job much much easier than the default instructions if the screen is shattered.
I found the hair dryer is far more effective and less dangerous than using the iopener. If you overheat the iopener you end up pulling a hot plastic bag spewing hot glycerine out of your microwave! Not fun!
I have an Ipad with touch screen issue, if i replace this part it should be Ok?
Packing tape won’t do anything. You need to use duct tape to prevent glass shards from spraying everywhere. If your screen is only partially cracked (mine was the top only), modify the directions and focus on the areas that aren’t cracked first. I was able to get the lower 90% of the screen off, and then worked the cracked pieces with a heat gun and metal razor spudger. The entire repair took around 3 hours, and prob 2 hours and 30 min of that was getting the shards out and pieces off. And lots of cursing. I also told my kids if they crack another screen they are out of luck. I am not doing this again.
-
-
-
将iOpener放置在iPad左侧。也就是Home键左侧位置。
-
将iOpener放置至少一分钟来软化玻璃下面的粘合剂。
The iOpener doesn't work because the heat isn't strong enough. I used a hair dryer which proved to be much more efficient.
jfmartin67 - 回复
“At least a minute.” Bullshit. Get the iOpener good and hot, place it on the area you’re going to work on clear side down, and cover it with a towel. Walk away for 2 minutes. Make yourself a drink — you’ll need steady hands later.
I've done this with an iOpener and at least in my case, it worked fine. You may have to modify the heating instructions though, since not all microwaves are created equal.
ii i just did this and it took a while but i figured it out it is true this thing doesnt get hot enough BUT heat it 2 times and then the 3rd time when u place it on the ipad put the ipad box on top and then maybe a second ipad on top of the box so it kinda smashes i down but not too much for it to break and then wait for it to turn warm THEN use the succion THEN the gap appears. the glue is super strong on the ipads so yea it will take some time lol
Joel Tyson - 回复
Doesn't work. Perhaps include more copy on exactly how to do it?
The iOpener does not work. It simply it is not hard enough to soften the glue. The heat hair dryer method does not work either.
The goal is simply to weaken the glue enough that you can use your suction cup to open up a tiny gap under the glass, so you can insert an opening pick and slice through the adhesive. It doesn't actually take all that much heat; the picks will do most of the work once you get them in there. iOpeners, hair dryers, heat guns all work fine in my experience—the iOpener is just a bit more foolproof because it won't get hot enough to cook the display panel underneath.
If using a hair dryer or heat gun make sure it is not too high heat. My heat gun has two settings, one 750 degree and an 1100. After using it on high I discolored the digitizer and warped the LCD slightly (only shows on pure white backgrounds). Low worked for the rest of the repair just fine. Also using a razor blade or something besides the pick works nice for the initial pry. Once you have a gap big enough, insert the pic and you’re all set.
I don’t have an iOpener, my heat gun wasn’t handy. The last time I did something like this it was a 90-100 degree day, so I just put it out in the sun for a while, and it worked great. This time it’s fall, so I used a 420W halogen Light that I have for photography. (A standard heat lamp would probably work too, but might take longer.) I held it close to the light until it felt hot to the touch, just a couple minutes, then I left is sitting about 16” below the light for 5-10 minutes to sink in and warm uniformly. It worked great.
For me, steps 8-31 were basically one step "Carefully pry off the digitizer glass with the plastic tools" took all of 30 seconds.
Although very hard this does work. The first time opening the ipad after buying it 8+ years ago it took about 3 times of heating the iopener. It did require an amount of pressure I did not expect but it did come open as instructed. I did add a towel and apply pressure to the iopener to make sure the heat transferred.
hmcarbajal - 回复
The iOpener didn’t work for me at all, zero, it literally did nothing. I resorted to my heat gun on low and yeah you need to be super careful, but once I started the adhesive came off pretty easy.
I used a 2-level heat gun, too. Supposedly 707 degrees/923 degrees.
I kept the heat gun about 1” away from the glass and used only the low setting. Even so, I did alter the digitizer pretty quickly in a few locations around the edge. It still functions fine, and you only see it under certain circumstances, so not a huge deal. But irritating. Be cautious about too much heat. It just looks like sort of a faint, polarized grid.
Don’t be afraid to put tension on the glue and just hold it. If it is warm enough, the glue will relax under sustained tension. This isn’t a speed event. Don’t try to rush it, or you’ll break something.
Now that those infrared surface thermometers have become so inexpensive, it would be great if someone posted a target temperature for softening the glue without damage. That would take some of the guesswork out of this process.
If you heat the iOpener somewhat longer than they recommend, and get it about as hot as your hand can stand, then place it on the iPad and cover with a towel for at least 3 minutes. Then really be patient. I got a bit impatient, and took a chance and slipped a really fine “exacto-type” of blade vertically beside the suction cup as I lifted, and thankfully that worked. That made enough room to get one of the “guitar pick” wedges in. The rest went fine.
I used the iOpener to soften the adhesive. I was extra careful and it took me about 90 minutes to get to Step 30. With my acquired experience I would say, it may be done in about 30 minutes. Most important: Be patient! You may have to reheat the iOpener a few times until you will be able to do Step 9. Once I had this part done, it was a lot easier. So I would say the first 60 minutes I spent on steps 1 through 9.
I’ve been using a heat and isopropyl alcohol combo on iPhone screens with no problem. This specifically says “only” heat. I feel like she’s trying to tell me to keep a lid on my IA. Because I don’t know what other methods some rogue might be trying in their efforts to compromise adhesive.
-
-
-
在您按照本指南操作时,请小心下述区域。
-
前置摄像头
-
天线
-
显示排线
Don't assume anything!! I thought I was pulling on the screen connector and I was pulling on an antenna component instead. Didn't ruin its connection range but I sure remember doing it and now my iPad has a little internal flaw only I'm aware of.
I’ve been using a heat and isopropyl alcohol combo on iPhone screens with no problem. This specifically says “only” heat. I feel like she’s trying to tell me to keep a lid on my IA. Because I don’t know what other methods some rogue might be trying in their efforts to compromise adhesive.
-
-
-
将吸盘小心的放在刚加热的一侧中间的位置。
-
确保吸盘已经牢牢吸住前玻璃面板。
-
使用一只手在固定住iPad,另一只手慢慢提起吸盘,将前玻璃面板与后壳分离。
-
如果你的 iPad 屏幕严重破裂,用一层光滑的透明包装胶带覆盖它可能有助于吸盘粘附。 或者,使用一条坚固的胶带(如大力胶/管道胶带)并将其折叠成手柄。
In this picture above, the glass isn't cracked at all so it helps the suction cup to be effective as it is hermetic. With cracked display, it won't work.
jfmartin67 - 回复
Suction cup would not work for me. No amount of heating with iOpener or hair dryer would allow even the slightest gap to form. I ended up looking at some YouTube videos and used a razor blade. I put the razor blade perpendicular to the top glass, right at the edge of the glass and pushed down until the blade went down 1/4". Then heated some more and pried up the glass enough to put in an opening pick. I spent a lot of time working with the suction cup. Glue was just too strong.
It's funny that iFixit changed the image they used. Even they themselves realized how stupid it was to try a suction cup on taped up surface. C'mon guys! You should at least make foot notes for your readers and let them know what to do if the glass is already shattered. It's a slow methodical process that involves working with a iOpener type tool. I personally have one that looks like a prison shank (lol)
Not sure what you are referring to there—I see no evidence in the document history of the photos having been changed. Suction cup + packing tape can work, but it depends how badly the glass is broken and the quality of the tape. Sometimes it takes a couple attempts. You can also skip the suction cup and try using tape alone to pull on the panel, if your tape is sticky enough. There are no guarantees though, which is why we have the disclaimer right in Step 4 that the procedure can be pretty fussy if you're working with a shattered panel. Depending on where it's broken and how badly, you're going to have to improvise.
Jeff, the change is evident from image 4, where all the surface is taped up. In this picture you show a clean not broken surface and yes, the suction cup works...
Ah, I see what you're saying! I can understand why you guys would assume that, but in reality the entire guide was originally photographed using an intact panel. We later added a step showing how to protect yourself if you have a shattered panel (with photos to go along with, obviously). I'm afraid it wouldn't be practical to re-shoot the entire guide every time we make a small change like that.
The suction cup is useless if your glass is shattered. Use a new, sharp razor blade, and insert it vertically between the edge of the glass and the metal back of the iPad. Don’t worry about pressing too hard — there’s a lip that stops the blade from going in too far and damaging anything. You’ll probably have to do this several times, but eventually the blade will “bite” into the edge of the glass well enough for you to pry it up. Insert a pick underneath the razor, then remove the razor and continue as directed.
After having to read several comments on this screen removal and the clear packing tape, I too have to agree that the tape method does not work well at all if your screen is already shattered. I combined several methods, with lots of patience to remove the screen on my iPad Air 2. What I found it very helpful was the heat gun used for paint removal. The heat gun generates a lot of concentrated heat at lower air velocity, unlike generic hair dryer, so you must be very careful not to ruin the electronics, and risk burning your hands and anything around it. My heat gun that I purchased from Home Depot had a nozzle to direct and focus the heat on a small area. That was helpful in working small area at a time. This method work thoroughly well.
It would work if you leave iopener in microwave for 1 minute.
Don’t trust the instruction from ifixit.
you can put iopener in microwave for 1 minute without any harm.
Note. you have to make sure that it is in cold position before you put it into microwave.
Suction cup didn’t work for me either, went the razor blade route (using an exacto knife blade) with very minimal damage to the aluminum shell. Be warned, if your screen has cracked along the edge (as it almost 100% certainly has if you’re reading this guide), the screen will continue to shatter and splinter as you make your way around the edge. That’s when having the screen taped up well will be to your advantage. There’s also a good chance you’ll have to re-insert the razor blade on the other side of a fracture and start the lifting process again, but keep going, being sure to avoid the points called out in this guide and you should be fine.
Also, do not apply the suction cup to an area of the screen with cracks and no tape. If you’re near the edge you run the risk of brutally shattering that area of the glass if the glass gives before the suction cup.
In order to get this to work for me I had to heat the IOpener to over 104 C - I needed to get the screen over 40 C before the adhesive would loosen.
Also I had to put the ipad on a towel - the granite countertop it was on was sucking the heat out too fast.
This step was brutal on my nerves - read about too many people ruining their iOpener and I don’t have a heat gun. I had to keep heating the iOpener incrementally hoping I wouldn’t pop it. … but if you’re patient, persistent, and cautious, you can definitely tell when you’re seeing separation. The iOpener ended up being WAY hotter than 30 seconds was getting me - borderline scorching my hands.
As the others noted, the suction cup is useless on a cracked screen, especially if you’ve applied tape (like the instructions say you should). The screen I was working on was busted up pretty bad, I ended up removing it and then going back to remove the edge glass and adhesive. When you have a really busted screen just take your time and use a heat gun or good hot hair dryer and it will eventually come off.
I used an iSesame tool vs a razor to pry the edge (from a previous replacement project) but again, the iOpener and suction cup are useless.
Thank you for the comments above. I was using the iOpener unsuccessfully, then turned to the hair dryer and heated it up for over 3 minutes. This gave me the gap I needed to insert the opening pick and begin the process. So, with patience and a hair dryer, I was able to get the digitizer off.
You really need a lot of patience here (30-45min). But then it works. The best way was with this plastic "crowbar" to get the beginning. You really have to press hard to get in between.
Arne Meier - 回复
I've passed on the iOpener as suggested in these comments and have tried to use a hairdryer. heating on high at medium speed for 1 minute then trying the suction cup. heating for another minute then using the suction cup. Been doing this for 1/2 an hour but it isn't working. Need to take a break because I'm afraid I'm going to hurt in internal components of the iPad 6 (just trying to replace a dead battery) Any suggestions ???
Just a guy - 回复
LOL...i tried the pastic clear tape to hold the cracked glass then apply the hairdryer. It melted the plastic tape glue and thus making the handle with the duct tape useless and the duct tape just pulled the melted glue from the plastic packing tape up like butter. But the screen still not budging. I've tried the hair dryer for 5 mins and nothing. I've tried the iOpener and that's useless. I'm heating it up 30 secs a time. I tried 1 min. The screen is welded shut.
brian -
-
-
-
在刚刚打开的缝隙处放置一个撬片。
-
然后取下吸盘。
This is an amazing tip! After trying for 10 minutes to use the pick with no luck, I grabbed a small razor blade and that worked perfectly to get me started!! Thanks!!
The suction cup also didn’t work to create a gap - it cracked the screen when i tried to lift (the screen was already cracked). This was after rotating between the iOpener and a microwavable hot pack for food. The iOpener was around 175 degrees, it brought the surface of the iPad to 130. I was finally able to lift the glass using a razor blade and then the picks like donprius. I continued to use the iOpener to loosen the glue around the rest of the iPad but I think a heat gun would have been more efficient.
You have to heat the glue really much, or you will, as i did, crack the glass.
Best bet is to mark the pick with a sharpie line on how far your maximum limit is so you don’t damage the LCD.
Jon Snyder - 回复
The iOpener works well, be patient and keep reheating until you can see the screen start to give a little. I kept putting mine in the microwave and it worked faster when the iOpener was hotter. 40 second intervals did the trick for me eventually
I spent an hour trying to lift the screen of an iPad Air first gen. The trick I found was that its a combination of lifting the screen a millimetre and then wiggling a razor blade vertically in the slot between the screen and the metal frame (yes its a microscopic slot). I used a hair drier on a section of the edge of the middle of the screen as above. The middle area allows for a bit of flexibility in the rail - we’re talking 0.5mm which is just enough for the razor.
So hit a section of the screen edge with the drier till its hot to touch, do the suction cap thing as above, insert the blade vertically and wiggle it *ever so slightly* in the slot as you don’t want to break anything. Keep repeating this until you see even the slightest rise in the screen under the cap. At this point, remove the razor and insert the blue pick. It should easily dig in and under the screen, but no further than the black border.
Remember, small wiggly steps will avoid breaking anything. Better a number of small heat and wiggles than a lift and snap.
for those who need to open more than one iPad, the iflex is safer and more effective than a razor blade. i use it to get started then switch to a pick
Yea, this suction cup cracked my glass. This made it near impossible to slide the picks around. I may try again another day, but I suspect it’s toast at this point.
I should have noted the difficulty rating before thinking I could replace the battery myself. I could have saved myself the cost of replacing a cracked screen, which happened when I attempted this step. I did not want to overheat the iOpener but consequently, I could not get a pick inserted underneath the screen. (I think the glue must take a lot more heat than expected to melt.) So just a warning to more novice tinkerers—this repair wasn't the same as fiddling with screwdrivers and a million small parts.
-
-
-
再次加热iOpener然后放置在刚才的位置。
This says "Always wait at least two minutes before reheating the iOpener", however the iOpener itself has a warning printed upon it that says wait at least 10 minutes. And that 10 minutes warning is also mentioned in Step 2 above.
Sorry about that! We fixed the text on this step. The two-minute interval was for an older version of the iOpener—the text printed on your iOpener will have the correct interval, which is indeed ten minutes. It can burst if overheated or reheated too quickly.
It still says 2 Minutes up there in the warning
-
-
-
沿着第一个撬片的开的口处插入另外一个翘片同时向下滑动,让撬片分离粘合剂。
You guys really need to show how it's done when your iPad isn't perfect like the one pictured above.. C'mon..
This is for BATTERY REPLACEMENT not CRACKED SCREEN REPLACEMENT!!
How do you slide the picks when the glass is broken? Even with the glass taped, it pulls away from the tape rather than the housing. I've just further shattered the glass with my attempts.
With my shattered screen, I was able to remove it using the suction cup slightly and a metal pry, had to break the edge glass some for removal also but it didn’t do damage. More layers of shipping tape helped to make the screen stay together better and come off more intact.
-
-
-
继续沿着下方继续滑动来将粘合剂分离。
-
如果撬片卡住了,请沿着iPad的侧面滚动撬片,然后继续进行分离工作。
-
-
-
将第一个插入iPad的撬片向上滑动到iPad的左上角
-
撬片可能会出现图片上的情况,请不要慌张。 只需将撬片拉出一点点来继续进行维修工作。 但要避免这种情况,因为粘合剂可能会粘附在LCD显示屏上变得难以清理。
I managed to get a couple of fingerprints on the LCD.
What's the best way to clean 'em off?
What's the safest way?
What I’ve read, and seems to work, is gentle circular pressure with a very clean, dry microfiber cloth. Lacking that, use a TINY drop of water ON THE CLOTH, not on the LCD. Small amounts of alcohol can be used, in my experience, but only if the above don’t work, and with better results if used in small amounts and applied to the cloth, not the LCD.
Can confirm. Microfiber with a little isopropyl worked great to clean off any adhesive or fingerprints from mine. Thanks for the tip.
Robert -
If you dare to use alcohol on your device, at least use isopropyl alcohol, not ethanol!!!
-
-
-
在左顶部插入撬片来分离粘合剂。
I broke the screen glass of my ipad just right when I moved the guitar pick towards the upperleft corner of the screen as depicted in your instructions. (Whereas my ipad screen was in perfect condition : no scratches, not broken at all...). There must be something wrong here. Be advised: move the pick towards the corner with caution !!!
-
-
-
轻轻拉出些许撬片,并沿着前置摄像头顶部位置慢慢的滑动。
At this point I’d use paper tape on the margins of the screen to mask off areas where you should use caution with the pick. Its just a visual reminder not to run the picker too deep in these areas. They are: the camera lens, lower right hand side and where the two antenna are along the base. Step 6 third image highlights these areas.
-
-
-
在右侧插入一个新的撬片来分离粘合剂,滑动到中部位置时停下。
Why there’s such an obsession with not damaging the cables is beyond me. Be careful, so as not to damage what the cables are connected to. But the cables are part of the replacement digitizer, so if you nick or even slice through them (like I did with the one closest to the bottom) don’t worry about it.
Keep in mind that some people are here to open an intact display to replace internal components! In those cases, keeping the cables un-harmed is quite important ;)
My digitizer WAS ok and I was only replacing the battery I wasn't careful enough when coming around the side with the pics and got a hold of the cable just enough with the pic to pull it off the underside of the panel. The battery replacement went great other than now I have to replace the digitizer. :(
BE CAREFUL WITH THIS STEP!!!
I also damaaged the digitizer cable while doing a battery replacement. Use just the tip of the opening pick.
Dean Gross - 回复
People need to realize iFixit routinely duplicates instructions for more than one type of repair/replacement. However, all of the comments are combined, which leads to confusion.
laura moon - 回复
-
-
-
松开粘合剂后,你现在可以将撬片插入右下角附近。 向左滑动拨片,并在离Home键不远的地方停下来。
This step needs a BIG CAVEAT to not insert the pick far enough to damage the home button/touch ID cable, as it is DIRECTLY above where you’re directing people to insert the pick. I just ruined a ribbon cable by following this guide too closely.
I also damaged the home button cable. Check the placement of the cables in steps 37-44.
Paul Klein - 回复
-
-
-
慢慢的提起玻璃面板,来进一步分离粘合剂。
This is very tricky if the screen is cracked (which I would assume most people are replacing the screen because of a crack). Use duct tape to try and secure the shards as much as possible, but be prepared for shards flying everywhere. Search for videos on cracked screen removal, there’s a good ifixit one. Maybe they can link it here? I finally was able to get it all by using a heat gun and metal spudger/razor like the guy in the video.
-
-
-
在支起玻璃面板的同时,用撬片分离掉最后的粘合剂。
Detailed pictures that better indicate the difference between the remaining adhesive and the two mylar cables (the very cables you are trying to avoid damaging!) would be much appreciated. On my unit the two were VERY hard to distinguish.
dlcatftwin - 回复
The front camera has a black bezel cover but it is attached to the broken glass digitizer. Peel it off and save it. I plan to tack glue it to the camera instead of gluing it back to the new digitizer glass. It has two alignment bumps so maybe it doesn’t need gluing to either side but I found it on the ground when it came off of the the broken digitizer. I almost tossed it as part of the broken glass.
-
-
-
一旦粘合剂全部分离掉,就像打开书一样将玻璃面板放在工作台上。
It looks like I have the same or similar question: the “hinge” part of the digitizer cables (the flap portion) looks like it is supposed to tuck into the crevice between the LCD panel and the side of the aluminum body - my replacement (from iFixit) has sticky contact on the upper side of this flap, making me think that its supposed to adhere to the side of the LCD panel, but the instructions do not make this clear - is my assumption correct?
dlcatftwin - 回复
Or, does the flap adhere to the underside of the front panel’s right edge?
dlcatftwin - 回复
I tried to put it ‘inside’ the case but was not able to - at the end, I just glued it against the front glass.
I must have done something wrong with the new home-button assembly as the fingerprint sensor does not work anymore - However, I am not going to go through that repair again so passcode it is.
My screen from ifixit had the rigid flaps with adhesive also. I removed adhesive and adhered it to the new glass, it worked fine and solved the problem with the flaps not pushing down.
if there is adhesive glue on the inside of the digitizer and the top of the LCD what do you recommend to clean it.
Isopropyl alcohol (and certainly not ethanol!!!)
Don’t throw away your old screen until you take the home button off of it! My screen was shattered and I kind of have a phobia of broken glass, so I bundled it all up and threw it into the trash can immediately. Next day when I went to continue the job I was sad that my roommate had finally taken out the trash for once and my home button was halfway to the dump by then.
Cleaning with isopropyl alcohol is not really working well. I am using it with a qtip. Is there a certain way you recommend in order to actually the adhesive off?
Yes, the flap seemed to want to be attached to the glass, not go down the slot. All went together well, except that my home button doesn’t work. I suspect the connections wasn’t right, although I did my best to (gently but firmly) push it in. Too late to do anything about it now.
Mussollini - 回复
I got my repair kit yesterday, had a go at it today on my iPad Air 1 (A1474). I’ve opened up phones before (the kind that open up easily), but first time dealing with a glued-together device. Anyway I got there, and now I’m putting things back together. I have a question regarding the pre-cut adhesive to hold the glass back on. Is it meant to be applied to the glass, or the frame?
Ok never mind - I just looked at the digitizer for this iPad and saw that the adhesive is preapplied to the glass, which confirms my suspicions. Now I can proceed and bring this repair to a conclusion.
SHL -
And it’s done! Doing the battery calibration now, but I’m relieved that the battery is working. I did turn on the iPad prior to removing the blue strips on the adhesive to make sure it was working before committing to fix the glass in place.
To reiterate the point, the adhesive strips go on the glass. The way they are packaged with the clear plastic makes it go very smoothly.
There are 2 oversize pieces of plastic sandwiching the adhesive sections. These keep the strips in their original shape free of dust off until you are ready to use them. Once you remove these, there is another clear plastic strip which has an inside edge that matches the adhesive section’s inside edge. This plastic allows you to position the adhesive accurately on the glass while keeping your fingers away from it. This is especially important on the right side where the digitizer cables are. Once you remove this clear plastic, there is still the blue film with pull tabs. You can leave these on to do a power up test, then remove them. …cont
SHL -
… After doing the power on check, you can also check that all the buttons work, home button, camera, speakers etc. Then I turned it off (probably wasn’t necessary), removed the blue strips and pressed the glass in. For this last step I suggest lining up the left edge of the glass with its corresponding edge in the aluminum shell, and then gently pressing down on the right side. ALSO: while doing this last step, look carefully at the right side for the ribbon cables there. In my case (reusing original digitizer), they were protruding just a smidge, so I used the spudger to just nudge it a bit and they got into place, and then I pressed the right side down. I then pressed down all around the edges of the glass.
SHL -
quick question... if this is a replacement, why are we worrying about the digitizer cables? My glass is shattered pretty bad on the to the left of the home button where he says to work. So I can't apply suction cup there. I don't understand the need to be concerned about the cables if the digitizer is going to be trashed...
-
-
-
拆下固定LCD屏幕的Phillips螺丝。
-
3个4.0 mm螺丝
-
1个4.8 mm螺丝
Use the provided replace screen case's square compartments to place your screws into as you remove them. Really helpful and you likely won't mess up.
I tape a stripe of double sided tape on my workbench. You can place the screws on the tape on the location where the screw would be if it was in the screen assembly. In this step, your screws would be in the four corners of the tape stripe, with the longest screw (4,8mm) in the upper left corner. The other screws from the next steps can also be placed on the tape this way.
**I believe you mean the “top Right corner” Is where the longer screw goes.. not left.
! went to Office World bought 4 packs of bluetac stuck them on a sheet of paper to give approximately size and shape of iPad put it in a flat cardboard box
John Smith - 回复
Where can I buy these screws please ?
-
-
-
使用撬棒扁平的一段来从前置摄像头一边撬起一道可以让你手指抓住LCD 屏幕的缝隙。
-
从前置摄像头处提起iPad Air 的LCD屏幕,就像翻书一样将它翻转到Home键一侧。
-
放下LCD屏幕,以便来处理LCD的排线。
Got a cracked screen from toddler stepping on the iPad. My repair went well, everything worked. Except I scratched the LCD. It seems to scratch easily.
At this step, be careful when folding over the screen, as it may scratch on the aluminum frame (third picture). When they say “soft lint free surface” that is needed, specifically where the LCD meets the frame. Place a thin cloth like sunglass cleaning cloth over the edge of the frame.
Thank you, very much, for this tip.
At this step, possibly depending on date of manufacture, there may be black silicone present on/around the four screws that mount the display. It needs to be carefully scraped away and the two screw mount holes at the top of the screen pried up and away from the chassis. Between the chassis and the plastic portion of the mounting frame, there is a slim sheet of metal. Be sure to pry this off WITH the mounting frame. It is part of it. DO NOT try to separate it.
-
-
-
卸下将电池连接器固定到主板的 2.3 毫米十字螺丝。
-
将电池阻挡器滑到主板的电池接口区域下方,并在工作时将其留在原位。
Not having the isolation pick, I used 2 thin guitar picks instead, which did the job fine.
goodcyning - 回复
I couldn't disconnect the battery connector - I applied some force, nothing happened and I was afraid of applying too much force - so I just left it connected and I was very careful not to short out any terminals with metal tools. I completed the repair without any other issues and the iPad now seems to be working fine.
Peter Gray - 回复
Mine was missing. Made one with scissors but still didn't do the trick. I just worked with the batteries still plugged in.
Couldn’t get the battery terminal disconnected so I continued with repair. I didn’t short anything but now it won’t do anything. It worked before, just a cracked glass to replace. Any solutions?
Why do you say you didn’t short anything? Your result would seem to suggest otherwise
I don’t know if it applies to the iPad Air, but I saw elsewhere in my researches in reference to a iPad mini (or was it an iPod mini?) that disconnecting the LCD and/or digitizer with the battery still connected will blow a “fuse” for the backlight. Might yours still be working, just with no screen illumination whatsoever? Dunno. Just a thought.
It apparently can be repaired, but is no longer a DIY job.
Tim -
try lifting the board and not blocking the connector. If you block the connector there are pins that could be damaged.
A replacement of the battery connector is required if pins are bent should you get power on or charge issue after battery disconnection. This can be replaced with the right tools and low melt solder to remove the connector and replace.
Best method to disconnect battery is to carefully lift the logic board near the battery connector enough to slip a piece of thin plastic or paper between the batter connector and the logic board battery connector and pins.
Failing to isolate battery so can result in blown back light or touch filters or diodes in backlight circuit.
At the very least run down the battery flat prior to repair but you are really best to isolate battery.
From a repair point of view. This connector is a royal pain. For assembly it's great, well, nearly great.
This connector is SOLDERED to the motherboard side. Never lever this on the motherboard side, I will call it the right hand side. It will break leaving it's soldered pins behind. Yes I did it.
The pins, on the battery side of this connector, just rest on the batteries plated pads. They are kept under tension by the screw. It should be noted though that removal of the screw will not disconnect the connector pins from the battery pads. Natural tension is still present.
I suggest strongly that you take a look at the battery connector online to see the nature of the pins and you will see that some are quite delicate.
The tools purpose is to raise the battery side of the connector ; the left side, so there is some clearance between the pins and the batteries pads. If you have seen a picture of this connector then you will realise the potential of damage to this connector and will have a better idea of what to do.
Contd.
Lifting the connector and simultaneously sliding a thin piece of card or plastic under the pins should be done carefully. In fact, to minimise damage I just slid it under ONE of the main battery pins, plus or minus, which are in the middle and quite robust compared with the tiddlers on the side of the connector.
The second point, the battery and the motherboard have protection circuitry. When I broke my connector the battery dropped to 0.5V at the terminals. Connecting the charger, when all the connections were sound and not shorted raised it from the dead back to over 3.2V
I replaced the battery, and got things hooked backup. For the test, the screen came on, digitizer seemed to be functioning fine. But I couldn’t get it to charge. I used the i-fixit battery blocker by using my spooger to put a little up pressure on the board, and then sliding the blocker in. I don’t think I damaged the pins, but its possible. This is a friends ipad, and its obviously been dropped a few times. I started eye balling the charging port, it LOOKS ok, but looks can be deceiving. When plugged in, even trying different cables, the ipad is not showing the charging symbol. Some of the comments here seem to imply, if I damaged the battery connection pins, I would still get a charging symbol. My question is, if I damaged those battery connector pins, would the ipad show the charging icon or not? Should I be looking at replacing the charging port?
-
-
-
取下3个显示排线支架上的1.4 mm Phillips螺丝。
Be careful when re-installing screws on reassembly. I mistakenly put the longer screw from the battery connector in the outboard hole, and wound up twisting off the lug that is only lightly soldered to the metal below. Still have 2 screws and system seems to work fine.
-
-
-
使用撬棒扁平一段来将支架从逻辑板上撬起。
bough my digitizer from ebay and have everything done up to this step. The screwdriver the kit came with said to be a #000 but it stripped the screw on the plate... I have tried rubber bands, tape and paper to no avail...anyone got an idea on how to remove the screw. Also I am currently studying in St. Kitts and they lack some products found in the US.
I'm sure you've moved past this by now, but I've had some success with stripped screws using a comparable, if slightly larger flathead screwdriver. The screwdrivers that come in those kits tend to suck quite a lot... iFixit actually has a guide for stripped screws: 如何卸下滑丝的螺丝
-
-
-
-
取下LCD显示屏。
Andddddd continue this iFix folks! It's not a matter of working backwards. Most people must have cracked screens and end up having to rip the screen off and won't have a chance to inspect connections.
He is far from complete…..if lcd is being replaced its probably because top screen is busted too. He didn’t show anything about how to remove the cables for that.
There is a separate guide for replacing the outer glass ;)
-
-
-
拆下覆盖home键带状电缆连接器的任何胶带。
I totally skipped steps 39-98 I didn’t see any need to remove all these components and the logic board just to get the battery out. I gently pried up the board where the battery connector goes in, slipped it out, and slipped in the new one.
That is a great tip. There is plenty of space inside the case to lever out the battery without taking out all of the components. I laid the iPad on top of a large bean bag, heated for 3 minutes in the microwave. After 4-5 minutes, I was able to lever out the battery with the spudger and the credit cards. It came out after a few minutes of careful levering and cramming the credit cards under the battery. I unscrewed the earphone connector and carefully taped it back to the iPad housing with paint tape to have more room to maneuver.
I second this.
Just be careful to make sure you don’t squish or tear any wires or anything else surrounding when you’re fighting with the batteries, and it’s still way easier than removing everything else in there first.
I’ll add one bit, though. The hole in the battery connector that accepts the screw through the logic board also apparently slips over a pin in which the screw seats. I couldn’t see that. So when I got the last bit of battery adhesive to let go, the pin tore out the battery connector hole. Since I was replacing the battery, it wasn’t a problem, but did produce a little conductive piece that I had to fish out before putting anything back together. Wouldn’t want that little torn out piece running around in there to short something out later.
Also, that pin will locate the battery correctly, so that in one of the last steps of reassembly, the battery connection screws together properly. Make sure you find it before the battery adhesive grabs on to the back of the case.
Tim -
Careful removing the tape. The home button has a zif connector and if you aren’t careful the tape can rip the zif flap right off. You might have to hold it down while you pull it off or pull the tape from a different direction to make sure you dont tear the zif tab off.
-
-
-
使用撬棒的扁平端将home键带状电缆ZIF接口向上翻转。
-
小心地将Home键带状电缆水平拉出 ZIF 接口。
I got through the repair, only to have the new screen give me problems that I can not find solutions to any where. The digitizer is working on its own without my input, it will start apps, switch windows, etc. I have pulled up the new screen and checked my ribbons and cables seem to be fine. ANY IDEAS??
Moses Roman
Same exact problem that I have. I think it has something to do with the glass touching the ipad. Something like on the iPad mini, where you had to cover some areas beside the home button.
I would love to see a real solution, as im stuck with unhappy customers and frustrated me :)
I had mine replaced TWICE by a local repair shop. Soon noticed both times that the iPad would soon go haywire after a few minutes use with random clicks, ghost typing, opening apps, etc.
The iPad Air's such a poor quality, un-durable product anyway. I only had my screen replaced in the first place because it cracked with no apparent drop or trauma and Apple wouldn't replace.
I have also the same issue, does anyone know what the problem is?
Please give us some feedback.
Elektromic - 回复
Have seen this with multiple repairs where the digitizer was replaced. In each case it was a problem with the digitizer cables where it gets tucked under the glass near the edge of the frame. Not yet sure if they are badly made digitizers or if the cable gets damaged trying to tuck it under frame during installation.
To avoid the digi sending the ipad crazy. In the same way you tape the copper/silver edges on the back of the glass for the iPad Mini. You tape all the way around, making sure not to dirty the protective cover when placing back down after taping one edge.
Make sure all the metal surround is cover by tape, but careful not too go over the edges too much. It will be visible when using the device.
Like i said earlier, the real skill is not too dirty the screen when lifting the protective sheet.
Have fun!
Thanks man, I'll give it a try. Any idea what kind of tape should I buy?
Kapton tape otherwise known as heat tape or polyamide tape
Just fitted the screen, the digitizer works, display all good but I had a message saying I could not use touch ID and the home button doesn’t work at all…is this expected?
Paul Kelly - 回复
I break the ZIF connector. Is tat touch connecter.?
How do you take the ribbon cable off from the home button site???
-
-
-
使用撬棒的扁平端或指甲将两个数字转换器电缆连接器从它们的插座中直接弹出。
What are those connectors for because i kinda half broke the left one on the screen on the glass frame and now the lcd wont turn on
-
-
-
小心地将被粘合剂固定到后壳上的home键带状连接线缆剥下。
THIS PICTURE IS PERFECT AND PERTANANT TO THE NEXT STEP REGARDING “GHOST OR PHANTOM TOUCH” - See that foam around the edges? For some reason, the ifixit replacement digitizer doesn’t come with it (but it does come with new adhesive applied already.) With your screen, also purchase their “tesa tape” : Tesa 61395 Tape / 4 mm - it comes in different widths fyi. I choose 4mm as advised by a staff member.
scottgogos - 回复
On the replacement screen I received from you, the home screen ribbon cable does not fully seat inside the Zif connector like the original and will not lock in place as a result. It seems too fat. Any tips to make it work?
I can’t think of any reason for that other than it’s the wrong display for your model, or it’s defective. Double-check the model very carefully and make sure you ordered/received a compatible part. If you ordered from iFixit, contact customer support directly for returns or exchanges. Good luck!
I didn’t receive any of the two sided tape…I assume it needed to be ordered separately??
So, when I removed the glass, the bottom cable tore and I have to replace it. The video is not as clear regarding replacement. The old button had a round rubber gasket but the new one does not. No inst. how to re-use it. I can’t attach and keep in place the new button.
In a previous repair, i broke the zif, what you want to do is hold it down while removing the tape, otherwise it will pull the parts up with it.
Since it was broke i put a piece of electrical tape on top for the pressure the zif would push down, then another piece from the screw hole to the bend in the cable, so it does not come loose when putting back together.
-
-
-
移除前面板组件
-
如果您的新屏幕遇到“幽灵”或“幻影”触摸输入问题,可以通过在面板背面的标注区域粘贴一层非常薄的绝缘胶带,例如Kapton (聚酰亚胺)胶带,来解决这个问题。 iFixit面板具有良好的绝缘性,不需要粘贴任何胶带。
In your conclusion, which doesn't have a comments area, you say to reverse the procedure - simple enough, BUT what about the sticky adhesive residue along the edges of the (a) the just-remove-glass (if re-using) and (b) along the 'inside' edges of the iPad chassis? Typically Apple says to remove the adhesive residue (careful) with alcohol wipes (lint free & 98% isopropyl). Thanks for the instructions!
Joe Kazura - 回复
the hardest part of this repair for me is actually aligning the ribbons (especially on the aftermarket version) so they don't jumble and cause the glass to mush away from the adhesive leaving a gap. Would would be very helpful to see how to fold the ribbon cables back on the aftermarket digitizers. They are slightly different than the originals, or at least they appear different. This repair is super useful but we could really use a step 44 because re-assembly has a sequence and a folding technique.
The ribbon cable is a little tricky to figure out. But if you look closely at the old ( Broken) screen you will see they stick to the underside of the screen thin the remaining ribbon slides down into the ipad between the display and ipads frame.
I used a heat gun and suction cups to loosen screen.
This was a very good ifix ii
This is what I need too!
It is not as simple as reverse disassembly steps, the ribbon cables need to be tucked into the pocket on the side of the iPad. There is tape on them that has to adhere to the side of the digitizer too. Mine did not make it all the way down into the gap, and stuck on the other adhesive, now I have a gap by these two cables. To tuck these into this area is difficult at best. I now need to remove the glass, hoping it does not shatter and purchase more tape.
Other than this the task was not bad.. BTW: YES People use the capton tape
I’ve read that people are putting glue at each corner. I haven’t figured out what glue. One person said Glue Dot 1” 16lb, another said rubber cement, 1 video shows 5 min epoxy… Heard that some sort of glue (not super glue) needs to be used to avoid the glass lifting later on. And to use 3m red tape along the edges. I’ve been searching for which glue because I still have an ipad air to do screen replacement on.
Would be helpful if the tape were listed in the master supplies for the guide. I got the whole kit overnighted, but then had to wait a week to get the tape from Amazon (since I wasn’t going to shell out another $50 for overnight shipping). Otherwise, it’d be nice to know if the displays through iFix it included the foam or not—mine didn’t.
Second the concern about the foam. I bought the full repair kit, but was surprised there wasn’t already polyimide tape on the digitizer or in the kit. At least mention that it needs to be purchased extra.
@baron9 The displays we sell have the proper insulation and don’t require any tape. That note is more for folks who use our guides while buying the parts from somewhere else. (They tend to complain here, even though it’s the part that’s at fault, not the guide.) I’ve updated the instructions to try to make things a little more clear. Sorry about that!
My digitizer kit from ifixit also looks like it is missing the polyimide tape on the digitizer. Can someone confirm that i do not need to get the tape with the original ifixit kit and just slap the digitizer on there?
Alex -
I did not realize that aftermarket screens (besides the one ifixit sells) do not come with adhesive strips. Well worth the time to figure out what kind of adhesive you’re going to use to re-adhere the glass before you begin. Stopping while you’re so close to the end of the repair (or having to open the ipad up again after the screen doesn’t stick back down) is slightly frustrating.
I used a b-7000. 48 h cure time.
Just wanna say thank you. I replaced my LCD and digitizer today…. took a LOT longer to get that adhesive off than I expected. And the IOpener busted in my microwave despite following all directions (eg only 30 sec at a time, out for at least 10 min before reheating. So that sucked. Turns out the rice in a sock worked pretty well too.
Regarding assembly: even with carefully tucking the ribbon cables down the side while reassembling, it’s still hard to get that area to stick down.
Gary Wolfe - 回复
Some advice when reassembling that I have learned in the hard way.
One good hint is to those who buy replacement parts that are not exactly the original ones. Some of the parts come with a 3M adhesive tape on the tab of the flex cables (I guess original parts are already folded and glued). I would strongly recommend to be very careful when you try to glue it on the front panel and maybe watch a video on how to fold it properly, so as not to fold or pinch the flex cable on an unrepairable way. Also, some of the low cost parts come with a very strong protection sticker on the front glass. It is advisable that you peel off the sticker before reassembling the ipad in order to not end up ruining the glue that was supposed to hold the front panel .
-
-
-
撬下接近 iPad 的天线电缆和用向上的力拔下天线电缆连接器的边缘。
Skip to the step 98 or even 100 if you just need to replace the power button - I think you should even consider this to replace volume buttons. I am fixing mine right now and screwed up the speaker cable. I did follow the instruction but totally missed the cable right below the tape. I proceeded further, but I just realized I didn't have to go through all the troubles. I wish ifixit.com can manage this type of direction clearly so that dis-assembly is minimum.
This is my first ipad and when the battery dies, it will be my last, way overrated and no options like memory cards or mini usb ports, and the battery thing is ridiculous,I wish I would have never bought this knowing this stuff , and way over priced.
It always helps to Google something before buying it. "iPad Air reviews" in Google would have saved you. I just find it funny how in this day and age, people STILL make "purchase mistakes" because they didn't take the time to research the several-hundred-dollar device they are about to commit to purchasing. You should have seen the amounts of research I did before buying my $1,399 Asus G751JY laptop. I'm absolutely pleased with it and am happy I don't deal with issues other people have. Just be weary, buddy. ALWAYS GOOGLE.
Scott S -
If you just want to replace the battery, skip to step 99. You can easily get to most sides of the battery without removing all other components. It worked for me. Good luck!
I wish I read this comment. Would have saved me a lot of time.
leo -
I followed your piece of advice and went to step 99. My new battery works just fine without removing all those components including the logic board - thanks a lot!!
An important note - as per the comments lower down, you can skip ahead to step 95 (unsticking the battery) just fine if you're just changing the battery, but after you've unstuck the battery you will need to go back to step 88 and soften the logic board adhesive so you can pry it up about a cm and lift the battery terminal up and over the post to remove it. I didn't realise the post was there, and broke off a piece of the original battery terminal that got stuck under the logic board. This prevented a good connection with the new battery, and caused random restarts after I put everything back together until I realised and went back to recover it.
Don’t skip to 99 because you need to remove the logic board.
I have successfully replaced the Battery without removing any components other than the Screen Assembly and LCD. You can skip steps 44 thru 99 by using a spudger as a wedge to lift & hold the Logic Board high enough to lift the battery contact over the post that holds it in place… this will save you a lot of time and frustration and makes the repair sooo much easier.
My goal was to replace the battery. As some suggested I skipped some steps. I did Step 46 and left out 47 to 100. But I think Step 46 can be skipped too. iFixit probably does not recommend skipping these steps because it is riskier to bend the batteries and damage them. But if you work carefully enough and make sure the adhesive has been softened well, you should be fine. It was no problem for me. It saved me quite some time. (I will write a comment in Step 102 to help you get the batteries out without Steps 46-100.)
-
-
-
有两个大块的胶带缠右天线电缆,将它们固定到后方。
-
这样来撕
You may partially skip steps 46 to 100, as it is not really mandatory to remove all those parts in order to remove the logic board and the battery.
-
-
-
小心的在扬声器与天线线缆支架之间插入一个拨片。
-
向home键方向滑动来去除胶水的作用。
-
清楚下面的胶水后,把支架从扬声器上拿开。
The pick was not thin enough but the razor worked.
In my view there is a few destructive steps here. I have been able to remove this entire assembly by lifting only the adhesive tape anchoring it to the back without touching this fine metal bracket as touched in in Step 46 & 63 or tearing the foam in Steps 48 & 65 on both the left & right sides. Remove the screws as in Step 47 & 57 and the one’s either side of the charging port in 64 & 71. Once removed, the only thing securing these to the rear is adhesive tape. Lift the tape and walk the units out by nudging them from side to side.
Neil Cross - 回复
Thanks. Made the whole next chunk much simpler :)
-
-
-
移除以下固定右天线的 Phillips #000 螺丝。
-
一个2.3 mm的螺丝
-
两个1.4 mm 螺丝
I would strongly advise not to follow this step and following ones: removing the 2 Wi-Fi antennas is not required for complete disassembly of the motherboard and battery, and you may potentially destroy your antennas: I scrupulously and foolishly followed this tutorial step by step and now I have severe Wi-Fi problems on my iPad because one of the 2 antennas has been damaged during the process (and by reading all the comments on this page you'll see that I'm not the only one to have this issue...).
=> As someone else already mentioned it in the comments, just skip most of these steps and go directly to something like step 79.
-
-
-
在天线和扬声器模组之间插入撬棒平的一端。
-
把撬棒向home键反向滑动来去除固定天线的泡沫胶水。
Este paso es innecesario, ya que con solo quitar los tornillos es suficiente, no hace falta despegar la goma espuma que mantiene la antena de la bocina.
tout a fais il n'est pas nécessaire de décoller l'antenne du haut-parleur ! Il faut juste enlever les vis et continuer le démontage du haut-parleur en laissent l'antenne fixer a lui !!!
dordetivan - 回复
Faire de même pour le deuxième haut-parleur !
dordetivan - 回复
-
-
-
左边扬声器天线有五片胶布盖着接口。
-
从后机壳把胶布揭起来。
-
把天线拉出来。
This step was not very well explained. It fails to mention the speaker cable attached on to the tape. This caused the speaker cable to be torn since it is so thoroughly attached to the tape. Guide made no mention that it was under there or that you should be careful about it. Not even the usual remove the tape gently they just tell you to rip it right off no problem. Not sure how this was missed when the guide was so thorough about this beforehand.
Approx. 3/4 of an inch past the bend in the cabling underneath the tape lies the right speaker cable. Beyond this point proceed with extreme caution. Delicate cables and ZIF connectors underneath the tape will be torn or damaged if they aren't separated from the underside of the insulation tape first. Use fingernails or thin-edged tools.
-
-
-
使用撬棒来帮助从后机壳边缘拉出扬声器。
-
从 iPad 移除右边扬声器。
When did you remove the blocker after installing the battery blocker? No photos with blockers after this procedure.
-
-
-
拧下这些十字 #000 螺丝:
-
两个 1.4 毫米螺丝
-
一个 2.3 毫米螺丝
I didn’t need to take the left antenna and speaker out. If you just get the wire and tape out of the way so you can unplug the speaker flex cables and take out the lightning connector, then you should still be able to get the logic board out. the left speaker isn’t in the way at all.
-
-
-
将撬棒的平端插入天线和扬声器组件之间。
-
将撬棒向 home 键滑动以切割固定天线的泡沫粘合剂。
Este paso es innecesario, ya que con solo quitar los tornillos es suficiente, no hace falta despegar la goma espuma que mantiene la antena de la bocina
-
-
-
用撬棒的平端将耳机插孔连接器从电路板上断开。
-
将耳机插孔电缆翻折起来。
Note for others. On this connector, i have some tape keeping it down, it's rather difficult to remove without ripping it. So i ripped the tape to remove it.
"Ripping" the tape seems ill-advised. A sharp ceramic craft paper cutting knife or the very tip of a fine-tip Exacto blade work well. Once the tape is cut on one side, the blade slides through it like it's nothing. Zero force required.
Be careful not to insert a blade too far or it may come into contact with conductive components.
-
-
-
卸下固定 Lightning 端口上的两个 3.3 毫米十字#000 螺丝。
-
要找到这些螺丝,请垂直握住 iPad 并从Lightning 端口向下看。
NOTE for others who might miss this: this picture is looking down, out the bottom of the iPad. There are four other screws near the lightning port, two for the speakers and two for the port. You see these four easily, looking down at the battery and motherboard. These two are additional to those, and perpendicular to them. Both pairs of lightning port screws, one set perpendicular to the other, must be removed.
Where did the battery blocker go? It was introduced in step 35. Nowhere has it been said it can be removed . . . yet it is now absent in this picture. I took it out when I got to steps 93-96.
Yes this is a deceptive image as the battery and connector strap seem to be missing. Hold your iPad vertically and look down at the lightning port and you’ll see these hidden screws.
Thanks for your comment! I’ll add a note in the step.
-
-
-
黏胶是六个泡沫形式的胶带 ——如果你需要知道它们的位置,请参考这个步骤。
Thread a piece of dental floss under the tip of the logic board. Be careful when rounding the corner not to snag any ribbon cables. This easily released the foam tape up to the battery connector.
Les 2 images suivantes sont contradictoires. elles donnent l'impression de devoir enlever la carte mère.
@totoy Effectivement, cela peut-être perturbant, mais ces images servent de référence et expliquent où se trouvent les six morceaux d'adhésif qu'il va falloir décoller au cours des étapes suivantes pour retirer la carte mère.
-
-
-
最后,在电池和 Lightning 接口之间滑动撬片,以分离电线下面的最后一些粘合剂。
There are two screws holding the lightning connector to the rear case, I didn’t see them in this guide. I recommend removing them before you attempt to remove the lightning connector, otherwise you’ll look like an idiot struggling with it for around 1/2 an hour like I just did.
Will Young - 回复
Did you skip this step?
I had this problem too!!
Will Young is correct. The two extra screws are horizontal - they are in addition to the vertical screws mentioned in step 82.
@usablethought AFAIK there are only two screws securing the actual port to the chassis. You can tell by looking at the part—there are only two screw holes. Those additional screws can be left in place, as shown in the photos. At least, that was my experience. If you’re working on a different model, then of course you may need to improvise—the instructions are only for the model indicated.
-
-
-
从后盖直接拉出 Lightning 接口。
there were two screws holding the lightening connector in place on my iPad
Yep! In this guide those screws are removed in Step 82, but you can remove them at any point prior to taking out the Lightning connector.
CAUTION - there are two ‘hidden’ screws holding the lightning port that face the battery. Hold the iPad vertically and look down to see them. I almost broke the cable trying to remove it thinking it was just stubborn adhesive. Yes its mentioned at Step 82 but its a confusing illustration and easily overlooked.
-
-
-
滑动并提起主板长的一边。
-
一旦粘合剂被切断了,撬动主板上电池的一边,脱离后壳。
Don't touch the small components which are under the motherboard !!! If you do it your iPad is definitively dead.
-
-
-
移除 iPad 主板。
Nice guide, thank you, very helpful. There would be no way to guess where the glue stripes are located and a couple of connectors are very difficult to spot. I don't see any need to remove the antennas and the speakers though, they are not really an obstacle to remove the board and can be left in place. The lightning connector is secured in place by two other two horizontal screws which are not shown in the guide.
Thanks again !
Technically, you are correct. But those screws are holding a bracket-like piece for the lightning connecter to screw into- which if you think about it, it wouldn't be considered apart of the lightning port (or at least that's what i think). Not trying to start an argument, as this comment is old, but yeah.
This is a bear of a job, and I wouldn’t have had any hope of completing it without this guide. THANK YOU for all your hard work!!!!
-
-
-
下面的步骤将指引你利用加热来软化保护着电池的胶水。你也可以用另一个更加安全的方法—在电池和后盖之间注射有机溶剂(比如iFixit adhesive remover )来溶解胶水。
-
在微波炉中重新加热iOpener 30秒钟。
-
将加热过的iOpener放在iPad背面的中央。 让它放在那里90秒以软化电池胶。
-
将iOpener移动到右侧(远离后置摄像头),然后让iOpener再放置90秒。
-
最后,将iOpener移动到iPad的右侧边缘等待90秒。
-
-
-
在右下角的下面的电池下方插入塑料卡。
Did you skip Step 46 through 100, then this is for you: Because the logic board is still in, you will have less space to loosen the battery pack. Be extra careful not to bend it. Work from the sides that are more accessible like in Step 113 and slowly work your way underneath the battery pack to loosen it all over. As I was loosening the battery I had the heated iOpener underneath the part I was working on. This really helped a lot. And be patient. You do not want to force it.
First of all, thanks @marcelflueeler and everyone else who gave advice on skipping ahead. This is definitely the way to go if you're just changing a battery! Once you've unstuck the battery you'll find you can't pull it out because it's stuck at the terminal though. Don't try and force it here! You'll need to return to step 88 and soften the logic board adhesive so you can pry it up about a cm, then you can lift the battery terminal up and over the locking post that's holding it in place. I didn't realise this and broke a piece of plastic off the old battery terminal, which got lodged under the logic board and prevented a good battery contact until I realised and retrieved it.
-
-
-
握住两个卡片牢固地扭转,将电池从后壳提起
-
从后壳拆下电池。
Finally done !
It took me nearly 3hrs, but i finally made it. Thanks for the great instructions
REASSEMBLY TIPS:
The adhesive strips that come with the iFixit battery have no labels to say which goes where. Look at them carefully and one side has a blue protective cover that runs the length of each strip. This faces up and is to be removed at the last moment when you’re ready to stick the screen down permanently. One strip has a narrowed section in the long length to clear the glass touch screen cables, so stick this one down first to avoid mistakes.
Before removing the protective strips, close the touch screen and boot the iPad. Test both cameras, wifi and speakers. (I found the rear facing camera connector hadn’t bedded properly which was easily fixed). Clean the screen and remove dust from LCD before bedding in touch screen.
The iFixit site has updated battery calibration instructions which differ from the card packed with the battery:
Charge it to 100% and keep charging it for at least 2 more hours.
Then use your device until it shuts off due to low battery.
Finally, charge it uninterrupted to 100%.
Great tip to boot the iPad before removing the adhesive from the battery. There are quite a few comments here about faulty batteries. Fortunately, mine worked just fine.
The iFixit battery replacement kit worked great! The repair guide is very good also. So glad I didn’t just try buying the battery. While testing everything after finishing the battery replacement, the digitizer, volume controls and the sleep button did not work. I was very happy when I went back in and found the cable connections had just come loose. My wife couldn’t believe I fixed her iPad.
The guide was pretty good but a few comments:
I didn’t liked the iOpener that much. I used an heat gun with good temperature control instead.
Any advice on how to remove the old glue residu would have been welcome. I used a combination of physical scraping and cleaning afterward with isopropyl alcohol.
An extra guide on how to apply the new adhesive strips would also be nice.
Fixed!....The guide is very clear and well laid out. I also had issues with the iOpener not working, I needed more heat, used heat gun with temp control. Also used floss to remove the logic board. Would have appreciated more clearer instructions on adding the adhesive strips.....Thanks
The iOpener is really bad. It isnt hot enough to keep the iPad that cools down to roomtemperature in a few seconds. I used an hair dryer which was also not warm enough but at least made it warm enough to create a gap where I was able to fit my pics under. Unfortunately my Digitizer still died. Battery works but I cannot turn off my iPad now lol
Very good guide to a very tedious project! Thank you for the detailed description of the digitizer separation. I didn’t sever any cables. The iOpener isn’t bad; it’s just too small. This project really requires the Anti-clamp, the acetone/isopropanol adhesive softener, and a heat gun that can be used at a low heat setting. I didn’t try a hair dryer, but I think that it might be too windy. Like other fixers,I skipped steps 47 thru 100 something and took my chances manhandling the battery. I opted to insulate the digitizer with Kapton tape. I only have a wide roll of Kapton, so I stuck it to the stiff plastic backing for the battery, then cut narrow strips and peeled them off the backing. Finally, I’d like to see a show of hands of the people who forgot to put in the four corner screws for the display. Maybe I’m the only one …
Laetiporus - 回复
I successfully replaced the battery in my A1954. But I stopped at step 40 and then I just pried the old battery with the plastic cards that came with the new battery and some isopropyl alcohol. Next step I pried the logic board upwards with a blue pick around the screw area. The board needs to flex upwards more than you're comfortable with in order to make room for the new battery connector to slide underneath the pick but over the screw hole underneath the logic board. I dint't really feel like gutting the entire housing of all the parts but I was risking damaging both the logic board and the new battery. So do it at your own risk.
-


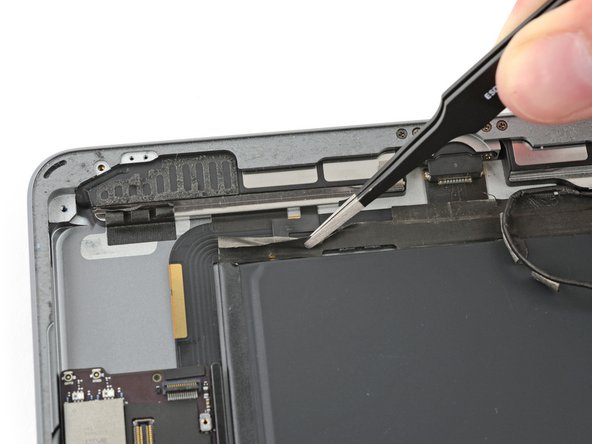


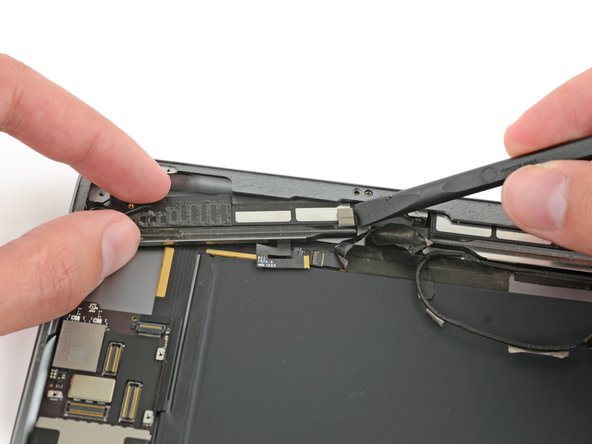


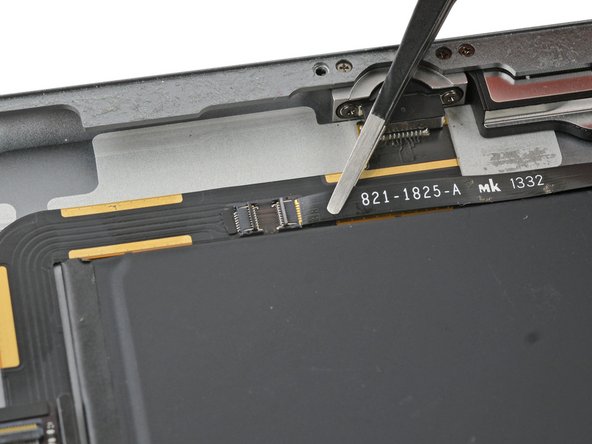


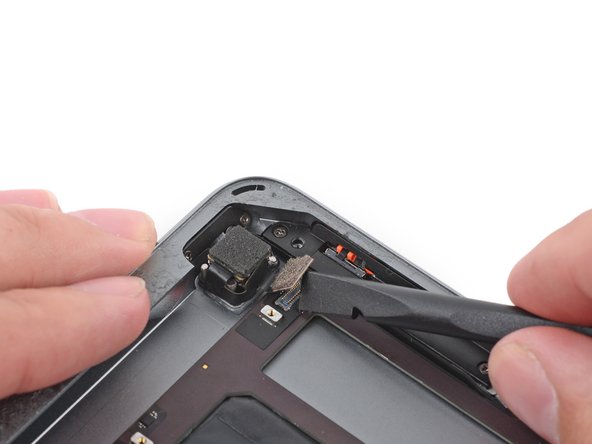
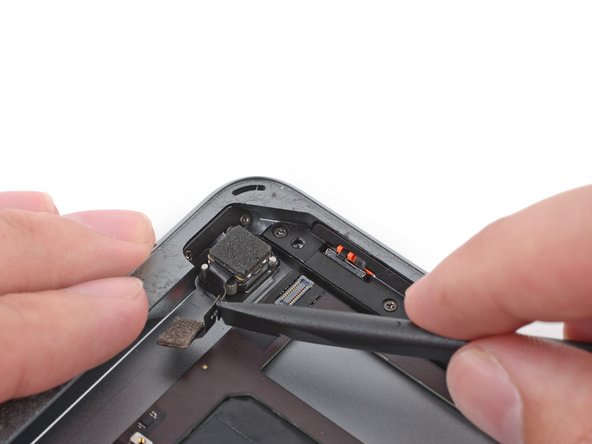


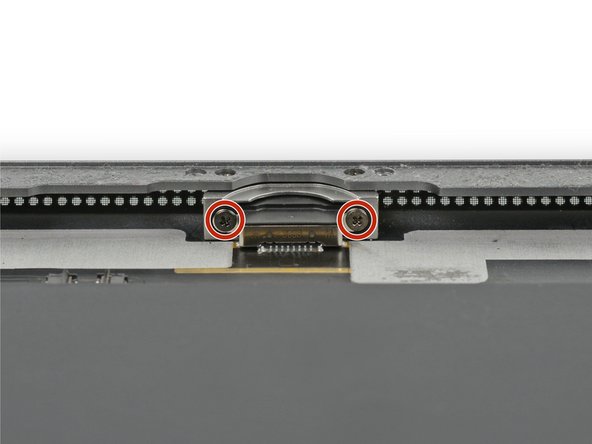

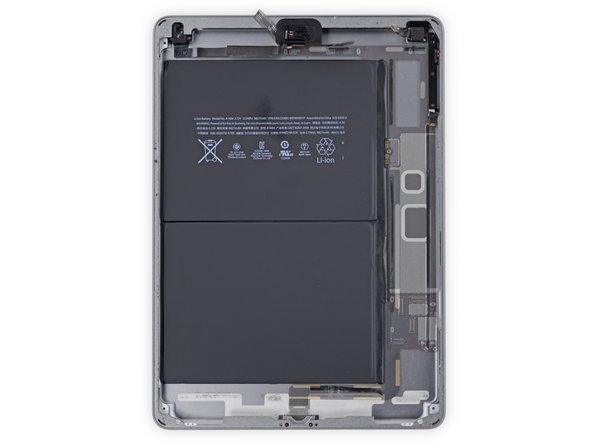


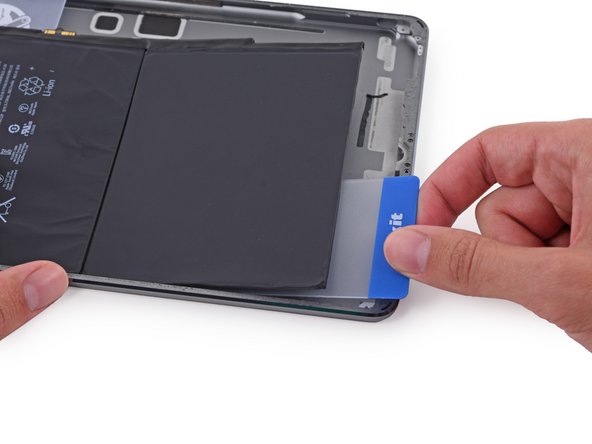


要重新组装您的设备,请按照该指南并按照相反的顺序重新组装。
要重新组装您的设备,请按照该指南并按照相反的顺序重新组装。
219等其他人完成本指南。


55条评论
I attempted the battery replacement and it all went to plan until I tried to boot up the iPad. Nothing happens until you plug it in, when you plug it in the apple logo comes up then it dies again. Any advice????
May be a faulty battery, try with a known working battery
Scott S -
Mason, did you find a solution? I’m having the exact same problem after replacing the battery…
Dustin -
I just put the screen less iPad on a hotplate at 65 to 70 degrees to warm up the case. Use dental floss under the battery to slice the adhesive away. No sharp tools needed
Neil Davis - 回复
Best way to position?
Scott S -
Nice Tip Neil Davis.
So you didnt remove all the other stuff except only the LCD screen then used the dental floss after heating up on a hot plate?
i wonder why the steps here are very complicated and long when you can do it the way you did to your ipad. maybe they just dont like to mess with other accessories when prying the battery, i hope thats the only reason for that.
i plan to replace my ipad Air1 battery (it was already replaced before but with a generic battery which sucks and died after 1.5yrs of usage… i guess it is not that difficult to remove the LCD screen anymore unlike the original glue that was previously there.
I completed this repair. Very difficult. Took me about 2 hours. Be very careful of the ZIF connectors and the tabs. Make sure they align perfectly and are gently pushed in, and all the way in.
Sure this is long, but I appreciate the detail. The iOpener is a painful necessity due to that adhesive, but this won't be bad if: 1) You have no other way to keep the old device going. 2) You aren't under tight time constraints. 3) You have your work space set up in advance and can leave it that way for a long while.
Really nice detail explaining how to disassemble the components to remove the battery. When reassembling, is it necessary to reapply adhesive? If so, what do you recommend?
Your replacement battery may already have adhesive pre-applied. When you've reconnected everything and verified it's working correctly, seal up the iPad with some custom-cut adhesive strips. (Make sure you remove all the old adhesive before you apply more.)
Lol you definitely don't need to do steps 35 to 98. Save your self a lot of time!
I agree, there is no need to remove all internal components, including the motherboard. Get the glass and LCD off, then just lift the motherboard slightly in the battery connector to slide the old battery out once you have the adhesive off, and likewise slide the new battery in, connector first.
Personally, I use the warming drawer on my stove to heat it up, works nicely.
I went from step 35 to 99. Worked perfect. After heating up the iPad and getting it pulled up I then used two tools. One under the battery because the contact point has to be raised and one under the logic board. Both at the same time then pull the battery out from under it.
Ok, going from step 35 to 99…skip every step in between…sounds interesting. Any photos for that suggestion? I’d be a bit more likely to do this replacement if I didn’t have to cut all that tape. Any pointers on this plan of action and some how-to suggestions would be appreciated.
Need to delete all the steps and replace with “Step 1: Find a replacement”
Réparation qui demande beaucoup de concentration et de délicatesse. La Batterie est fortement collée et il nécessite de forcer sur les cartes sans endommager les cellules. Il est très important de ne pas endommager les cellules car la batterie peut prendre feu et dégager des gaz brûlants et très toxiques!!! Je me suis fait avoir avec un i phone 5S. Il serait important à mon sens bien prévenir de l’importance des risques lors du démontage de ces batteries collées ;).
I completed this battery replacement in just over and hour. I didn’t have the iOpener heating pad so I used a hand held hair dryer. Worked fine. It’s not necessary to get the ipad really hot, just warm up the glue so it comes off fairly easy, just take your time with it. There were at least 3 more connections on my ipad that weren’t on the instructions. I have the wifi/Cell version, so I suppose that was the difference. Ipad is now like new again. I replaced the battery because it was bulging out. I was using this ipad for a smart home and kept it plugged in all the time. That is a bad idea. I now plug it in only once in a while.
If you just want to replace the battery, go from step 44 to step 99. You can easily get to most sides of the battery without removing all other components inside the case. Removing the screen and digitizer only is fine. If you use the iOpener, it should be really hot. I microwaved it until bubbles started to form inside the iOpener. This makes it swell a bit, so stop before it bursts! When you see some bubbles, it’s hot enough, otherwise it won’t help to loosen te adhesive. It worked for me. Good luck!
DIY is standard for me . I’ve fixed much Apple hardware with iFixIt.
iPad Airs were packed, and my experience has convinced me that some are easier than others, but they all use things like kapton tape to do miracles of assembly that are one way. Put it on, no big deal. Take it off, you wrinkle and damage it. (Kapton is resistant to damage, but usually really difficult to remove without damaging whatever it’s attached to. Adhesive gaskets? 100% sacrificial.) Apple has fixtures to position parts for alignments, but a DIY guy has luck and one chance to do it right.
There is literally not enough space inside an iPad Air to put a business card. Every piece comes out for battery replacements.
I could take it apart no problem. Getting it back together? Almost certain to screw something up.
Apple charged me $100 to fix it, and iFixit accepted my unused battery for return (A+++ iFixit! I love you guys.)
iFixit rating “very difficult” at 111 steps, 1-3 hours. Most other iPads are “difficult”.
Just adding this…. I bought the battery and tool kit without examining this guide too closely. When I sat down to do it, I changed my mind and decided to send back the battery. I have 40+ years experience in electronic design, a lot of lab equipment, good lighting, excellent skills, magnification, small parts management assets, and all the time I need. I would not hesitate one minute to replace a home button or LCD or digitizer on this. The battery, however, is the first thing to go in the iPad Air case. It requires a complete disassembly, and IMO, is of questionable value to save $50 in cost. iFixit.com however, is a top notch outfit and my go-to place for Apple hardware parts that are more manageable. I am completely satisfied with this outfit and 100% behind the concept of self-maintenance. iFixit does what it does extremely well.
I also have removed the battery, going from step 43 to step 99.
At another website I saw the same steps (iPad Air LTE Battery Replacement).
And this warning:
You don't need to lift very far (2 or 3 mm).
Work carefully and don't put any unnecessary pressure on the logic board.
Do not attempt to simply pull the battery straight up, or you may damage the logic board.
So, I hope, that I haven’t damaged my logic board.
I am still waiting at my order of the battery and adhesive strips, so I don’t know yet if my iPad will do it after the reassembly.
Putting the new battery in the case, I have to pull up the logic board again.
So, I wonder, if I do steps 75-86, 92-94 and partly 96, will this help a little bit doing the pulling again.
One site of the logic board is then loose/detachable of the case.
Rob Willemsen (from Holland)
Yesterday, I got my battery and adhesive strips.
To remove the battery, I already had done step 1 - 43.
But as I wrote before, I had to pull up the logic board.
But this logic board is also glued at both ends of the logic board.
So I decided to do step 92,93,94 and 96 (partly).
Now the pull up was easier.
In a Dutch instruction movie, the strips were installed (fit) in the borders of te case.
I have also done this, but then putting back the lcd screen and glass, I had to pay attention at the glue of these strips.
But finally I had a working iPad again!
i’m stressed out just looking through all those steps…..but, it’s that or order a NEW iPad….sigh….no repair facilities i like around where I live.
The instructions are great and very accurate. CAUTION: When removing the battery in steps 99 - 111, take plenty of time to sufficiently heat and soften the adhesive and in no way bend the battery, especially at the corners. The lithium ion battery can ignite if sufficiently bent. I learned the hard way by rushing the job and destroyed my IPad. Almost my house. If I would have taken my time I would have a serviceable IPad.
Got it done! Puh. Wasn’t all too confident about after I saw I had to basically disassemble the whole pad. But it worked out well. The instructions are perfect.
A great THANK YOU from good old Germany. Saved a lot of money for not having to buy a new iPad. Now it works so much faster than before.
Again - thanks!
Mathias
Unlike many who have commented, I did the full guide, which made it easier to remove the battery. Assembly went fine - actually a bit tricky because you it’s more than just reversing the instructions..
The battery itself that I installed at present only holds 83 percent charge, or so says the iPad; this was after an initial charge from whatever state it had been in - I think it was pretty flat. I will run it all the way until the iPad shuts off automatically & then recharge it once again; don’t know if this will help or not. Even at 83 percent it will be better than the totally dead battery I replaced - it does seem to be working properly aside from the relatively low total charge.
Success with the battery charge - after initially showing 83 percent charge on the first charge, I ran the iPad until it shut down automatically to protect the battery; then recharged; and this time it came back at full charge. I guess the “smart” aspect of the charging system really does need “calibration.”
I successfully replaced the battery and screen on my 5yr old’s iPad. I just diligently followed the steps and took my time. I came very close to giving up when it came down to separating the battery from the enclosure because that glue is strong and I was genuinely concerned that the battery would get damaged. However, I finally just let the iOpener sit on the back of enclosure for 5 minutes every time instead of the recommended 1 minute. I should have read the comments first because I believe Neil Davis’ trick to use dental floss to cut the adhesive under the battery would have worked beautifully and saved me 30 minutes. The only truly hard part was installing the new front panel. I couldn’t find instructions and came close to pinching some cables. Maybe adding a link to an online reasembly with parts/kits would help out.
Overall, this was a satisfying experience and the extremely detailed instructions were definitely appreciated! I look forward to fixing other devices to extend their lives. Thanks
This maybe wasn't the best repair to be my first, byt thanks to this guide i succesfully replaced the battery of my ipad! Great guide!
So i completed this guide, skipped steps 44 - 99…I used a old heat up bean bag its about the size of the battery… I warmed it up placed the ipad air on the bean bag. I then took some old steel guitar string, I wore some gloves (so you dont cut yourself) and worked the string from the left to the right (had to leave the plastic triangle card under the connect of the battery so nothing shorted) once the adhesive tape warmed up the string sliced it and diced the adhesive tape and then I could shift the battery out to the right - away from logic board… and then I had to use the spunger to life the logic board up slightly to fit the new battery into the logic board (this was kinda tricky -keep the splunger at the bottom) then placed the new battery in. so basically only took out the lcd and the front glass digitizer… did this in less than an hour. So had no need to remove logic board/wifi antenna etc… making it alot easier not to damage anything by forcefully reassembling the whole ipad.
i had a problem with battery replacement with iPhone 6. everything went well up until turning it on. the apple logo came on then wouldn’t boot up. i plugged the phone into my computer and factory reset the thing. it worked fine after this. thank goodness i back up regularly. was able to restore from iTunes backup.
I don’t have an iOpener. The last time I did something like this it was a 100 degree day, so I just put it out in the sun for a while, and it worked great. Now it’s fall, so I used a 420W halogen Light that I have for photography. (Regular heat lamp would probably work too, but might take longer.) I held it close to the light until it felt hot to the touch, just a minute, then I left is sitting about 16” below the light for 5-10 minutes to warm uniformly. It worked great.
Steps 8-31 were basically one step "Carefully pry off the digitizer glass with the plastic tools" took all of 30 seconds.
I totally skipped steps 39-98 I didn’t see any need to remove all these components and the logic board just to get the battery out. I gently pried up the board where the battery connector goes in, slipped it out, and slipped in the new one.
99-111 were basically 2 steps,
Heat up the back of the case
Pry up the battery with an old credit card and a dull butter knife.
Thanks Neil Davis for the dental floss idea, I'll try that next time!
This guide is a full 50 steps longer than the guide for the LTE version of the same generation iPad - iPad Air LTE Battery Replacement
Is there a reason for this?
Just finished replacing an iPadAir battery. I skipped from step 43 to 99 and also used dental floss to loosen the battery. The hardest parts were getting that first opener in and getting the battery free. I used a heat gun and an infrared heat gauge. Had to get to about 225°F before the front glass would come loose. I separated the logic section glue to allow enough wiggle for clearance for the old battery locating tab to clear the pin.
I’ve just begun the process of replacing the battery in my iPad Air A1474. I thought that the iOpener would be an invaluable aid but, after microwaving it twice and leaving it on the left bezel for first one minute, then two and then ten, the adhesive hasn’t even begun to budge. Am I missing something?
Most likely it’s not hot enough. I used my wife’s wrap wheat bag and on the first attempts nothing happened. But after an extra round in the microwave it was really hot and after two minutes on the iPad the adhesive was soft enough to lift the front.
Work perfectly!
All the heating took it’s time but overall not as difficult as I expected. Used my wife’s wrap wheat bag to heat and it work very well.
For reassembling I used 2 mm adhesive red tape, both on smaller components and the front piece. A lot easier than any kind of glue and it seems to stick in place.
Not too bad of a job to do. but; had to use a little extra heating. Also. the glue they talk about is actually double stick tape & kind of wide in a few spots. i skipped after removing the lcd, straight to the battery removal. When loosening the battery, lots of heat helps & start at bottom;.. watch out for those cables that are still attached to the screen, cameras, & boards. Remember; while removing the battery when loose, the screw must be out of battery connector,,, you have to raise the board slightly to get the battery to wiggle off of that raised stud where the screw was. The worst part of whole job is removing the old glue/tape from case & back of screen. Plan ahead when installing the new sticky tape. Double check screen fit & cables before final “stick “ into case. lastly, be sure to clean lcd and inside of touch screen good, or you will get smeared look when done,.. good luck,…………………… terrill
… i forgot the most important thing. clean lcd and inside of touch screen very, very good. wear a mask when ckeaning to keep from getting spots on both lcd and inside of screen. if you get those streaks and smears on the inside, your touch screen will go crazy and you will have to take apart again to clean better,…………. t
I told my wife, I give it 50/50 on the iPad working after I get it back together. Honestly, I gave it much fewer odds than that. To my surprise, it works! The only problem I see so far is that the wifi signal is not as strong as it was. I can live with that.
Thanks!
Rick Mills - 回复
This guide’s complexity is completely ridiculous. Follow this video instead : https://www.youtube.com/watch?v=0tFJg7SO... and the replacement takes under an hour.
Forcing the battery out with a spudger creates a much higher risk of a dangerous accident. Also, flexing the logic board can separate BGA chips from their pads, at which point you are in for a much more difficult/expensive repair. Might work out alright if you’re lucky, but I wouldn’t recommend it to anyone.
Not a bad repair at all. Pop off the digitizer and the LCD, skip all of the other madness. As per usual, the iOpener approach was useless; used a heat gun to get the digitizer off and tossed the case (minus digitizer and LCD) onto a hot plate, then did the usual dental floss trick. Total time (excluding the 15 minutes of trying to get the iOpener to do anything) was about 30 minutes.
Only other issue is that it was mildly problematic to properly position the new battery with the batter isolator in place, since it’s difficult to make sure the screw hole is properly aligned.
I replaced the digitizer while I was there (mine was cracked), but that’s pretty much a freebee when doing the battery swap.
Just had success completing a battery change on my wife's iPad Air 1st Gen. Used a blow dryer instead of pad. Be warned about 3/4 the way down on the right side are the digitizer ribbon cables. I ran into them with the pick but did not break them. There is adhesive on the very edge but do not go deep. Cleaned the glue off with “Goo Gone" and paper towels, just be careful not to get it on the inside of the digitizer as you will be cleaning it off when you dig not have to in the first place.
Placed the new battery, putting everything back toghether , switched on and works fine BUT I have must done someting wrong because the touch is not working anymore... Any suggestions?
The guide works fine, and I agree that with a little more attention you can skip at least 50 steps.
To soften the glue, I prefer to leave the iPad out in the sunshine - it gives it a really even temperature and is hot enough on a summer day. Once the glass is off I only removed 4 screws for the screen, 3 screws in step 65 and the single screw clamping down the battery. That is enough to prise up the battery clamp and slip out the battery from under it. I put talc on the replacement battery sticky strips since there's no way it is going to slide around in there. And I just cleaned up the old glue around the screen because there's more than enough left after opening it. I don't need it to be waterproof.
I didn't find this to be as hard as I had built it up in my mind to be; HOWEVER, saying that I need to say years ago I was the local Nokia service center in my town. But many years ago right after they got rid of analog times. Yeah. A classic installer/repairer mistake when starting something they haven't fixed or installed before is picking up the instructions, flipping through them; maybe even reading a section that is new-then tossing the instructions over the shoulder. "I got this." This usually comes right before something major gets broke. And I can tell you when you try to do it yourself and then mess it up horribly then take it to the repair shop. Well we called that "I can do it myself" syndrome and charged extra to put back together what they brought in in the box. Now knowing all this - I can't stress this enough because I am stupid, stupid, stupid. COVER YOUR SCREEN IN CLEAR BOXING TAPE AND READ ALL THE INSTRUCTION BELOW THROUGH TO THE END BEFORE EVEN ATTEMPTING THIS FIX. Take my advise.
windizy - 回复
I didn't have an iOpener, so I used a wheat type heat bag. If you do this though, make sure you put a layer of plastic between your Mac and the bag, or you'll get condensation in places you don't want it.
Martin Gray - 回复
I started out using the iOpener but switched to my wife's hairdryer. A heat gun or hair dryer proved to be much more convenient and is a time saviour. You can heat more and the glue becomes more fluid make the next steps with the opening picks much easier
Jan Van Puymbroeck - 回复
I know this is obvious, but backup your iPad with iTunes before you start. I'd also turn off your passcode if you have one.
Laurie Higgins - 回复
Ther first time you heat up the iOpener for this repair when its room temperature I had to heat it up for more than 30 seconds. I remember I had to heat it up for around 45 seconds. However, after that when you need to reheat it again during the repair 30 seconds will be enough.
Yousef Ghalib - 回复
I used the wheat bag in a sensor microwave heating up to 65-70 deg C (155 def F).
ian cheong - 回复
Get yourself a cherry pit bean bag the size of your iPad. Heat it, put the iPad on it for 3 to 5 minutes or so, reheat the cherry pit bean bag, again put your iPad on it. Then heat the iOpener and start working. The cherry pit bean bag will have to be reheated several times, but it will soften the adhesive so you have less problems with the iOpener
Tim Feyaerts - 回复
The heating can be done very effectively (and quickly) with 3d printer heated bed. Make sure the bed is clean. Set the temperature to 60c, (130f ) and put the ipad face down for +/- 10 minutes. Repeat as needed throughout the “gentle prying” stages.
polleyphony - 回复
The iOpener did not work at all for me.
I had to use a heat gun and bring the edges of the case up to ~200 degrees (used an infrared thermometer to measure) before the glue would weaken. This obviously superheated the metal frame, so I also had to wear gloves to handle the phone while prying the back off with the included picks.
Mike Jeanette - 回复
Repair instructions worked like a charm. Had to be patient with the iOpener and getting the screen off. I tried repeatedly without success until shifting the suction cup a bit to the left side where perhaps the glue had loosened up a bit more.
Kyle - 回复
The iOpener, in my opinion, is of no help. Many warnings to say “don’t warm it too much”, but the glue doesn’t melt if not warm enough. As a result, a complete waste of time and energy. In addition, too much liquid in it, so it doesn’t lay on the device on a sufficient surface. I took a hairdryer and it worked much much better.
laurentvidu - 回复
I used an immersion bath to heat this to 180F and applied it to the device until the outside temperature of the opener read 150F with an IR thermometer. Removing the screen took very little force with this method.
breadandbits - 回复
My experience. I was replacing the screen which had been cracked and a little shattered in some places. The iopener is pretty much useless, so was the suction cup. The suction cup would probably be more useful if I was doing something besides the screen. Also you probably want the clean the screen before using it so it can get good suction. I used a hair dryer on high for a couple of minutes at a time (someone on this tread suggested that). I used my exacto knife and a razor blade to get into the adhesive. First the exacto to get the initial cut, then the razor blade to go a little deeper. Could have probably just used the razor blade, but the exacto has a little more finesse. I got the razor blade in and a little under the glass then I used the picks to wedge in. I didn’t want to risk anything using the razor blade too much. Used tape to keep the shattered glass together.
trebor65 - 回复
My experience pt2
Fortunately the shattering was mostly on the edges and most of it had adhesive on the back so it stuck together. Just take your time and work your way around following the guide to get the screen off. Have some goof off or goo be gone to clean the frame when putting the new glass on or putting the existing one back. (someone suggested that also, very good idea). Be careful of the LCD (you should know that). The cable on my LCD was pretty tight, so I propped it up while taking the cable cover off and when I put it back on I did the same thing. I just put a bottle on the battery and leaned the back of the LCD on that while attaching the cables and putting the screws back on the cover. Also be careful with the home button and the bracket on the back of it. I had enough old adhesive on left on the bracket that it stuck back to the new glass fine. So far only 12 hours in, so we will see how that holds up when the kids get at it.
trebor65 - 回复
Another alternative if you do not have the iopener is to use a bed time hotwater bottle. Do not over fill it though. Just put enough hot water in to support the phone while you work around the adhesive.
I use both the hot water bottle and iopener together on Samsung's. It makes life easier
gazza667 - 回复
I followed the directions and heated my iOpener for 30 seconds in a 1000 watt microwave, and it came out at 160 degrees F, as verified by a infrared thermometer. This allowed me to separate the last bit of the back of my Samsung S8, which was already coming off due to a swollen battery (hence the reason for the repair).
Dennis - 回复
Hallo,habe den Akku erfolgreich getauscht.Doch seitdem gibt es bei Telefonaten eine Rückkopplung für den anrufenden.Bei mir ist alles normal.Woran liegt das?Mfg
Manu R - 回复
If you follow these instructions, you will crack your screen like I did. Heating the iOpener for 30 seconds, using it to melt glue, then waiting 10 minutes to reheat is useless. The iOpener can be used to maybe warm the glue on whatever side you aren’t working on. You need a hairdryer and/or a heat gun to melt the glue and separate the glass from the iPad.
Anyone want to buy an old iPad with broken glass and a dead battery?
mpulliam - 回复
Not everybody has a microwave. You should provide a target temperature for the iOpener and instructions for a conventional oven, or pot of warm water, or whatever. Although I will probably use a heat gun …
Esmond Pitt - 回复
Three times heating opener and no luck. Tried pressing down gently on opener with a towel, and the opener broke. Wondering if I now replace table mats, fancy table cloth, etc. or will this stuff wash out.
Not impressed so far. Maybe the hair dryer next.
doug - 回复
I support the comments about the iOpener. Everyone has a hair drier, FHS, so get a cheap IR thermometer (£18) and blow heat until the area is 60+ deg C. Still takes w while, and getting the screen off is v scary, but just add more heat if you feel resistance.
The rest of the kit is good, esp the magnetic screwdrivers.
Richard O'Brien - 回复
No, everyone does not have a hairdryer. Some of us don’t even have hair. Thank goodness I already had an IR thermometer, though.
nin10doh -
#### WARNUNG WENN MINIMALSTER SPRUNG IM DISPLAY IST FUNKTIONERT DAS NICHT!!! ######
Hatte einen winzigen, minimalen Sprung im Display. Ich dachte es könnte gehen, weil der Sprung “abgeschlossen” war. Er hat in einer Ecke ein winzige Glasteil rausgeschnitten. NEIN! Geht nicht. Habe alles mit viel Geduld dem iOpener und einem Föhn erhitzt. Es ist trotzdem sofort über das komplette Display zersprungen…
T z - 回复
I’ve started with iOpener but changed very quickly to a heatgun. That was more efficient.
Mizzoo, s.r.o. - 回复
I could not get the iOpener hot enough to melt the glue on my ipad 6. I heated for 45 seconds once and it was boiling and it still never worked. Thank goodness contributors mentioned using a hair dryer. Using an 1700w hair dryer on high did the trick to get the screen off. Still took some time and the case got pretty hot but be patient. It took twice as long and a lot more patience to get the battery out.
Randal Haufler - 回复
I have an Ipad with touch screen issue, if i replace this part it should be Ok?
janderson martin - 回复
WARNING - DO NOT MICROWAVE ON A METAL MICROWAVE RACK
The metal microwave rack can heat up and melt through the iOpener cover letting the contents leak out.
Not a big issue for me as I have a heat gun and used that instead.
Run Up A Tree - 回复
I opened my iPad with the iOpener. Be patient! It may take quite a bit longer to it the iOpener in the microwave than it says in the guide. My microwave can only do 800W and I had to put the iOpener in several times (maybe a total of 90-120 seconds). I recommend that you have the transparent side up an watch the bag carefully. As long a the bag doesn't bloat up and the liquid doesn't start bubbling you should be fine. But I recommend to take the iO out from time to time to check it. (More comments in Step 6.)
marcelflueeler - 回复
I gave upon the I opener and used a hairdryer. (Fixed an iPad 6)
Tom Weber - 回复
iPad mini gen5. I used the iOpener. My microwave is 1200w with carousel. 30 sec got the iOpener to 155ºF. For the 2nd heating, after 10 minutes sitting, the temp was still around 125º so I only cooked it for 15 sec. Not enough increase so +5 sec more which me to 165-170ºF. This should be considered ballpark info because who knows the real output of the various microwaves and the quality of the IR tool used to determine temp.
To successfully open my iPad mini I applied the iOpener twice to the left edge and twice to bottom. & once to R edge. Using the suction cup was difficult for me (I'm in my 70's so my hands don't work too well anymore). I had trouble holding the guitar pick and slipping them in (at an downward angle). In the end, sliding my thumbnail along the edge opened it very slightly and allowed the pick to get into the gap. I marked the ends of all my picks with a sharpie pen for the recommended 2mm insertion to avoid going in too deep. To get the screen open it took me approx 1 hour.
jharrison - 回复
Can’t you just use a hair curler instead?
Aspect22 - 回复
A hairdryer or heat gun works, if heating is kept around 100 deg C (212 deg F - boiling point of water). But… heating this way is cumbersome. Using a hotplate, set to 100 deg C, measured carefully with a fairly inexpensive IR gun, is simpler and easier, if you can afford the hotplate (I used an old pancake griddle with a thermostat knob). It works great for phones, setting them face down for 2 minutes, then picking them up with insulated gloves - cheap, wool gloves work fine. This may require repeated reheating to continue the display removal, but its much simpler.
Because its almost impossible to repeatedly lay an iPad/tablet on the hot plate, I propose an alternative.
Initially lay the larger iPad/tablet, face down, for 2 min, to heat all of the adhesive surrounding the display. Lift and begin the picking process describe in your removal steps. Then lay an iOpener on the hotplate for 2 min (already set to the exact, desired temp) to bring it to working temp for the remaining operations.
Dan Smith - 回复
For iPads in particular, it makes sense to construct a simple, aluminum window frame, laid on a hotplate (see my comment above) that only touches the edges of the display, heating only the adhesive underneath. This prevents general heating of the entire device. Four strips of aluminum, placed together as a frame, would be the simplest and allow variations for all devices - envision it as a pinwheel of strips, radiating outward. Use it for any size device.
Dan Smith - 回复
BTW, always read all comments at each step. New, and possibly useful, suggestions appear on occasion that can be crucial.
Dan Smith - 回复