跳转到主内容

当前版本的文档还未经巡查,您可以查看最新的已查核版本

3G版iPad(初代) 电池更换

你所需要的

  1. 这个步骤还没有翻译 帮忙翻译一下

    3G版iPad(初代) 电池更换: 步骤 1 中的图像 1,3 3G版iPad(初代) 电池更换: 步骤 1 中的图像 2,3 3G版iPad(初代) 电池更换: 步骤 1 中的图像 3,3
    • If your display glass is cracked, keep further breakage contained and prevent bodily harm during your repair by taping the glass.

    • Lay overlapping strips of clear packing tape over the iPad's display until the whole face is covered.

    • This will keep glass shards contained and provide structural integrity when prying and lifting the display.

    • Do your best to follow the rest of the guide as described. However, once the glass is broken, it will likely continue to crack as you work, and you may need to use a metal prying tool to scoop the glass out.

    • Wear safety glasses to protect your eyes, and be careful not to damage the LCD screen.

  2. 这个步骤还没有翻译 帮忙翻译一下

    3G版iPad(初代) 电池更换: 步骤 2 中的图像 1,2 3G版iPad(初代) 电池更换: 步骤 2 中的图像 2,2
    • The iPad shown in the photos may look slightly different from your iPad, but the procedure is the same.

    • Insert a metal spudger between the right edge of the display assembly and the rear panel assembly.

    • Rotate the spudger away from you to release the tabs along the top edge of the display.

  3. 这个步骤还没有翻译 帮忙翻译一下

    3G版iPad(初代) 电池更换: 步骤 3 中的图像 1,2 3G版iPad(初代) 电池更换: 步骤 3 中的图像 2,2
    • Insert a second metal spudger between the top edge of the display assembly and the rear panel assembly to keep the tabs from snapping back into place.

    • Pry the display assembly away from the rear panel.

  4. 这个步骤还没有翻译 帮忙翻译一下

    3G版iPad(初代) 电池更换: 步骤 4 中的图像 1,2 3G版iPad(初代) 电池更换: 步骤 4 中的图像 2,2
    • Continue prying the display assembly away from the rear panel along the bottom and left edges of the iPad.

    • Use extreme caution as you approach the top edge of the iPad. The digitizer ribbon cable is located near the edge of the rear panel and can easily be damaged.

  5. 这个步骤还没有翻译 帮忙翻译一下

    3G版iPad(初代) 电池更换: 步骤 5 中的图像 1,1
    • Lift the display assembly away from the rear panel assembly by its bottom edge.

    • Do not excessively lift the display assembly off the rest of the iPad, as a fragile antenna cable with very little slack still connects the two components.

  6. 这个步骤还没有翻译 帮忙翻译一下

    3G版iPad(初代) 电池更换: 步骤 6 中的图像 1,1
    • Use the flat end of a spudger to pry the antenna connector closest to the bottom of the iPad up off its socket on the communications board.

  7. 这个步骤还没有翻译 帮忙翻译一下

    3G版iPad(初代) 电池更换: 步骤 7 中的图像 1,1
    • In the following steps, you will disconnect the three cables attaching the display assembly to the logic board. The cables are for the following components:

    • Digitizer

    • Ambient Light Sensor

    • Display Data Cable

  8. 这个步骤还没有翻译 帮忙翻译一下

    3G版iPad(初代) 电池更换: 步骤 8 中的图像 1,3 3G版iPad(初代) 电池更换: 步骤 8 中的图像 2,3 3G版iPad(初代) 电池更换: 步骤 8 中的图像 3,3
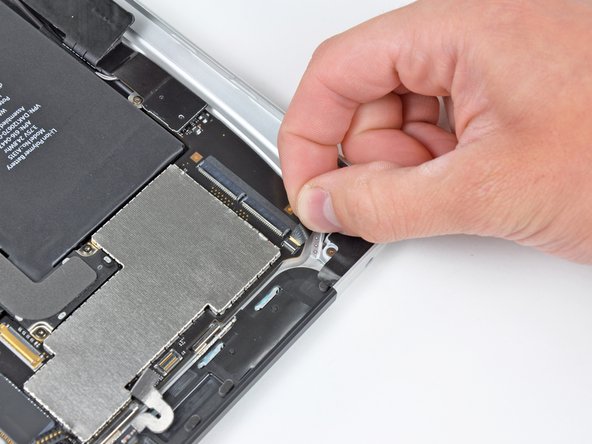
    • Use the edge of an iPod opening tool to flip up the retaining flaps holding the digitizer ribbon cables in their sockets on the logic board.

    • Be sure you are flipping up the retaining flap, not the socket itself.

    • Pull the digitizer ribbon cables straight out of their sockets.

  9. 这个步骤还没有翻译 帮忙翻译一下

    3G版iPad(初代) 电池更换: 步骤 9 中的图像 1,1
    • Use an iPod opening tool to remove the ambient light sensor connector from its socket by gently prying upward.

  10. 这个步骤还没有翻译 帮忙翻译一下

    3G版iPad(初代) 电池更换: 步骤 10 中的图像 1,2 3G版iPad(初代) 电池更换: 步骤 10 中的图像 2,2
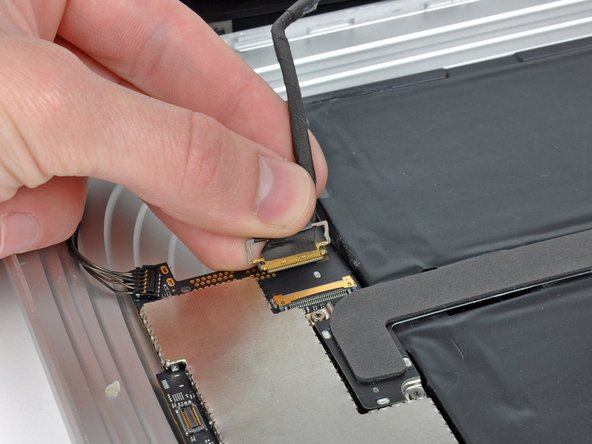
    • Disconnect the display data cable from the main board by flipping up the metal retainer by its black plastic pull tab.

    • Pull the cable connector away from its socket.

    • Pull the connector parallel to the face of the logic board.

  11. 这个步骤还没有翻译 帮忙翻译一下

    3G版iPad(初代) 电池更换: 步骤 11 中的图像 1,1
    • Remove the display assembly from the rear panel assembly.

  12. 3G版iPad(初代) 电池更换, 通信模块: 步骤 12 中的图像 1,1
    • 使用塑料撬棒挑开扣在通信模块上的天线。

  13. 3G版iPad(初代) 电池更换: 步骤 13 中的图像 1,2 3G版iPad(初代) 电池更换: 步骤 13 中的图像 2,2
    • 将控制按钮排线从通讯模块顶部边缘上拆卸下来。

    • 把通信排线的卡扣向上拉起并从主板座子中取出排线。

  14. 3G版iPad(初代) 电池更换: 步骤 14 中的图像 1,1
    • 拧掉把通信模块固定在后盖上的单颗Torx T5 螺丝。

  15. 3G版iPad(初代) 电池更换: 步骤 15 中的图像 1,2 3G版iPad(初代) 电池更换: 步骤 15 中的图像 2,2
    • 如果有必要,把通讯模块右边缘向上抬起,松开将其固定后盖上的胶条。

    • 把通信模块从主板上取出来。

  16. 3G版iPad(初代) 电池更换, 逻辑主板: 步骤 16 中的图像 1,1
    • 小心地剥开覆盖在GPS天线插座上的橡胶电磁屏蔽罩。

    • 用塑料撬棒边缘挑开扣在主板上的GPS排线扣子。

    • 确保只是挑开排线扣子,而不是座子本身。

  17. 3G版iPad(初代) 电池更换: 步骤 17 中的图像 1,1
    • 从座子上取出GPS排线。

  18. 3G版iPad(初代) 电池更换: 步骤 18 中的图像 1,2 3G版iPad(初代) 电池更换: 步骤 18 中的图像 2,2
    • 用撬棒边缘挑开耳机插孔和麦克风排线的固定盖。

    • 确保只是挑开固定盖,而不是挑起座子本身。

    • 从卡座上拉出耳机插孔和麦克风排线。

    • 把排线移到iPad机身的左侧。

  19. 3G版iPad(初代) 电池更换: 步骤 19 中的图像 1,1
    • 用塑料撬棒挑开扣在主板上的SIM卡排线。

    • 排线可能被黑色胶带覆盖。在挑开排线前使用镊子将胶带剥开。

  20. 3G版iPad(初代) 电池更换: 步骤 20 中的图像 1,1
    • 把SIM卡排线折叠以便有空间挑开扬声器排线。

    • 用塑料撬棒挑开主板上的扬声器排线固定盖。

    • 从排线下方挑开。

  21. 3G版iPad(初代) 电池更换: 步骤 21 中的图像 1,1
    • 拧掉以下把主板固定在后盖上的螺丝:

    • 2颗4.56mm的Torx T5 螺丝。

    • 2颗3.76mm的Torx T5 螺丝。

  22. 3G版iPad(初代) 电池更换: 步骤 22 中的图像 1,1
    • 用撬棒挑开扣在主板上的尾插排线。

  23. 3G版iPad(初代) 电池更换: 步骤 23 中的图像 1,1
    • 从后盖上取出逻辑主板。

  24. 3G版iPad(初代) 电池更换, 电池: 步骤 24 中的图像 1,2 3G版iPad(初代) 电池更换, 电池: 步骤 24 中的图像 2,2
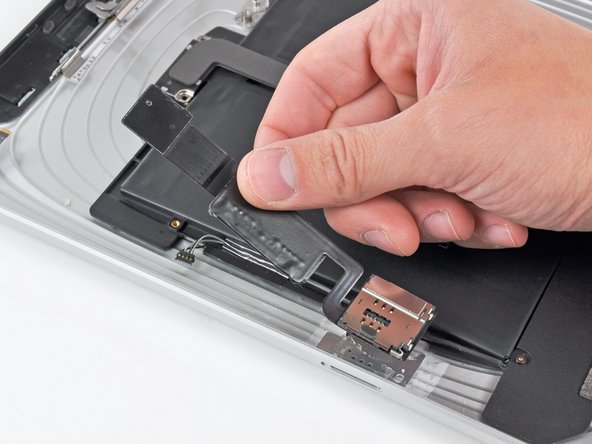
    • 用撬棒的边缘把SIM卡卡座固定在后盖上的胶条撬起。

    • 从机身中取出SIM卡卡座。

  25. 3G版iPad(初代) 电池更换: 步骤 25 中的图像 1,1
    • 拧掉将扬声器组件固定在后盖上的2颗2.84 mm Torx T5 螺丝。

    • 拧掉把尾插排线固定在后盖上的单颗Torx T5 螺丝。

  26. 3G版iPad(初代) 电池更换: 步骤 26 中的图像 1,1
    • 拧掉把尾插固定在后盖上的2颗2.84mm的Torx T5 螺丝。

  27. 3G版iPad(初代) 电池更换: 步骤 27 中的图像 1,1
    • 使用iPod塑料撬棒,小心的挑开WiFi/蓝牙和尾插排线的塑料屏蔽盖。

  28. 3G版iPad(初代) 电池更换: 步骤 28 中的图像 1,1
    • 小心的挑起主板上WiFi/蓝牙座子的上WiFi/蓝牙天线。

  29. 3G版iPad(初代) 电池更换: 步骤 29 中的图像 1,1
    • 从后盖上取出尾插排线。

  30. 3G版iPad(初代) 电池更换: 步骤 30 中的图像 1,2 3G版iPad(初代) 电池更换: 步骤 30 中的图像 2,2
    • 从电池的左侧取出扬声器排线。

    • 从扬声器组件的凹槽中取出WiFi天线。

  31. 3G版iPad(初代) 电池更换: 步骤 31 中的图像 1,2 3G版iPad(初代) 电池更换: 步骤 31 中的图像 2,2
    • 提起扬声器组件向前推动,直到扬声器组件从后盖上完全分离出来。

    • 从后盖上取出扬声器组件。

  32. 3G版iPad(初代) 电池更换: 步骤 32 中的图像 1,2 3G版iPad(初代) 电池更换: 步骤 32 中的图像 2,2
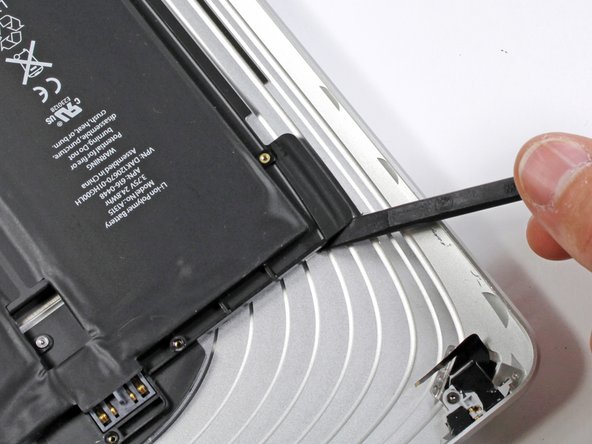
    • 电池用大量的胶条固定在后盖上。接下来需要保持耐心和谨慎。

    • 使用平口撬棒小心的从电池底部轻轻撬动。

    • 继续轻轻使用撬棒扩大间隙并向电池的右侧移动。

    • 继续从电池的右侧撬起电池直到电池从后盖分离。

  33. 3G版iPad(初代) 电池更换: 步骤 33 中的图像 1,2 3G版iPad(初代) 电池更换: 步骤 33 中的图像 2,2
    • 从电池顶部插入平口撬棒继续分离胶条。

    • 重复动作直到电池顶部从后盖上分离。

  34. 3G版iPad(初代) 电池更换: 步骤 34 中的图像 1,2 3G版iPad(初代) 电池更换: 步骤 34 中的图像 2,2
    • 当有足够的间隙时,用手把仍然被粘合剂固定在后盖上的电池分离出来。

    • 从后盖上取出电池。

结论

请倒序重组你的设备。

92等其他人完成本指南。

由衷感谢以下译者:

en zh

100%

Warrior E正在帮助我们修复这个世界! 您也想加入吗?
开始翻译 ›

12条评论

Everything done, battery charges but screen not responsive to touch when trying to input password. It switches on/off fine and I'm able to swipe the lock button but can't input password. Any suggestions? Thanks.

Rene Alexis Penaloza Munoz - 回复

Battery replacement of my son's 2011 iPad 1. Once more invaluable help from ifixit as with an earlier G5 Dual 2.5 and also an iMac 27.

After the battery replacement some non responsive areas on the touch screen. Review revealed I had not relocked the digizer cable and once I did this with yet more replacement clips applied then a return to perfect function. Thanks for the invaluable help. Steve Henderson, Perth, Australia.

Steve Henderson - 回复

Great tutorial.

One thing i am not sure how to do is the battery pack itself, Where will i find the adhesive ? Thank you.

Cedric H.

tipex - 回复

You don’t need adhesive with a new battery pack. It will hold in place with the existing adhesive and once the iPad is reassembled, it won’t fall apart.

Peter Hillman -

I replaced the battery in my old iPad 1 Cellular model. What a PITA. You’ll break most of the clips, but it still holds together pretty well. There is a high risk of breaking the cellular antenna wires because the photo in this guide opening the display is for the Wi-Fi version, leaving out the location of the cellular board and the short length of the antenna wires. So one of the cellular wires broke the moment I raised the display, unaware that the wires were short. The wire pulled right out of the copper connector. No big deal. I replaced the battery just for fun to see if I could resurrect this old iPad that would no longer turn on. So I did it and it is back together and everything works except cell service, but I would never use cell service with it anyway. Wi-Fi works because the antenna is the Apple logo. Nice to boot up iOS 5.1.1, but it is worthless these days.

Peter Hillman -

添加评论

浏览统计数据:

过去 24 小时: 3

过去 7 天: 49

过去 30 天: 265

总计 122,086