跳转到主内容

当前版本的文档还未经巡查,您可以查看最新的已查核版本

仅作为前提条件
本指南仅用作其他指南的先决条件。不能单独食用。

你所需要的

  1. 这个步骤还没有翻译 帮忙翻译一下

    : 步骤 1 中的图像 1,1
    • Peel back and remove the adhesive tape covering the headphone jack assembly.

  2. 这个步骤还没有翻译 帮忙翻译一下

    : 步骤 2 中的图像 1,1
    • Remove the single 2.6 mm Phillips #0 screw securing the camera cable to the headphone jack assembly.

  3. 这个步骤还没有翻译 帮忙翻译一下

    : 步骤 3 中的图像 1,3 : 步骤 3 中的图像 2,3 : 步骤 3 中的图像 3,3
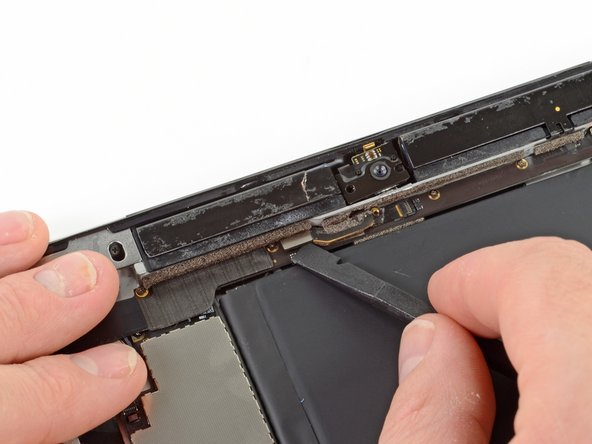
    • Using the flat end of a spudger, pry the front-facing camera off of its socket on the headphone jack assembly.

    • Without removing the spudger, slide the spudger to the right, releasing the adhesive holding down the camera cable.

  4. 这个步骤还没有翻译 帮忙翻译一下

    : 步骤 4 中的图像 1,3 : 步骤 4 中的图像 2,3 : 步骤 4 中的图像 3,3
    • Using the tip of the spudger, flip up the retaining flap on the microphone cable ZIF connector.

    • Insert the tip of the spudger underneath the microphone ribbon cable, removing it from its ZIF connector.

    • Slide the spudger to the left, releasing the adhesive holding the microphone ribbon cable to the headphone jack assembly.

  5. 这个步骤还没有翻译 帮忙翻译一下

    : 步骤 5 中的图像 1,1
    • Use the flat end of the spudger to pry up the antenna connector cable out of its socket on the headphone jack assembly board.

  6. 这个步骤还没有翻译 帮忙翻译一下

    : 步骤 6 中的图像 1,2 : 步骤 6 中的图像 2,2
    • Flip up the retaining flap securing the volume/power button ribbon cable connector to the headphone jack assembly board.

    • Remove the volume button ribbon cable from its ZIF connector.

  7. 这个步骤还没有翻译 帮忙翻译一下

    : 步骤 7 中的图像 1,3 : 步骤 7 中的图像 2,3 : 步骤 7 中的图像 3,3
    • Remove the following screws from the headphone jack assembly:

    • Five 2.6 mm Phillips #0

    • Two 2.2 mm Wide Head Phillips #00

    • Two 2.6 mm Phillips #00

    • These screws are angled into the aluminum frame. Be sure to hold the screwdriver so that the screwdriver is in line with the screw, to avoid stripping the screw.

  8. 这个步骤还没有翻译 帮忙翻译一下

    : 步骤 8 中的图像 1,2 : 步骤 8 中的图像 2,2
    • Holding onto the ribbon cable of the headphone jack assembly, carefully pull the assembly parallel to the iPad, toward the bottom of the device.

  9. 这个步骤还没有翻译 帮忙翻译一下

    : 步骤 9 中的图像 1,3 : 步骤 9 中的图像 2,3 : 步骤 9 中的图像 3,3
    • Grasping the headphone jack assembly with both hands, pull the assembly from the iPad, minding any cables that may get caught.

终点

Brett Hartt

于04/12/10注册

127,897 声望

创作了143篇指南

团队

iFixit iFixit 的会员

Staff

135 名成员

创作了16,817篇指南

0条评论

添加评论

浏览统计数据:

过去 24 小时: 0

过去 7 天: 1

过去 30 天: 1

总计 94