跳转到主内容

当前版本的文档还未经巡查,您可以查看最新的已查核版本

已存档的指南
本指南只作为历史记录保留。请使用指南的最新版本来进行维修。

你所需要的

  1. , 加热iOpener: 步骤 1 中的图像 1,2 , 加热iOpener: 步骤 1 中的图像 2,2
    • 在操作前我们推荐你清空微波炉,在底部的任何讨厌的食物残渣最终都可能粘在iOpener上。

    • 将iOpener放在微波炉中央 。

    • 对于旋转式微波炉:确保盘子可以自由旋转。如果转盘卡住了,iOpener可能会过热并燃烧

  2. : 步骤 2 中的图像 1,1
    • 加热iOpener三十秒

    • 在整个维修过程中,如果iOpener 冷却了,在微波炉中每次重新加热额外的三十秒。

    • 注意在维修过程中不要过度加热iOpener,过热可能会导致iOpener爆炸。

    • 如果iOpener过热膨胀,千万不要触碰iOpener。

    • 如果iOpener中间部分依然烫的没法碰,请等待冷却后再使用,加热好的iOpener 应该可以保持热度十分钟

  3. : 步骤 3 中的图像 1,1
    • 把iOpener从微波炉中拿出来,捏着两边扁平边缘中的一个以避免碰到中心热的部分。

    • iOpener会非常烫,所以拿着它的时候千万要小心。必要的时候可以使用烤箱手套。

  4. , 加热iOpener的替代方案: 步骤 4 中的图像 1,2 , 加热iOpener的替代方案: 步骤 4 中的图像 2,2
    • 如果你没有微波炉,请按照此步骤在沸水中加热iOpener。

    • 在锅或平底锅里装满足够的水来完全淹没iOpener。

    • 把水加热到沸腾。关火。

    • 将iOpener放入热水中2-3分钟。确保iOpener完全浸入水中。

    • 用钳子从热水中提取加热的iOpener。

    • 用毛巾彻底擦干iOpener。

    • iOpener会很燙,所以拿取時請小心的從iOpener的邊邊拿

    • 你的iOpener已准备好使用!如果你需要重新加热iOpener,请将水加热到沸点,关火,并将iOpener放入水中2-3分钟。

  5. , 前面板: 步骤 5 中的图像 1,3 , 前面板: 步骤 5 中的图像 2,3 , 前面板: 步骤 5 中的图像 3,3
    • 如果你的显示屏玻璃已经碎裂,在修理过程中用胶带粘起来。可以防止进一步的破损和在修理过程中玻璃碎片飞溅造成额外伤害。

    • 使用透明胶带把整个屏幕给粘起来。

    • 这样做可以避免在撬动的时候屏幕玻璃渣飞溅。

    • 尽全力地遵循指南的步骤。但是,一旦屏幕玻璃破了,在撬动的过程中便会继续破损,你可能需要金属撬动工具来把玻璃弄出来。

    • 戴上防护眼镜来保护您的眼睛,并小心不要损坏液晶显示屏。

  6. 这个步骤还没有翻译 帮忙翻译一下

    : 步骤 6 中的图像 1,1
    在这个步骤中使用的工具:
    Safety Glasses
    $3.19
    购买
    • Again, as you may find yourself working with broken glass during this procedure, we strongly recommend wearing safety glasses for protection from flying shards.

    • Lay the iOpener flat on the right edge of the iPad, smoothing it out so that there is good contact between the surface of the iPad and the iOpener.

    • Let the bag sit on the iPad for approximately 90 seconds before attempting to open the front panel.

  7. 这个步骤还没有翻译 帮忙翻译一下

    : 步骤 7 中的图像 1,3 : 步骤 7 中的图像 2,3 : 步骤 7 中的图像 3,3
    • There is a small gap in the iPad's adhesive ring in the upper right corner of the iPad, approximately 2.0 inches (~5 cm) from the top of the iPad. You are going to exploit this weakness.

    • Align the tool with the mute button. Insert the tip of a plastic opening tool into the gap between the front glass and the plastic bezel. Just insert the very tip of the opening tool, just enough to widen the crack.

    • It may require some force to get the wedged tip of the opening tool between the glass and plastic. Work patiently and carefully, wiggling the plastic opening tool back and forth as necessary.

  8. 这个步骤还没有翻译 帮忙翻译一下

    : 步骤 8 中的图像 1,1
    • Make sure you place the tool in the proper spot—between the plastic display bezel and the front panel glass.

  9. 这个步骤还没有翻译 帮忙翻译一下

    : 步骤 9 中的图像 1,2 : 步骤 9 中的图像 2,2
    • Keeping the tip of the plastic opening tool wedged between the front glass and plastic bezel, slide a plastic opening pick in the gap, right next to the plastic opening tool.

  10. 这个步骤还没有翻译 帮忙翻译一下

    : 步骤 10 中的图像 1,2 : 步骤 10 中的图像 2,2
    • Remove the plastic opening tool from the iPad, and push the opening pick further underneath the front glass to a depth of ~0.5 inches.

  11. 这个步骤还没有翻译 帮忙翻译一下

    : 步骤 11 中的图像 1,1
    • While you work on releasing the adhesive on the right side of the iPad, reheat the iOpener, and replace it on the bottom edge of the iPad.

  12. 这个步骤还没有翻译 帮忙翻译一下

    : 步骤 12 中的图像 1,3 : 步骤 12 中的图像 2,3 : 步骤 12 中的图像 3,3
    • While the bottom edge is being heated by the iOpener, begin releasing the adhesive from the right edge of the iPad.

    • Slide the opening pick down along the edge of the iPad, releasing the adhesive as you go.

    • The adhesive is very strong, and some serious force may be required. Work carefully.

    • If you can see the tip of the opening pick underneath the front glass, pull the pick out just a little bit. While using the opening pick this deep won't damage anything, it may get adhesive residue all over the LCD.

  13. 这个步骤还没有翻译 帮忙翻译一下

    : 步骤 13 中的图像 1,3 : 步骤 13 中的图像 2,3 : 步骤 13 中的图像 3,3
    • It may be necessary to move the heated iOpener back onto the right edge of the iPad as you release the adhesive. This depends on how long the iPad has been able to cool while you were working on it.

    • If the opening pick gets stuck in the adhesive, "roll" the pick along the side of the iPad, continuing to release the adhesive.

  14. 这个步骤还没有翻译 帮忙翻译一下

    : 步骤 14 中的图像 1,2 : 步骤 14 中的图像 2,2
    • Before removing the first opening pick from the bottom corner of the iPad, insert a second pick under the right edge of the front glass to keep the adhesive from re-adhering.

    • Re-heat the iOpener, and move it to the top edge of the iPad.

  15. 这个步骤还没有翻译 帮忙翻译一下

    : 步骤 15 中的图像 1,1
    • The next few steps require extreme caution.

    • The Wi-Fi antenna is attached to the bottom right edge of the rear case of the iPad via screws and a cable. Because of the orientation of the Wi-Fi antenna, it is imperative to proceed with caution otherwise irreversible damage to the Wi-Fi antenna may result.

    • You will have to release the adhesive securing the antenna to the front panel without damaging the delicate parts attaching the antenna to the bottom of the iPad. Follow the next steps carefully.

  16. 这个步骤还没有翻译 帮忙翻译一下

    : 步骤 16 中的图像 1,2 : 步骤 16 中的图像 2,2
    • Slide the opening pick around the bottom right corner of the iPad, releasing the adhesive there.

    • Do not slide the pick further than the bottom right corner. You may damage the Wi-Fi antenna by doing so.

  17. 这个步骤还没有翻译 帮忙翻译一下

    : 步骤 17 中的图像 1,2 : 步骤 17 中的图像 2,2
    • This step requires you to move the opening pick along the bottom right edge of the front panel. The Wi-Fi antenna is very close to the corner and is easily severed if the adhesive is released improperly.

    • Do not completely remove the pick from under the front glass, but pull it out just a little bit so that ~1/8" (3 mm) of the tip is still under the front glass.

    • Slide the tip of the opening pick along the bottom edge of the iPad, releasing the adhesive over the Wi-Fi antenna.

  18. 这个步骤还没有翻译 帮忙翻译一下

    : 步骤 18 中的图像 1,2 : 步骤 18 中的图像 2,2
    • Once you have moved past the Wi-FI antenna (approximately 3" (75 mm) from the right edge, or right next to the home button) re-insert the opening pick to its full depth.

    • Slide the pick to the right, releasing the adhesive securing the Wi-Fi antenna to the front glass.

    • The antenna is attached to the bottom of the iPad via screws and a cable. This step detaches the antenna from the front panel, ensuring that when you remove the panel, the antenna will not be damaged.

  19. 这个步骤还没有翻译 帮忙翻译一下

    : 步骤 19 中的图像 1,3 : 步骤 19 中的图像 2,3 : 步骤 19 中的图像 3,3
    • Continue releasing the adhesive along the bottom of the iPad, pulling the opening pick out far enough to go around the home button, and re-inserting it to a depth of 1/2 inch (10 mm) once the pick is past the home button.

    • If the adhesive has cooled too much along the bottom edge, reheat the iOpener to warm the adhesive where you are working.

    • Do not heat the iOpener more than a minute at a time, and always allow at least two minutes before reheating it.

  20. 这个步骤还没有翻译 帮忙翻译一下

    : 步骤 20 中的图像 1,2 : 步骤 20 中的图像 2,2
    • Continue releasing the adhesive all the way along the bottom edge of the iPad.

    • On iPad 4 models, insert the pick to a maximum depth of 1/2 inch (10 mm) in this area, to avoid damaging the home button ribbon cable.

    • Leave the opening pick wedged underneath the front glass near the home button.

  21. 这个步骤还没有翻译 帮忙翻译一下

    : 步骤 21 中的图像 1,1
    • Reheat the iOpener in the microwave and set it on the left edge of the iPad to start warming the adhesive in that section.

  22. 这个步骤还没有翻译 帮忙翻译一下

    : 步骤 22 中的图像 1,3 : 步骤 22 中的图像 2,3 : 步骤 22 中的图像 3,3
    • Slide the opening pick along the top edge of the iPad, pulling it out slightly to go around the front-facing camera bracket.

    • The adhesive along this section is very thick, and a fair amount of force may be required. Work carefully and slowly, making sure to not slip and damage yourself or your iPad.

    • If the adhesive has cooled too much, replace the iOpener along the top edge and continue working. If the iOpener has cooled too much, reheat it.

    • If the opening pick is getting stuck in the adhesive, "roll" the pick as shown in step 9.

  23. 这个步骤还没有翻译 帮忙翻译一下

    : 步骤 23 中的图像 1,2 : 步骤 23 中的图像 2,2
    • Continue releasing the adhesive along the top edge of the iPad, and slide the opening pick around the top left corner.

    • If the adhesive is warm enough, remove the iOpener from the iPad for convenience. However, if the adhesive is still quite sticky, re-heat the iOpener and lay it on the left edge while you work.

  24. 这个步骤还没有翻译 帮忙翻译一下

    : 步骤 24 中的图像 1,3 : 步骤 24 中的图像 2,3 : 步骤 24 中的图像 3,3
    • Slide the opening pick along the left edge of the iPad, releasing the adhesive as you go. The adhesive is thin here due to the digitizer along the whole left side. Make sure the pick is not too deep (max 1/2 inch) 10 mm to prevent damaging the digitizer.

    • The digitizer cable is located approximately 2" (50 mm) from the bottom of the iPad. Stop sliding the pick when you get ~2.25" (60 mm) from the bottom of the iPad.

  25. 这个步骤还没有翻译 帮忙翻译一下

    : 步骤 25 中的图像 1,2 : 步骤 25 中的图像 2,2
    • Using the opening pick that is still underneath the bottom edge of the iPad, release the adhesive along the bottom left corner.

    • The bottom of the digitizer cable is only ~1" (25 mm) from the bottom of the iPad. Work carefully and slowly, making sure to not sever this cable.

  26. 这个步骤还没有翻译 帮忙翻译一下

    : 步骤 26 中的图像 1,2 : 步骤 26 中的图像 2,2
    • Using one of the opening picks, pry up the bottom right corner of the iPad and grab it with your fingers.

    • Some of the adhesive along the perimeter of the iPad may have stuck back down again. If this is the case, slide a pick underneath the edge of the iPad where the front glass is still stuck and "cut" the adhesive.

  27. 这个步骤还没有翻译 帮忙翻译一下

    : 步骤 27 中的图像 1,2 : 步骤 27 中的图像 2,2
    在这个步骤中使用的工具:
    Microfiber Cleaning Cloths
    $3.99
    购买
    • Holding the iPad by the top and bottom right corners, rotate the front glass away from the iPad.

    • Be careful of any adhesive that may still be attached, and use an opening pick to cut any adhesive that may still be holding the front panel down.

    • During reassembly use a microfiber cloth and compressed air to clean any dust or fingerprints off the LCD before reinstalling the glass.

  28. 这个步骤还没有翻译 帮忙翻译一下

    : 步骤 28 中的图像 1,1
    • Remove the four 2.0 mm Phillips screws securing the LCD to the rear case.

  29. 这个步骤还没有翻译 帮忙翻译一下

    : 步骤 29 中的图像 1,2 : 步骤 29 中的图像 2,2
    • Lift the LCD from its long edge closest to the volume buttons and rotate it out of the rear case.

    • Lay the LCD on the front panel as seen in the second picture.

  30. 这个步骤还没有翻译 帮忙翻译一下

    : 步骤 30 中的图像 1,1
    • Use the edge of a plastic opening tool to flip up the metal retaining clip securing the display data cable to its socket on the logic board.

  31. 这个步骤还没有翻译 帮忙翻译一下

    : 步骤 31 中的图像 1,1
    • Pull the display data cable out of its socket on the logic board.

    • Do not lift upward on the display data cable connector as you disconnect it.

  32. 这个步骤还没有翻译 帮忙翻译一下

    : 步骤 32 中的图像 1,1
    • Remove the LCD assembly from the iPad 2.

  33. , 后置摄像头: 步骤 33 中的图像 1,1
    • 小心地剥掉摄像头保护罩并将其从ipad2上移除。

  34. : 步骤 34 中的图像 1,3 : 步骤 34 中的图像 2,3 : 步骤 34 中的图像 3,3
    • 拆下以下两个螺丝:

    • 1个3.3mm的飞利浦螺丝。

    • 1个2.1mm的飞利浦螺丝。

    • 从后面板的凹槽向上提起金属扣件。

    • 确保小的海绵垫附着在金属固定夹上,如图第三幅图所示,在更换后置摄像头时。

  35. : 步骤 35 中的图像 1,2 : 步骤 35 中的图像 2,2
    • 用塑料撬棒挑开主板上摄像头的排线。

    • 取出后置摄像头。

  36. 这个步骤还没有翻译 帮忙翻译一下

    : 步骤 36 中的图像 1,3 : 步骤 36 中的图像 2,3 : 步骤 36 中的图像 3,3
    • Once the LCD panel and rear camera are removed, you can begin removing the Power, Mute, Volume cable (hereafter called the PMV cable for short).

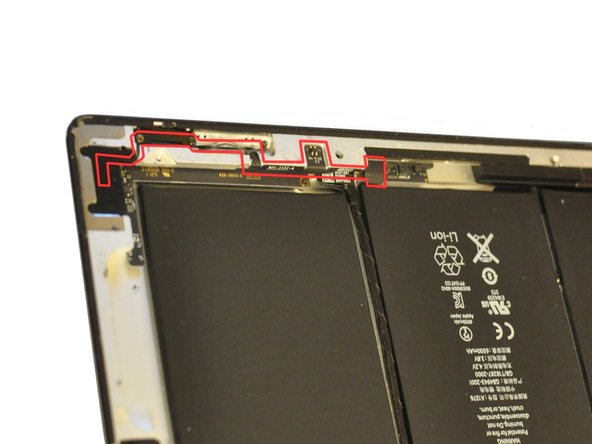
    • The PMV cable starts near the end of the control board cable that runs between two of the battery units, and runs in a complicated path along the side and corner of the iPad. (see photos 1 and 2)

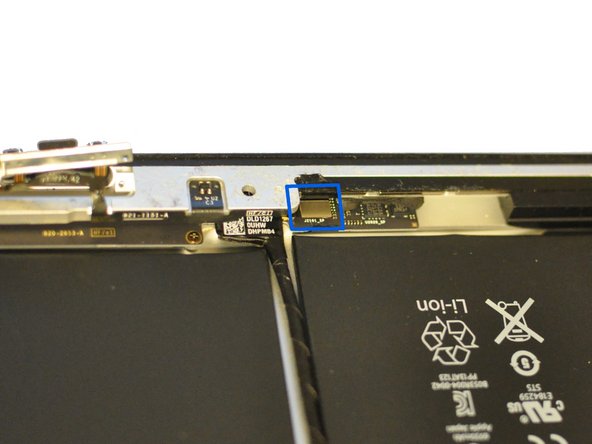
    • The end of the PMV cable is wrapped in tape. Begin by removing this tape to expose the silver rectangular connector on the end of the cable. (see photo 3)

    • Use a plastic opening tool or small screwdriver to lift free the rectangular connector.

  37. 这个步骤还没有翻译 帮忙翻译一下

    : 步骤 37 中的图像 1,1
    • Now you must disassemble the side switches.

    • Remove the 2.1 mm Phillips screw from the volume switch mechanism.

    • Remove the two 5.0 mm Phillips screws from the mute slider mechanism.

    • If you have not already removed the rear camera, do so now.

  38. 这个步骤还没有翻译 帮忙翻译一下

    : 步骤 38 中的图像 1,1
    • Remove the two 2.5 mm Phillips screws from the back of the power switch mechanism.

    • You can then push in on the power switch (on the exterior of the iPad) to push the mechanism's internal metal plate loose.

    • You can then peel the PMV cable free from the iPad's case, working backwards from the power switch towards the mute switch.

    • Lift free the small metal frame piece supporting the mute and volume switches.

    • Note: The photo shows the mute and volume switch frame being removed before the rear camera and power switch; this is possible but it's probably best to start with the power switch first.

  39. 这个步骤还没有翻译 帮忙翻译一下

    : 步骤 39 中的图像 1,1
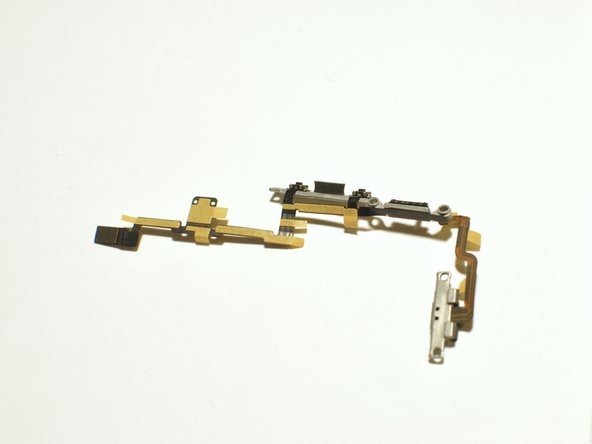
    • The PMV cable itself is a complicated piece with three integrated buttons and a switch slider.

    • You will need to carefully peel off the old cable free from the ipad frame and the two metal supports (one for the power switch, one for the mute and volume switches).

    • Note that each button is held in place with a tiny bit of adhesive. Use a plastic opening tool or small screwdriver to lift them free.

  40. 这个步骤还没有翻译 帮忙翻译一下

    : 步骤 40 中的图像 1,2 : 步骤 40 中的图像 2,2
    • Now assemble the replacement PMV cable to the two metal brackets.

    • Each button has on its underside two tiny black plastic pegs which fit into holes in the metal frames, to ensure the proper fit. Make sure to line these up properly when attaching the cable to the metal frames. The reassembled cable should look as shown in the figures.

    • Install the new cable working from the power switch back towards the mute and volume switches and then to the cable connector, snaking the PMV cable along its complicated path.

    • The replacement part should have adhesive patches to hold the cable in place.

    • Attaching the rectangular cable connector is tricky as there is little clearance from the edge of the iPad case. It may be helpful to use a plastic opening tool to push it gently until it snaps into place.

终点

114等其他人完成本指南。

6条评论

Successfully completed this guide. Thanks.

musstafaa - 回复

Hi, we have an iPad 2 in for repair and needs a new power button assembly. Thing is the ribbon is different from a standard iPad 2. There are subtle differences in the inside too. It is definitely a genuine iPad, and has same model numbers. Anyone come across this before?

iPhoneSurgery - 回复

Chris, I have the same problem with power ribbon cable it's not the one everyone is selling, did you manage to find a source who sold the correct part?

David -

Completed this guide thank you. Just want to point out that there are two cables for the iPad 2, making sure that you have the right one is very important. Be very careful around the camera area of the iPad too this is very tricky and there are no pictures of this part, wish I had done some now to upload for others, but I'm sure that I'll have another to do before to long and I will then. One main tip... Don't stick anything down till you've got everything secure as removing the the tape is very tricky once stuck and you don't want to be replacing this again...

Roberto Enrieu - 回复

Beware of fake versions of this cable 821-1151-A from many suppliers. The Hall Effect magnetic switch will then not work because the printed circuit traces on the cable are incorrect. The fake cable can be identified by an ohmmeter showing the two contacts for the Hall chip farthest from the cable edge to be shorted together.

geoffrey - 回复

添加评论

浏览统计数据:

过去 24 小时: 0

过去 7 天: 3

过去 30 天: 5

总计 84,223