跳转到主内容

iMac Intel 27" EMC 2429 Optical Drive Replacement

你所需要的

  1. iMac Intel 27" EMC 2429 Optical Drive Replacement, Glass Panel: 步骤 1 中的图像 1,3 iMac Intel 27" EMC 2429 Optical Drive Replacement, Glass Panel: 步骤 1 中的图像 2,3 iMac Intel 27" EMC 2429 Optical Drive Replacement, Glass Panel: 步骤 1 中的图像 3,3
    在这个步骤中使用的工具:
    Heavy-Duty Suction Cups (Pair)
    $14.95
    购买
    • Stick a heavy-duty suction cup near each of the two top corners of the glass panel.

    • To attach the suction cups, first position the suction cup with the movable handle parallel to the face of the glass panel (as indicated in the second picture).

    • While lightly holding the suction cup against the glass, raise the movable handle until it is parallel with the other handle (as indicated by the third picture).

    • If your suction cups refuse to stick, try cleaning both the glass panel and the suction cup with a damp soft, lint-free cloth. (Dampen with distilled water, and if needed, an equal ratio of distilled water and white vinegar for best results.)

    • Do not use the suction cups to carry the display glass because if one of them fails to stick, you could drop the screen and break it.

    • The original iMac box makes a good place to store the glass panel. Otherwise, a padded horizontal surface, like a towel on a desk, will do nicely.

  2. iMac Intel 27" EMC 2429 Optical Drive Replacement: 步骤 2 中的图像 1,3 iMac Intel 27" EMC 2429 Optical Drive Replacement: 步骤 2 中的图像 2,3 iMac Intel 27" EMC 2429 Optical Drive Replacement: 步骤 2 中的图像 3,3
    • Gently lift the glass panel perpendicular to the face of the LCD, enough to clear the steel mounting pins attached along the underside of the top edge of the glass panel.

    • Pull the glass panel away from the lower edge of the iMac and carefully set it aside.

    • Don't use the suction cups to carry the glass panel—if either one loses its grip, the panel could fall and break.

    • After setting the glass panel down safely, be sure to release the suction cups, as the suction force over time can crack the glass.

    • During reinstallation, be sure to meticulously clean the inside of the glass panel and the face of the LCD as any dust or fingerprints trapped inside will be annoyingly visible when the machine is turned on.

  3. iMac Intel 27" EMC 2429 Optical Drive Replacement, Display: 步骤 3 中的图像 1,1
    • Remove the eight T10 Torx screws securing the LCD to the outer case.

    • Be careful not to touch the display as the oil from your fingers may leave a residue that can be difficult to remove.

    • If necessary, peel the EMI gaskets located near the top center edge of the display assembly.

  4. iMac Intel 27" EMC 2429 Optical Drive Replacement, Display: 步骤 4 中的图像 1,3 iMac Intel 27" EMC 2429 Optical Drive Replacement, Display: 步骤 4 中的图像 2,3 iMac Intel 27" EMC 2429 Optical Drive Replacement, Display: 步骤 4 中的图像 3,3
    • Carefully lay the iMac stand-side down on a flat surface.

    • Due to tight tolerances, you will have to use a thin hooked tool to lift the display out of the outer case. As seen in the first picture, we made one out of a bent paperclip. A pair of angled tweezers can also work well.

    • Use a thin hooked tool to lift one side of the top edge of the display by its steel outer frame.

    • After lifting the top edge of the display on one side, hold it out of the outer case while you use a hooked tool to lift the other side.

    • Raise and hold the display high enough to access the cables.

    • Do not lift the top edge of the display out of the outer case too far, as several short ribbon cables still connect the two components.

  5. iMac Intel 27" EMC 2429 Optical Drive Replacement: 步骤 5 中的图像 1,1
    • Disconnect the vertical sync cable in the upper left corner of the screen. Use the tip of a spudger to push on the connector's side tabs and gently walk it out of its socket.

  6. iMac Intel 27" EMC 2429 Optical Drive Replacement: 步骤 6 中的图像 1,1
    • This step brings your hands close to the exposed rear of the power supply. To avoid a high-voltage shock from the many large capacitors attached to the board, do NOT touch the rear of the power supply.

    • Disconnect the LED backlight driver cable with your hand by pressing the tab down and sliding it towards the bottom of the display.

  7. iMac Intel 27" EMC 2429 Optical Drive Replacement: 步骤 7 中的图像 1,2 iMac Intel 27" EMC 2429 Optical Drive Replacement: 步骤 7 中的图像 2,2
    • Pull the black tab straight up to disconnect the latch on the display data cable ZIF connector.

    • Do not pull up too hard or you will damage the connector and socket.

    • Continue to pull the black tab up toward the top of the device, to detach the display data cable.

  8. iMac Intel 27" EMC 2429 Optical Drive Replacement: 步骤 8 中的图像 1,1
    • Use the tip of a spudger to disconnect the display power cable next to the display data cable.

  9. iMac Intel 27" EMC 2429 Optical Drive Replacement: 步骤 9 中的图像 1,1
    • Carefully pull the display toward the top edge of your iMac and lift it out of the iMac case.

  10. iMac Intel 27" EMC 2429 Optical Drive Replacement: 步骤 10 中的图像 1,1
    • Lay the display face down on a flat, soft surface.

    • If you are replacing the display panel, you will need to transfer additional components from the old panel to the new one. Compare the back of the old display with the replacement display. Note all cables, sensors, and foam cushioning that are missing from the new display.

    • If there is a wire or cable underneath adhesive tape, always pull the tape off first. Do not pull on the cable directly.

    • If the cable is glued to the chassis, use a heated iOpener or a hair dryer to soften the adhesive first. You can then slide an opening pick underneath the cable to loosen it. Never pull on the delicate connectors.

    • Slide an opening pick underneath the foam cushion pieces to separate them from the display, and gently pull them off. You may need some double sided tape to re-attach them to the new display.

  11. iMac Intel 27" EMC 2429 Optical Drive Replacement, Optical Drive: 步骤 11 中的图像 1,1
    • Use the flat end of a spudger to pull the optical drive data cable out of the optical drive.

  12. iMac Intel 27" EMC 2429 Optical Drive Replacement: 步骤 12 中的图像 1,1
    • Use the tip of a spudger to pull the optical drive thermal sensor connector out of its socket.

  13. iMac Intel 27" EMC 2429 Optical Drive Replacement: 步骤 13 中的图像 1,1
    • Remove the four T10 Torx screws securing the optical drive to the iMac case.

    • The bottom left screw has a slightly bigger head than the others.

  14. iMac Intel 27" EMC 2429 Optical Drive Replacement: 步骤 14 中的图像 1,2 iMac Intel 27" EMC 2429 Optical Drive Replacement: 步骤 14 中的图像 2,2
    • Slightly lift the left edge of the optical drive and then pull it to the side to release the centering pins.

    • Be careful not to rip the thermal sensor cable as you remove the optical drive.

  15. iMac Intel 27" EMC 2429 Optical Drive Replacement, Optical Drive: 步骤 15 中的图像 1,2 iMac Intel 27" EMC 2429 Optical Drive Replacement, Optical Drive: 步骤 15 中的图像 2,2
    • Peel back the portion of aluminum tape highlighted in red, leaving the rest attached to the black plastic optical drive bracket.

    • It is not necessary to peel all of the EMI tape off the optical drive bracket.

  16. iMac Intel 27" EMC 2429 Optical Drive Replacement: 步骤 16 中的图像 1,2 iMac Intel 27" EMC 2429 Optical Drive Replacement: 步骤 16 中的图像 2,2
    • Remove the two T10 Torx screws from each side of the optical drive (four screws total).

  17. iMac Intel 27" EMC 2429 Optical Drive Replacement: 步骤 17 中的图像 1,3 iMac Intel 27" EMC 2429 Optical Drive Replacement: 步骤 17 中的图像 2,3 iMac Intel 27" EMC 2429 Optical Drive Replacement: 步骤 17 中的图像 3,3
    • Use the tip of a spudger to press each of the optical drive bracket tabs out of their slots on the bottom of the optical drive.

    • Rotate the optical drive bracket slightly away from the optical drive.

    • Pull the optical drive bracket away from the open end of the optical drive, minding any tabs that may get caught.

  18. iMac Intel 27" EMC 2429 Optical Drive Replacement: 步骤 18 中的图像 1,2 iMac Intel 27" EMC 2429 Optical Drive Replacement: 步骤 18 中的图像 2,2
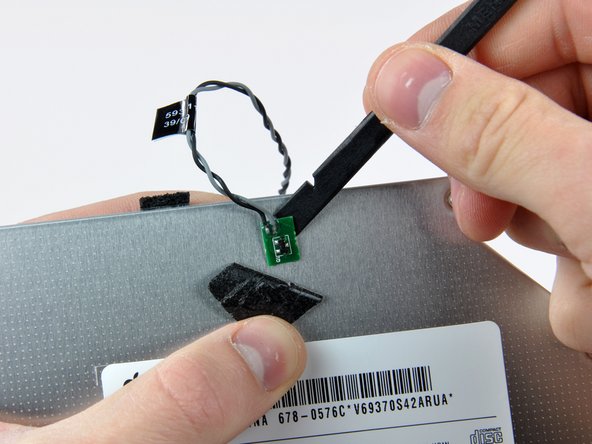
    • Use the tip of a spudger to peel back the piece of foam tape covering the optical drive thermal sensor.

    • Use the flat end of a spudger to carefully pry the thermal sensor up off the adhesive securing it to the optical drive.

    • If you have a disc or anything else stuck inside your optical drive, we have a guide to fix it.

结论

To reassemble your device, follow these instructions in reverse order.

35等其他人完成本指南。

Phillip Takahashi

于08/22/11注册

86,632 声望

创作了87篇指南

9条评论

I replaced origin with an LG CA30P internal Slot-in Blueray Combo, works fine.

Uwe Petermann - 回复

I have a 2011 27” iMac that I want to install a SSD to it and found a caddy that replaces the DVD drive with a second HDD or SSD. Has anyone here done this?

Corrado VRz - 回复

Doing it today, let you know how it goes.

did you get yours done?

Stu Blair -

Great guide. Thanks.

Arturo Ibarra - 回复

hi and thank you for a wonderful breakdown of the imac. i followed all your steps and it went off without a hitch. i have one question, all seemed fine but when i went to take out optical drive as i lifted it a bunch of black powder came out from under it. kind of like pencil lead. do you have any idea what it could be or maybe its just dirt although it clearly looks like black pencil lead thank you

art - 回复

添加评论

浏览统计数据:

过去 24 小时: 2

过去 7 天: 12

过去 30 天: 95

总计 46,137