跳转到主内容

当前版本的文档还未经巡查,您可以查看最新的已查核版本

你所需要的

  1. , 玻璃面板: 步骤 1 中的图像 1,3 , 玻璃面板: 步骤 1 中的图像 2,3 , 玻璃面板: 步骤 1 中的图像 3,3
    在这个步骤中使用的工具:
    Heavy-Duty Suction Cups (Pair)
    $14.95
    购买
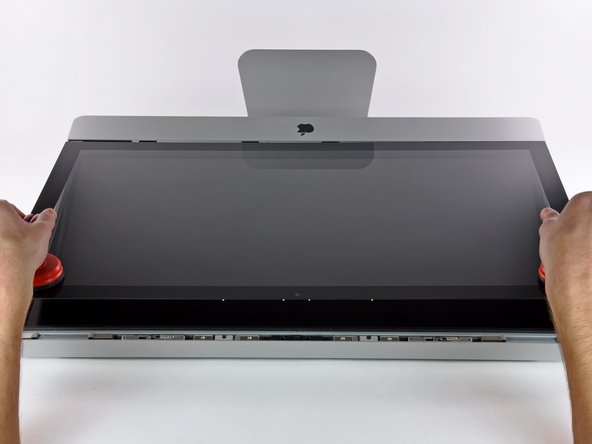
    • 将两个大吸力吸盘分别吸附在玻璃面板的左右上角。

    • 在将吸盘吸附在玻璃面板上时,请将吸盘放置在玻璃面板上然后按照图二方法将拉环横置。

    • 然后将拉环扶住,接着抬起拉环,使之与另外一个拉环平行。(如图三)

    • 如果您的吸盘无法吸住面板,请使用潮湿柔软的无绒布清洁玻璃面板和吸盘。(使用蒸馏水浸泡,如果有需要的话请使用等比例的蒸馏水和白醋配置成溶液来浸泡以取得最佳效果[1]。)

    • [1]: 译者注:不必非使用蒸馏水,也可以使用饮用纯净水。

    • 切勿使用吸盘来移动显示屏,如果其中一个没有吸附牢固的话可能会打碎屏幕。

    • 您购买iMac时的包装盒是临时放置玻璃面板的好地方。 不然就需要放在一个水平的表面之上,比如铺有毛巾的桌子上。

  2. : 步骤 2 中的图像 1,3 : 步骤 2 中的图像 2,3 : 步骤 2 中的图像 3,3
    • 小心的抬起玻璃面板,抬升起足够的高度,来让面板与卡扣相分离。

    • 小心的将iMac玻璃面板拉离iMac外壳,放在一边。

    • 切勿使用吸盘来移动显示屏,如果其中一个没有吸附牢固的话可能会打碎屏幕。

    • 将玻璃面板安放好后请释放掉吸盘,因为随着时间的推移吸盘可能会弄破玻璃。

    • 在重新安装时请确保玻璃面板内部以及LCD显示屏内部的清洁,以防止日后使用时被屏幕内部的指纹和灰尘所困扰。

  3. , 显示屏: 步骤 3 中的图像 1,1
    • 移除8个固定显示器外壳的T10 Torx螺丝。

  4. : 步骤 4 中的图像 1,3 : 步骤 4 中的图像 2,3 : 步骤 4 中的图像 3,3
    • 小心的将iMac放倒在水平的表面上。

    • 由于制造时严格的公差,你有可能需要使用钩子来将显示屏提起。 如图三,我们用回形针制作了一个小工具。

    • 用小工具从显示器顶端一侧将显示器从外框中抬出。

    • 在抬起一侧的显示器后。扶住它,在您要去提起另一侧显示器时。 将铅笔或笔平行放置在刚刚提起的一侧显示器下,来支撑刚才提起的那一面。

    • 不要将显示器本体从外框中提起过远,这样将有可能损坏电缆。

  5. : 步骤 5 中的图像 1,2 : 步骤 5 中的图像 2,2
    • 使用镊子将位于iMac左上角的LED驱动板上的垂直同步带状电缆从基座中拔出。

    • 在一些iMac上这有可能不是带状电缆而是4个十分脆弱 的4条独立电缆。 要小心,如果镊子滑落,这将从组件中拉出线缆。

  6. : 步骤 6 中的图像 1,1
    • 将显示屏从外框中提升足够的高度来在LED驱动板上切断LED背光电源排线。

  7. : 步骤 7 中的图像 1,1
    • 将显示数据连接器臂同时挤压来将其从逻辑板上分离。

    • 将显示数据线缆从逻辑板上的插座中拉离。

    • 当您将线缆与逻辑板上的插座分离时请小心分离。 逻辑板上的插座是及其的脆弱。 在您重新连接时请用尽可能小的力量来连接。

  8. : 步骤 8 中的图像 1,1
    • 将显示屏抬起到足够高的高度,来分离LCD热传感器与逻辑板插座所连接的线缆。

    • 如果您的风扇在组装完成后全速运行,请检查本连接线路或硬盘热传感器线路。 热传感器的插座十分脆弱,所以请您在重新组装时小心操作。

  9. : 步骤 9 中的图像 1,1
    • 小心地从您的iMac顶部提起屏幕外框然后移除屏幕。

  10. 这个步骤还没有翻译 帮忙翻译一下

    : 步骤 10 中的图像 1,1
    • Remove the four T10 Torx screws securing the LED driver board to the outer case.

  11. 这个步骤还没有翻译 帮忙翻译一下

    : 步骤 11 中的图像 1,2 : 步骤 11 中的图像 2,2
    • Lift the LED driver board out of its recess in the outer case, minding the DC-In cable still attaching it to the power supply.

    • Disconnect the DC-In cable by depressing the locking mechanism while pulling the connector away from its socket on the LED driver board.

终点

23等其他人完成本指南。

6条评论

COMPLETED!

I took a ton of time taking the screen off since this was the first time I've opened up my iMac - the connections are fragile, but once you know where they are and how they connect, it's quite simple. I found that my inverter board and power supply had been corroded by moisture - a couple years right next to an AC unit were suspect, I guess. My screen is at full brightness and I've had no issue so far! Thanks, ifixit!

Evan Lipkin - 回复

Thank you so much for posting these steps. I have a question regarding my iMac led board replacement. How to make sure of the exact type/model of LED driver board I need for my iMac? And what would be a good and reasonable place I may purchase it from?

My iMac is a late 2009 with 27" display.

Ayman Hamdan - 回复

Great guide, swapped the board without issue. Unfortunately didn't solve the problem, screen still goes black if brightness over 1/3 of full.

Ed - 回复

My iMac has a dark left side of the screen, I tried the fiddle with the left corner connector trick but that did nothing. I noticed the user had the display set to full brightness to get a useable image on the screen, this issue may have caused the Power Supply failure not sure, the cheaper easier fix would be to replace this board, but I don't want to replace the board if that is not the issue. For folks who had a bad board was the screen not working at all or did you get a half lighted screen like I mentioned above? Thank You

Kurt L Nelson - 回复

Wow- that was so easy a repair! Time will tell if the “new” board is up to the task but everything is working great right now. Thank you so much for this excellent tutorial! I would be buying a new Mac now if I hadn’t have been for your excellent advice!!!

Ilse Burden - 回复

添加评论

浏览统计数据:

过去 24 小时: 2

过去 7 天: 13

过去 30 天: 58

总计 57,538