跳转到主内容

iMac Intel 24" EMC 2111 Front Bezel Replacement

仅作为前提条件
本指南仅用作其他指南的先决条件。不能单独食用。

你所需要的

  1. iMac Intel 24" EMC 2111 Front Bezel Replacement, Front Bezel: 步骤 1 中的图像 1,1
    • Remove the following screws along the lower edge of your iMac:

    • Three 6 mm T8 Torx screws

    • One 8 mm T8 Torx screw

  2. iMac Intel 24" EMC 2111 Front Bezel Replacement: 步骤 2 中的图像 1,2 iMac Intel 24" EMC 2111 Front Bezel Replacement: 步骤 2 中的图像 2,2
    • Lay your iMac stand-side down on a flat surface.

    • To lift the front bezel off the iMac, simultaneously:

    • Use your thumbs to press in the RAM arms and hold the iMac down.

    • Use your index fingers to pull the small bridge of material on the front bezel toward yourself.

    • Pull the front bezel up with your index fingers.

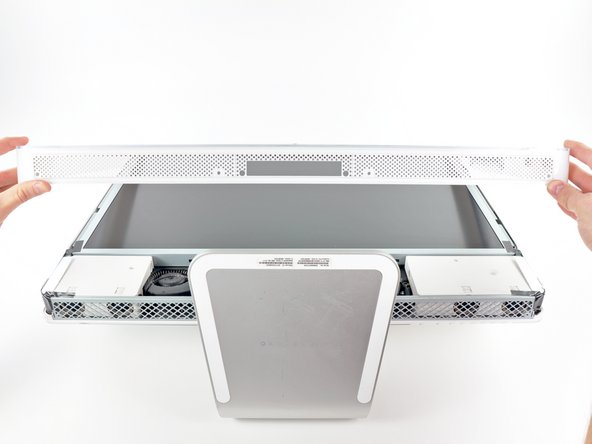
    • Once the small bridge of material has cleared the RAM arms, lift the front bezel by its lower edge just enough to clear the bottom edge of the rear case.

  3. iMac Intel 24" EMC 2111 Front Bezel Replacement: 步骤 3 中的图像 1,3 iMac Intel 24" EMC 2111 Front Bezel Replacement: 步骤 3 中的图像 2,3 iMac Intel 24" EMC 2111 Front Bezel Replacement: 步骤 3 中的图像 3,3
    • Lift the front bezel off the rear case and rotate it away from the bottom edge of the iMac, minding the camera and microphone cables still attached to its upper edge.

    • The third picture shows the top front bezel brackets and their slots cut into the top edge of the iMac's rear case.

    • Do not completely remove the front bezel, as it is still attached by the camera/microphone cables.

  4. iMac Intel 24" EMC 2111 Front Bezel Replacement: 步骤 4 中的图像 1,1
    • If necessary, remove the strip of tape covering the microphone cable connector.

    • The microphone connector is located near the inside of top edge of your iMac.

  5. iMac Intel 24" EMC 2111 Front Bezel Replacement: 步骤 5 中的图像 1,3 iMac Intel 24" EMC 2111 Front Bezel Replacement: 步骤 5 中的图像 2,3 iMac Intel 24" EMC 2111 Front Bezel Replacement: 步骤 5 中的图像 3,3
    • Disconnect the microphone cable.

    • Disconnect the camera cable by pulling its connector away from the socket on the camera board.

    • The camera cable connector and socket are delicate and easily bent. Remove with caution.

结论

To reassemble your device, follow these instructions in reverse order.

0条评论

添加评论

浏览统计数据:

过去 24 小时: 0

过去 7 天: 0

过去 30 天: 0

总计 266