跳转到主内容

当前版本的文档还未经巡查,您可以查看最新的已查核版本

你所需要的

  1. , 显示屏组件: 步骤 1 中的图像 1,1
    在这个步骤中使用的工具:
    iMac Intel 21.5" Cardboard Service Wedge
    $4.99
    购买
    • 如果铰链可以自由活动,iMac将会失去平衡,维修很难进行。有了 iMac 维修支撑盒,维修操作将会更加丝滑,但是没有这玩意儿也行。

    • 如果你使用的是 iFixit 硬纸板维修楔,请按照 这些组装说明 将其组装在一起。

    • 在开始你的iMac的任何维修操作之前:拔掉电源线,按住电源按钮至少十秒钟,以释放电源的电容器。

    • 特别注意!不要触摸电源线上的电容器引线或任何外露焊点,只能触摸电路板边缘。

  2. : 步骤 2 中的图像 1,2 : 步骤 2 中的图像 2,2
    • 从显示屏的左边开始,就是靠近电源按钮的一侧。将 iMac 开屏工具插入玻璃面板和后部外壳之间的缝隙中。

    • 在 iMac开屏工具中心的支点会防止你将轮子插太深。如果使用别的没有防呆设计的工具,插入请不要超过0.95厘米。否则,您可能会切断天线电缆并造成严重损坏。

  3. : 步骤 3 中的图像 1,3 : 步骤 3 中的图像 2,3 : 步骤 3 中的图像 3,3
    • 像用披萨刀一样用这个工具——沿着缝隙一直滚动就行,里面的泡沫双面胶就会被割开了。

    • 这个工具一定要用往前推的,不要往回拉,否则轮子会掉。

    • 按照如上所述方法,沿着显示器的左侧使用这个工具。

  4. : 步骤 4 中的图像 1,3 : 步骤 4 中的图像 2,3 : 步骤 4 中的图像 3,3
    • 沿着屏幕顶端左上角前进,继续使用工具。

  5. : 步骤 5 中的图像 1,2 : 步骤 5 中的图像 2,2
    • 沿着显示器的左上角切胶。

  6. : 步骤 6 中的图像 1,2 : 步骤 6 中的图像 2,2
    • 沿着显示器的顶部继续。

    • 你可能需要重复上述操作数次,以确保尽可能地将胶分开。

  7. : 步骤 7 中的图像 1,3 : 步骤 7 中的图像 2,3 : 步骤 7 中的图像 3,3
    • 将工具从显示屏右上角推进去。

  8. : 步骤 8 中的图像 1,2 : 步骤 8 中的图像 2,2
    • 沿著显示屏右侧使用工具向下滚动。

  9. : 步骤 9 中的图像 1,2 : 步骤 9 中的图像 2,2
    • 将开屏工具沿着屏幕右侧推到底。

    • 此时,你需要在整个显示器周围重复数次切胶操作,以确保可以去除更多的胶。

  10. : 步骤 10 中的图像 1,3 : 步骤 10 中的图像 2,3 : 步骤 10 中的图像 3,3
    • 虽然开屏工具切除了大部分的胶,但显示屏的些许的胶还是会黏在外壳。塑料卡是最后分离粘合剂的必要工具。

    • 让 iMac 躺在桌面上,屏幕朝天。

    • 从 iMac 的右上角开始,往屏幕和后壳之间插一张塑料卡。

    • 请注意不要将塑料卡插入超过0.95厘米,否则可能会损坏内部组件。

  11. : 步骤 11 中的图像 1,2 : 步骤 11 中的图像 2,2
    • 轻柔地扭动塑料卡,这样可以把屏幕和后壳之间撬个缝。

    • 别撬大劲儿了。这个缝不大于0.6厘米就行。

  12. : 步骤 12 中的图像 1,3 : 步骤 12 中的图像 2,3 : 步骤 12 中的图像 3,3
    • 将卡片往前滑至机身顶端中间,以去除显示器右上角剩余的黏胶。

    • 请确定避开 iSight 摄像头,否则摄像头可能会损坏。

  13. : 步骤 13 中的图像 1,2 : 步骤 13 中的图像 2,2
    • 將塑料卡再次插入右上角做稍微的固定,防止黏胶再次黏上显示屏。

  14. : 步骤 14 中的图像 1,3 : 步骤 14 中的图像 2,3 : 步骤 14 中的图像 3,3
    • 在显示屏和框架之间的空隙插入第二张塑料卡,位置大概在 iMac 左上角顶端。

  15. : 步骤 15 中的图像 1,2 : 步骤 15 中的图像 2,2
    • 轻轻地向上扭动卡片,稍微增加显示器和框架之间的空隙。

    • 与另一边一样,慢慢地扭动卡片使黏胶分离,请注意不要给显示屏玻璃施加太大的压力。

  16. : 步骤 16 中的图像 1,3 : 步骤 16 中的图像 2,3 : 步骤 16 中的图像 3,3
    • 将塑料卡向中间滑动,在 iSight 摄像头之前停止。

  17. : 步骤 17 中的图像 1,2 : 步骤 17 中的图像 2,2
    • 将塑料卡插入左上角。

  18. : 步骤 18 中的图像 1,3 : 步骤 18 中的图像 2,3 : 步骤 18 中的图像 3,3
    • 如图所示,将两张塑料卡片插入角落附近,轻轻地往侧边扭动来增加显示屏跟主机壳的间隙。

    • 如果有部分的黏胶而无法完全分离的时候,停止扭转,使用其中一张卡片来切开剩余的黏胶。

    • 开始将显示屏上部从框架拉起。

    • 只需抬起显示屏几英寸——因为显示屏的数据线和电源线仍然和主板相连。

  19. , 显示屏排线: 步骤 19 中的图像 1,2 , 显示屏排线: 步骤 19 中的图像 2,2
    • 将显示屏向上抬起,以便于接触到连接器,但不要抬的过高,以免拉伸排线并对其连接造成压力(约 8 英寸)。

    • 用一只手扶住显示屏,同时用另一只手拔下显示屏电源线。

  20. : 步骤 20 中的图像 1,3 : 步骤 20 中的图像 2,3 : 步骤 20 中的图像 3,3
    • 继续用一只手支撑显示屏,然后将显示屏数据线上的金属固定扣翻起。

    • 小心地将显示屏数据线从主板上的插槽中拔出。

    • 务必将显示屏数据线连接器直接从其插槽中直线拉出,保持与主板平行,以避免损坏。

  21. , 显示屏组件: 步骤 21 中的图像 1,2 , 显示屏组件: 步骤 21 中的图像 2,2
    • 将显示屏抬起至接近垂直位置。

    • 此时,底部仍然有一条粘性胶带,会像铰链一样将显示屏固定在框架上。你可以通过多次上下移动显示屏来松开这个粘性胶带。

  22. : 步骤 22 中的图像 1,3 : 步骤 22 中的图像 2,3 : 步骤 22 中的图像 3,3
    • 请务必小心,不要触碰电容器引线或电源背面任何裸露的焊点(红色方框)。

    • 抓住显示屏底部边缘粘胶条末端的小标签,将粘胶条拉向 iMac 顶部,将其取下。

    • 重复此步骤,将另一个胶条也取下。

    • 如果任何一个胶条在取下之前断裂,用塑料卡片划开剩余的胶条。

  23. : 步骤 23 中的图像 1,3 : 步骤 23 中的图像 2,3 : 步骤 23 中的图像 3,3
    • 将显示屏从边框上抬起,并从iMac上取下。

    • 可能需要从一侧缓慢抬起,以撕下剩余的粘性胶带。

    • 在操作的时候要非常小心,因为显示屏又大又重,而且它是由玻璃制成的。

    • 一旦粘性胶条被切断,那么它将不能再用于将显示器重新密封,请参考这个指南,替换用于固定显示器屏的粘性胶条。

  24. 这个步骤还没有翻译 帮忙翻译一下

    : 步骤 24 中的图像 1,1
    • Remove the two 4.0 mm T5 Torx screws securing the four antenna connectors to the AirPort/Bluetooth card.

    • There's a small washer on each screw; be careful not to misplace them.

  25. 这个步骤还没有翻译 帮忙翻译一下

    : 步骤 25 中的图像 1,3 : 步骤 25 中的图像 2,3 : 步骤 25 中的图像 3,3
    • Use a spudger to disconnect all four antenna connectors by prying them up from their sockets on the AirPort/Bluetooth Card.

  26. 这个步骤还没有翻译 帮忙翻译一下

    : 步骤 26 中的图像 1,1
    • Remove the two 3.3 mm T5 Torx screws securing the AirPort/Bluetooth card to the logic board.

  27. 这个步骤还没有翻译 帮忙翻译一下

    : 步骤 27 中的图像 1,3 : 步骤 27 中的图像 2,3 : 步骤 27 中的图像 3,3
    • Gently push the antenna cables aside to clear access to the AirPort/Bluetooth card.

  28. 这个步骤还没有翻译 帮忙翻译一下

    : 步骤 28 中的图像 1,3 : 步骤 28 中的图像 2,3 : 步骤 28 中的图像 3,3
    • Do not push the AirPort/Bluetooth card away from the logic board more than 1-2 mm. Doing so may cause severe damage.

    • With a firm grip on the edges of the AirPort/Bluetooth card, pull it straight out of its socket on the underside of the logic board.

    • Try not to touch the antenna connector sockets with your fingers, as the oils can corrode the metal and prevent good contact.

  29. 这个步骤还没有翻译 帮忙翻译一下

    : 步骤 29 中的图像 1,3 : 步骤 29 中的图像 2,3 : 步骤 29 中的图像 3,3
    • During reassembly, if installing the AirPort card proves challenging, you can use curved tweezers to help orient the card and insert it into its slot on the back of the logic board.

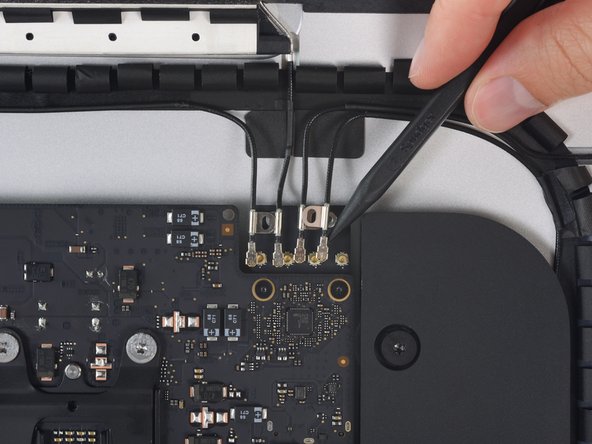
    • With the tweezers pointed downwards, insert the points of the tweezers through the screw holes in the AirPort card, next to its antenna connector sockets.

    • Using your finger, press down on the edge of the AirPort card to angle it until it is roughly parallel to the logic board.

    • Align the AirPort card with its slot on the logic board, and press the card into the slot until the screw holes nearest the connector align with those in the logic board.

    • For reference, the third photo shows the logic board removed and flipped over for a clear view of how the AirPort card is installed.

终点

Adam O'Camb

于04/11/15注册

196,587 声望

创作了416篇指南

0条评论

添加评论

浏览统计数据:

过去 24 小时: 1

过去 7 天: 7

过去 30 天: 15

总计 1,010