跳转到主内容

iMac Intel 21.5" EMC 2638 胶带更换

你所需要的

  1. iMac Intel 21.5" EMC 2638 胶带更换, 放置iMac支架: 步骤 1 中的图像 1,1
    在这个步骤中使用的工具:
    iMac Intel 21.5" Cardboard Service Wedge
    $4.99
    购买
    • 一旦铰链可以自由移动,iMac 将失去平衡,难以操作。在支架上放置一个 iMac 支架 以稳定 iMac。

    • 如果使用 iFixit iMac支架,请按照 本组装教程 进行组装。

    • 如果没有 iMac 支架,请小心操作,因为如果 iMac 意外移动,显示屏很容易脱落和损坏。

  2. iMac Intel 21.5" EMC 2638 胶带更换, 移除旧的胶条: 步骤 2 中的图像 1,2 iMac Intel 21.5" EMC 2638 胶带更换, 移除旧的胶条: 步骤 2 中的图像 2,2
    • 安装新胶条之前,请清除后机箱周边的所有旧胶条。

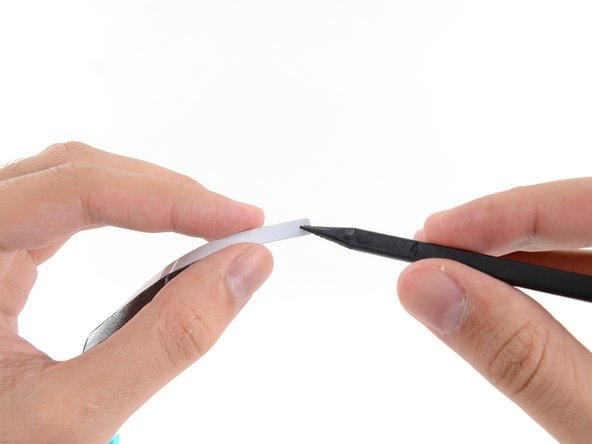
    • 如果要重复使用现有的显示屏,还必须清除显示屏背面的旧粘胶。

    • 用镊子或手指剥离旧的胶条。从底部开始,向设备顶部向上剥离。

    • 清除所有旧胶条后,用高浓度异丙醇(90% 或更高)和无绒布仔细擦去胶条残留物。顺着一个方向擦拭,不要来回擦拭。

    • 请不要跳过这一步,否则新胶条可能无法正常粘合,显示屏可能会从 iMac 中脱落。

  3. iMac Intel 21.5" EMC 2638 胶带更换: 步骤 3 中的图像 1,2 iMac Intel 21.5" EMC 2638 胶带更换: 步骤 3 中的图像 2,2
    • 胶条上应预留麦克风缺口,标有 4R。

    • 如果你的 4R 胶条不包含凹槽,请查看本指南

  4. iMac Intel 21.5" EMC 2638 胶带更换: 步骤 4 中的图像 1,2 iMac Intel 21.5" EMC 2638 胶带更换: 步骤 4 中的图像 2,2
    • 事先铺好胶条,这样就不会不小心把胶条装错位置:

    • 胶条1在左上方摆放

    • 胶条2在右上方摆放

    • 胶条3在右侧垂直摆放

    • 胶条 4R 在右下方摆放,暗面朝上

    • 胶条 4L 在左下方摆放,暗面朝上

    • 胶条5在左侧垂直摆放

  5. iMac Intel 21.5" EMC 2638 胶带更换, 撕掉第一条胶带上的背胶: 步骤 5 中的图像 1,3 iMac Intel 21.5" EMC 2638 胶带更换, 撕掉第一条胶带上的背胶: 步骤 5 中的图像 2,3 iMac Intel 21.5" EMC 2638 胶带更换, 撕掉第一条胶带上的背胶: 步骤 5 中的图像 3,3
    • 从第 03 条开始,它位于后机箱的右侧垂直面上。

    • 在撕下任何背胶之前,将胶带沿着 iMac 的框架对比,以了解它的位置。

    • 抓住蓝色标签,从条带背面剥下一小块背胶,露出一段粘合剂,将其固定在外壳上。

  6. iMac Intel 21.5" EMC 2638 胶带更换, 粘贴第一条胶条: 步骤 6 中的图像 1,2 iMac Intel 21.5" EMC 2638 胶带更换, 粘贴第一条胶条: 步骤 6 中的图像 2,2
    • 将撬棒的尖端插入刚刚移除一层背胶的胶条末端的孔中。 从仍有一层白色背胶的一侧插入撬棒。

  7. iMac Intel 21.5" EMC 2638 胶带更换: 步骤 7 中的图像 1,3 iMac Intel 21.5" EMC 2638 胶带更换: 步骤 7 中的图像 2,3 iMac Intel 21.5" EMC 2638 胶带更换: 步骤 7 中的图像 3,3
    • 在撬棒仍然从胶带上的孔中戳出的情况下,将撬棒尖端推入 iMac 框架上相应的孔中。

    • 使用孔和撬棒固定胶条的位置,将胶条与右边缘对齐,轻轻向上拉动撬棒以确保胶条拉紧,然后将其粘贴到框架上。

  8. iMac Intel 21.5" EMC 2638 胶带更换: 步骤 8 中的图像 1,2 iMac Intel 21.5" EMC 2638 胶带更换: 步骤 8 中的图像 2,2
    • 对齐胶条的下半部分后,将较长的背衬从胶条后面剥离。

    • 如果下半部分未正确对齐,你可以小心地将其剥离并重新粘贴,然后再剥离下背衬条。 请务必使用撬棒尖端固定顶部。

  9. iMac Intel 21.5" EMC 2638 胶带更换: 步骤 9 中的图像 1,2 iMac Intel 21.5" EMC 2638 胶带更换: 步骤 9 中的图像 2,2
    • 将胶条的上半部分与后外壳的右边缘对齐,然后将其粘贴下来。

  10. iMac Intel 21.5" EMC 2638 胶带更换: 步骤 10 中的图像 1,2 iMac Intel 21.5" EMC 2638 胶带更换: 步骤 10 中的图像 2,2
    • 用手指抚平胶条。确保它与框架的右侧整齐对齐,并且平整。

    • 先不要剥离前面的背胶。

  11. iMac Intel 21.5" EMC 2638 胶带更换, 贴上剩余的胶条: 步骤 11 中的图像 1,1
    • 按逆时针方向,在 iMac 的四周,以同样的方式再添加三条胶条:

    • 右上方的胶条2

    • 左上方的胶条1

    • 左侧垂直的胶条5

  12. iMac Intel 21.5" EMC 2638 胶带更换, 黏上底部胶条: 步骤 12 中的图像 1,3 iMac Intel 21.5" EMC 2638 胶带更换, 黏上底部胶条: 步骤 12 中的图像 2,3 iMac Intel 21.5" EMC 2638 胶带更换, 黏上底部胶条: 步骤 12 中的图像 3,3
    • 接下来的几个步骤将展示如何安装右下角的胶带(胶带 4R),其中包括一个必须与麦克风对齐的凹口。

    • 在尝试操作之前,请通读此步骤和接下来的四个步骤。

    • 抓住条带 4R 上的红色拉片,拉动使约 2 英寸(5 厘米)的白色背胶与胶条分离。

  13. iMac Intel 21.5" EMC 2638 胶带更换: 步骤 13 中的图像 1,3 iMac Intel 21.5" EMC 2638 胶带更换: 步骤 13 中的图像 2,3 iMac Intel 21.5" EMC 2638 胶带更换: 步骤 13 中的图像 3,3
    • 将剥下的白背胶底折成直角,用手指捏住折痕。

    • 这样就会露出 2 英寸的粘合剂,同时将红色标签折叠出来。

  14. iMac Intel 21.5" EMC 2638 胶带更换: 步骤 14 中的图像 1,3 iMac Intel 21.5" EMC 2638 胶带更换: 步骤 14 中的图像 2,3 iMac Intel 21.5" EMC 2638 胶带更换: 步骤 14 中的图像 3,3
    • 麦克风孔是 中心孔,两侧有两个较大的孔。

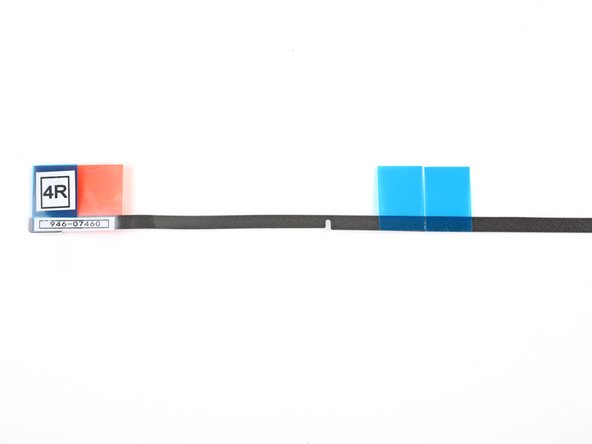
    • 将麦克风槽口对准麦克风孔,将胶条对准底部边缘。

    • 如果你的 iMac 没有麦克风孔,请对齐胶条的右端,使 L 形弯头位于右侧垂直粘合剂旁边. L 形弯曲不应与右侧垂直胶条重叠。

    • 胶条很容易撕裂。注意不要用力过猛拉扯胶条。

    • 对齐胶条后,小心地将左侧露出的边缘固定在 iMac 上,以确保对齐。

  15. iMac Intel 21.5" EMC 2638 胶带更换: 步骤 15 中的图像 1,3 iMac Intel 21.5" EMC 2638 胶带更换: 步骤 15 中的图像 2,3 iMac Intel 21.5" EMC 2638 胶带更换: 步骤 15 中的图像 3,3
    • 剥去胶条后面的白色背胶,露出剩余的粘合剂。

  16. iMac Intel 21.5" EMC 2638 胶带更换: 步骤 16 中的图像 1,3 iMac Intel 21.5" EMC 2638 胶带更换: 步骤 16 中的图像 2,3 iMac Intel 21.5" EMC 2638 胶带更换: 步骤 16 中的图像 3,3
    • 用手指沿着胶条的长度从左到右划,确保胶条平直无皱,边划边向下按,将胶条粘在 iMac 上。

  17. iMac Intel 21.5" EMC 2638 胶带更换: 步骤 17 中的图像 1,3 iMac Intel 21.5" EMC 2638 胶带更换: 步骤 17 中的图像 2,3 iMac Intel 21.5" EMC 2638 胶带更换: 步骤 17 中的图像 3,3
  18. iMac Intel 21.5" EMC 2638 胶带更换, 安装屏幕: 步骤 18 中的图像 1,2 iMac Intel 21.5" EMC 2638 胶带更换, 安装屏幕: 步骤 18 中的图像 2,2
    • 将显示屏轻轻放在 iMac 上,并仔细对齐。

  19. iMac Intel 21.5" EMC 2638 胶带更换: 步骤 19 中的图像 1,2 iMac Intel 21.5" EMC 2638 胶带更换: 步骤 19 中的图像 2,2
    • 使用宽胶带将显示屏底部边缘暂时固定在 iMac 机箱上。

    • 胶带可保持显示屏的对齐,并允许你安全地打开显示屏的顶部边缘,以触及到显示屏排线。

    • 不要将胶带缠绕在 iMac 背面,否则在连排线时可能会弄碎屏幕。

  20. iMac Intel 21.5" EMC 2638 胶带更换, 测试屏幕: 步骤 20 中的图像 1,2 iMac Intel 21.5" EMC 2638 胶带更换, 测试屏幕: 步骤 20 中的图像 2,2
    • 此时,最好测试一下你的修复工作,以确保你的 iMac 能正常工作,然后再将其重新封好。请按照以下三个步骤暂时重新连接显示屏排线,并在从胶条上撕下保护膜之前启动 iMac。

    • 如果你已确认 iMac 工作正常,并准备将其密封,请跳过下一步。

    • 将显示屏电源线插入主板上的插座。

  21. iMac Intel 21.5" EMC 2638 胶带更换: 步骤 21 中的图像 1,3 iMac Intel 21.5" EMC 2638 胶带更换: 步骤 21 中的图像 2,3 iMac Intel 21.5" EMC 2638 胶带更换: 步骤 21 中的图像 3,3
    • 用镊子或另一只手将显示数据排线插口轻轻插入主板上的插座。

    • 确保将其直接按入插座,并完全插入。

    • 将显示屏数据线上的金属保护罩向下朝向主板固定。

  22. iMac Intel 21.5" EMC 2638 胶带更换: 步骤 22 中的图像 1,2 iMac Intel 21.5" EMC 2638 胶带更换: 步骤 22 中的图像 2,2
    • 将显示屏装回 iMac 的后机箱。

    • 此时,请插入 iMac 电源,并测试你的修复工作,然后再继续实际密封电脑。请务必检查已移除或断开连接的硬件是否完全正常。

    • 完成后,请关闭 iMac 并拔下电源线,然后再继续。

  23. iMac Intel 21.5" EMC 2638 胶带更换, 密封iMac: 步骤 23 中的图像 1,3 iMac Intel 21.5" EMC 2638 胶带更换, 密封iMac: 步骤 23 中的图像 2,3 iMac Intel 21.5" EMC 2638 胶带更换, 密封iMac: 步骤 23 中的图像 3,3
    • 继续之前,请确认 iMac 已关闭并拔下电源插头。

    • 确认 iMac 功能正常后,断开显示屏排线,小心地将显示屏向前倾斜。

    • 用镊子从上方伸入,然后从显示屏的底部边缘向上拉蓝色拉片,从两个底部条带上取下薄膜。

  24. iMac Intel 21.5" EMC 2638 胶带更换, 重新连接显示屏排线: 步骤 24 中的图像 1,3 iMac Intel 21.5" EMC 2638 胶带更换, 重新连接显示屏排线: 步骤 24 中的图像 2,3 iMac Intel 21.5" EMC 2638 胶带更换, 重新连接显示屏排线: 步骤 24 中的图像 3,3
    • 最后一次重新连接显示器电源线和数据线。

    • 切记固定显示屏数据线上的金属保护壳。

  25. iMac Intel 21.5" EMC 2638 胶带更换, 清除剩余的背胶: 步骤 25 中的图像 1,3 iMac Intel 21.5" EMC 2638 胶带更换, 清除剩余的背胶: 步骤 25 中的图像 2,3 iMac Intel 21.5" EMC 2638 胶带更换, 清除剩余的背胶: 步骤 25 中的图像 3,3
    • 检查摄像头正前方的玻璃是否有灰尘和其他污染物。如有必要,在密封显示屏前用超细纤维布擦拭。

    • 在以下步骤中取下保护膜时,用一只手稳住显示屏,或将显示屏轻轻靠在 iMac 的外壳上。

  26. iMac Intel 21.5" EMC 2638 胶带更换: 步骤 26 中的图像 1,3 iMac Intel 21.5" EMC 2638 胶带更换: 步骤 26 中的图像 2,3 iMac Intel 21.5" EMC 2638 胶带更换: 步骤 26 中的图像 3,3
    • 垂直向上拉动胶带 01 的拉片,将其撕下。

  27. iMac Intel 21.5" EMC 2638 胶带更换: 步骤 27 中的图像 1,2 iMac Intel 21.5" EMC 2638 胶带更换: 步骤 27 中的图像 2,2
    • 从胶带 1 上撕下背胶的另一面。

  28. iMac Intel 21.5" EMC 2638 胶带更换: 步骤 28 中的图像 1,1
    • 重复前面的步骤,撕掉所有剩余胶条上的背胶。

  29. iMac Intel 21.5" EMC 2638 胶带更换: 步骤 29 中的图像 1,3 iMac Intel 21.5" EMC 2638 胶带更换: 步骤 29 中的图像 2,3 iMac Intel 21.5" EMC 2638 胶带更换: 步骤 29 中的图像 3,3
    • 为确保粘合牢固,请小心地将 iMac 背面平放(屏幕朝上),然后小心而用力地按压显示屏的所有四个边缘。

    • 撕下将显示屏固定到后壳的胶带。

    • 24 小时后检查显示屏,确保它在 iMac 上没有松动。

终点

104等其他人完成本指南。

由衷感谢以下译者:

en zh

100%

Yanqi Wang正在帮助我们修复这个世界! 您也想加入吗?
开始翻译 ›

Sam Goldheart

于10/18/12注册

465,656 声望

创作了538篇指南

团队

iFixit iFixit 的会员

Staff

135 名成员

创作了16,734篇指南

7条评论

Bring a loupe or magnifying glass, and a bright flashlight. And a pillow for the display.

bstaud - 回复

Great guide, I highly recommend a service wedge. I bought a foam one on Amazon that has a removable section so it can be used on a 21.5 inch or 27 inch , and it made the job easy.

fo4ever - 回复

Be VERY CAREFUL with the bottom strips. I found them very difficult. The front peeled off first allowing the strips to stretch. Made it work but went slow and meticulously. I found the use of a headlamp useful instead of a flashlight.

Danny McFarlin - 回复

I’ve just upgraded the RAM in two iMacs requiring adhesive strips and had a problem both times. In the first, the white tape on the lower part of the ‘3’ strip broke leaving about 50% behind.. In the second, both ‘2’ tags came off the white tape leaving all the tape still attached to the sticky layer. Both these instances caused a major problem as part of the screen was already stuck down. I had to try to make a gap between the screen and the case to insert a craft knife to loosen an edge of the white tape so I could grab it with my tweezers. Nightmare! Perhaps the adhesive strip kits sold in Europe aren’t as good quality as the ones sold in the US.

richard - 回复

Thank you iFixIt for top notch parts, instructions and tutorials. The reassembly went smoothly, removing the adhesive on the iMac was much easier than the iWatch I performed earlier. The adhesive strips went on easily (kudos for the alignment notches). Like previous comments, the only issue I had was w/ the bottom strips (4L/4R) in that the backing doesn’t want to release and the backing with the adhesive strip actually releases from the front backing instead. I carefully teased the adhesive from front backing with the bent tip iFixIt tweezers and then was able to get the backing released, but it wasn’t optimal because the front backing was slightly releasing from the adhesive as I was applying it and if not careful would stretch a bit which could cause miss-alignment when you get to the end of the adhesive. All-in-all the reassembly of the iMac is one of the easier ones.

Erica Rogers - 回复

添加评论

浏览统计数据:

过去 24 小时: 5

过去 7 天: 29

过去 30 天: 123

总计 24,885