跳转到主内容

当前版本的文档还未经巡查,您可以查看最新的已查核版本

iMac Intel 21.5" EMC 2544 硬盘更换

你所需要的

  1. iMac Intel 21.5" EMC 2544 硬盘更换, 显示器: 步骤 1 中的图像 1,1
    在这个步骤中使用的工具:
    iMac Intel 21.5" Cardboard Service Wedge
    $4.99
    购买
    • 由于铰链可以自由移动,iMac将不平衡且难以操作。维修可以如图所示完成,但使用iMac维修楔更快更容易

    • 如果您使用的是iFixit iMac支架, 查看本指南 来学习如何将其组装起来

    • 在开始对iMac进行任何操作之前:拔下电脑插头,然后按住电源按钮10秒钟,使电源电容器放电。

    • 小心不要触摸电容器引线或电源背面的任何暴露的焊点。只能边缘处理电路板。

  2. iMac Intel 21.5" EMC 2544 硬盘更换: 步骤 2 中的图像 1,2 iMac Intel 21.5" EMC 2544 硬盘更换: 步骤 2 中的图像 2,2
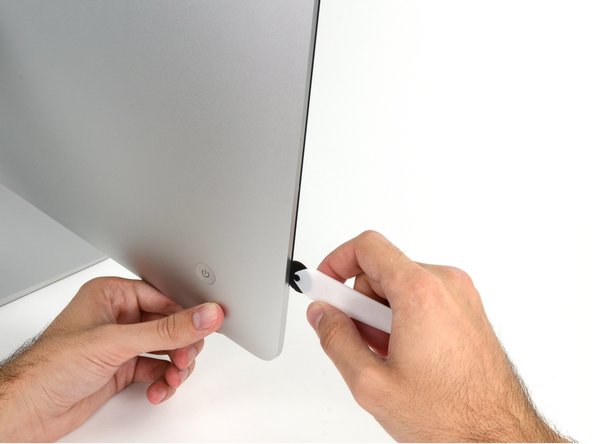
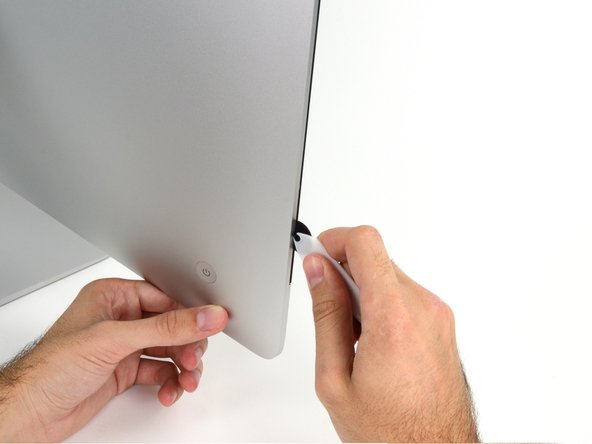
    • 从显示屏左侧靠近电源按钮的位置开始,将 iMac 打开工具插入玻璃面板和后壳之间的间隙。

    • iMac 打开工具上的轮毂可防止您将滚轮推得太远。 如果使用其他工具,插入显示屏的深度不得超过 3/8"。否则,可能会导致天线排线断裂并造成严重损坏。

    • 动作要轻柔!如果撬得太用力,玻璃可能会破裂。如果室温较低,可用吹风机加热边缘,松开胶带。

  3. iMac Intel 21.5" EMC 2544 硬盘更换: 步骤 3 中的图像 1,3 iMac Intel 21.5" EMC 2544 硬盘更换: 步骤 3 中的图像 2,3 iMac Intel 21.5" EMC 2544 硬盘更换: 步骤 3 中的图像 3,3
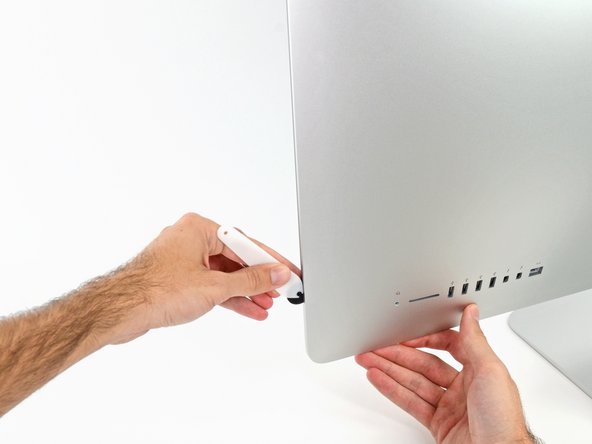
    • 使用该工具就像使用披萨刀一样--沿着缝隙滚动,它就会从中间切开泡沫粘合剂。

    • 确保始终用切割轮后面的手柄推动。如果用力拉,切割轮可能会被拉出手柄。

    • 将工具沿显示屏左侧向上移动。

  4. iMac Intel 21.5" EMC 2544 硬盘更换: 步骤 4 中的图像 1,3 iMac Intel 21.5" EMC 2544 硬盘更换: 步骤 4 中的图像 2,3 iMac Intel 21.5" EMC 2544 硬盘更换: 步骤 4 中的图像 3,3
    • 继续沿着左上角向上移动工具。

  5. iMac Intel 21.5" EMC 2544 硬盘更换: 步骤 5 中的图像 1,2 iMac Intel 21.5" EMC 2544 硬盘更换: 步骤 5 中的图像 2,2
    • 沿显示屏左上方切开粘合剂。

  6. iMac Intel 21.5" EMC 2544 硬盘更换: 步骤 6 中的图像 1,2 iMac Intel 21.5" EMC 2544 硬盘更换: 步骤 6 中的图像 2,2
    • 沿着显示屏顶部继续操作。

    • 您可能需要用工具来回切割几次,以确保尽可能多地分离粘合剂。

  7. iMac Intel 21.5" EMC 2544 硬盘更换: 步骤 7 中的图像 1,3 iMac Intel 21.5" EMC 2544 硬盘更换: 步骤 7 中的图像 2,3 iMac Intel 21.5" EMC 2544 硬盘更换: 步骤 7 中的图像 3,3
    • 将工具推到显示屏右上角周围。

  8. iMac Intel 21.5" EMC 2544 硬盘更换: 步骤 8 中的图像 1,2 iMac Intel 21.5" EMC 2544 硬盘更换: 步骤 8 中的图像 2,2
    • 沿显示屏右侧向下滚动工具。

  9. iMac Intel 21.5" EMC 2544 硬盘更换: 步骤 9 中的图像 1,2 iMac Intel 21.5" EMC 2544 硬盘更换: 步骤 9 中的图像 2,2
    • 将打开工具推至显示屏右侧底部。

    • 这时,你要用工具绕着整个显示屏转一圈,以确保切下尽可能多的粘合剂。

  10. iMac Intel 21.5" EMC 2544 硬盘更换: 步骤 10 中的图像 1,3 iMac Intel 21.5" EMC 2544 硬盘更换: 步骤 10 中的图像 2,3 iMac Intel 21.5" EMC 2544 硬盘更换: 步骤 10 中的图像 3,3
    在这个步骤中使用的工具:
    Plastic Cards
    $2.99
    购买
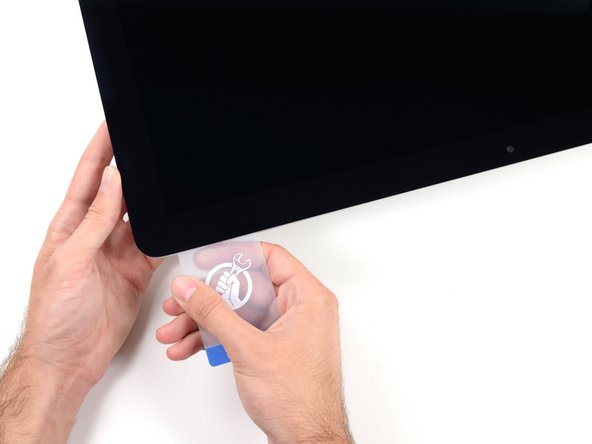
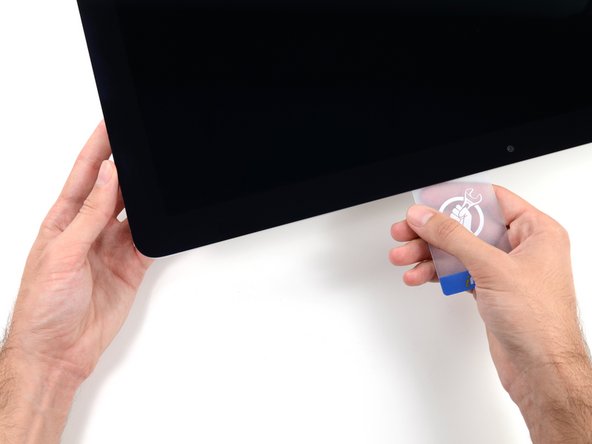
    • 虽然打开工具可以切开大部分粘合剂,但显示屏仍会与外壳有轻微粘连。需要使用塑料卡来切开最后的粘合剂。

    • 将 iMac 面朝上放在桌子上。

    • 从 iMac 的右上角开始,在显示屏和边框之间楔入一张 塑料卡

    • 注意不要将塑料卡插入超过 3/8",否则可能会损坏内部组件。

  11. iMac Intel 21.5" EMC 2544 硬盘更换: 步骤 11 中的图像 1,2 iMac Intel 21.5" EMC 2544 硬盘更换: 步骤 11 中的图像 2,2
    • 将塑料卡轻轻向侧面扭转,在显示屏和边框之间形成间隙。

    • 慢慢移动,注意不要对显示屏玻璃造成太大压力,只需留出约 1/4 英寸的缝隙即可。

  12. iMac Intel 21.5" EMC 2544 硬盘更换: 步骤 12 中的图像 1,3 iMac Intel 21.5" EMC 2544 硬盘更换: 步骤 12 中的图像 2,3 iMac Intel 21.5" EMC 2544 硬盘更换: 步骤 12 中的图像 3,3
    • 将卡滑向显示屏中心,剪掉 iMac 右上角剩余的粘合剂。

    • 确保在 iSight 摄像头之前停止,否则可能会损坏摄像头。

  13. iMac Intel 21.5" EMC 2544 硬盘更换: 步骤 13 中的图像 1,2 iMac Intel 21.5" EMC 2544 硬盘更换: 步骤 13 中的图像 2,2
    • 再次将塑料卡片楔入右上角,让它停留在那里,以防止粘合剂重新凝固。

  14. iMac Intel 21.5" EMC 2544 硬盘更换: 步骤 14 中的图像 1,3 iMac Intel 21.5" EMC 2544 硬盘更换: 步骤 14 中的图像 2,3 iMac Intel 21.5" EMC 2544 硬盘更换: 步骤 14 中的图像 3,3
    • 将第二张塑料卡插入 iMac 左上角显示屏与边框之间的缝隙。

  15. iMac Intel 21.5" EMC 2544 硬盘更换: 步骤 15 中的图像 1,2 iMac Intel 21.5" EMC 2544 硬盘更换: 步骤 15 中的图像 2,2
    • 轻轻向上扭转卡片,稍微增大显示屏和边框之间的空间。

    • 与另一侧一样,慢慢扭转,让粘合剂有时间分离,注意不要过度拉伸显示屏玻璃。

  16. iMac Intel 21.5" EMC 2544 硬盘更换: 步骤 16 中的图像 1,3 iMac Intel 21.5" EMC 2544 硬盘更换: 步骤 16 中的图像 2,3 iMac Intel 21.5" EMC 2544 硬盘更换: 步骤 16 中的图像 3,3
    • 将塑料卡向中间滑动,同样停在 iSight 摄像头之前。

  17. iMac Intel 21.5" EMC 2544 硬盘更换: 步骤 17 中的图像 1,2 iMac Intel 21.5" EMC 2544 硬盘更换: 步骤 17 中的图像 2,2
    • 将塑料卡片塞回左上角。

  18. iMac Intel 21.5" EMC 2544 硬盘更换: 步骤 18 中的图像 1,3 iMac Intel 21.5" EMC 2544 硬盘更换: 步骤 18 中的图像 2,3 iMac Intel 21.5" EMC 2544 硬盘更换: 步骤 18 中的图像 3,3
    • 如图所示,将两张塑料卡插入四角附近,轻轻向侧面扭转塑料卡,以增大显示屏与外壳之间的间隙。

    • 如果有粘在一起无法分开的部分,请停止扭动,用一张卡片切开剩余的粘胶。

    • 开始将显示屏顶部从框架上抬起。

    • 只需将显示屏抬起几英寸,显示屏的数据线和电源线仍连接在主板上。

  19. iMac Intel 21.5" EMC 2544 硬盘更换: 步骤 19 中的图像 1,2 iMac Intel 21.5" EMC 2544 硬盘更换: 步骤 19 中的图像 2,2
    • 用一只手托住显示屏,另一只手拔下显示屏电源线。确保将电缆从塑料片上拔出,而不是拉扯彩色电线。

    • 将显示屏向上抬起,以便于接触到接口,但不要太用力,以免拉伸电缆并对其连接造成压力(约 8 英寸)。

  20. iMac Intel 21.5" EMC 2544 硬盘更换: 步骤 20 中的图像 1,3 iMac Intel 21.5" EMC 2544 硬盘更换: 步骤 20 中的图像 2,3 iMac Intel 21.5" EMC 2544 硬盘更换: 步骤 20 中的图像 3,3
    • 使用撬棒尖端撬起显示屏数据线上的金属固定支架。

    • 小心地将显示数据排线从主板上的插座中拔出。

    • 确保将显示屏数据线连接器从插座中直接拔出。

  21. iMac Intel 21.5" EMC 2544 硬盘更换: 步骤 21 中的图像 1,2 iMac Intel 21.5" EMC 2544 硬盘更换: 步骤 21 中的图像 2,2
    • 将显示屏抬起到接近垂直的位置。

    • 此时,沿显示屏底部仍有一条粘合剂,它会像铰链一样将显示屏固定在框架上。您可以将显示屏上下移动几次来松开粘胶。

  22. iMac Intel 21.5" EMC 2544 硬盘更换: 步骤 22 中的图像 1,3 iMac Intel 21.5" EMC 2544 硬盘更换: 步骤 22 中的图像 2,3 iMac Intel 21.5" EMC 2544 硬盘更换: 步骤 22 中的图像 3,3
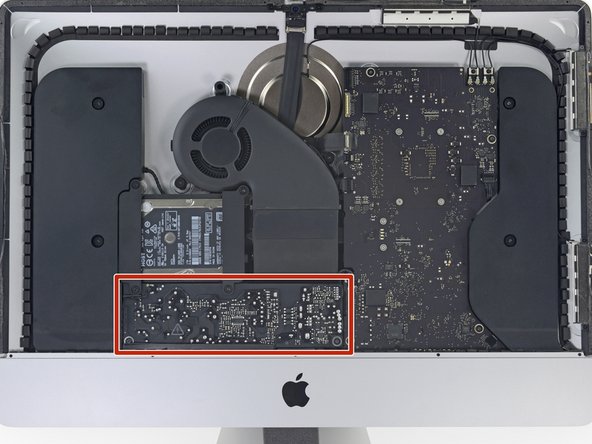
    • 请小心不要触碰电容器引线或电源背面任何外露的焊点(红色方框)。

    • 抓住显示屏底部边缘粘胶条末端的小标签,将粘胶条拉向 iMac 顶部,将其取下。

    • 对另一条粘胶条重复这一步骤,然后取下。

    • 如果任一胶条在取下前断裂,可用塑料卡片划开剩余的胶条。

  23. iMac Intel 21.5" EMC 2544 硬盘更换: 步骤 23 中的图像 1,3 iMac Intel 21.5" EMC 2544 硬盘更换: 步骤 23 中的图像 2,3 iMac Intel 21.5" EMC 2544 硬盘更换: 步骤 23 中的图像 3,3
    • 将显示屏从框架上抬起,然后从 iMac 上取下。

    • 可能需要从一侧慢慢提起,与剩余的粘合剂剥离。

    • 处理显示屏时要非常小心——它又大又重,而且是玻璃制成的。

    • 在重新组装过程中,请查看我们的 显示屏粘合剂指南 来安装新粘合剂。

  24. 这个步骤还没有翻译 帮忙翻译一下

    iMac Intel 21.5" EMC 2544 硬盘更换: 步骤 24 中的图像 1,1
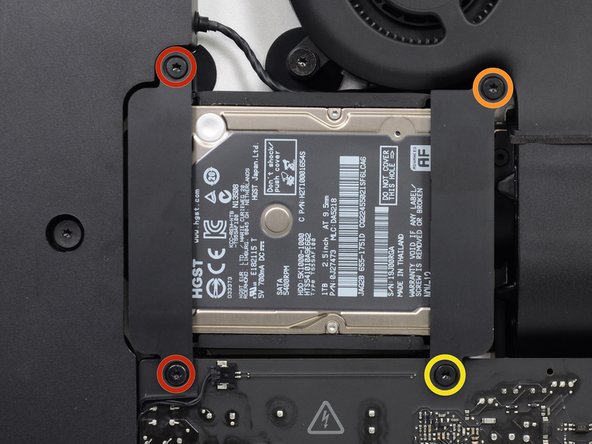
    • Remove the following screws securing the hard drive bracket to the rear enclosure:

    • Two 21 mm T10 Torx screws from the left-hand hard drive bracket.

    • One 9 mm T10 Torx screw.

    • One 27 mm T10 Torx screw.

  25. 这个步骤还没有翻译 帮忙翻译一下

    iMac Intel 21.5" EMC 2544 硬盘更换: 步骤 25 中的图像 1,2 iMac Intel 21.5" EMC 2544 硬盘更换: 步骤 25 中的图像 2,2
    • Remove the left and right hard drive brackets from the iMac.

  26. 这个步骤还没有翻译 帮忙翻译一下

    iMac Intel 21.5" EMC 2544 硬盘更换: 步骤 26 中的图像 1,3 iMac Intel 21.5" EMC 2544 硬盘更换: 步骤 26 中的图像 2,3 iMac Intel 21.5" EMC 2544 硬盘更换: 步骤 26 中的图像 3,3
    • Lift the hard drive from the edge nearest the fan and pull it slightly out of its recess.

    • The hard drive is attached by two cables, do not attempt to fully remove it from the iMac just yet.

  27. 这个步骤还没有翻译 帮忙翻译一下

    iMac Intel 21.5" EMC 2544 硬盘更换: 步骤 27 中的图像 1,2 iMac Intel 21.5" EMC 2544 硬盘更换: 步骤 27 中的图像 2,2
    • Disconnect the SATA power cable.

  28. 这个步骤还没有翻译 帮忙翻译一下

    iMac Intel 21.5" EMC 2544 硬盘更换: 步骤 28 中的图像 1,2 iMac Intel 21.5" EMC 2544 硬盘更换: 步骤 28 中的图像 2,2
    • Unplug the SATA data cable from the hard drive.

  29. 这个步骤还没有翻译 帮忙翻译一下

    iMac Intel 21.5" EMC 2544 硬盘更换: 步骤 29 中的图像 1,1
    • Lift and remove the hard drive from the iMac.

  30. iMac Intel 21.5" EMC 2544 硬盘更换, 硬盘: 步骤 30 中的图像 1,2 iMac Intel 21.5" EMC 2544 硬盘更换, 硬盘: 步骤 30 中的图像 2,2
    • 从硬盘的左上角取下硬盘套。

  31. iMac Intel 21.5" EMC 2544 硬盘更换: 步骤 31 中的图像 1,2 iMac Intel 21.5" EMC 2544 硬盘更换: 步骤 31 中的图像 2,2
    • 继续剥下牢固粘合在硬盘上的硬盘套

    • 从硬盘上完全剥离硬盘套

    • 仅留下硬盘

结论

若要组装你的设备,请依照教程反向操作并且使用我们的教程Adhesive Strips Guide重新组装屏幕玻璃。

347等其他人完成本指南。

由衷感谢以下译者:

en zh

100%

ningma1997正在帮助我们修复这个世界! 您也想加入吗?
开始翻译 ›

Sam Goldheart

于10/18/12注册

465,807 声望

创作了538篇指南

团队

iFixit iFixit 的会员

Staff

135 名成员

创作了16,832篇指南

41条评论

I used the iMac Opening Tool just as shown in this guide to separate the tape. DISASTER! The screen cracked! I used the tool slowly and carefully and despite this, the screen cracked. I should have simply used a guitar pick. That said, while I was inside my iMac replacing the Harddisk with a SSD, which was pretty easy to do, I decided to also see if I could replaced the 8GB RAM with 16GB RAM WITHOUT removing the logic board, as shown in other instructions on this site. I found that by simply removing the fan assembly, this makes enough room to reach behind the logic board and unclip the 2 memory modules. I installed 2 8GB modules (1600MHz DDR3L SO-DIMM PC12800 204 Pin) without much trouble. I used a plastic stick to reach behind the logic board and unclip the existing memory modules, then carefully inserted the new ones and clipped them into place. This is much easier than removing the power supply and logic board and all of the associated connectors and screws.

gcortesi - 回复

I had to replace the HD as it failed after less than two years. It was a good opportunity to increase the RAM from 8 to 16 GB. So I ordered the RAM chips from Kingston and a 256 GB SSD from Angelbird.

The repair went smoothly: to anyone trying this, please carefully follow the iFixit step-by-step guide. I recommend reading at least twice the whole procedure *before* beginning. Check all the photos. During the operation itself, I had the guide open before my eyes on my iPad and followed it step by step. The opening tool is a bit fragile, the wheel got damaged after the operation, but I guess it was designed to be used only once. After all, the adhesive strips can also be used only once!

For those replacing the hard-disk with an SSD: I highly recommend the Angelbird model "SSD wrk for Mac" (http://www.angelbird.com/en/prod/ssd-wrk...), for several dollars more you spare yourself the need to use additional software to enable TRIM or persuade the fans of your Mac that the HD's temperature is Ok.

lix - 回复

Thanks for the tip on the Angelbird, working smoothly so far!

Elling -

Hi! Thanks for the tip! Do you know if can I put an SSD on an imac 21.5 in late 2012 ?

Tania Diego -

after changing the hard drive the monitor no longer works. Apple won't fix it because I opened it, and third-part wants to charge me $300-500. Hope you guys have better luck!

max - 回复

添加评论

浏览统计数据:

过去 24 小时: 66

过去 7 天: 291

过去 30 天: 1,325

总计 237,238