简介
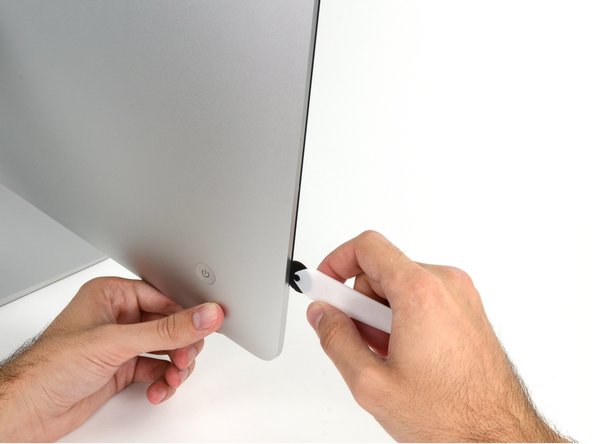
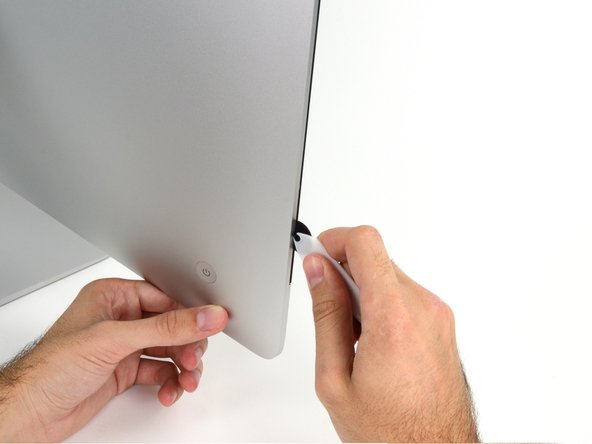
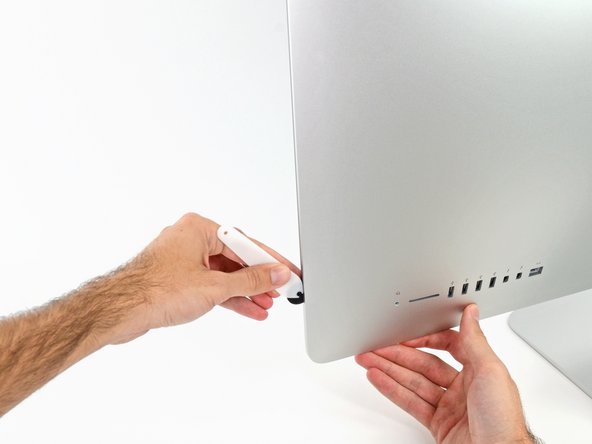
拆卸 2012 款后期 iMac 显示屏需要使用专用的 iMac 打开工具切割粘合剂。完成维修后,您需要按照我们的 粘胶条指南 将旧的粘胶刮掉,换上新的双面粘胶条。
你所需要的
-
-
So sorry. Thanks for that caution.
Using suction cups (the ones that were made for removing the magnetic front glass on the 2011 and earlier iMacs) work well too. Place one in each top corner, while the Mac is lying face up on a table, and gently pull and it will separate the display from the main body. You might need to do a little more slicing around the edges if you did not get all the way through the first time with the roller. Then you can lift the display up at an angle to disconnect the cables.
This was a great idea, worked well for me. Thanks!
Florin -
-
-
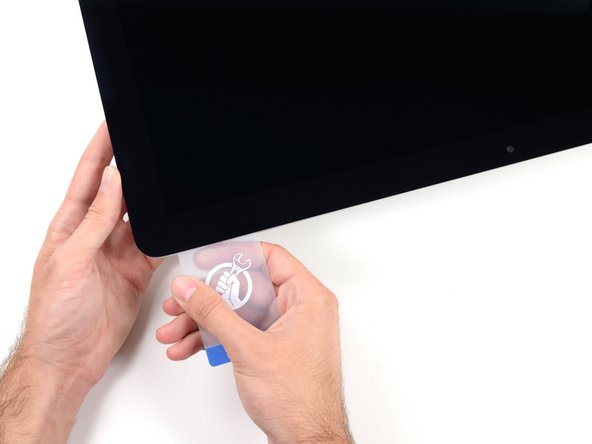
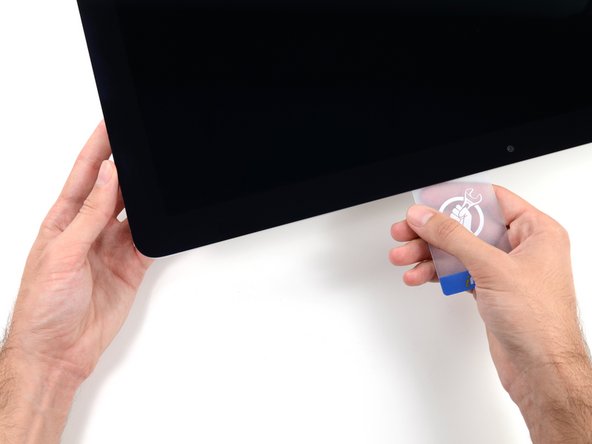
如图所示,将两张塑料卡插入四角附近,轻轻向侧面扭转塑料卡,以增大显示屏与外壳之间的间隙。
-
开始将显示屏顶部从框架上抬起。
-
-
-
抓住显示屏底部边缘粘胶条末端的小标签,将粘胶条拉向 iMac 顶部,将其取下。
-
对另一条粘胶条重复这一步骤,然后取下。
The roller tool for slicing open the display works great for this step. Get in there like using the card and roll across the bottom to slice through the remaining adhesive.
-
-
-
将显示屏从框架上抬起,然后从 iMac 上取下。
-
可能需要从一侧慢慢提起,与剩余的粘合剂剥离。
After removing the display, I also removed the 3 screws for the processor fan, disconnected the power connector for it and set the fan shroud aside. Disconnecting the remaining cable (similar style to 1 of the cables for the display) that is in the way of the RAM chips is all that's left to do. I was then able to access and quickly remove the two Apple-provided RAM chips, and replace them with 3rd party RAM. Turning the iMac on its side, so that it's in a position where you're physically putting the RAM chips DOWNWARD into their respective slots is the best way to go about uninstalling and reinstalling the chips. Using a narrow but long'ish plastic spudger tool is the best way to defeat the spring-tabs which hold the RAM chips in place. After removing the LCD display, changing the RAM is about a 10 minute process!! And I'd SURE prefer not to remove all the parts and risk damage to the iMac via the standard procedure listed. As per usual, take your time and work gently :-)
Teardown the whole machine just to change RAM? While preparing to comment on this procedure I just noticed the comment made by Mitch K above. I ran pretty much the same procedure that he describes this afternoon (steps 1-23, 43-45, and step 55). Then I swapped out the original 2x4GB RAM chips for 2x8GB chips by reaching behind the logic board, releasing the spring retaining clips one chip at a time (starting with the chip further away from the logic board), pivoting the RAM towards the back of the machine, and then carefully sliding it out of the slot. I easily slid in the new chips and then pivoted them to lock them down. No hassle, no time lost. As Mitch K states above, not only is this “shortcut” method much quicker and easier, but it provides less risk of damaging cables, sockets and other delicate components during a total teardown. Why mess with the power supply board just to change RAM? I do not advise to follow the current iFixit.com procedure written by Sam Lionheart, regardless of user skill-level.
THAT sounds one !&&* of a lot easier than the full tear down. I wonder if there’s a video of the process described by Mitch K? Adding that to these verbal instructions would really help relieve the apprehension and anxiety around the process! I do sometimes find the additional warnings, though appreciated from a “safety first” perspective, are somewhat overstated. It’s been a very long time since I shorted out RAM, or fried a PCB, or broke a connector, regardless of how finicky, fragile or awkwardly designed and positioned. I may have WANTED to break something, and the air might be blue for a few seconds, but inevitably, things go back together, the start button gets pressed, the startup chime sounds, and we’re in business. Practice DOES make as close to perfect we are likely to get.
Mitch has the exact method that works a treat. You don’t need to follow steps 24-37 and also 40-63. Step 51 is the step to remove the camera cable and is needed. Steps 38 and 39 are for the Fan. That is all that is needed. Done quite a few like this.
Be careful not to drop the RAM down the back of the logic board!
By NOT removing all the other stuff you can avoid either damaging it or forgetting to plug in a cable.
I just trued this shortcut and it was not successful. I was not able to seat both RAM chips with this shortcut, and managed to slightly damage one of the retainer clips. I simply could not manipulate the chips into and out of the slots effectively without taking everything apart as described in the full set of steps.. I ended up retracing my steps and following the entire procedure, carefully, and that worked without incident. So, bottomline, it is definitely more work to follow all the steps but from my experience, it is decidedly safer. Your mileage may, of course, vary. It was successful in the end, and I swapped out the hard drive with an ssd during the same procedure and my machine is very, very much faster.
I have completed by following the Mitch K post and it is much easier than stripping down the whole thing, just be aware that to remove and replace the ram chips means working in a tight space, you need slim fingers and don’t be tempted to use force, take your time.
Well, I have slim fingers, but they are 60 years old, and they don’t work like they used to! LOL.
Agree with Mitch K’s procedure. The only added tip I would throw in is to use two 45 degree tweezers with their plastic covers still installed to easily pop loose the RAM. I couldn’t get the plastic spudger tool to work myself, but the tweezers easily reach the RAM clips. Just make sure the plastic covers are installed and you won’t be in danger of scratching or shorting anything out.
So thankful I discovered these comments. Saved me a TON of time! Thank you!!
These comments were very useful. Thank you. I just needed to modify a pair of tweezers to allow me to seat the new RAM more easily. The ifixit screwdriver wasn't able to turn some of the screws as they were installed too tightly, and I didn't want to wait to order and reveive a pair of right angled Torx screwdrivers that would give me more leverage to get those boards off.
-
70等其他人完成本指南。
由衷感谢以下译者:
100%
这些译者帮助我们修补全世界! 您也想加入吗?
开始翻译 ›
22条评论
It was really easy but the display did not power on for me. Any suggestions?
I got to the point where I fit in the display back on before I pulled the covers off of the adhesive strips. I turned the computer on and the display worked perfectly. Everything worked! The camera was aligned and everything! It must’ve been beginners luck.
I turn the computer off, unplugged the display, pulled the covers off the adhesive strips, plugged the display back in and sealed the display down. When I turn the computer on again I had a blank screen. It wasn’t just blank, it never came back on. The iMac did, but the display didn’t. I tried the old display. Same thing. After some research I found that I had burned up a device on my logic board.
So, I am left with only my iPhone and don’t know how to upload a picture in comments or I would show you exactly which one it is.
Done in 20 Min :D
John Grace - 回复
Merci pour ce tuto! Toutefois l’écran est vraiment très fragile et il vaut mieux attaquer directement avec le heat gun vendu par iFixit (ou un sèche cheveux) tout autour du cadre et passer la roulette au fur et a mesure pour éviter que ça craque lorsqu’on veut ouvrir l'iMac. Croyez moi ça craque super facilement si vous tentez d’y aller directement avec la roulette et les cartes en plastique! Je vous conseille aussi de mettre des gants. Je me suis ouvert un doigt la 1ere fois en glissant le long du cadre en aluminium qui est très fin. Comme expliqué dans la vidéo l'écran est plus lourd qu’on ne l’imagine, soyez prudent ;)
The key is to be patient. Let the adhesive slowly release. Worked perfectly. I find that old credit card, ID cards, etc work in place of an iFixit plastic card. I strongly recommend the iMac Opening Tool though.
Also, before using iso-propyl alcohol to clean off the adhesive, first use you fingernail to carefully pull up the edge of a strip and pull on it to remove large sections easily. The bottom strip is fiddly to get an edge of but should peel off in a single piece if you get hold of either end. Makes final cleanup with iso quick and easy.
What is the bezel made out of? I scratched the black behind the glass when removing the adhesive from the display…
Glass with black paint.
I followed the instruction carefully and replaced a hard drive and put display back I just get a black screen,I can heard the chimes but no video.
Help!!
Check again the flat that connects the display on the motherboard, maybe you didn’t insert it correctly.
have you solved ? i had the same problem
cufre -
I completed this repair twice succesfully, but failed on my third iMac. Screen stayed dark after restart, then after it found a startup drive it just gave me blue lines. I reopened and reseated the two cables, but still nothing.
Is there a chance I connected the display data cable upside down? Going to reopen and check it.
No luck. The display data cable clearly plugs in with the gold side down, silver side up. I reseated the cable on both the display and the logic board, but still get no image. Time for a new screen, maybe.
sgust -
Just tried this and around the middle section the adhesive is so much tougher. I forced it and the screen chipped leading to cracks. Gutted.So be careful at the middle section along the sides.
I liked the instruction on the ifixit video. I followed instructions. Checked I had power. I saw a green light inside the computer. Sealed it back up. power it on. Heard a Apple chimes, but just got a blank screen. Any ideas on how to restarted it?










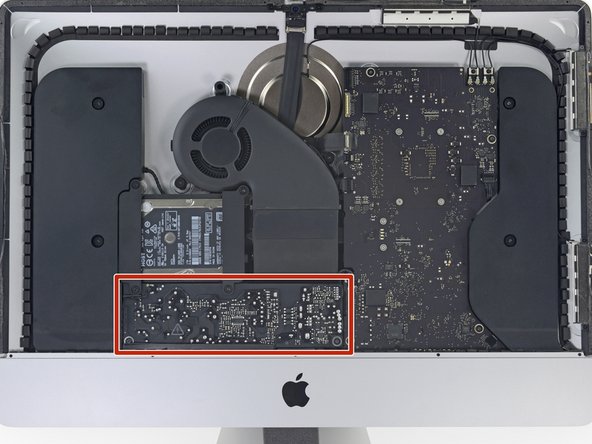


I have (21.5 inch, mid 2017, 2.3 ghz) base model same as this but not 4k. How much max ram can I install in my iMac??
Narendra Verma - 回复
This guide contains many extra steps for what should be a straight forward, simple parts replacement without disturbing more than the display, left hand speaker and removal of 4 logic board screws for play. Nothing else except for the left hand speaker wire & iSight cable from logic board, the lower support bracket and loosening the speaker so as to move it around a bit.
For the ram, I bent a pair of cheap tweezers long ago supplied with these replacement kits to the perfect angle for holding, locating and inserting the ram into the slots under the logic bd after moving each retainer w/spudger and popping out the old. Pay attention to the orientation of the ram when removing/inserting the ram! An automotive mirror is handy along with a small flashlight for closeups. Once the ram is aligned properly substitute your fingers for the tweezers, ease it into the slot, push up & engage! Reinstall screws and all else. I have done this job successfully this way countless times. For a tweezers pic contact me!
Ross Elkins - 回复
Additionally, if a blade is present, I install the OSx system on the blade and everything else, apps and home folders on the new SSD. You get the very fast boot off of the blade and the full ssd for all else!
Ross Elkins - 回复