跳转到主内容

当前版本的文档还未经巡查,您可以查看最新的已查核版本

iMac Intel 21.5" EMC 2544 刀片 SSD 替换件

你所需要的

  1. iMac Intel 21.5" EMC 2544 刀片 SSD 替换件, 显示器: 步骤 1 中的图像 1,1
    在这个步骤中使用的工具:
    iMac Intel 21.5" Cardboard Service Wedge
    $4.99
    购买
    • 由于铰链可以自由移动,iMac将不平衡且难以操作。维修可以如图所示完成,但使用iMac维修楔更快更容易

    • 如果您使用的是iFixit iMac支架, 查看本指南 来学习如何将其组装起来

    • 在开始对iMac进行任何操作之前:拔下电脑插头,然后按住电源按钮10秒钟,使电源电容器放电。

    • 小心不要触摸电容器引线或电源背面的任何暴露的焊点。只能边缘处理电路板。

  2. iMac Intel 21.5" EMC 2544 刀片 SSD 替换件: 步骤 2 中的图像 1,2 iMac Intel 21.5" EMC 2544 刀片 SSD 替换件: 步骤 2 中的图像 2,2
    • 从显示屏左侧靠近电源按钮的位置开始,将 iMac 打开工具插入玻璃面板和后壳之间的间隙。

    • iMac 打开工具上的轮毂可防止您将滚轮推得太远。 如果使用其他工具,插入显示屏的深度不得超过 3/8"。否则,可能会导致天线排线断裂并造成严重损坏。

    • 动作要轻柔!如果撬得太用力,玻璃可能会破裂。如果室温较低,可用吹风机加热边缘,松开胶带。

  3. iMac Intel 21.5" EMC 2544 刀片 SSD 替换件: 步骤 3 中的图像 1,3 iMac Intel 21.5" EMC 2544 刀片 SSD 替换件: 步骤 3 中的图像 2,3 iMac Intel 21.5" EMC 2544 刀片 SSD 替换件: 步骤 3 中的图像 3,3
    • 使用该工具就像使用披萨刀一样--沿着缝隙滚动,它就会从中间切开泡沫粘合剂。

    • 确保始终用切割轮后面的手柄推动。如果用力拉,切割轮可能会被拉出手柄。

    • 将工具沿显示屏左侧向上移动。

  4. iMac Intel 21.5" EMC 2544 刀片 SSD 替换件: 步骤 4 中的图像 1,3 iMac Intel 21.5" EMC 2544 刀片 SSD 替换件: 步骤 4 中的图像 2,3 iMac Intel 21.5" EMC 2544 刀片 SSD 替换件: 步骤 4 中的图像 3,3
    • 继续沿着左上角向上移动工具。

  5. iMac Intel 21.5" EMC 2544 刀片 SSD 替换件: 步骤 5 中的图像 1,2 iMac Intel 21.5" EMC 2544 刀片 SSD 替换件: 步骤 5 中的图像 2,2
    • 沿显示屏左上方切开粘合剂。

  6. iMac Intel 21.5" EMC 2544 刀片 SSD 替换件: 步骤 6 中的图像 1,2 iMac Intel 21.5" EMC 2544 刀片 SSD 替换件: 步骤 6 中的图像 2,2
    • 沿着显示屏顶部继续操作。

    • 您可能需要用工具来回切割几次,以确保尽可能多地分离粘合剂。

  7. iMac Intel 21.5" EMC 2544 刀片 SSD 替换件: 步骤 7 中的图像 1,3 iMac Intel 21.5" EMC 2544 刀片 SSD 替换件: 步骤 7 中的图像 2,3 iMac Intel 21.5" EMC 2544 刀片 SSD 替换件: 步骤 7 中的图像 3,3
    • 将工具推到显示屏右上角周围。

  8. iMac Intel 21.5" EMC 2544 刀片 SSD 替换件: 步骤 8 中的图像 1,2 iMac Intel 21.5" EMC 2544 刀片 SSD 替换件: 步骤 8 中的图像 2,2
    • 沿显示屏右侧向下滚动工具。

  9. iMac Intel 21.5" EMC 2544 刀片 SSD 替换件: 步骤 9 中的图像 1,2 iMac Intel 21.5" EMC 2544 刀片 SSD 替换件: 步骤 9 中的图像 2,2
    • 将打开工具推至显示屏右侧底部。

    • 这时,你要用工具绕着整个显示屏转一圈,以确保切下尽可能多的粘合剂。

  10. iMac Intel 21.5" EMC 2544 刀片 SSD 替换件: 步骤 10 中的图像 1,3 iMac Intel 21.5" EMC 2544 刀片 SSD 替换件: 步骤 10 中的图像 2,3 iMac Intel 21.5" EMC 2544 刀片 SSD 替换件: 步骤 10 中的图像 3,3
    在这个步骤中使用的工具:
    Plastic Cards
    $2.99
    购买
    • 虽然打开工具可以切开大部分粘合剂,但显示屏仍会与外壳有轻微粘连。需要使用塑料卡来切开最后的粘合剂。

    • 将 iMac 面朝上放在桌子上。

    • 从 iMac 的右上角开始,在显示屏和边框之间楔入一张 塑料卡

    • 注意不要将塑料卡插入超过 3/8",否则可能会损坏内部组件。

  11. iMac Intel 21.5" EMC 2544 刀片 SSD 替换件: 步骤 11 中的图像 1,2 iMac Intel 21.5" EMC 2544 刀片 SSD 替换件: 步骤 11 中的图像 2,2
    • 将塑料卡轻轻向侧面扭转,在显示屏和边框之间形成间隙。

    • 慢慢移动,注意不要对显示屏玻璃造成太大压力,只需留出约 1/4 英寸的缝隙即可。

  12. iMac Intel 21.5" EMC 2544 刀片 SSD 替换件: 步骤 12 中的图像 1,3 iMac Intel 21.5" EMC 2544 刀片 SSD 替换件: 步骤 12 中的图像 2,3 iMac Intel 21.5" EMC 2544 刀片 SSD 替换件: 步骤 12 中的图像 3,3
    • 将卡滑向显示屏中心,剪掉 iMac 右上角剩余的粘合剂。

    • 确保在 iSight 摄像头之前停止,否则可能会损坏摄像头。

  13. iMac Intel 21.5" EMC 2544 刀片 SSD 替换件: 步骤 13 中的图像 1,2 iMac Intel 21.5" EMC 2544 刀片 SSD 替换件: 步骤 13 中的图像 2,2
    • 再次将塑料卡片楔入右上角,让它停留在那里,以防止粘合剂重新凝固。

  14. iMac Intel 21.5" EMC 2544 刀片 SSD 替换件: 步骤 14 中的图像 1,3 iMac Intel 21.5" EMC 2544 刀片 SSD 替换件: 步骤 14 中的图像 2,3 iMac Intel 21.5" EMC 2544 刀片 SSD 替换件: 步骤 14 中的图像 3,3
    • 将第二张塑料卡插入 iMac 左上角显示屏与边框之间的缝隙。

  15. iMac Intel 21.5" EMC 2544 刀片 SSD 替换件: 步骤 15 中的图像 1,2 iMac Intel 21.5" EMC 2544 刀片 SSD 替换件: 步骤 15 中的图像 2,2
    • 轻轻向上扭转卡片,稍微增大显示屏和边框之间的空间。

    • 与另一侧一样,慢慢扭转,让粘合剂有时间分离,注意不要过度拉伸显示屏玻璃。

  16. iMac Intel 21.5" EMC 2544 刀片 SSD 替换件: 步骤 16 中的图像 1,3 iMac Intel 21.5" EMC 2544 刀片 SSD 替换件: 步骤 16 中的图像 2,3 iMac Intel 21.5" EMC 2544 刀片 SSD 替换件: 步骤 16 中的图像 3,3
    • 将塑料卡向中间滑动,同样停在 iSight 摄像头之前。

  17. iMac Intel 21.5" EMC 2544 刀片 SSD 替换件: 步骤 17 中的图像 1,2 iMac Intel 21.5" EMC 2544 刀片 SSD 替换件: 步骤 17 中的图像 2,2
    • 将塑料卡片塞回左上角。

  18. iMac Intel 21.5" EMC 2544 刀片 SSD 替换件: 步骤 18 中的图像 1,3 iMac Intel 21.5" EMC 2544 刀片 SSD 替换件: 步骤 18 中的图像 2,3 iMac Intel 21.5" EMC 2544 刀片 SSD 替换件: 步骤 18 中的图像 3,3
    • 如图所示,将两张塑料卡插入四角附近,轻轻向侧面扭转塑料卡,以增大显示屏与外壳之间的间隙。

    • 如果有粘在一起无法分开的部分,请停止扭动,用一张卡片切开剩余的粘胶。

    • 开始将显示屏顶部从框架上抬起。

    • 只需将显示屏抬起几英寸,显示屏的数据线和电源线仍连接在主板上。

  19. iMac Intel 21.5" EMC 2544 刀片 SSD 替换件: 步骤 19 中的图像 1,2 iMac Intel 21.5" EMC 2544 刀片 SSD 替换件: 步骤 19 中的图像 2,2
    • 用一只手托住显示屏,另一只手拔下显示屏电源线。确保将电缆从塑料片上拔出,而不是拉扯彩色电线。

    • 将显示屏向上抬起,以便于接触到接口,但不要太用力,以免拉伸电缆并对其连接造成压力(约 8 英寸)。

  20. iMac Intel 21.5" EMC 2544 刀片 SSD 替换件: 步骤 20 中的图像 1,3 iMac Intel 21.5" EMC 2544 刀片 SSD 替换件: 步骤 20 中的图像 2,3 iMac Intel 21.5" EMC 2544 刀片 SSD 替换件: 步骤 20 中的图像 3,3
    • 使用撬棒尖端撬起显示屏数据线上的金属固定支架。

    • 小心地将显示数据排线从主板上的插座中拔出。

    • 确保将显示屏数据线连接器从插座中直接拔出。

  21. iMac Intel 21.5" EMC 2544 刀片 SSD 替换件: 步骤 21 中的图像 1,2 iMac Intel 21.5" EMC 2544 刀片 SSD 替换件: 步骤 21 中的图像 2,2
    • 将显示屏抬起到接近垂直的位置。

    • 此时,沿显示屏底部仍有一条粘合剂,它会像铰链一样将显示屏固定在框架上。您可以将显示屏上下移动几次来松开粘胶。

  22. iMac Intel 21.5" EMC 2544 刀片 SSD 替换件: 步骤 22 中的图像 1,3 iMac Intel 21.5" EMC 2544 刀片 SSD 替换件: 步骤 22 中的图像 2,3 iMac Intel 21.5" EMC 2544 刀片 SSD 替换件: 步骤 22 中的图像 3,3
    • 请小心不要触碰电容器引线或电源背面任何外露的焊点(红色方框)。

    • 抓住显示屏底部边缘粘胶条末端的小标签,将粘胶条拉向 iMac 顶部,将其取下。

    • 对另一条粘胶条重复这一步骤,然后取下。

    • 如果任一胶条在取下前断裂,可用塑料卡片划开剩余的胶条。

  23. iMac Intel 21.5" EMC 2544 刀片 SSD 替换件: 步骤 23 中的图像 1,3 iMac Intel 21.5" EMC 2544 刀片 SSD 替换件: 步骤 23 中的图像 2,3 iMac Intel 21.5" EMC 2544 刀片 SSD 替换件: 步骤 23 中的图像 3,3
    • 将显示屏从框架上抬起,然后从 iMac 上取下。

    • 可能需要从一侧慢慢提起,与剩余的粘合剂剥离。

    • 处理显示屏时要非常小心——它又大又重,而且是玻璃制成的。

    • 在重新组装过程中,请查看我们的 显示屏粘合剂指南 来安装新粘合剂。

  24. 这个步骤还没有翻译 帮忙翻译一下

    iMac Intel 21.5" EMC 2544 刀片 SSD 替换件: 步骤 24 中的图像 1,2 iMac Intel 21.5" EMC 2544 刀片 SSD 替换件: 步骤 24 中的图像 2,2
    • Remove the following five Phillips screws holding the lower support bracket in place:

    • Four 3.2 mm screws

    • One 1.7 mm screw

    • On at least some EMC 2544 machines, all five screws are the same size.

    • You may need to peel up the display adhesive lining the bottom edge of the iMac enclosure to access the screws.

  25. 这个步骤还没有翻译 帮忙翻译一下

    iMac Intel 21.5" EMC 2544 刀片 SSD 替换件: 步骤 25 中的图像 1,1
    • Remove the lower support bracket from the iMac enclosure.

  26. 这个步骤还没有翻译 帮忙翻译一下

    iMac Intel 21.5" EMC 2544 刀片 SSD 替换件: 步骤 26 中的图像 1,2 iMac Intel 21.5" EMC 2544 刀片 SSD 替换件: 步骤 26 中的图像 2,2
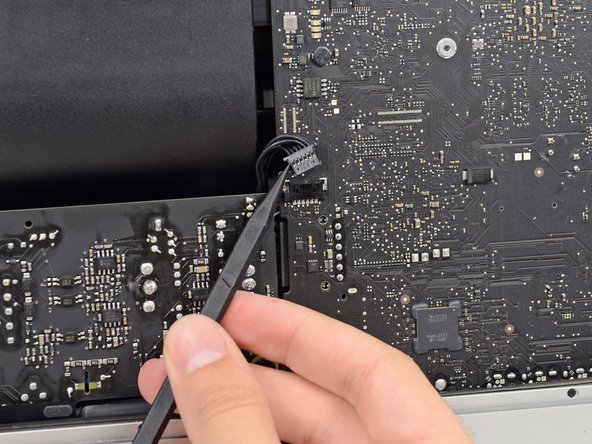
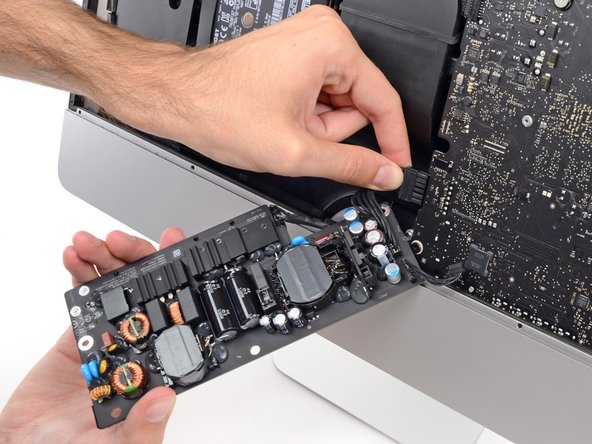
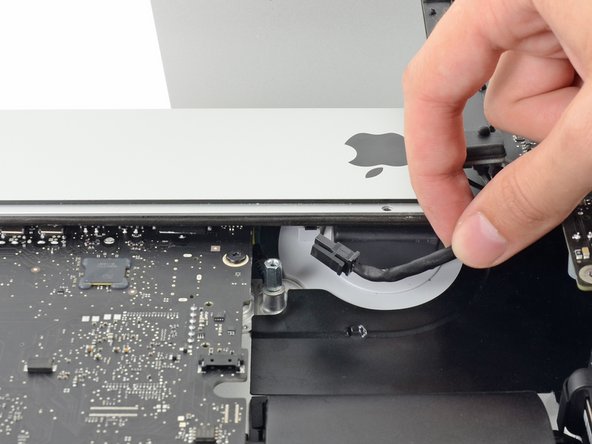
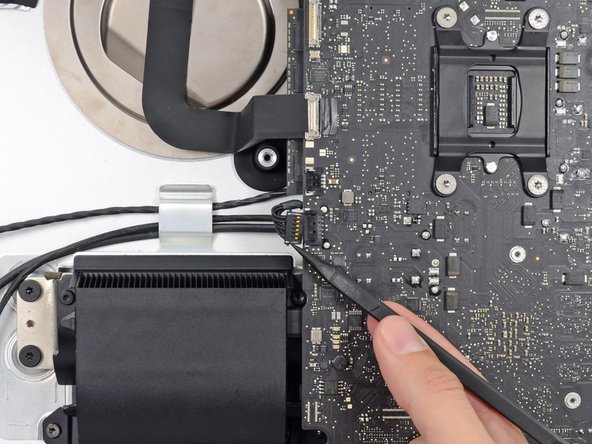
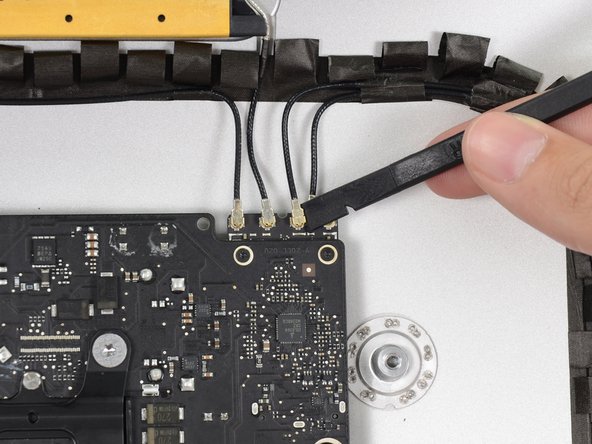
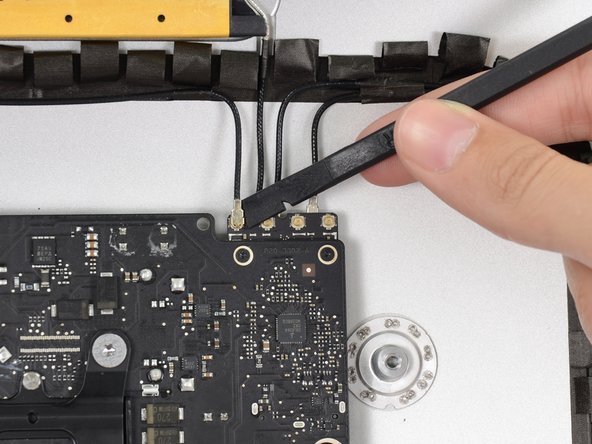
    • Use a spudger to loosen the right speaker cable's connector from its socket on the logic board.

    • It is useful to push downward on both short sides of the connector to "walk" it out of its socket. Be careful with the corners of the connectors, they can be easily broken off.

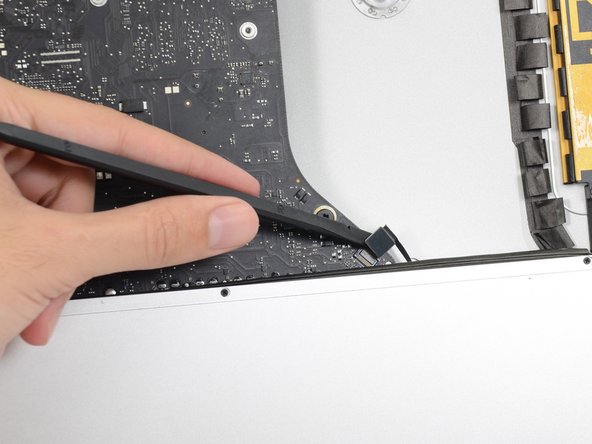
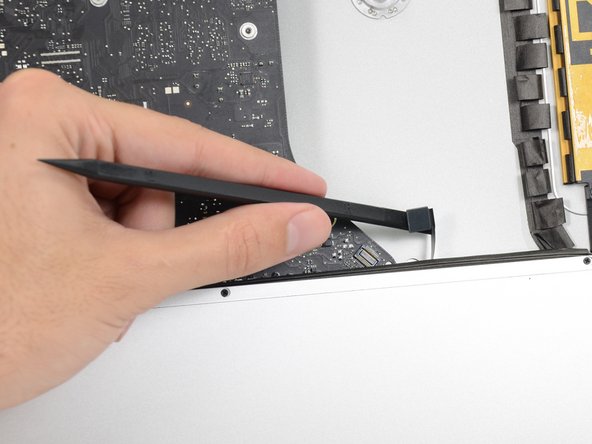
    • Pull the connector downwards to remove it from its socket.

  27. 这个步骤还没有翻译 帮忙翻译一下

    iMac Intel 21.5" EMC 2544 刀片 SSD 替换件: 步骤 27 中的图像 1,1
    • Remove the two 10.0 mm T10 screws securing the right speaker to the rear enclosure.

  28. 这个步骤还没有翻译 帮忙翻译一下

    iMac Intel 21.5" EMC 2544 刀片 SSD 替换件: 步骤 28 中的图像 1,2 iMac Intel 21.5" EMC 2544 刀片 SSD 替换件: 步骤 28 中的图像 2,2
    • Pull the top of the right speaker away from the rear enclosure, about half an inch, to expose the antenna cable running down its right side.

  29. 这个步骤还没有翻译 帮忙翻译一下

    iMac Intel 21.5" EMC 2544 刀片 SSD 替换件: 步骤 29 中的图像 1,3 iMac Intel 21.5" EMC 2544 刀片 SSD 替换件: 步骤 29 中的图像 2,3 iMac Intel 21.5" EMC 2544 刀片 SSD 替换件: 步骤 29 中的图像 3,3
    • Insert the tip of a spudger between the right speaker and the antenna cable that is routed into the speaker's right side.

    • Run the spudger down along the right side of the speaker to pry the antenna cable from its channel in the right speaker.

  30. 这个步骤还没有翻译 帮忙翻译一下

    iMac Intel 21.5" EMC 2544 刀片 SSD 替换件: 步骤 30 中的图像 1,3 iMac Intel 21.5" EMC 2544 刀片 SSD 替换件: 步骤 30 中的图像 2,3 iMac Intel 21.5" EMC 2544 刀片 SSD 替换件: 步骤 30 中的图像 3,3
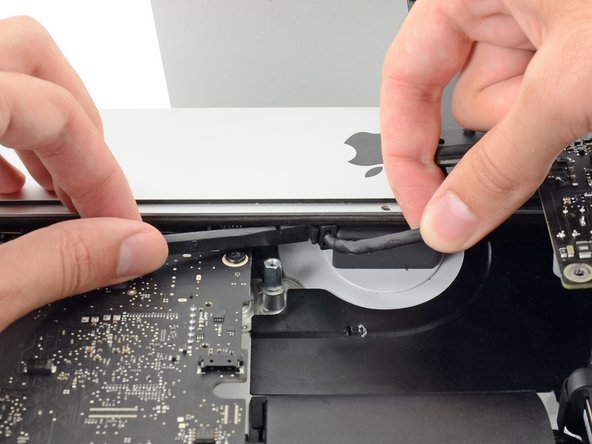
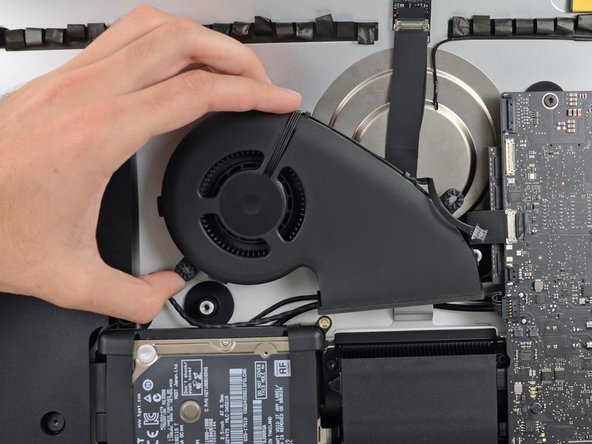
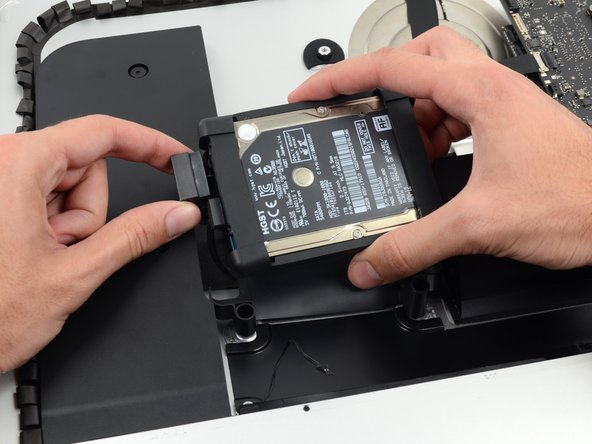
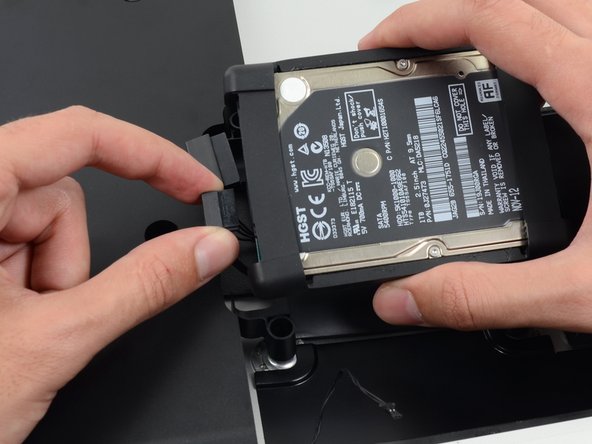
    • Pull the right speaker straight up about an inch, toward the top of the iMac.

    • Lift the right speaker straight up and remove it from the iMac. This may take some force, both hands and rocking the speaker right and left to get it out.

  31. 这个步骤还没有翻译 帮忙翻译一下

    iMac Intel 21.5" EMC 2544 刀片 SSD 替换件: 步骤 31 中的图像 1,1
    • Remove the following screws securing the hard drive bracket to the rear enclosure:

    • Two 21 mm T10 Torx screws from the left-hand hard drive bracket.

    • One 9 mm T10 Torx screw.

    • One 27 mm T10 Torx screw.

  32. 这个步骤还没有翻译 帮忙翻译一下

    iMac Intel 21.5" EMC 2544 刀片 SSD 替换件: 步骤 32 中的图像 1,2 iMac Intel 21.5" EMC 2544 刀片 SSD 替换件: 步骤 32 中的图像 2,2
    • Remove the left and right hard drive brackets from the iMac.

  33. iMac Intel 21.5" EMC 2544 刀片 SSD 替换件, 电源: 步骤 33 中的图像 1,3 iMac Intel 21.5" EMC 2544 刀片 SSD 替换件, 电源: 步骤 33 中的图像 2,3 iMac Intel 21.5" EMC 2544 刀片 SSD 替换件, 电源: 步骤 33 中的图像 3,3
    • 接下来的几个步骤中你的手将会靠近电源的外露表面。请勿触摸电源的表面,以免碰到电路板上的电容器而造成高压电击。

    • 使用撬棒的尖端推动电源按钮排线接口的每一侧,然后轻轻地将其从插座中“取出”。

  34. iMac Intel 21.5" EMC 2544 刀片 SSD 替换件: 步骤 34 中的图像 1,2 iMac Intel 21.5" EMC 2544 刀片 SSD 替换件: 步骤 34 中的图像 2,2
    • 使用撬棒的尖端推动电源按钮排线接口的每一侧,然后轻轻地将其从插座中“取出”。

  35. iMac Intel 21.5" EMC 2544 刀片 SSD 替换件: 步骤 35 中的图像 1,1
    • 卸下将电源固定至后机壳的两颗 7.2 毫米 T10 螺钉。

  36. iMac Intel 21.5" EMC 2544 刀片 SSD 替换件: 步骤 36 中的图像 1,2 iMac Intel 21.5" EMC 2544 刀片 SSD 替换件: 步骤 36 中的图像 2,2
    • 操作电源时,要非常小心,不要触摸电容器引线或电源背面任何裸露的焊点。 仅握住电路板的边缘。

    • 将电源向前倾斜。

  37. iMac Intel 21.5" EMC 2544 刀片 SSD 替换件: 步骤 37 中的图像 1,3 iMac Intel 21.5" EMC 2544 刀片 SSD 替换件: 步骤 37 中的图像 2,3 iMac Intel 21.5" EMC 2544 刀片 SSD 替换件: 步骤 37 中的图像 3,3
    • 将电源稍微向上拉出后壳。

    • 逆时针旋转电源,将右侧提升至比左侧高约一英寸。

  38. iMac Intel 21.5" EMC 2544 刀片 SSD 替换件: 步骤 38 中的图像 1,2 iMac Intel 21.5" EMC 2544 刀片 SSD 替换件: 步骤 38 中的图像 2,2
    • 将电源滑至右侧以远离后外壳上的螺丝柱。

  39. iMac Intel 21.5" EMC 2544 刀片 SSD 替换件: 步骤 39 中的图像 1,3 iMac Intel 21.5" EMC 2544 刀片 SSD 替换件: 步骤 39 中的图像 2,3 iMac Intel 21.5" EMC 2544 刀片 SSD 替换件: 步骤 39 中的图像 3,3
    • 向前摇动电源并将其从后外壳的凹槽中取出。

    • 请勿尝试从 iMac 上完全卸下电源--它仍与主板连在一起。

  40. iMac Intel 21.5" EMC 2544 刀片 SSD 替换件: 步骤 40 中的图像 1,2 iMac Intel 21.5" EMC 2544 刀片 SSD 替换件: 步骤 40 中的图像 2,2
    • 请小心,不要触摸电容器引线或电源背面任何裸露的焊点。 仅握住电路板的边缘。

    • 将电源的顶部朝向你的方向翻转,以接触到主板后面的直流电源排线接口。

    • 捏住直流电源排线接口的卡舌,将其从主板背面的插座中直接拔出。

  41. iMac Intel 21.5" EMC 2544 刀片 SSD 替换件: 步骤 41 中的图像 1,3 iMac Intel 21.5" EMC 2544 刀片 SSD 替换件: 步骤 41 中的图像 2,3 iMac Intel 21.5" EMC 2544 刀片 SSD 替换件: 步骤 41 中的图像 3,3
    • 在接下来的步骤中,将 iMac 背面朝下放在桌面上会比较好操作。

    • 使用撬棒的扁平端将交流输入排线接口一侧的卡扣向内推。

    • 用撬棒按住卡扣的同时,抓住交流输入排线,然后将接口直接从插座中拔出。

  42. iMac Intel 21.5" EMC 2544 刀片 SSD 替换件: 步骤 42 中的图像 1,1
    • 卸下电源控制板

  43. 这个步骤还没有翻译 帮忙翻译一下

    iMac Intel 21.5" EMC 2544 刀片 SSD 替换件: 步骤 43 中的图像 1,2 iMac Intel 21.5" EMC 2544 刀片 SSD 替换件: 步骤 43 中的图像 2,2
    • Gently pull the fan cable connector straight away from its socket on the logic board.

  44. 这个步骤还没有翻译 帮忙翻译一下

    iMac Intel 21.5" EMC 2544 刀片 SSD 替换件: 步骤 44 中的图像 1,1
    • Remove the three 12.3 mm T10 shoulder screws securing the fan to the rear enclosure.

  45. 这个步骤还没有翻译 帮忙翻译一下

    iMac Intel 21.5" EMC 2544 刀片 SSD 替换件: 步骤 45 中的图像 1,2 iMac Intel 21.5" EMC 2544 刀片 SSD 替换件: 步骤 45 中的图像 2,2
    • Remove the fan from the iMac.

  46. 这个步骤还没有翻译 帮忙翻译一下

    iMac Intel 21.5" EMC 2544 刀片 SSD 替换件: 步骤 46 中的图像 1,3 iMac Intel 21.5" EMC 2544 刀片 SSD 替换件: 步骤 46 中的图像 2,3 iMac Intel 21.5" EMC 2544 刀片 SSD 替换件: 步骤 46 中的图像 3,3
    • Lift the hard drive from the edge nearest the logic board and pull it slightly out of its recess.

    • The hard drive is attached by two cables, do not attempt to fully remove it from the iMac.

  47. 这个步骤还没有翻译 帮忙翻译一下

    iMac Intel 21.5" EMC 2544 刀片 SSD 替换件: 步骤 47 中的图像 1,2 iMac Intel 21.5" EMC 2544 刀片 SSD 替换件: 步骤 47 中的图像 2,2
    • Disconnect the SATA power cable.

  48. 这个步骤还没有翻译 帮忙翻译一下

    iMac Intel 21.5" EMC 2544 刀片 SSD 替换件: 步骤 48 中的图像 1,2 iMac Intel 21.5" EMC 2544 刀片 SSD 替换件: 步骤 48 中的图像 2,2
    • Unplug the SATA data cable from the hard drive.

  49. 这个步骤还没有翻译 帮忙翻译一下

    iMac Intel 21.5" EMC 2544 刀片 SSD 替换件: 步骤 49 中的图像 1,1
    • Remove the hard drive from the iMac.

  50. 这个步骤还没有翻译 帮忙翻译一下

    iMac Intel 21.5" EMC 2544 刀片 SSD 替换件: 步骤 50 中的图像 1,1
    • Remove the single 7.2 mm T10 screw securing the hard drive tray to the rear enclosure.

  51. 这个步骤还没有翻译 帮忙翻译一下

    iMac Intel 21.5" EMC 2544 刀片 SSD 替换件: 步骤 51 中的图像 1,1
    • Remove the hard drive tray from the rear enclosure.

  52. 这个步骤还没有翻译 帮忙翻译一下

    iMac Intel 21.5" EMC 2544 刀片 SSD 替换件: 步骤 52 中的图像 1,2 iMac Intel 21.5" EMC 2544 刀片 SSD 替换件: 步骤 52 中的图像 2,2
    • Push on each side of the left speaker cable connector with the tip of a spudger and gently "walk" it out of its socket.

  53. 这个步骤还没有翻译 帮忙翻译一下

    iMac Intel 21.5" EMC 2544 刀片 SSD 替换件: 步骤 53 中的图像 1,2 iMac Intel 21.5" EMC 2544 刀片 SSD 替换件: 步骤 53 中的图像 2,2
    • De-route the left speaker cable by pulling it straight up out of the retaining clip in the back of the rear enclosure.

  54. 这个步骤还没有翻译 帮忙翻译一下

    iMac Intel 21.5" EMC 2544 刀片 SSD 替换件: 步骤 54 中的图像 1,3 iMac Intel 21.5" EMC 2544 刀片 SSD 替换件: 步骤 54 中的图像 2,3 iMac Intel 21.5" EMC 2544 刀片 SSD 替换件: 步骤 54 中的图像 3,3
    • In a similar fashion as the previous step, de-route the SATA data and power cables up out of the retaining clip.

  55. 这个步骤还没有翻译 帮忙翻译一下

    iMac Intel 21.5" EMC 2544 刀片 SSD 替换件: 步骤 55 中的图像 1,3 iMac Intel 21.5" EMC 2544 刀片 SSD 替换件: 步骤 55 中的图像 2,3 iMac Intel 21.5" EMC 2544 刀片 SSD 替换件: 步骤 55 中的图像 3,3
    • Use the flat edge of a spudger to flip up the metal retaining bracket on the iSight camera cable connector.

    • Pull the iSight camera cable straight out of its socket on the logic board.

    • This is a delicate connector that can be easily damaged.

  56. 这个步骤还没有翻译 帮忙翻译一下

    iMac Intel 21.5" EMC 2544 刀片 SSD 替换件: 步骤 56 中的图像 1,3 iMac Intel 21.5" EMC 2544 刀片 SSD 替换件: 步骤 56 中的图像 2,3 iMac Intel 21.5" EMC 2544 刀片 SSD 替换件: 步骤 56 中的图像 3,3
    • Use the flat edge of a spudger to disconnect each of the four antenna connectors from the AirPort/Bluetooth card.

    • Note the original positions for each connector when reconnecting the cables.

  57. 这个步骤还没有翻译 帮忙翻译一下

    iMac Intel 21.5" EMC 2544 刀片 SSD 替换件: 步骤 57 中的图像 1,1
    • If brackets secure the four antenna cables, remove the two T5 Torx screws from the brackets.

  58. 这个步骤还没有翻译 帮忙翻译一下

    iMac Intel 21.5" EMC 2544 刀片 SSD 替换件: 步骤 58 中的图像 1,3 iMac Intel 21.5" EMC 2544 刀片 SSD 替换件: 步骤 58 中的图像 2,3 iMac Intel 21.5" EMC 2544 刀片 SSD 替换件: 步骤 58 中的图像 3,3
    • Use the flat edge of a spudger to pry the headphone jack cable connector from its socket on the logic board.

    • Push the cable slightly to the right.

  59. 这个步骤还没有翻译 帮忙翻译一下

    iMac Intel 21.5" EMC 2544 刀片 SSD 替换件: 步骤 59 中的图像 1,1
    • Remove the following screws securing the exhaust duct to the rear enclosure:

    • Two 6.3 mm T8 screws

    • Two 4.7 mm T8 screws

  60. 这个步骤还没有翻译 帮忙翻译一下

    iMac Intel 21.5" EMC 2544 刀片 SSD 替换件: 步骤 60 中的图像 1,1
    • Remove the four 7.2 mm T10 screws securing the logic board to the rear enclosure.

    • Depending on the age and model of your iMac, a T9 driver may work best.

  61. 这个步骤还没有翻译 帮忙翻译一下

    iMac Intel 21.5" EMC 2544 刀片 SSD 替换件: 步骤 61 中的图像 1,3 iMac Intel 21.5" EMC 2544 刀片 SSD 替换件: 步骤 61 中的图像 2,3 iMac Intel 21.5" EMC 2544 刀片 SSD 替换件: 步骤 61 中的图像 3,3
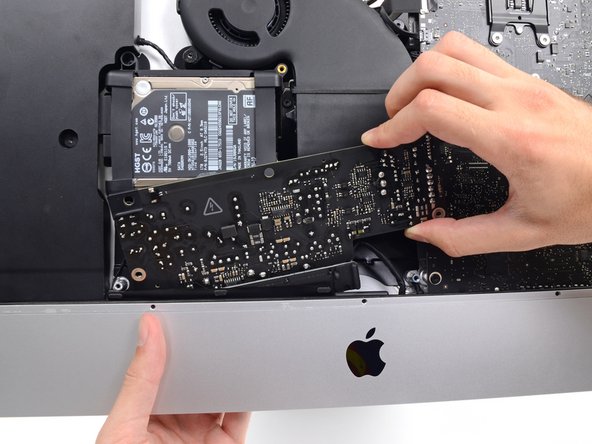
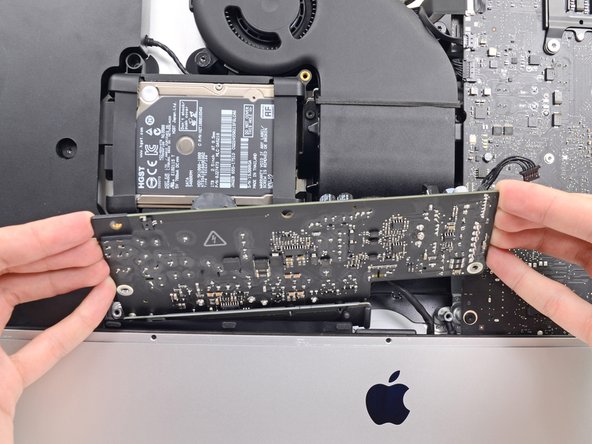
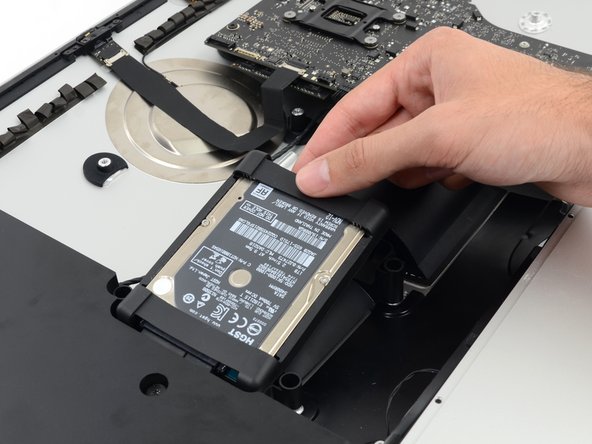
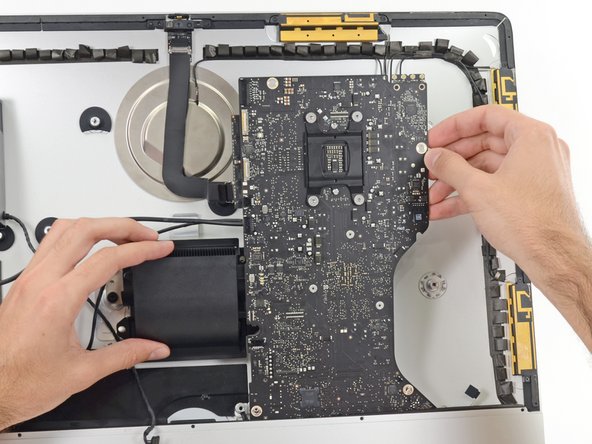
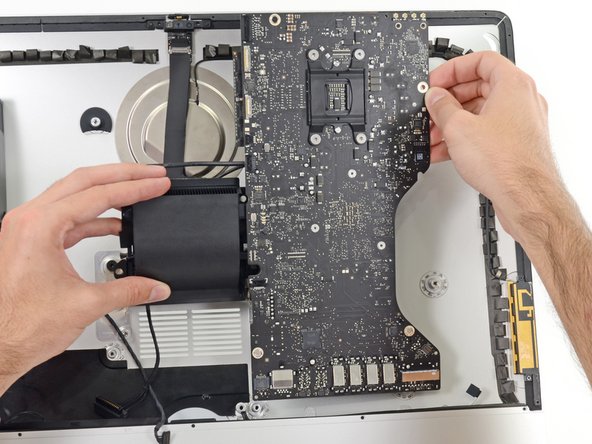
    • Tilt the top of the logic board away from the rear enclosure.

    • Lift the logic board straight up and out of the iMac.

    • Be careful not to snag the board on any of the rear case's screw posts.

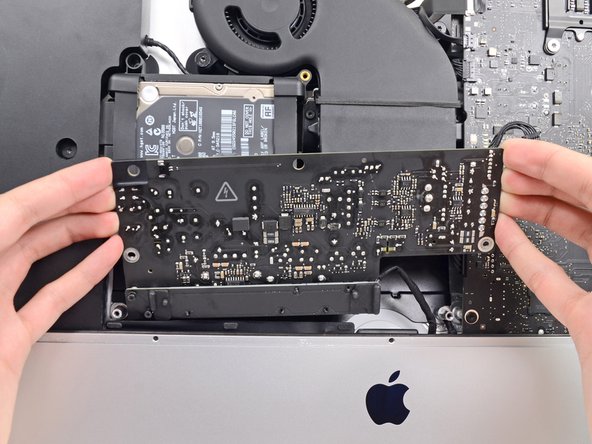
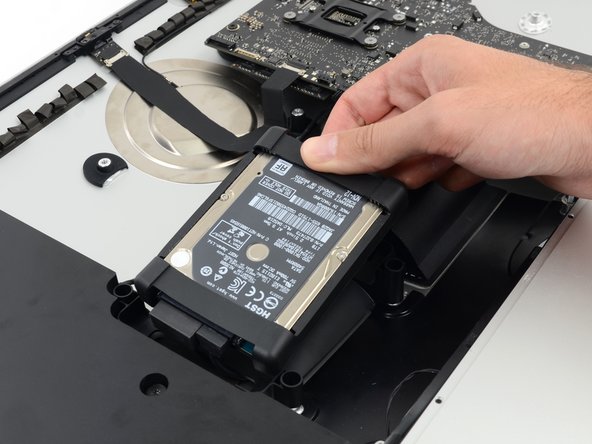
    • The I/O boards at the bottom of the logic board will be the greatest challenge. It is recommended to pull gently to avoid any damage.

    • During reassembly of the logic board, pay attention to the position of the I/O connectors. When the board is back in the case, insert a USB or Thunderbolt cable into one of the connectors to align it perfectly.

  62. iMac Intel 21.5" EMC 2544 刀片 SSD 替换件, 刀片式固态硬盘: 步骤 62 中的图像 1,1
    • 卸下将固态硬盘固定到主板上的单颗 Torx 螺钉。

  63. iMac Intel 21.5" EMC 2544 刀片 SSD 替换件: 步骤 63 中的图像 1,3 iMac Intel 21.5" EMC 2544 刀片 SSD 替换件: 步骤 63 中的图像 2,3 iMac Intel 21.5" EMC 2544 刀片 SSD 替换件: 步骤 63 中的图像 3,3
    • 轻轻抬起固态硬盘的最右侧,然后用力将其从主板上的插座中直接滑出。

结论

要重新组装设备,请按照相反的说明进行操作。

23等其他人完成本指南。

由衷感谢以下译者:

en zh

100%

Yanqi Wang正在帮助我们修复这个世界! 您也想加入吗?
开始翻译 ›

13条评论

If i want to add a news ssd at my iMac? Actualy is a model without a ssd

felixos890 - 回复

Which kind of SSD can I install? Is this the normal M.2 connector?

Thanks in advanced..

Ronald Hartwig - 回复

It is a special blade SATA drive, essentially just a SATA SSD with special connector. Same form factor as in 2012-2013 MacBook Pro Retinas. You can install a normal M2 SATA (not NVMe!), but with an adapter

oldnwstf -

Remember guys: the base model that did not ship with SSD is completely missing the M.2 connection soldered on the board from the factory, and will not be able to mount one. The main HDD can still be swapped for one though.

Cloakedbug - 回复

I have an iMac 21.5 Late 2012 (2.7GHz i5) and I was thrilled to find a vacant Apple SSD slot!

I have since installed an SSD and I am creating a Time Machine backup.

A fusion drive will then be created and the data migrated.

Also really nice to know the RAM can be upgraded to 16GB at some point :)

At first glance I was sure this iMac would not be upgradeable but it just goes to show, you should always physically check!

martincrickett - 回复

添加评论

浏览统计数据:

过去 24 小时: 17

过去 7 天: 65

过去 30 天: 203

总计 42,103