跳转到主内容

当前版本的文档还未经巡查,您可以查看最新的已查核版本

你所需要的

  1. , 维修孔盖: 步骤 1 中的图像 1,1
    • 将iMac正面朝下平放在桌面上,将底部对准自己。

    • 将维修孔盖中间的一个十字螺丝拧松。

    • 螺丝是固定在维修孔盖上的。

    • 移除维修孔盖。

  2. , 玻璃面板: 步骤 2 中的图像 1,2 , 玻璃面板: 步骤 2 中的图像 2,2
    在这个步骤中使用的工具:
    Heavy-Duty Suction Cups (Pair)
    $14.95
    购买
    • 玻璃面板固定在前挡板上, 周围有十四块磁铁。

    • 将两个吸盘固定在玻璃面板的对角上。

    • 要连接我们销售的吸盘, 首先将吸盘口与玻璃面板表面平行放置。轻轻握住吸盘并转动可动手柄, 直到它与其他手柄平行。

    • 如果你的吸盘无法吸附,尝试清理玻璃面板和吸盘的接触面。

  3. : 步骤 3 中的图像 1,1
    • 轻轻地将玻璃面板直接拉出 iMac。

    • 玻璃面板外围有多个定位点。为了避免把这些针脚从玻璃面板上扯下来, 一定要在拆卸过程中直接拉直。

    • 在重新安装前, 务必要一丝不苟地清洗液晶屏和玻璃面板的内侧面, 因为在显示屏上的任何指纹或灰尘都将会令人讨厌。

    • 更换玻璃时, 要确保玻璃和框架之间没有任何东西。杂乱电缆可能损坏玻璃。

  4. , 嵌玻璃凹槽: 步骤 4 中的图像 1,1
    • 移除以下固定嵌玻璃凹槽的12颗螺丝:

    • 8颗13mm T8星形螺丝

    • 4颗25mm T8星形螺丝

    • 在24" iMac Intel Model A1225上,底部中央的两颗螺丝长度较长(26mm),两边的四颗螺丝(左边两颗,右边两颗)长度中等(18mm),剩余的六颗螺丝(顶部四颗,底部角落两颗)长度较短(14mm)。

  5. : 步骤 5 中的图像 1,2 : 步骤 5 中的图像 2,2
    • 嵌玻璃凹槽上的麦克风排线仍与机身相连。

    • 轻轻地从后壳提起凹槽的顶端。

    • 当凹槽从后壳提起后,将其向自己的一侧旋转立起。

    • 将整个凹槽旋转远离机身,然后将其平放在机身上方。

    • 重新安装凹槽时,先将凹槽的底部与后壳齐平,然后再将凹槽顶部放下。

  6. : 步骤 6 中的图像 1,1
    • 断开麦克风排线的连接,必要时移除胶带。

    • 为了能让嵌玻璃凹槽放好,确保将麦克风排线塞入摄像头旁的空隙中。

  7. , 显示屏面板: 步骤 7 中的图像 1,1
    • 从主板上拉起LCD温度感应器的排线插头。

    • (在24寸电脑的主板顶端)

  8. : 步骤 8 中的图像 1,2 : 步骤 8 中的图像 2,2
    • 移除将显示屏数据排线固定在主板上的两颗T6星形螺丝。

    • 使用黑色的拉条将排线头从主板拉起。

  9. : 步骤 9 中的图像 1,2 : 步骤 9 中的图像 2,2
    • 移除将显示屏面板固定在后壳上的8颗T8星形螺丝。

    • 从左缘提起面板,朝机身右侧旋转。

  10. : 步骤 10 中的图像 1,2 : 步骤 10 中的图像 2,2
    • 提起屏幕的同时,断开变频器排线的连接。

    • 重新组装的时候,为了使显示屏面板与后壳边缘完全齐平,将变频器排线放到后面板上的元件的空隙中。

    • (24”版本的插头是两个合为一个)

  11. 这个步骤还没有翻译 帮忙翻译一下

    : 步骤 11 中的图像 1,2 : 步骤 11 中的图像 2,2
    • Peel the strip of EMI tape off the edge of the rear case.

  12. 这个步骤还没有翻译 帮忙翻译一下

    : 步骤 12 中的图像 1,1
    • Remove the two T10 Torx screws securing the optical drive to the rear case.

  13. 这个步骤还没有翻译 帮忙翻译一下

    : 步骤 13 中的图像 1,1
    • If necessary, remove the piece of tape holding the thermal sensor wires to the hard drive.

  14. 这个步骤还没有翻译 帮忙翻译一下

    : 步骤 14 中的图像 1,1
    • Pull the optical drive thermal sensor connector straight away from its socket on the logic board.

    • When removing this connector, it is helpful use your thumbnails to push the ears on either side of the connector toward the top of your iMac.

  15. 这个步骤还没有翻译 帮忙翻译一下

    : 步骤 15 中的图像 1,1
    • Lift the left edge of the optical drive slightly and pull it away from the right side of the rear case.

  16. 这个步骤还没有翻译 帮忙翻译一下

    : 步骤 16 中的图像 1,1
    • Insert a spudger between the optical drive connector and the optical drive.

    • Twist the spudger to slightly separate the optical drive connector from the optical drive, then use your fingers to pull the connector away from the drive.

  17. 这个步骤还没有翻译 帮忙翻译一下

    : 步骤 17 中的图像 1,1
    • Remove the piece of foam tape covering the optical drive thermal sensor.

  18. 这个步骤还没有翻译 帮忙翻译一下

    : 步骤 18 中的图像 1,1
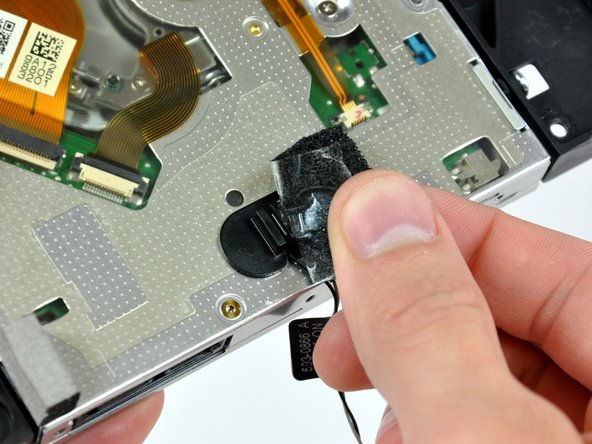
    • To remove the optical drive thermal sensor, use the tip of a spudger to lift the center finger of the thermal sensor bracket while applying slight tension to the thermal sensor cable.

    • If your thermal sensor is stuck to the optical drive, use the flat end of a spudger to pry the thermal sensor bracket off the drive.

    • If the adhesive on the bracket refuses to stick, apply some double stick tape to the underside of both flat bracket ears.

终点

0条评论

添加评论

浏览统计数据:

过去 24 小时: 0

过去 7 天: 1

过去 30 天: 3

总计 6,197