简介
* The purpose of this guide is to provide detail on testing of the iMac PSU voltages.
- Should only be attempted by those with experience working with a multimeter or voltmeter and LIVE equipment.
- If you don't know how to use a meter to measure voltages then you should not proceed.
你所需要的
-
-
Loosen the single Phillips screw in the center of the access door.
-
Remove the access door from your iMac.
-
-
-
Stick two suction cups to opposing corners of the glass panel.
My GPS unit's car mount suction cup worked nicely here - couldn't find any at the store and didn't want to wait for mail order!
Two cups would make it easier but one is fine if you place it in the center and are careful to pull the panel straight out.
Why use suction cups when some finger nails will do the job nicely, though a plastic spudger might work too. Start at a top corner. Prize the glass away from the case and leave finger nails in. Move the other hand along the top edge and then with finger spread peel the screen cover away. Be careful not to twist plastic I suppose, but I've had no difficulties.
damianwise - 回复
3M Command Strip hooks in opposite corners is another fabulous option when suction cups are not available!
Suction cups usually available at Home Depot or Lowes, in the flooring section. (They're used to handle large ceramic & stone floor tiles.)
-
-
-
Gently pull the glass panel straight up off the iMac.
In order to avoid unnecessary smudges and what not I covered the LCD itself with some plastic wrap while doing the hard drive upgrade. When I reinstalled it all I needed to do was blow off a few dust particles.
While you are at it, it is worth cleaning out dust within the case to help with cooling - particularly around the fans and vents.
For the screen I used a lens cleaner from my camera bag. These have very fine fibers and won't leave detritus.
Note that the front glass panel is quite light. When reassembling I found it impossible to get the LCD free of dust with the computer lying on its back. I had success with standing the computer up, tilting the LCD down as far as it goes, holding the glass panel upright in front of the computer (about 1 foot away), lightly spraying both the LCD and the back side of the glass panel with compressed air, and then attaching the glass panel (with the computer upright). It took me 5 tries before it was completely clean of dust once the front glass was on.
Tuandomino ini sudah di akui oleh para member member setia di dunia situs poker online Indonesia. Yang pertama situs ini sudah diakui dan mendapatkan sertifikat resmi oleh pusat server situs poker online.
Get out of here with your spam.
-
-
-
-
Remove the following 12 screws securing the front bezel to the rear case:
-
Eight 13 mm T8 Torx.
-
Four 25 mm T8 Torx.
Note for the less experienced.. the case is plastic and the metal coarse thread screws will easily cut a new thread in the hole if you don't line up the screw in the original thread. Do this a few times and the hole will be stripped and the screw no longer tightens.
TIP:- place the screw in the hole and rotate BACKWARDS/counter clockwise (for RH threads) until you hear/feel it click/drop into the original thread then tighten the screw down. rotate it a couple times to get the feel of things. If there is any significant resistance you probably don't have the original thread.
This trick also works on the fine metal thread screws and can help avoid cross threading them.
HIH
This step is not really explained here with pictures. But you can check this same step in another guide to help you : iMac Intel 20" EMC 2266 嵌玻璃凹槽的更换
I think you're missing this step: With the iMac lying on its back screen facing up, grasp the aluminum sides of the bezel and carefully pull it straight up. Then disconnect the microphone cable. Took me a while to figure it out.
I found it helpful to use a few lids from spaghetti sauce jars to hold the different screws. I used a sharpie to mark the inside of the lid w/ location taken from or the step number from directions. Then I placed a small magnet under the lid to hold the screws inside the lid in case I accidentally jostle something on the table. Worked great! You can also use a magnetic knife bar to line up the lids in sequential for the project.
I cut a hardwood block and drew the outline of the the iMac shape with the base as key. I then drew another two lines at 1/2” and 1” all around from the outline. This done I drilled holes for each screw (12 Outer securing the front bezel to the rear case , and 8 Inner screws securing the display panel to the rear case ). That way I don’t lose any or get them mixed up.
I think the title of this chapter could be (in french) désinstallation but not Installation with is the contrary. Idem for the other chapters.
-
-
-
Place your hands at the top corners of the bezel (to the side) and lift the bezel 2-3cm from the body by working from the top. After this you can also disengage the bottom of the bezel (the memory modules will prevent the bottom of the bezel to detach first). When reassembling, start with the bottom of the bezel.
-
To fully detach the bezel: disconnect the microphone cable connector, removing tape as necessary.
-
To keep it attached, leave the microphone cable attached to the logic board, and place the bezel 'above' the chassis, with the microphone cable forming a hinge.
I avoided this step by just flipping the housing over and having it lay flat on the table. The tape on mine was on really tight, and I risking ripping the wires out of the connector if I messed with it (I didn't have some really small scissors which might have helped removing it). I would suggest either securing the body of the iMac and the housing to the table you're working on, or somehow securing the housing to the body, so that it doesn't move around accidentally, since it's only hanging on by a very thin wire at that point.
^^^ This! This tutorial should be amended for this step. Much, much easier and less damage-prone.
(There really oughta be a step addressing the removal of the bezel as well.)
cklarson -
Make sure you do not pull this apart by the wires. Have a firm grasp on the plastic parts. Do not force back together. It only goes back together one way. Also, it is crucial when placing the aluminum bezel back in place that this wire is out of the way. It often gets in the way and is easily damaged.
CAUTION - To disconnect the cable, you'll need to support the bezel while you carefully extract slack microphone cable which is tightly tucked within the iMac. (I didn't have this guide's 'notes on' and missed robgendreau's warning - then inadvertently shifted the bezel and busted my microphone cable in this step.)
Don't forget to pull the microphone cord out before you put the panel back on. Otherwise you will have to go back and remove screws to find that microphone cord
As robgendreau says, avoid this whole step by opening the bezel and laying it upside down above the iMac, still connected by the mic cord, just carefully. Then replace the battery, suck/blow out your dust, and carefully rotate the front bezel back over the iMac from where you removed it. No cord manipulation or damage at all!
When reassembling the bezel, you should actually gently pull the microphone connector (and cables) through the ~1 inch long slot in the bezel next to the iSight camera, when lowering the top part of the bezel onto the chassis . Then further lower the bezel onto the chassis of the iMac, while making sure there’s no room / play between the bottom of the bezel and the bottom of the body (where the memory slots reside). . This way you’ll avoid damaging the microphone cable. Finally gently push the microphone wires and connector through that sale long slot in the bezel to conceal them inside the bezel.
Tuandomino merupakan Situs Poker Online dan qiu qiu online yang terbaik di indonesia dengan halaman mobile friendly , serta sangat ringan untuk dapat kalian akses melalui pc atau pun gadget.
How about no?
The tutorial video is great, but they were fortunate to have such a long microphone cable to work with. The iMac I just upgraded had a cable on the system side (not the one on the bezel) that is barely long enough to provide enough play to be able to grasp the connectors when re-attaching them.
Disconnecting the microphone cable is done automatically, when you breathe on it. Or look at it. Or reattach the bezel and get it screwed down.
However, it should be noted that this connector is a LUXURY compared to the first-gen ("polycarbonate") Intel iMacs. Those come configured with the auto-slice microphone cable: the cable simply shears off during disassembly of the case.
-
-
-
be sure to tuck the microphone cable and connector into the void next to the camera board.
-
Gently guide the microphone connector and cables through the ±1in long slot at the right of the iSight camera. Once the bezel is properly assembled, gently push the microphone connector and cable into the bezel through that slot.
-
-
-
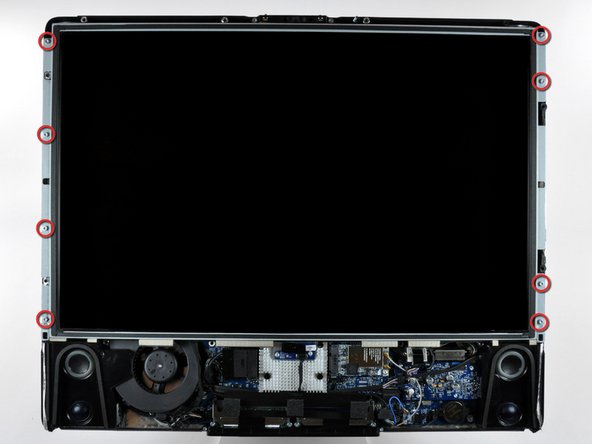
After removing the front bezel, you need to remove the 8ea 12mm T8 screws around the perimeter of the LCD
-
-
-
Use the chart provided as a reference and test the various voltages with your meter being sure to restrict the probes to the 10 solder joints on the PSU connector shown within the BLUE rectangle. Shorting any part of the PCB will almost certainly cause damage to the imac
-
All voltage measurements are taken with PIN 1 as reference (Marked with the YELLOW square). Pin 1 is marked on the board by a dot and is the right hand pin when viewed as shown in photos
-
Reassemble your iMac in reverse order. When lowering the LCD ensure you don't crimp or crush the LCD back-light cables
-


To reassemble your device, follow these instructions in reverse order.
To reassemble your device, follow these instructions in reverse order.
20等其他人完成本指南。

团队

10条评论
Something I don't get…
I'm investigating on my mid2007 iMac power problems and I don't get the same results of voltage as in this article. In my case, number 9 is at around 12V and number 8 is at 0V.
Is my PSU really faulty or there might be some other PSU models?
I've got the same results as you. Wondering if we have the wrong ps model, despite being what iFixit recommends and sells. Very odd.
i have the same issue. Do we have the wrong power supply or the wrong voltage chart?
Tim Bowman - 回复
Have also the same, maybe the table here is wrong. What kind of problems does your mac have?
The chart is wrong! Pins 7 and 8 are connected together and will both be at 0 volts in standby, both +12 when the supply is running. Pin 9 is the standby 12 volt supply and must be at a constant +12 volts whenever the power supply is connected to an operating mains supply. It is impossible to get the combination of voltage readings recorded for these three pins on this chart
isn't it actually pc2-5300s ?
grze - 回复
It is for the 2133, the 2210 uses 6400
maccentric - 回复
There are comments elsewhere in this step by step re. the bezel removal. That step does NOT show how to remove it. Well, take the 5:39 secs to watch the above video. It clearly shows how the aluminum framed bezel easily comes off once you've seen it done. To whoever decided to preface these instructions with that video, thank you.
ECJohansen - 回复