Re-orient your iMac so it sits upright on the stand.
Insert a plastic card up into the corner of the air vent slot near the top of the rear case.
Push the card toward the top of the iMac to release the front bezel latch.
Pull the front bezel away from the rear case.
Repeat this process for the other side of the front bezel.
It may be necessary to apply several layers of duct tape to the top of the access card to aid in releasing the latches. Or use two cards for the additional thickness.
If the bezel refuses to release, try lifting the lower edge of the front bezel slightly away from the rear case (detailed in the next few steps) and repeat the latch release process.
To lift the front bezel off the iMac, simultaneously:
Use your thumbs to press in the RAM arms and hold the iMac down.
Use your index fingers to pull the small bridge of material on the front bezel toward yourself.
Pull the front bezel up with your index fingers.
Once the small bridge of material has cleared the RAM arms, lift the front bezel by its lower edge just enough to clear the bottom edge of the rear case.
Lift the front bezel off the rear case and rotate it away from the bottom edge of the iMac, minding the camera and microphone cables still attached to its upper edge.
Peel back the EMI tape from the two vertical edges of the display.
During reassembly, it is helpful to use several small strips of tape to hold the EMI shielding along the left and right edges of the display footprint out of the way before lowering the display into the rear case of your iMac.
Disconnect both inverter cables from the inverter board.
These connectors are seated very tightly in their sockets. It is helpful to use your fingernails or the tip of a spudger to push the ears on either side of the connectors to dislodge them from their sockets. A small pair of hemostats helps a lot.
Use a metal spudger to disconnect the SATA data cable up off the logic board.
The SATA connector on most iMacs tends to stick in its socket on the logic board. If you are having trouble disconnecting the SATA cable, insert a metal spudger or any other thin tool into the gap between the SATA connector and its socket and twist the spudger's shaft to safely separate the two pieces.
Disconnect the DC-In cable by simultaneously depressing both locking arms and pulling its connector away from the socket on the logic board toward the top of your iMac.
After both locking arms pass their retaining tabs, it is helpful to push the arms toward the top edge of your iMac while wiggling the connector.
Disconnect the following connectors from the logic board:
Camera/IR board cable.
Optical drive fan.
When removing the optical drive fan connector, it is helpful to use a spudger or your fingernails to push the ears on either side of the connector toward the top edge of the iMac.
To aid in removing the camera/IR board connector, it is helpful to use one hand to pinch the cables against a spudger and pull up toward the top edge of the iMac while pulling up gently on the cables with your other hand.
Disconnect the following connectors from the logic board:
Hard drive thermal sensor cable.
CPU fan cable.
When removing these connectors, it is helpful to push the ears on either side of the connector with your fingernails or the tip of a spudger toward the top edge of the iMac.
Carefully rotate the top edge of the logic board out of the rear case and lift the board up out of the iMac, minding the RAM arms and any cables that may get caught.
Be especially careful with the hard drive thermal sensor cable that is routed underneath the heat sink framework.
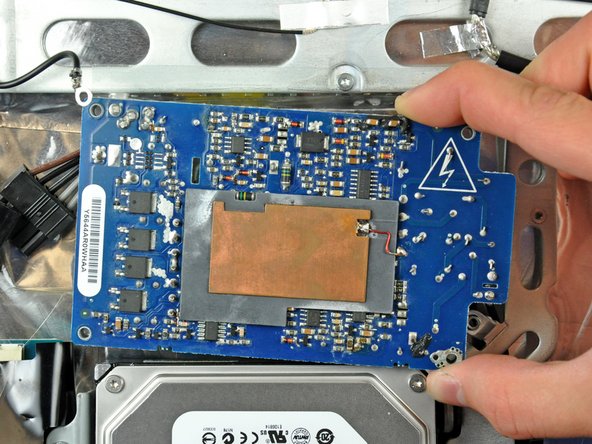
The next few steps bring your hands close to the exposed face of the power supply. Do not touch the face of the power supply to avoid a high voltage shock from the many large capacitors attached to the board.
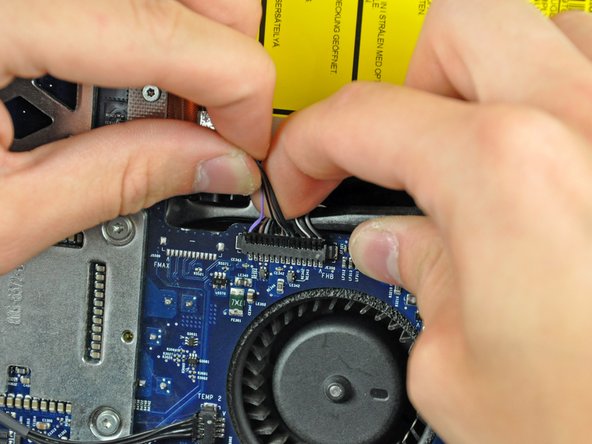
If necessary, remove the tape covering the inverter cable.
Remove four T10 Torx screws securing the power supply to the rear case.
The fine-thread screw belongs in the lower right corner of the power supply. When reinstalling the power supply, install the fine-threaded screw first.
Lift the power supply out of the rear case, minding the AC-in cable that may get caught.
Do not touch the face of the power supply board to avoid electric shock.
This guide was awesome. The iMac power supply replacement is a lot of work/steps but fixed an intermittent power supply problem for less than a $100 US dollars.
Great guide! Powered down computer prior to vacation and came back to find it non-operative. This guide, about 90 minutes, and a $50 replacement power supply off of ebay and it is back up and running. This is a secondary computer we don't use much any more, but I hated to throw it out when it was still working for what we were using it for. Thanks so much!