跳转到主内容

iMac G5 20" Model A1076 Right Fan Replacement

你所需要的

  1. iMac G5 20" Model A1076 Right Fan Replacement, Rear Panel: 步骤 1 中的图像 1,1
    • Lay the iMac display-side down on a flat surface (putting a cloth under the screen to protect it from bumps).

    • Loosen the three Phillips screws securing the rear panel to the iMac.

    • These screws are captive in the iMac. The center screw will stop turning after about 3.5 turns and the outer screws will stop turning after about 5.5 turns. Do not try to remove these screws from your iMac.

  2. iMac G5 20" Model A1076 Right Fan Replacement: 步骤 2 中的图像 1,2 iMac G5 20" Model A1076 Right Fan Replacement: 步骤 2 中的图像 2,2
    • Lift the rear panel slightly near the bottom of the iMac.

    • Pull the rear panel toward yourself and remove it from the iMac.

  3. iMac G5 20" Model A1076 Right Fan Replacement, Fan Duct: 步骤 3 中的图像 1,1
    • Remove the following two screws:

    • One 11 mm T10 Torx.

    • One 10.6 mm T8 Torx.

  4. iMac G5 20" Model A1076 Right Fan Replacement: 步骤 4 中的图像 1,1
    • Lift the fan duct out of the chassis.

  5. iMac G5 20" Model A1076 Right Fan Replacement, Right Fan: 步骤 5 中的图像 1,1
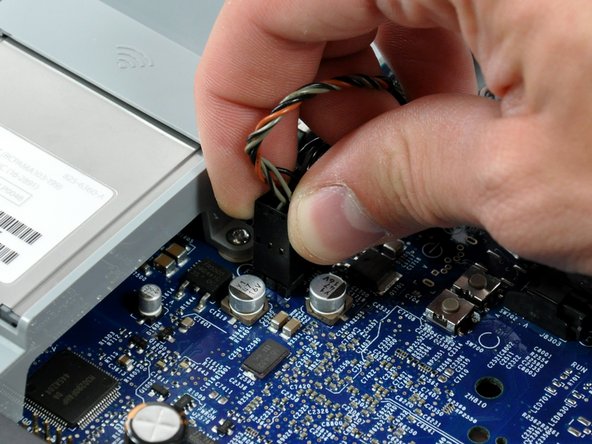
    • Disconnect the right fan from the logic board by pulling its connector straight up.

    • If you bend the pins on the logic board during removal, use the fan connector as a guide to bend them straight.

  6. iMac G5 20" Model A1076 Right Fan Replacement: 步骤 6 中的图像 1,1
    • Remove the two 11.6 mm shouldered T8 Torx screws from the right fan.

  7. iMac G5 20" Model A1076 Right Fan Replacement: 步骤 7 中的图像 1,2 iMac G5 20" Model A1076 Right Fan Replacement: 步骤 7 中的图像 2,2
    • Lift the fan near its outlet and rotate it toward yourself until its lower bracket clears the edge of the logic board.

    • Lift the fan out of the chassis.

    • De-route the fan cable as necessary.

结论

To reassemble your device, follow these instructions in reverse order.

6等其他人完成本指南。

0条评论

添加评论

浏览统计数据:

过去 24 小时: 0

过去 7 天: 1

过去 30 天: 2

总计 6,972