跳转到主内容

当前版本的文档还未经巡查,您可以查看最新的已查核版本

仅作为前提条件
本指南仅用作其他指南的先决条件。不能单独食用。

你所需要的

  1. 这个步骤还没有翻译 帮忙翻译一下

    : 步骤 1 中的图像 1,1
    • Lay the iMac display-side down on a flat surface.

    • Loosen the three Phillips screws securing the rear panel to the iMac.

    • These screws are captive in the iMac. The center screw will stop turning after about 3.5 turns and the outer screws will stop turning after about 5.5 turns. Do not try to remove these screws from your iMac.

  2. 这个步骤还没有翻译 帮忙翻译一下

    : 步骤 2 中的图像 1,3 : 步骤 2 中的图像 2,3 : 步骤 2 中的图像 3,3
    • Lift the rear panel slightly from the bottom edge of the iMac.

    • Pull the rear panel toward yourself and remove it from the iMac.

  3. 这个步骤还没有翻译 帮忙翻译一下

    : 步骤 3 中的图像 1,2 : 步骤 3 中的图像 2,2
    • Remove the two Phillips screws securing the fan cover to the midplane.

    • The shouldered screw belongs in the lower left corner of the fan cover.

    • Lift the fan cover up off midplane.

  4. 这个步骤还没有翻译 帮忙翻译一下

    : 步骤 4 中的图像 1,1
    • Disconnect the hard drive thermal sensor cable from the hard drive thermal sensor.

    • During reassembly, plug in the hard drive thermal sensor before lowering your new hard drive into the midplane.

  5. 这个步骤还没有翻译 帮忙翻译一下

    : 步骤 5 中的图像 1,2 : 步骤 5 中的图像 2,2
    • Remove the three Phillips screws securing the hard drive to the midplane.

    • Lift the hard drive from its right edge and maneuver it out of the midplane.

    • The hard drive is still connected to the motherboard.

  6. 这个步骤还没有翻译 帮忙翻译一下

    : 步骤 6 中的图像 1,2 : 步骤 6 中的图像 2,2
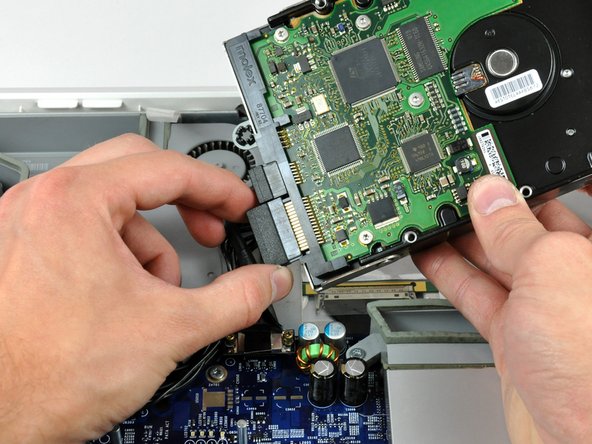
    • Insert the flat end of a spudger between the SATA power cable connector and the body of the hard drive.

    • Twist the spudger counter-clockwise to slightly separate the SATA power cable connector from its socket on the hard drive.

    • Pull the SATA power cable connector away from the hard drive.

  7. 这个步骤还没有翻译 帮忙翻译一下

    : 步骤 7 中的图像 1,1
    • Pull the SATA data cable connector away from the hard drive.

终点

0条评论

添加评论

浏览统计数据:

过去 24 小时: 0

过去 7 天: 7

过去 30 天: 7

总计 1,739