跳转到主内容

iMac G4 15" 700 MHz EMC 1873 Internal RAM Replacement

你所需要的

  1. iMac G4 15" 700 MHz EMC 1873 Internal RAM Replacement, Outer Base Plate: 步骤 1 中的图像 1,2 iMac G4 15" 700 MHz EMC 1873 Internal RAM Replacement, Outer Base Plate: 步骤 1 中的图像 2,2
    • Place the computer monitor face down on a safe, harmless surface.

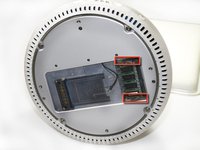
    • Using a Phillips #00 screw driver, remove the four 6.86 mm screws from the metal plate.

  2. iMac G4 15" 700 MHz EMC 1873 Internal RAM Replacement: 步骤 2 中的图像 1,1
    • Remove the metal plate from bottom of the iMac G4.

    • The four screws do not completely separate from the metal plate.

  3. iMac G4 15" 700 MHz EMC 1873 Internal RAM Replacement, RAM DIMM: 步骤 3 中的图像 1,2 iMac G4 15" 700 MHz EMC 1873 Internal RAM Replacement, RAM DIMM: 步骤 3 中的图像 2,2
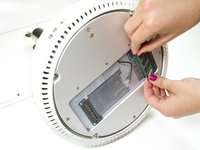
    • Release the tabs on each side of the module by simultaneously pushing each tab away from the RAM.

    • These tabs lock the module in place and releasing them will cause the module to "pop" up.

    • Remove the RAM module from the iMac.

  4. iMac G4 15" 700 MHz EMC 1873 Internal RAM Replacement, Removing the Lower Case: 步骤 4 中的图像 1,1
    • Remove the four 28.07mm Torx #15 screws from the lower case.

  5. iMac G4 15" 700 MHz EMC 1873 Internal RAM Replacement: 步骤 5 中的图像 1,2 iMac G4 15" 700 MHz EMC 1873 Internal RAM Replacement: 步骤 5 中的图像 2,2
    • Open the base by carefully pulling straight off, do not rotate the cover.

    • Open slowly to ensure that no cables are damaged or disconnected.

  6. iMac G4 15" 700 MHz EMC 1873 Internal RAM Replacement: 步骤 6 中的图像 1,1
    • Squeeze the small black tab and wiggle gently to remove the colored power cable.

    • Do not pull directly on the colored wires.

    • Do not remove black grounding wire.

  7. iMac G4 15" 700 MHz EMC 1873 Internal RAM Replacement: 步骤 7 中的图像 1,1
    • Grab both sides of the blue connector and firmly pull to remove it from the mother board.

    • Do not pull directly on the ribbon cable.

  8. iMac G4 15" 700 MHz EMC 1873 Internal RAM Replacement, Internal RAM: 步骤 8 中的图像 1,1
    • Release the tabs on each side of the module by pulling them away from the internal RAM

    • Once the tabs are pulled the module will "pop" out and you can slowly remove it.

结论

To reassemble your device, follow these instructions in reverse order.

19等其他人完成本指南。

Lilly

于10/11/11注册

632 声望

创作了2篇指南

团队

Cal Poly, Team 5-32, Amido Fall 2011 Cal Poly, Team 5-32, Amido Fall 2011 的会员

CPSU-AMIDO-F11S5G32

4 名成员

创作了8篇指南

2条评论

It's a bit vague. That is, it explains where and how one has access and how the said memory module fits, but most importantly it does not. What kind of memory are we referring to, just as it does not explain the type of memory it has to be and its speed as well as the process of not touching hands with the gold connectors of the memory module

Carlos Sousa - 回复

Which memory bank is inside Bank 0 or Bank 1?

Michael Inman - 回复

添加评论

浏览统计数据:

过去 24 小时: 1

过去 7 天: 4

过去 30 天: 35

总计 11,673