跳转到主内容

iBook G4 12" 1.33 GHz LCD Replacement

你所需要的

  1. iBook G4 12" 1.33 GHz LCD Replacement, Battery: 步骤 1 中的图像 1,2 iBook G4 12" 1.33 GHz LCD Replacement, Battery: 步骤 1 中的图像 2,2
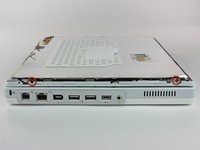
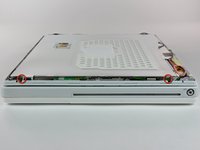
    • Lay your iBook upside down on a flat surface.

    • Use a coin to rotate the battery locking screw 90 degrees clockwise.

    • Lift the battery out of the computer.

  2. iBook G4 12" 1.33 GHz LCD Replacement, Rear Display Bezel: 步骤 2 中的图像 1,2 iBook G4 12" 1.33 GHz LCD Replacement, Rear Display Bezel: 步骤 2 中的图像 2,2
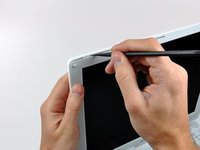
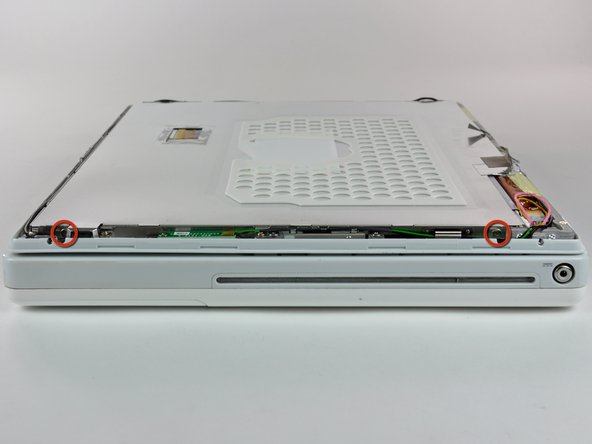
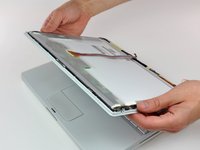
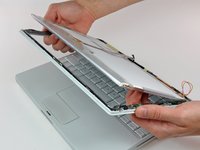
    • Use a 1.5mm hex screwdriver to remove the two hex screws on either side of the display (four screws total).

    • If you don't have a 1.5mm hex driver, you can probably get these screws out with a T6 Torx screwdriver. However, if you use a T6 Torx driver you'll be more likely to strip the screws.

  3. iBook G4 12" 1.33 GHz LCD Replacement: 步骤 3 中的图像 1,2 iBook G4 12" 1.33 GHz LCD Replacement: 步骤 3 中的图像 2,2
    • Insert the flat end of a spudger perpendicular to the face of the display into the gap between the front and rear bezels near the upper left corner of the display.

    • Rotate the spudger away from the display to pry the rear bezel off the front bezel.

  4. iBook G4 12" 1.33 GHz LCD Replacement: 步骤 4 中的图像 1,1
    • Run your spudger along the top edge of the front display bezel to evenly separate the two bezels.

  5. iBook G4 12" 1.33 GHz LCD Replacement: 步骤 5 中的图像 1,2 iBook G4 12" 1.33 GHz LCD Replacement: 步骤 5 中的图像 2,2
    • Working down from the upper left corner, use the flat end of a spudger to pry the rear bezel away from the left edge of the display.

  6. iBook G4 12" 1.33 GHz LCD Replacement: 步骤 6 中的图像 1,1
    • Use the flat end of a spudger to pry the rear bezel away from the right edge of the display.

    • If necessary, pry along the bottom edge of the rear bezel to separate it from the display assembly.

  7. iBook G4 12" 1.33 GHz LCD Replacement: 步骤 7 中的图像 1,1
    • Lift the rear bezel off the display assembly.

  8. iBook G4 12" 1.33 GHz LCD Replacement, LCD: 步骤 8 中的图像 1,2 iBook G4 12" 1.33 GHz LCD Replacement, LCD: 步骤 8 中的图像 2,2
    • Close the display.

    • Remove the small pieces of yellow tape securing the thin metal LCD cover to the display.

    • Remove the large piece of tape near the right display hinge.

  9. iBook G4 12" 1.33 GHz LCD Replacement: 步骤 9 中的图像 1,2 iBook G4 12" 1.33 GHz LCD Replacement: 步骤 9 中的图像 2,2
    • Remove the tape covering the inverter cable connector.

    • Remove the piece of foil tape near the center of the thin metal LCD cover.

  10. iBook G4 12" 1.33 GHz LCD Replacement: 步骤 10 中的图像 1,2 iBook G4 12" 1.33 GHz LCD Replacement: 步骤 10 中的图像 2,2
    • Remove the Phillips screw near the right display hinge.

    • Use the tip of a spudger to remove the small spacer under the screw you just removed.

  11. iBook G4 12" 1.33 GHz LCD Replacement: 步骤 11 中的图像 1,2 iBook G4 12" 1.33 GHz LCD Replacement: 步骤 11 中的图像 2,2
    • Pull the foil/braided pieces of tape off the aluminum frame of the clutch hinges. Leave the tape attached to the thin steel LCD cover.

    • Remove the small piece of tape holding the display data cable ground strap to the LCD cover.

  12. iBook G4 12" 1.33 GHz LCD Replacement: 步骤 12 中的图像 1,2 iBook G4 12" 1.33 GHz LCD Replacement: 步骤 12 中的图像 2,2
    • Remove the two Phillips screws securing the left and right sides of the LCD to the frame of the clutch hinges (four screws total).

  13. iBook G4 12" 1.33 GHz LCD Replacement: 步骤 13 中的图像 1,1
    • Carefully remove the thin steel LCD cover.

  14. iBook G4 12" 1.33 GHz LCD Replacement: 步骤 14 中的图像 1,2 iBook G4 12" 1.33 GHz LCD Replacement: 步骤 14 中的图像 2,2
    • Remove the long piece of tape securing the display data cable to the LCD.

    • Disconnect the display data cable by pulling the cable away from the socket on the LCD.

  15. iBook G4 12" 1.33 GHz LCD Replacement: 步骤 15 中的图像 1,1
    • Disconnect the backlight cable from the inverter.

    • It is helpful to use a spudger to push the backlight connector away from its socket while you lightly pull its cables away from the inverter.

  16. iBook G4 12" 1.33 GHz LCD Replacement: 步骤 16 中的图像 1,3 iBook G4 12" 1.33 GHz LCD Replacement: 步骤 16 中的图像 2,3 iBook G4 12" 1.33 GHz LCD Replacement: 步骤 16 中的图像 3,3
    • Open the display.

    • Lift the LCD out of the display assembly.

结论

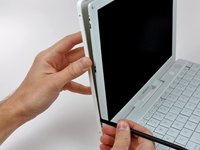
To reassemble your device, follow these instructions in reverse order.

12等其他人完成本指南。

附加文件

0条评论

添加评论

浏览统计数据:

过去 24 小时: 0

过去 7 天: 4

过去 30 天: 13

总计 13,096